User Manual
Page 5
... 4.3 Setup ...42 4.3.1 System ...42 4.3.2 TCP/IP ...43 4.4 Misc ...44 4.4.1 Factory Default ...44 4.4.2 Firmware Upgrade ...45 4.5 Restart ...46 Appendix A: How to Configure the Print Server 3 3.1 Using PSWizard in Windows XP/ Windows Vista/ Windows 7 3 3.2 Using Web Management Page in Windows XP/ Windows Vista/ Windows 7 ......... 14 3.3 Using Web Management Page on MAC OS 20 3.4 Printer Installation...27 3.4.1 If You Have Installed A Printer Before 27 3.4.2 If You Never Install A Printer Before 32 Chapter 4. How to Reset the Print Server 47 Appendix B: Troubleshooting 48...
... 4.3 Setup ...42 4.3.1 System ...42 4.3.2 TCP/IP ...43 4.4 Misc ...44 4.4.1 Factory Default ...44 4.4.2 Firmware Upgrade ...45 4.5 Restart ...46 Appendix A: How to Configure the Print Server 3 3.1 Using PSWizard in Windows XP/ Windows Vista/ Windows 7 3 3.2 Using Web Management Page in Windows XP/ Windows Vista/ Windows 7 ......... 14 3.3 Using Web Management Page on MAC OS 20 3.4 Printer Installation...27 3.4.1 If You Have Installed A Printer Before 27 3.4.2 If You Never Install A Printer Before 32 Chapter 4. How to Reset the Print Server 47 Appendix B: Troubleshooting 48...

User Manual
Page 6
... USB2.0 Port Fast Ethernet Print Server Chapter 1. Introduction 1.1 Product Overview The external print servers enhance capability by letting you place your local dealer for Windows system ¾ One external AC power adapter ¾ Built-in Reset Button ¾ One Quick Installation Guide 1.3 LED Indicator LED Status Indication Status Blinking (Orange) 100Mbps On (Green) 10Mbps On (Orange) USB On (Green) On (Orange) When power switched on, the Status indicator will flash five times, and then on the Ethernet network, and by default...
... USB2.0 Port Fast Ethernet Print Server Chapter 1. Introduction 1.1 Product Overview The external print servers enhance capability by letting you place your local dealer for Windows system ¾ One external AC power adapter ¾ Built-in Reset Button ¾ One Quick Installation Guide 1.3 LED Indicator LED Status Indication Status Blinking (Orange) 100Mbps On (Green) 10Mbps On (Orange) USB On (Green) On (Orange) When power switched on, the Status indicator will flash five times, and then on the Ethernet network, and by default...
User Manual
Page 7
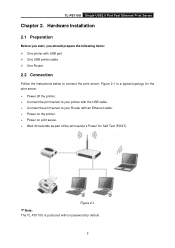
... password by default. 2 Hardware Installation 2.1 Preparation Before you start, you should prepare the following items: ¾ One printer with an Ethernet cable. ¾ Power on the printer. ¾ Power on print server. ¾ Wait 40 seconds as part of the print server's Power On Self Test (POST). Figure 2-1 )Note: The TL-PS110U is a typical typology for the print server. ¾ Power off the printer. ¾ Connect the print server to your printer with the USB cable. ¾ Connect...
... password by default. 2 Hardware Installation 2.1 Preparation Before you start, you should prepare the following items: ¾ One printer with an Ethernet cable. ¾ Power on the printer. ¾ Power on print server. ¾ Wait 40 seconds as part of the print server's Power On Self Test (POST). Figure 2-1 )Note: The TL-PS110U is a typical typology for the print server. ¾ Power off the printer. ¾ Connect the print server to your printer with the USB cable. ¾ Connect...
User Manual
Page 8
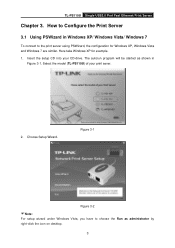
... autorun program will be started as administrator by right-click the icon on desktop. 3 Figure 3-1 Figure 3-2 )Note: For setup wizard under Windows Vista, you have to the print server using PSWizard, the configuration for example. 1. Insert the setup CD into your print sever. 2. How to Configure the Print Server 3.1 Using PSWizard in Windows XP/ Windows Vista/ Windows 7 To connect to choose the Run as shown in Figure 3-1. Select the model...
... autorun program will be started as administrator by right-click the icon on desktop. 3 Figure 3-1 Figure 3-2 )Note: For setup wizard under Windows Vista, you have to the print server using PSWizard, the configuration for example. 1. Insert the setup CD into your print sever. 2. How to Configure the Print Server 3.1 Using PSWizard in Windows XP/ Windows Vista/ Windows 7 To connect to choose the Run as shown in Figure 3-1. Select the model...
User Manual
Page 15
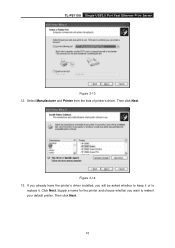
If you already have the printer's driver installed, you want to replace it your default printer. TL-PS110U Single USB2.0 Port Fast Ethernet Print Server Figure 3-13 12. Then click Next. Click Next. Then click Next. 10 Supply a name for the printer and choose whether you will be asked whether to keep it or to make it . Figure 3-14 13. Select Manufacturer and Printer from the lists of printer's driver.
If you already have the printer's driver installed, you want to replace it your default printer. TL-PS110U Single USB2.0 Port Fast Ethernet Print Server Figure 3-13 12. Then click Next. Click Next. Then click Next. 10 Supply a name for the printer and choose whether you will be asked whether to keep it or to make it . Figure 3-14 13. Select Manufacturer and Printer from the lists of printer's driver.
User Manual
Page 21
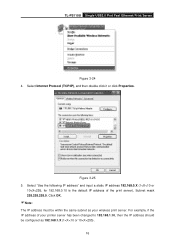
Figure 3-25 5. Select "Use the following IP address" and input a static IP address 192.168.0.X (1 TL-PS110U Single USB2.0 Port Fast Ethernet Print Server Figure 3-24 4. Select Internet Protocol (TCP/IP), and then double click it or click Properties.
Figure 3-25 5. Select "Use the following IP address" and input a static IP address 192.168.0.X (1 TL-PS110U Single USB2.0 Port Fast Ethernet Print Server Figure 3-24 4. Select Internet Protocol (TCP/IP), and then double click it or click Properties.
User Manual
Page 23
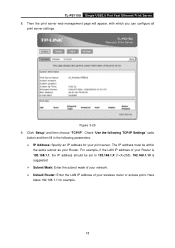
Check "Use the following TCP/IP Settings" radio button and then fill in the following parameters. ¾ IP Address: Specify an IP address for your Router. Then the print server web management page will appear, with which you can configure all print server settings. TL-PS110U Single USB2.0 Port Fast Ethernet Print Server 8. Figure 3-29 9. For example, if the LAN IP address of your Router is 192.168.1.1, the IP address should be within the same subnet as your print server. The IP address must be set to 192.168.1.X (1 Click "Setup" and then choose "TCP/IP".
Check "Use the following TCP/IP Settings" radio button and then fill in the following parameters. ¾ IP Address: Specify an IP address for your Router. Then the print server web management page will appear, with which you can configure all print server settings. TL-PS110U Single USB2.0 Port Fast Ethernet Print Server 8. Figure 3-29 9. For example, if the LAN IP address of your Router is 192.168.1.1, the IP address should be within the same subnet as your print server. The IP address must be set to 192.168.1.X (1 Click "Setup" and then choose "TCP/IP".
User Manual
Page 25
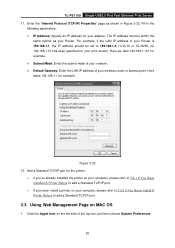
The IP address must be set to 192.168.1.X (1 For example, if the LAN IP address of your Router is 192.168.1.1, the IP address should be within the same subnet as shown in the following parameters. ¾ IP Address: Specify an IP address for your Router. Enter the "Internet Protocol (TCP/IP) Properties" page as your adapter. Fill in Figure 3-32. TL-PS110U Single USB2.0 Port Fast Ethernet Print Server 11.
The IP address must be set to 192.168.1.X (1 For example, if the LAN IP address of your Router is 192.168.1.1, the IP address should be within the same subnet as shown in the following parameters. ¾ IP Address: Specify an IP address for your Router. Enter the "Internet Protocol (TCP/IP) Properties" page as your adapter. Fill in Figure 3-32. TL-PS110U Single USB2.0 Port Fast Ethernet Print Server 11.
User Manual
Page 32
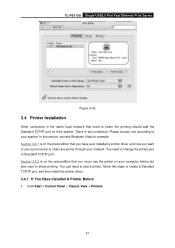
... Start > Control Panel > Classic View > Printers. 27 Please choose one according to your computer before but also want to use the printer on their system. In this section, we take Windows Vista for example. You need to add a printer, follow the steps to create a Standard TCP/IP port, and then install the printer driver. 3.4.1 If You Have Installed A Printer Before 1. TL-PS110U Single USB2.0 Port Fast Ethernet Print Server Figure 3-42 3.4 Printer Installation...
... Start > Control Panel > Classic View > Printers. 27 Please choose one according to your computer before but also want to use the printer on their system. In this section, we take Windows Vista for example. You need to add a printer, follow the steps to create a Standard TCP/IP port, and then install the printer driver. 3.4.1 If You Have Installed A Printer Before 1. TL-PS110U Single USB2.0 Port Fast Ethernet Print Server Figure 3-42 3.4 Printer Installation...

User Manual
Page 38
Figure 3-54 Figure 3-55 4. Select Add a local printer. Select "Create a new port", and the type of port is "Standard TCP/IP Port". 33 TL-PS110U Single USB2.0 Port Fast Ethernet Print Server 2. Click Add a printer. Figure 3-53 3.
Figure 3-54 Figure 3-55 4. Select Add a local printer. Select "Create a new port", and the type of port is "Standard TCP/IP Port". 33 TL-PS110U Single USB2.0 Port Fast Ethernet Print Server 2. Click Add a printer. Figure 3-53 3.
User Manual
Page 40
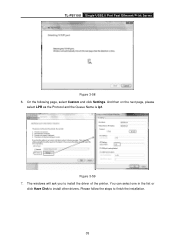
You can select one in the list or click Have Disk to install the driver of the printer. The windows will ask you to install other drivers. Please follow the steps to finish the installation. 35 On the following page, select Custom and click Settings. And then on the next page, please select LPR as the Protocol and the Queue Name is lp1. TL-PS110U Single USB2.0 Port Fast Ethernet Print Server Figure 3-58 6. Figure 3-59 7.
You can select one in the list or click Have Disk to install the driver of the printer. The windows will ask you to install other drivers. Please follow the steps to finish the installation. 35 On the following page, select Custom and click Settings. And then on the next page, please select LPR as the Protocol and the Queue Name is lp1. TL-PS110U Single USB2.0 Port Fast Ethernet Print Server Figure 3-58 6. Figure 3-59 7.
User Manual
Page 43
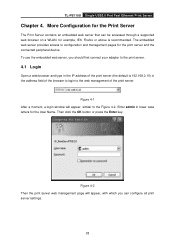
... button or press the Enter key. TL-PS110U Single USB2.0 Port Fast Ethernet Print Server Chapter 4. More Configuration for the Print Server The Print Server contains an embedded web server that can configure all print server settings. 38 To use the embedded web server, you can be accessed through a supported web browser on a WLAN, for example, IE6, Firefox or above is 192.168.0.10) in the address field of the browser to login to the print server. 4.1 Login Open a web-browser and type...
... button or press the Enter key. TL-PS110U Single USB2.0 Port Fast Ethernet Print Server Chapter 4. More Configuration for the Print Server The Print Server contains an embedded web server that can configure all print server settings. 38 To use the embedded web server, you can be accessed through a supported web browser on a WLAN, for example, IE6, Firefox or above is 192.168.0.10) in the address field of the browser to login to the print server. 4.1 Login Open a web-browser and type...
User Manual
Page 46
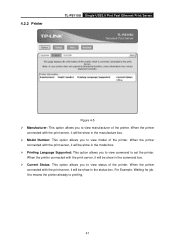
... printing. 41 When the printer connected with the print server, it will be show in the command box. ¾ Current Status: This option allows you to view status of the printer. When the printer connected with the print server, it will be show in the model box. ¾ Printing Language Supported: This option allows you to view command to set the printer. For Example: Waiting for job. 4.2.2 Printer TL-PS110U Single USB2.0 Port Fast Ethernet Print Server...
... printing. 41 When the printer connected with the print server, it will be show in the command box. ¾ Current Status: This option allows you to view status of the printer. When the printer connected with the print server, it will be show in the model box. ¾ Printing Language Supported: This option allows you to view command to set the printer. For Example: Waiting for job. 4.2.2 Printer TL-PS110U Single USB2.0 Port Fast Ethernet Print Server...
User Manual
Page 47
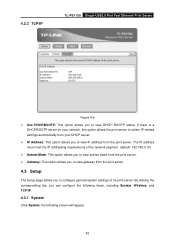
... gateway from the print server. By clicking the corresponding tab, you to view DHCP/ BOOTP status. If there is a DHCP/BOOTP server on your network, this option allows the print server to obtain IP-related settings automatically from your DHCP server. ¾ IP Address: This option allows you to view IP address from the print server. 4.3 Setup The Setup page allows you can configure the following items, including System, Wireless, and TCP...
... gateway from the print server. By clicking the corresponding tab, you to view DHCP/ BOOTP status. If there is a DHCP/BOOTP server on your network, this option allows the print server to obtain IP-related settings automatically from your DHCP server. ¾ IP Address: This option allows you to view IP address from the print server. 4.3 Setup The Setup page allows you can configure the following items, including System, Wireless, and TCP...

User Manual
Page 53
... network cabling is properly configured. )Note: Make sure that the AC power adapter included with USB printer. 2) Power Related Problems The print server requires an external AC power adapter in order for technical support. 1) LED Light Indicators The print server is powered on, the Status LED will damage your initial installation steps: " I have a power problem, check to perform improperly, are covered in your country or area. This indicates that are damaged. LAN (Green: 100Mbps; Using an incorrect AC adapter...
... network cabling is properly configured. )Note: Make sure that the AC power adapter included with USB printer. 2) Power Related Problems The print server requires an external AC power adapter in order for technical support. 1) LED Light Indicators The print server is powered on, the Status LED will damage your initial installation steps: " I have a power problem, check to perform improperly, are covered in your country or area. This indicates that are damaged. LAN (Green: 100Mbps; Using an incorrect AC adapter...

User Manual
Page 54
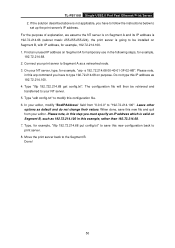
I can't, therefore, continue installing the print server." If this problem, there are three possible causes: A. The print server's Node ID you specified in NT's ARP cache table is not correct. At NT's DOS prompt, type "arp -d TL-PS110U Single USB2.0 Port Fast Ethernet Print Server print server's configuration file and save its IP address permanently. Regarding this is the case, please ensure the Node ID field in the...
I can't, therefore, continue installing the print server." If this problem, there are three possible causes: A. The print server's Node ID you specified in NT's ARP cache table is not correct. At NT's DOS prompt, type "arp -d TL-PS110U Single USB2.0 Port Fast Ethernet Print Server print server's configuration file and save its IP address permanently. Regarding this is the case, please ensure the Node ID field in the...
User Manual
Page 55
... example, 192.72.214.68. 2. Connect your print server to Segment A as 192.72.214.100 in this step you have to follow the instructions below to the Segment B. The configuration file will then be installed on Segment B, such as a networked node. 3. Find an unused IP address on purpose. Type "tftp 192.722.214.68 get config.txt". Please note, in this...
... example, 192.72.214.68. 2. Connect your print server to Segment A as 192.72.214.100 in this step you have to follow the instructions below to the Segment B. The configuration file will then be installed on Segment B, such as a networked node. 3. Find an unused IP address on purpose. Type "tftp 192.722.214.68 get config.txt". Please note, in this...

User Manual
Page 56
... USB2.0 Port Fast Ethernet Print Server Appendix C: Frequently Asked Questions 1) Question A: Print jobs are properly connected. 4. Install the proper printer driver. Possible Explanation: There might be sent to the print server is off-line, jammed or out of the print server by running PSAdmin. 3. Solutions: 51 Solutions: 1. Recheck the print server connection by running the PSAdmin. 2) Question B Print jobs start printing, but fail to be a network problem. The Print server Name/Print Queue configuration is incorrect. 2. If these printer drivers...
... USB2.0 Port Fast Ethernet Print Server Appendix C: Frequently Asked Questions 1) Question A: Print jobs are properly connected. 4. Install the proper printer driver. Possible Explanation: There might be sent to the print server is off-line, jammed or out of the print server by running PSAdmin. 3. Solutions: 51 Solutions: 1. Recheck the print server connection by running the PSAdmin. 2) Question B Print jobs start printing, but fail to be a network problem. The Print server Name/Print Queue configuration is incorrect. 2. If these printer drivers...

User Manual
Page 58
Furthermore, the print server doesn't support any non-printing functions of power cable issue causes print server to disconnect, please re-plug the USB cable or re-start power to the print server. TL-PS110U Single USB2.0 Port Fast Ethernet Print Server Appendix D: Additional Installation Instructions Panasonic KX-P6100/6300/6500 If you are using a Panasonic KX-P6100/6300/6500 laser printer with host-based printers, e.g. DO NOT redirect the printer named "Panasonic KX-P6100 GDI...
Furthermore, the print server doesn't support any non-printing functions of power cable issue causes print server to disconnect, please re-plug the USB cable or re-start power to the print server. TL-PS110U Single USB2.0 Port Fast Ethernet Print Server Appendix D: Additional Installation Instructions Panasonic KX-P6100/6300/6500 If you are using a Panasonic KX-P6100/6300/6500 laser printer with host-based printers, e.g. DO NOT redirect the printer named "Panasonic KX-P6100 GDI...
Installation Instructions
Page 1
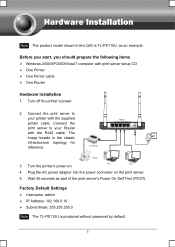
Wait 40 seconds as an example. Connect the print server to your printer with print server setup CD ¾ One Printer ¾ One Printer cable ¾ One Router Hardware Installation 1. The image beside is produced without password by default. 1 Plug the AC power adapter into the power connector on . 4. Turn off the printer's power. 2. Factory Default Settings ¾ Username: admin ¾ IP Address: 192.168.0.10 ¾ Subnet Mask: 255.255.255.0 Note The TL...
Wait 40 seconds as an example. Connect the print server to your printer with print server setup CD ¾ One Printer ¾ One Printer cable ¾ One Router Hardware Installation 1. The image beside is produced without password by default. 1 Plug the AC power adapter into the power connector on . 4. Turn off the printer's power. 2. Factory Default Settings ¾ Username: admin ¾ IP Address: 192.168.0.10 ¾ Subnet Mask: 255.255.255.0 Note The TL...


