TL-WR842ND V1 User Guide
Page 12
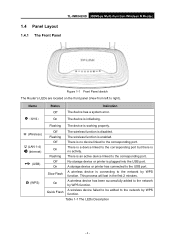
... A storage device or printer has connected to right). On There is a device linked to the corresponding port. Flashing The wireless function is disabled. Off The wireless function is enabled. TL-WR842ND 300Mbps Multi-Function Wireless ...N Router 1.4 Panel Layout 1.4.1 The Front Panel Figure 1-1 Front Panel sketch The Router's LEDs are located on the front panel (View from left to the USB port. Off No storage device or printer...
... A storage device or printer has connected to right). On There is a device linked to the corresponding port. Flashing The wireless function is disabled. Off The wireless function is enabled. TL-WR842ND 300Mbps Multi-Function Wireless ...N Router 1.4 Panel Layout 1.4.1 The Front Panel Figure 1-1 Front Panel sketch The Router's LEDs are located on the front panel (View from left to the USB port. Off No storage device or printer...
TL-WR842ND V1 User Guide
Page 13
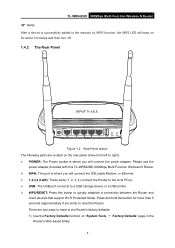
...190; 1,2,3,4 (LAN): These ports (1, 2, 3, 4) connect the Router to the local PC(s). ¾ USB: The USB port connects to a USB storage device or a USB printer. ¾ WPS/RESET: Press this button to reset the Router. TL-WR842ND 300Mbps Multi-Function Wireless N Router ) Note: After a device is successfully added to the network by WPS...seconds) to quickly establish a connection between the Router and client devices that support Wi-Fi Protected Setup. Press and hold this TL-WR842ND 300Mbps Multi-Function Wireless N Router. ¾ WAN: This port is where you will connect the power adapter.
...190; 1,2,3,4 (LAN): These ports (1, 2, 3, 4) connect the Router to the local PC(s). ¾ USB: The USB port connects to a USB storage device or a USB printer. ¾ WPS/RESET: Press this button to reset the Router. TL-WR842ND 300Mbps Multi-Function Wireless N Router ) Note: After a device is successfully added to the network by WPS...seconds) to quickly establish a connection between the Router and client devices that support Wi-Fi Protected Setup. Press and hold this TL-WR842ND 300Mbps Multi-Function Wireless N Router. ¾ WAN: This port is where you will connect the power adapter.
TL-WR842ND V1 User Guide
Page 16
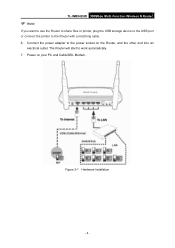
Figure 2-1 Hardware Installation - 8 - Connect the power adapter to work automatically. 7. The Router will start to the power socket on your PC and Cable/DSL Modem. Power on the Router, and the other end into an electrical outlet. ) Note: TL-WR842ND 300Mbps Multi-Function Wireless N Router If you want to use the Router to share files or printer, plug the USB storage device to the USB port or connect the printer to the Router with a matching cable. 6.
Figure 2-1 Hardware Installation - 8 - Connect the power adapter to work automatically. 7. The Router will start to the power socket on your PC and Cable/DSL Modem. Power on the Router, and the other end into an electrical outlet. ) Note: TL-WR842ND 300Mbps Multi-Function Wireless N Router If you want to use the Router to share files or printer, plug the USB storage device to the USB port or connect the printer to the Router with a matching cable. 6.


