
User Guide
Page 1
TL-WR841N TL-WR841ND Wireless N Router Rev: 1.0.1 1910010029
TL-WR841N TL-WR841ND Wireless N Router Rev: 1.0.1 1910010029

User Guide
Page 6
TL-WR841N/TL-WR841ND Wireless N Router Package Contents The following items should be found in your package: ¾ TL-WR841N/TL-WR841ND Wireless N Router ¾ DC Power Adapter for TL-WR841N/TL-WR841ND Wireless N Router ¾ Quick Installation Guide ¾ Resource CD for TL-WR841N/TL-WR841ND Wireless N Router, including: • This Guide • Other Helpful Information ) Note: Make sure that the package contains the above items. If any of the listed items are damaged or missing, please contact with your distributor. 1
TL-WR841N/TL-WR841ND Wireless N Router Package Contents The following items should be found in your package: ¾ TL-WR841N/TL-WR841ND Wireless N Router ¾ DC Power Adapter for TL-WR841N/TL-WR841ND Wireless N Router ¾ Quick Installation Guide ¾ Resource CD for TL-WR841N/TL-WR841ND Wireless N Router, including: • This Guide • Other Helpful Information ) Note: Make sure that the package contains the above items. If any of the listed items are damaged or missing, please contact with your distributor. 1
User Guide
Page 7
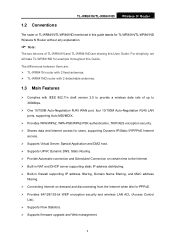
... management function. It also supports Virtual Server and DMZ host for choosing the TL-WR841N/TL-WR841ND Wireless N Router. 1.1 Overview of the Router The TL-WR841N/TL-WR841ND Wireless N Router integrates 4-port Switch, Firewall, NAT-router and Wireless AP. Powered by step in real time with other 802.11n wireless clients. Before installing the router, please look through this user guide. PSK, WPA- Quick Setup Wizard is...
... management function. It also supports Virtual Server and DMZ host for choosing the TL-WR841N/TL-WR841ND Wireless N Router. 1.1 Overview of the Router The TL-WR841N/TL-WR841ND Wireless N Router integrates 4-port Switch, Firewall, NAT-router and Wireless AP. Powered by step in real time with other 802.11n wireless clients. Before installing the router, please look through this user guide. PSK, WPA- Quick Setup Wizard is...
User Guide
Page 8
..., The differences between them are sharing this guide stands for TL-WR841N/TL-WR841ND Wireless N Router without any explanation. ) Note: The two devices of TL-WR841N and TL-WR841ND are : ¾ TL-WR841N router with 2 fixed antennas. ¾ TL-WR841ND router with 2 detachable antennas. 1.3 Main Features ¾ Complies with IEEE 802.11n draft version 2.0 to provide a wireless data rate of up to 300Mbps. ¾ One 10/100M...
..., The differences between them are sharing this guide stands for TL-WR841N/TL-WR841ND Wireless N Router without any explanation. ) Note: The two devices of TL-WR841N and TL-WR841ND are : ¾ TL-WR841N router with 2 fixed antennas. ¾ TL-WR841ND router with 2 detachable antennas. 1.3 Main Features ¾ Complies with IEEE 802.11n draft version 2.0 to provide a wireless data rate of up to 300Mbps. ¾ One 10/100M...
User Guide
Page 9
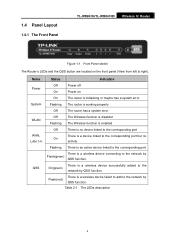
... Front Panel TL-WR841N/TL-WR841ND Wireless N Router Figure 1-1 Front Panel sketch The Router's LEDs and the QSS button are located on On The router is initializing or maybe has a system error Flashing The router is working properly Off The router has a system error Off The Wireless function is disabled Flashing The Wireless function is enabled Off There is no device linked to...
... Front Panel TL-WR841N/TL-WR841ND Wireless N Router Figure 1-1 Front Panel sketch The Router's LEDs and the QSS button are located on On The router is initializing or maybe has a system error Flashing The router is working properly Off The router has a system error Off The Wireless function is disabled Flashing The Wireless function is enabled Off There is no device linked to...
User Guide
Page 10
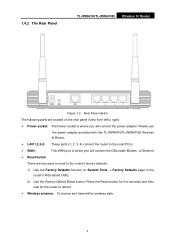
1.4.2 The Rear Panel TL-WR841N/TL-WR841ND Wireless N Router Figure 1-2 Rear Panel sketch The following parts are two ways to reset to the router's factory defaults: 1) Use the Factory Defaults function on the rear panel (View from left to reboot. ¾ Wireless antenna: To receive and transmit the wireless data. 5 Please use the power adapter provided with this TL-WR841N/TL-WR841ND Wireless N Router. ¾ LAN...
1.4.2 The Rear Panel TL-WR841N/TL-WR841ND Wireless N Router Figure 1-2 Rear Panel sketch The following parts are two ways to reset to the router's factory defaults: 1) Use the Factory Defaults function on the rear panel (View from left to reboot. ¾ Wireless antenna: To receive and transmit the wireless data. 5 Please use the power adapter provided with this TL-WR841N/TL-WR841ND Wireless N Router. ¾ LAN...
User Guide
Page 11
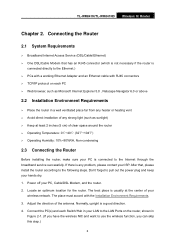
...Ports on each Switch/Hub in Figure 2-1. (If you have the wireless NIC and want to use the wireless function, you can skip this step.) 6 Don't forget to the following steps. Connecting the Router 2.1 System Requirements ¾ Broadband Internet Access Service (DSL/Cable/Ethernet)... 2 inches (5 cm) of the antenna. Locate an optimum location for the router. The place must accord with RJ45 connectors ¾ TCP/IP protocol on the router, shown in your ISP. TL-WR841N/TL-WR841ND Wireless N Router Chapter 2. The best place is connected directly to the Internet through the broadband ...
...Ports on each Switch/Hub in Figure 2-1. (If you have the wireless NIC and want to use the wireless function, you can skip this step.) 6 Don't forget to the following steps. Connecting the Router 2.1 System Requirements ¾ Broadband Internet Access Service (DSL/Cable/Ethernet)... 2 inches (5 cm) of the antenna. Locate an optimum location for the router. The place must accord with RJ45 connectors ¾ TCP/IP protocol on the router, shown in your ISP. TL-WR841N/TL-WR841ND Wireless N Router Chapter 2. The best place is connected directly to the Internet through the broadband ...
User Guide
Page 12
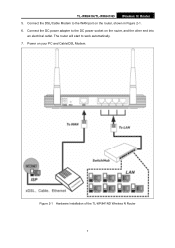
TL-WR841N/TL-WR841ND Wireless N Router 5. Power on the router, and the other end into an electrical outlet. Connect the DC power adapter to the WAN port on the router, shown in Figure 2-1. 6. Figure 2-1 Hardware Installation of the TL-WR841ND Wireless N Router 7 Connect the DSL/Cable Modem to the DC power socket on your PC and Cable/DSL Modem. The router will start to work automatically. 7.
TL-WR841N/TL-WR841ND Wireless N Router 5. Power on the router, and the other end into an electrical outlet. Connect the DC power adapter to the WAN port on the router, shown in Figure 2-1. 6. Figure 2-1 Hardware Installation of the TL-WR841ND Wireless N Router 7 Connect the DSL/Cable Modem to the DC power socket on your PC and Cable/DSL Modem. The router will start to work automatically. 7.
User Guide
Page 13
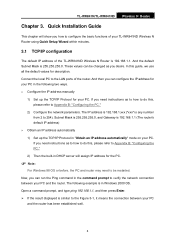
...show you need to be changed as you can configure the IP address for your TL-WR841ND Wireless N Router using Quick Setup Wizard within minutes. 3.1 TCP/IP configuration The default IP address of the TL-WR841ND Wireless N Router is 255.255.255.0. And then you need instructions as to how to do ...up the TCP/IP Protocol in the command prompt to the LAN ports of your PC. TL-WR841N/TL-WR841ND Wireless N Router Chapter 3. Connect the local PC to verify the network connection between your PC and the router. In this , please refer to do this guide, we use all the default values ...
...show you need to be changed as you can configure the IP address for your TL-WR841ND Wireless N Router using Quick Setup Wizard within minutes. 3.1 TCP/IP configuration The default IP address of the TL-WR841ND Wireless N Router is 255.255.255.0. And then you need instructions as to how to do ...up the TCP/IP Protocol in the command prompt to the LAN ports of your PC. TL-WR841N/TL-WR841ND Wireless N Router Chapter 3. Connect the local PC to verify the network connection between your PC and the router. In this , please refer to do this guide, we use all the default values ...
User Guide
Page 14
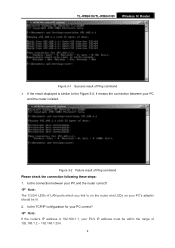
TL-WR841N/TL-WR841ND Wireless N Router Figure 3-1 Success result of LAN ports which you link to the Figure 3-2, it means the connection between your PC's IP address must be lit. 2. Is the connection between your PC and the router correct? ) Note: The 1/2/3/4 LEDs of Ping command ¾ If the result displayed is failed. Is the TCP/IP configuration for...
TL-WR841N/TL-WR841ND Wireless N Router Figure 3-1 Success result of LAN ports which you link to the Figure 3-2, it means the connection between your PC's IP address must be lit. 2. Is the connection between your PC and the router correct? ) Note: The 1/2/3/4 LEDs of Ping command ¾ If the result displayed is failed. Is the TCP/IP configuration for...
User Guide
Page 15
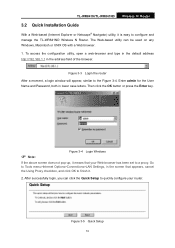
TL-WR841N/TL-WR841ND Wireless N Router 3.2 Quick Installation Guide With a Web-based (Internet Explorer or Netscape® Navigator) utility, it is easy to finish it means that appears, cancel the Using Proxy checkbox, and click OK to configure and manage the TL-WR841ND Wireless N Router. Go to Tools menu>Internet Options>Connections>LAN Settings, in the screen that your router... Setup to quickly configure your Web-browser has been set to the Figure 3-4. Figure 3-3 Login the router After a moment, a login window will appear, similar to a proxy. To access the configuration utility...
TL-WR841N/TL-WR841ND Wireless N Router 3.2 Quick Installation Guide With a Web-based (Internet Explorer or Netscape® Navigator) utility, it is easy to finish it means that appears, cancel the Using Proxy checkbox, and click OK to configure and manage the TL-WR841ND Wireless N Router. Go to Tools menu>Internet Options>Connections>LAN Settings, in the screen that your router... Setup to quickly configure your Web-browser has been set to the Figure 3-4. Figure 3-3 Login the router After a moment, a login window will appear, similar to a proxy. To access the configuration utility...
User Guide
Page 16
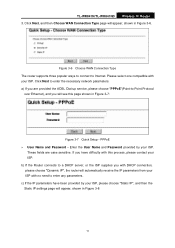
...Enter the User Name and Password provided by your ISP. b) If the Router connects to a DHCP server, or the ISP supplies you with DHCP connection, please choose "Dynamic IP", the router will automatically receive the IP parameters from your ISP with this page shown ...PPPoE"(Point-to enter any parameters. Figure 3-6 Choose WAN Connection Type The router supports three popular ways to connect to enter the necessary network parameters. PPPoE ¾ User Name and Password - TL-WR841N/TL-WR841ND Wireless N Router 3. Click Next to Internet. Click Next, and then Choose WAN Connection ...
...Enter the User Name and Password provided by your ISP. b) If the Router connects to a DHCP server, or the ISP supplies you with DHCP connection, please choose "Dynamic IP", the router will automatically receive the IP parameters from your ISP with this page shown ...PPPoE"(Point-to enter any parameters. Figure 3-6 Choose WAN Connection Type The router supports three popular ways to connect to enter the necessary network parameters. PPPoE ¾ User Name and Password - TL-WR841N/TL-WR841ND Wireless N Router 3. Click Next to Internet. Click Next, and then Choose WAN Connection ...
User Guide
Page 17
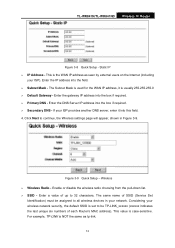
... it is set to be assigned to 32 characters. This value is the WAN IP address as tp-link. 12 TL-WR841N/TL-WR841ND Wireless N Router Figure 3-8 Quick Setup - Static IP ¾ IP Address - This is case-sensitive. Enable or disable the wireless radio choosing from the pull-down list. ¾ SSID - If your network. Enter the DNS Server...
... it is set to be assigned to 32 characters. This value is the WAN IP address as tp-link. 12 TL-WR841N/TL-WR841ND Wireless N Router Figure 3-8 Quick Setup - Static IP ¾ IP Address - This is case-sensitive. Enable or disable the wireless radio choosing from the pull-down list. ¾ SSID - If your network. Enter the DNS Server...
User Guide
Page 18
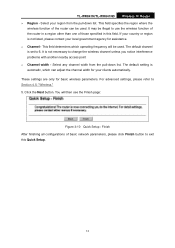
.... For advanced settings, please refer to 6. You will be used . Select your local government agency for assistance. ¾ Channel - TL-WR841N/TL-WR841ND Wireless N Router ¾ Region - If your clients automatically. The default setting is not necessary to exit this field. It is automatic, which operating frequency will then see ...
.... For advanced settings, please refer to 6. You will be used . Select your local government agency for assistance. ¾ Channel - TL-WR841N/TL-WR841ND Wireless N Router ¾ Region - If your clients automatically. The default setting is not necessary to exit this field. It is automatic, which operating frequency will then see ...
User Guide
Page 19
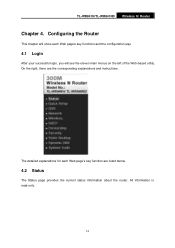
Configuring the Router This chapter will show each Web page's key function are the corresponding explanations and instructions. The detailed explanations for each Web page's key functions and the configuration way. 4.1 Login After your successful login, you will see the eleven main menus on the left of the Web-based utility. All information is read-only. 14 TL-WR841N/TL-WR841ND Wireless N Router Chapter 4. On the right, there are listed below. 4.2 Status The Status page provides the current status information about the router.
Configuring the Router This chapter will show each Web page's key function are the corresponding explanations and instructions. The detailed explanations for each Web page's key functions and the configuration way. 4.1 Login After your successful login, you will see the eleven main menus on the left of the Web-based utility. All information is read-only. 14 TL-WR841N/TL-WR841ND Wireless N Router Chapter 4. On the right, there are listed below. 4.2 Status The Status page provides the current status information about the router.
User Guide
Page 20
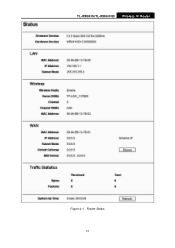
TL-WR841N/TL-WR841ND Wireless N Router Figure 4-1 Router Status 15
TL-WR841N/TL-WR841ND Wireless N Router Figure 4-1 Router Status 15
User Guide
Page 21
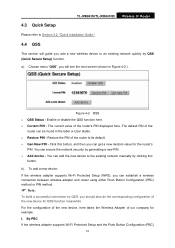
... configuration of our company for example. For the configuration of the new device, here takes the Wireless Adapter of the new device for the router's PIN. You can get a new random value for QSS function meanwhile. I. TL-WR841N/TL-WR841ND Wireless N Router 4.3 Quick Setup Please refer to Section 3.2: "Quick Installation Guide." 4.4 QSS This section will see the next...
... configuration of our company for example. For the configuration of the new device, here takes the Wireless Adapter of the new device for the router's PIN. You can get a new random value for QSS function meanwhile. I. TL-WR841N/TL-WR841ND Wireless N Router 4.3 Quick Setup Please refer to Section 3.2: "Quick Installation Guide." 4.4 QSS This section will see the next...
User Guide
Page 22
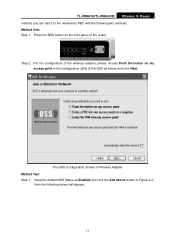
Step 2: For the configuration of the wireless adapter, please choose Push the button on the front panel of the router. The QSS Configuration Screen of the QSS as Enabled and click the Add device button in the configuration utility of Wireless Adapter Method Two: Step 1: Keep the default QSS Status as below, and click Next. TL-WR841N/TL-WR841ND Wireless N Router method, you can add it to the network by PBC with the following screen will appear. 17 Method One: Step 1: Press the QSS button on my access point in Figure 4-2, then the following two methods.
Step 2: For the configuration of the wireless adapter, please choose Push the button on the front panel of the router. The QSS Configuration Screen of the QSS as Enabled and click the Add device button in the configuration utility of Wireless Adapter Method Two: Step 1: Keep the default QSS Status as below, and click Next. TL-WR841N/TL-WR841ND Wireless N Router method, you can add it to the network by PBC with the following screen will appear. 17 Method One: Step 1: Press the QSS button on my access point in Figure 4-2, then the following two methods.
User Guide
Page 23
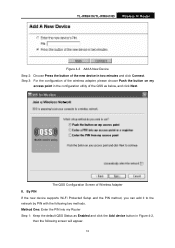
... and click Next. The QSS Configuration Screen of the new device in Figure 4-2, then the following two methods. TL-WR841N/TL-WR841ND Wireless N Router Figure 4-3 Add A New Device Step 2: Choose Press the button of Wireless Adapter II. By PIN If the new device supports Wi-Fi Protected Setup and the PIN method, you can add... it to the network by PIN with the following screen will appear. 18 Step 3: For the configuration of the wireless adapter, please choose Push the button on my access point in the configuration utility of the QSS as Enabled and click the Add device ...
... and click Next. The QSS Configuration Screen of the new device in Figure 4-2, then the following two methods. TL-WR841N/TL-WR841ND Wireless N Router Figure 4-3 Add A New Device Step 2: Choose Press the button of Wireless Adapter II. By PIN If the new device supports Wi-Fi Protected Setup and the PIN method, you can add... it to the network by PIN with the following screen will appear. 18 Step 3: For the configuration of the wireless adapter, please choose Push the button on my access point in the configuration utility of the QSS as Enabled and click the Add device ...
User Guide
Page 24
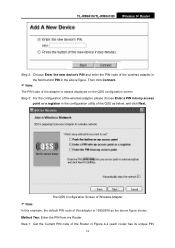
... on the QSS configuration screen Step 3: For the configuration of the QSS as the above figure. TL-WR841N/TL-WR841ND Wireless N Router Step 2: Choose Enter the new device's PIN and enter the PIN code of the wireless adapter in the field behind PIN in the above figure shown. Then click Connect. ) Note: ... PIN code of the adapter is 16952898 as below, and click Next. Method Two: Enter the PIN from my Router Step 1: Get the Current PIN code of the Router in the configuration utility of the wireless adapter, please choose Enter a PIN into my access point or a registrar in Figure 4-2 (each...
... on the QSS configuration screen Step 3: For the configuration of the QSS as the above figure. TL-WR841N/TL-WR841ND Wireless N Router Step 2: Choose Enter the new device's PIN and enter the PIN code of the wireless adapter in the field behind PIN in the above figure shown. Then click Connect. ) Note: ... PIN code of the adapter is 16952898 as below, and click Next. Method Two: Enter the PIN from my Router Step 1: Get the Current PIN code of the Router in the configuration utility of the wireless adapter, please choose Enter a PIN into my access point or a registrar in Figure 4-2 (each...


