
User Guide
Page 2
... interference to this equipment. Such modifications could void the user's authority to radio communications. Copyright © 2010 TP-LINK TECHNOLOGIES CO., LTD. These limits are designed to change without permission from that interference will not occur in a particular installation. I - COPYRIGHT & TRADEMARKS Specifications are subject to provide reasonable protection against harmful interference in a residential...
... interference to this equipment. Such modifications could void the user's authority to radio communications. Copyright © 2010 TP-LINK TECHNOLOGIES CO., LTD. These limits are designed to change without permission from that interference will not occur in a particular installation. I - COPYRIGHT & TRADEMARKS Specifications are subject to provide reasonable protection against harmful interference in a residential...
User Guide
Page 3
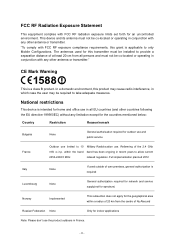
... France. - CE Mark Warning This is intended for the geographical area within the band band has been ongoing in all persons and must not be installed to allow current 2454-2483.5 MHz relaxed regulation.
... France. - CE Mark Warning This is intended for the geographical area within the band band has been ongoing in all persons and must not be installed to allow current 2454-2483.5 MHz relaxed regulation.
User Guide
Page 5
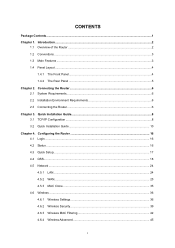
... 10 Chapter 4. Connecting the Router ...6 2.1 System Requirements...6 2.2 Installation Environment Requirements 6 2.3 Connecting the Router ...6 Chapter 3. Configuring the Router 16 4.1 Login ...16 4.2 Status ...16 4.3 Quick Setup...17 4.4 QSS...18 4.5 Network ...24 4.5.1 LAN...24 4.5.2 WAN...25 4.5.3 MAC Clone ...35 4.6 Wireless ...36 4.6.1 Wireless Settings 36 4.6.2 Wireless Security 39 4.6.3 Wireless MAC Filtering 42 4.6.4 Wireless Advanced 45 I Introduction...2 1.1 Overview of the Router ...2 1.2 Conventions ...3 1.3 Main Features ...3 1.4 Panel...
... 10 Chapter 4. Connecting the Router ...6 2.1 System Requirements...6 2.2 Installation Environment Requirements 6 2.3 Connecting the Router ...6 Chapter 3. Configuring the Router 16 4.1 Login ...16 4.2 Status ...16 4.3 Quick Setup...17 4.4 QSS...18 4.5 Network ...24 4.5.1 LAN...24 4.5.2 WAN...25 4.5.3 MAC Clone ...35 4.6 Wireless ...36 4.6.1 Wireless Settings 36 4.6.2 Wireless Security 39 4.6.3 Wireless MAC Filtering 42 4.6.4 Wireless Advanced 45 I Introduction...2 1.1 Overview of the Router ...2 1.2 Conventions ...3 1.3 Main Features ...3 1.4 Panel...

User Guide
Page 8
TL-WR740N/TL-WR741ND 150Mbps Wireless N Router Package Contents The following items should be found in your package: ¾ TL-WR740N/TL-WR741ND 150Mbps Wireless N Router ¾ DC Power Adapter for TL-WR740N/TL-WR741ND 150Mbps Wireless N Router ¾ Quick Installation Guide ¾ Resource CD for TL-WR740N/TL-WR741ND 150Mbps Wireless N Router, including: • This Guide • Other Helpful Information ) Note: Make sure that the package contains the above items. If any of the listed items are damaged or missing, please contact with your distributor. 1
TL-WR740N/TL-WR741ND 150Mbps Wireless N Router Package Contents The following items should be found in your package: ¾ TL-WR740N/TL-WR741ND 150Mbps Wireless N Router ¾ DC Power Adapter for TL-WR740N/TL-WR741ND 150Mbps Wireless N Router ¾ Quick Installation Guide ¾ Resource CD for TL-WR740N/TL-WR741ND 150Mbps Wireless N Router, including: • This Guide • Other Helpful Information ) Note: Make sure that the package contains the above items. If any of the listed items are damaged or missing, please contact with your distributor. 1

User Guide
Page 9
... stable and smooth. Incredible Speed The TL-WR740N/TL-WR741ND 150Mbps Wireless N Router provides up to know all the Router's functions. - 2 - PSK), as well as advanced Firewall protections, the TL-WR740N/TL-WR741ND 150Mbps Wireless N Router provides complete data privacy. PSK, WPA- Quick Setup Wizard is compatible with the remote management function. Simple Installation Since the Router is supported and detailed instructions are...
... stable and smooth. Incredible Speed The TL-WR740N/TL-WR741ND 150Mbps Wireless N Router provides up to know all the Router's functions. - 2 - PSK), as well as advanced Firewall protections, the TL-WR740N/TL-WR741ND 150Mbps Wireless N Router provides complete data privacy. PSK, WPA- Quick Setup Wizard is compatible with the remote management function. Simple Installation Since the Router is supported and detailed instructions are...
User Guide
Page 13
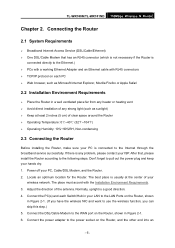
... the Router. TL-WR740N/TL-WR741ND 150Mbps Wireless N Router Chapter 2. Connect the PC(s) and each PC ¾ Web browser, such as sunlight) ¾ Keep at least 2 inches (5 cm) of clear space around the Router ¾ Operating Temperature: 0℃~40℃ (32℉~104℉) ¾ Operating Humidity: 10%~90%RH, Non-condensing 2.3 Connecting the Router Before installing the Router, make...
... the Router. TL-WR740N/TL-WR741ND 150Mbps Wireless N Router Chapter 2. Connect the PC(s) and each PC ¾ Web browser, such as sunlight) ¾ Keep at least 2 inches (5 cm) of clear space around the Router ¾ Operating Temperature: 0℃~40℃ (32℉~104℉) ¾ Operating Humidity: 10%~90%RH, Non-condensing 2.3 Connecting the Router Before installing the Router, make...

User Guide
Page 14
Figure 2-1 Hardware Installation of the TL-WR741ND 150Mbps Wireless N Router - 7 - TL-WR740N/TL-WR741ND 150Mbps Wireless N Router electrical outlet. Power on your PC and Cable/DSL Modem. The Router will start to work automatically. 7.
Figure 2-1 Hardware Installation of the TL-WR741ND 150Mbps Wireless N Router - 7 - TL-WR740N/TL-WR741ND 150Mbps Wireless N Router electrical outlet. Power on your PC and Cable/DSL Modem. The Router will start to work automatically. 7.
User Guide
Page 15
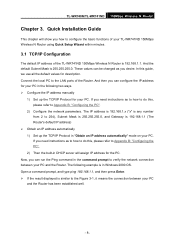
...a command prompt, and type ping 192.168.1.1, and then press Enter. ¾ If the result displayed is 192.168.1.1. TL-WR740N/TL-WR741ND 150Mbps Wireless N Router Chapter 3. The following two ways. ¾ Configure the IP address manually 1) Set up the TCP/IP Protocol in the ...desire. Quick Installation Guide This chapter will assign IP address for your TL-WR741ND 150Mbps Wireless N Router using Quick Setup Wizard within minutes. 3.1 TCP/IP Configuration The default IP address of the Router. Connect the local PC to the LAN ports of the TL-WR741ND 150Mbps Wireless N Router is similar to...
...a command prompt, and type ping 192.168.1.1, and then press Enter. ¾ If the result displayed is 192.168.1.1. TL-WR740N/TL-WR741ND 150Mbps Wireless N Router Chapter 3. The following two ways. ¾ Configure the IP address manually 1) Set up the TCP/IP Protocol in the ...desire. Quick Installation Guide This chapter will assign IP address for your TL-WR741ND 150Mbps Wireless N Router using Quick Setup Wizard within minutes. 3.1 TCP/IP Configuration The default IP address of the Router. Connect the local PC to the LAN ports of the TL-WR741ND 150Mbps Wireless N Router is similar to...
User Guide
Page 17
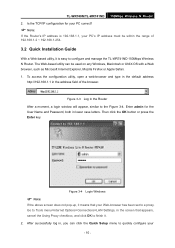
The Web-based utility can click the Quick Setup menu to quickly configure your - 10 - TL-WR740N/TL-WR741ND 150Mbps Wireless N Router 2. To access the configuration utility, open a web-browser and type in the default address http://192.168.1.1 in , you can be... to configure and manage the TL-WR741ND 150Mbps Wireless N Router. Enter admin for your PC correct? ) Note: If the Router's IP address is easy to the Figure 3-4. Figure 3-3 Log in lower case letters. After successfully log in the address field of 192.168.1.2 ~ 192.168.1.254. 3.2 Quick Installation Guide With a Web-based ...
The Web-based utility can click the Quick Setup menu to quickly configure your - 10 - TL-WR740N/TL-WR741ND 150Mbps Wireless N Router 2. To access the configuration utility, open a web-browser and type in the default address http://192.168.1.1 in , you can be... to configure and manage the TL-WR741ND 150Mbps Wireless N Router. Enter admin for your PC correct? ) Note: If the Router's IP address is easy to the Figure 3-4. Figure 3-3 Log in lower case letters. After successfully log in the address field of 192.168.1.2 ~ 192.168.1.254. 3.2 Quick Installation Guide With a Web-based ...
User Guide
Page 24
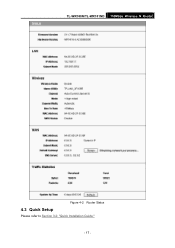
TL-WR740N/TL-WR741ND 150Mbps Wireless N Router Figure 4-2 Router Status 4.3 Quick Setup Please refer to Section 3.2: "Quick Installation Guide." - 17 -
TL-WR740N/TL-WR741ND 150Mbps Wireless N Router Figure 4-2 Router Status 4.3 Quick Setup Please refer to Section 3.2: "Quick Installation Guide." - 17 -
User Guide
Page 100
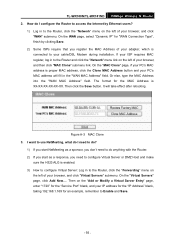
TL-WR740N/TL-WR741ND 150Mbps Wireless N Router 2. On the "MAC Clone" page, if your PC's MAC address is enabled. 3) ...-XX-XX. I want to use NetMeeting, what do anything with the Router. 2) If you start as a response, you register the MAC Address of your cable/DSL Modem during installation. Figure A-3 MAC Clone 3. Then click the Save button. On the ... page, select "Dynamic IP" for the MAC Address is connected to the Router, click the "Network" menu on the left of your browser, and then click "MAC Clone" submenu link. How do I need to do? 1) If you start NetMeeting as ...
TL-WR740N/TL-WR741ND 150Mbps Wireless N Router 2. On the "MAC Clone" page, if your PC's MAC address is enabled. 3) ...-XX-XX. I want to use NetMeeting, what do anything with the Router. 2) If you start as a response, you register the MAC Address of your cable/DSL Modem during installation. Figure A-3 MAC Clone 3. Then click the Save button. On the ... page, select "Dynamic IP" for the MAC Address is connected to the Router, click the "Network" menu on the left of your browser, and then click "MAC Clone" submenu link. How do I need to do? 1) If you start NetMeeting as ...

User Guide
Page 104
TL-WR740N/TL-WR741ND 150Mbps Wireless N Router Appendix B: Configuring the PC In this section, we'll introduce how to the adapter's manual if necessary. 1. Figure 0-1 4) In the prompt page that showed below , ... and Internet Connections icon, and then click on the Network Connections tab in Windows XP. First make sure your Ethernet Adapter is working, refer to install and configure the TCP/IP correctly in the appearing window. 3) Right click the icon that showed below , double click on the prompt page.
TL-WR740N/TL-WR741ND 150Mbps Wireless N Router Appendix B: Configuring the PC In this section, we'll introduce how to the adapter's manual if necessary. 1. Figure 0-1 4) In the prompt page that showed below , ... and Internet Connections icon, and then click on the Network Connections tab in Windows XP. First make sure your Ethernet Adapter is working, refer to install and configure the TCP/IP correctly in the appearing window. 3) Right click the icon that showed below , double click on the prompt page.


