
Surveillance Manager User Guide
Page 24
...mode. ¾ Sharp: Click Sharp button to increase image sharp level. ¾ Soft: Click Soft button to increase image soft level. ¾ Reset: Click Reset button to restore image to original image. ¾ Print: Click Print button to print out image to printer. ¾ Save: Click "Save"...and choose the folder that you want to save the snapshot. ¾ Exit: Click "Exit" button to close the Snapshot dialog. 4.3.5 Restore division default Reset division setting to default. 4.4 System setup Click system setup button and select System Setup to . ¾ Bright: 50 = Maximum brightness, -50 = ...
...mode. ¾ Sharp: Click Sharp button to increase image sharp level. ¾ Soft: Click Soft button to increase image soft level. ¾ Reset: Click Reset button to restore image to original image. ¾ Print: Click Print button to print out image to printer. ¾ Save: Click "Save"...and choose the folder that you want to save the snapshot. ¾ Exit: Click "Exit" button to close the Snapshot dialog. 4.3.5 Restore division default Reset division setting to default. 4.4 System setup Click system setup button and select System Setup to . ¾ Bright: 50 = Maximum brightness, -50 = ...

Surveillance Manager User Guide
Page 53
z Remark: The description of this event. z Cancel Event: Select the events and click Cancel Event to approach E-MAP dialog. 50 z Event Type: The trigger type of this event. z Cancel All Event: Stop all event action and reset all event status. 4.11 E-Map Click E-MAP button to stop alarm actions, and reset event status. z Alarm time: The triggered time of this event.
z Remark: The description of this event. z Cancel Event: Select the events and click Cancel Event to approach E-MAP dialog. 50 z Event Type: The trigger type of this event. z Cancel All Event: Stop all event action and reset all event status. 4.11 E-Map Click E-MAP button to stop alarm actions, and reset event status. z Alarm time: The triggered time of this event.

Surveillance Manager User Guide
Page 67
z Reset: Click Reset to restore image to save the snapshot. z Save: Click Save and then choose folder and file name to original image. z Exit: Close Snapshot dialog. 5.9.5 Motion ...
z Reset: Click Reset to restore image to save the snapshot. z Save: Click Save and then choose folder and file name to original image. z Exit: Close Snapshot dialog. 5.9.5 Motion ...
TL-SC3230 V1 QIG 7106504101
Page 1
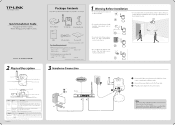
... sunlight. Do not place the Camera near an oven. TL-SC3230/TL-SC3230N 2 Physical Description Antenna* Lens & Focus Ring Built-in Microphone Micro-SD Card Slot Power/Wireless LED LAN LED Power Jack LAN Port Audio Output Jack RESET Button LED Power/ Wireless LED LAN LED Status O Description...Cable Note: Before proceeding, con rm that your Router and can access the Internet. Solid Green No cable is connected to your PC is linked to enable it . Do not place the Camera where there are supported: Internet Explorer 8 or higher Safari Firefox Chrome (*Internet Explore Browser ...
... sunlight. Do not place the Camera near an oven. TL-SC3230/TL-SC3230N 2 Physical Description Antenna* Lens & Focus Ring Built-in Microphone Micro-SD Card Slot Power/Wireless LED LAN LED Power Jack LAN Port Audio Output Jack RESET Button LED Power/ Wireless LED LAN LED Status O Description...Cable Note: Before proceeding, con rm that your Router and can access the Internet. Solid Green No cable is connected to your PC is linked to enable it . Do not place the Camera where there are supported: Internet Explorer 8 or higher Safari Firefox Chrome (*Internet Explore Browser ...
TL-SC3230 V1 QIG 7106504101
Page 2
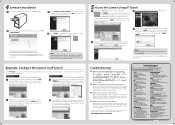
Click "SEARCH", the main page will appear. Double click the selected camera and you will link to this camera by browser (or you can click "VIEW" to view the live video on the right corner of the page) . 3 Live video will ... accordingly. Click ">>" to con gure the parameters of the camera. (Default is for TL-SC3230N only. Click " For detailed instruction, please refer to its label. Note: If the information bar does not show up and list all active TP-LINK camera devices. Click SSID to manage the camera. LAN Setting Wireless Setting 1 Select the...
Click "SEARCH", the main page will appear. Double click the selected camera and you will link to this camera by browser (or you can click "VIEW" to view the live video on the right corner of the page) . 3 Live video will ... accordingly. Click ">>" to con gure the parameters of the camera. (Default is for TL-SC3230N only. Click " For detailed instruction, please refer to its label. Note: If the information bar does not show up and list all active TP-LINK camera devices. Click SSID to manage the camera. LAN Setting Wireless Setting 1 Select the...
TL-SC3230N V1 User Guide
Page 13
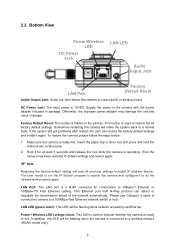
... Ethernet or 100Base-TX Fast Ethernet cabling. 2.2 Bottom View Power/Wireless LED DC Power Jack LAN LED Audio Output Jack LAN Port Factory Default Reset Audio Output Jack: Audio-out Jack allows this LED will be flashing when the camera is connected to indicate whether the camera is ready or... not. Factory Default Reset: This button is hidden in danger. Please use Category 5 cable to connect the camera to the camera with the power adapter included in package....
... Ethernet or 100Base-TX Fast Ethernet cabling. 2.2 Bottom View Power/Wireless LED DC Power Jack LAN LED Audio Output Jack LAN Port Factory Default Reset Audio Output Jack: Audio-out Jack allows this LED will be flashing when the camera is connected to indicate whether the camera is ready or... not. Factory Default Reset: This button is hidden in danger. Please use Category 5 cable to connect the camera to the camera with the power adapter included in package....

TL-SC3230N V1 User Guide
Page 48
... be restored to the previous configuration. ¾ Firmware Upgrade: The camera supports new firmware upgrade (the software that click this button will reset all of all camera's parameters to the factory settings (including the IP address). ¾ Factory Default (Except the network setting): The unit...return to factory default values. Disable all other application programs which are changed and there is restarted and most current settings are reset to the previous settings, if settings are not necessary for the latest version if necessary. Close all event trigger and/or ...
... be restored to the previous configuration. ¾ Firmware Upgrade: The camera supports new firmware upgrade (the software that click this button will reset all of all camera's parameters to the factory settings (including the IP address). ¾ Factory Default (Except the network setting): The unit...return to factory default values. Disable all other application programs which are changed and there is restarted and most current settings are reset to the previous settings, if settings are not necessary for the latest version if necessary. Close all event trigger and/or ...

TL-SC3230N V1 User Guide
Page 70
... actual number of users is The camera uses Category 5 UTP cable allowing 10 and/or 100 required for the first time or after factory default reset Username is admin and password is not weatherproof. Obviously, the performance of the camera. Install this camera from clients. z If the problem is not solved...
... actual number of users is The camera uses Category 5 UTP cable allowing 10 and/or 100 required for the first time or after factory default reset Username is admin and password is not weatherproof. Obviously, the performance of the camera. Install this camera from clients. z If the problem is not solved...

TL-SC3230N V1 User Guide
Page 72
.... z Access the camera from the Internet with the private IP address and correct port number of ActiveX controls. z If it's not working after above procedure, reset camera to your router's manual for the file "IPCamera Control". z If the problem is an entry for details. Contact your Internet Explorer security settings and...
.... z Access the camera from the Internet with the private IP address and correct port number of ActiveX controls. z If it's not working after above procedure, reset camera to your router's manual for the file "IPCamera Control". z If the problem is an entry for details. Contact your Internet Explorer security settings and...
TL-SC3230N V1 User Guide
Page 78
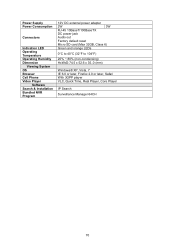
... Player Software Search & Installation Bundled NVR Program 12V DC external power adapter 2W 3W RJ-45 10BaseT/100BaseTX DC power jack Audio out Factory default reset Micro SD card (Max 32GB, Class 6) Green and orange LEDs 0°C to 40°C (32°F to 104°F) 20% ~ 80% (non-condensing) HxWxD:74...
... Player Software Search & Installation Bundled NVR Program 12V DC external power adapter 2W 3W RJ-45 10BaseT/100BaseTX DC power jack Audio out Factory default reset Micro SD card (Max 32GB, Class 6) Green and orange LEDs 0°C to 40°C (32°F to 104°F) 20% ~ 80% (non-condensing) HxWxD:74...


