User Guide
Page 15
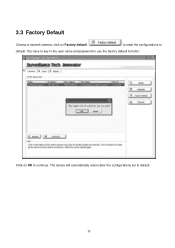
The device will automatically reboot after the configurations set to continue. Click on Factory default to reset the configurations to use the factory default function. You have to key in the user name and password to default. 3.3 Factory Default Choose a network camera, click on OK to default. 13
The device will automatically reboot after the configurations set to continue. Click on Factory default to reset the configurations to use the factory default function. You have to key in the user name and password to default. 3.3 Factory Default Choose a network camera, click on OK to default. 13
Quick Installation Guide
Page 1
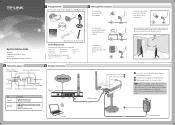
There is no Ethernet connection. There is no electrical power. • Solid. The Ethernet port is linked, but there is for TL-SC3171G only) System Requirement The following operating systems are supported: • Windows XP • Windows 98 • Windows Me &#... where are sharp temperature such as an oven 3 Physical Description Antenna Connector (For TL-SC3171G Only) Ethernet 10/100Mbps RJ45 Port 4 Hardware Connection Audio Out Power Audio In Power LED Ethernet LED Reset Button General I/O Terminal Block Item Power LED Ethernet LED Description • Solid....
There is no Ethernet connection. There is no electrical power. • Solid. The Ethernet port is linked, but there is for TL-SC3171G only) System Requirement The following operating systems are supported: • Windows XP • Windows 98 • Windows Me &#... where are sharp temperature such as an oven 3 Physical Description Antenna Connector (For TL-SC3171G Only) Ethernet 10/100Mbps RJ45 Port 4 Hardware Connection Audio Out Power Audio In Power LED Ethernet LED Reset Button General I/O Terminal Block Item Power LED Ethernet LED Description • Solid....
User Guide
Page 8
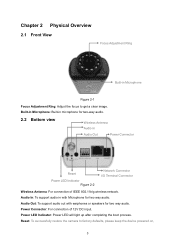
... device powered on, 3 Audio Out: To support audio out with Microphone for two-way audio. 2.2 Bottom view Wireless Antenna Audio In Audio Out Power Connector Reset Power LED Indicator Figure 2-2 Network Connector I/O Terminal Connector Wireless Antenna: For connection of 12V DC input...
... device powered on, 3 Audio Out: To support audio out with Microphone for two-way audio. 2.2 Bottom view Wireless Antenna Audio In Audio Out Power Connector Reset Power LED Indicator Figure 2-2 Network Connector I/O Terminal Connector Wireless Antenna: For connection of 12V DC input...

User Guide
Page 9
The CPU of the camera starts to support External Alarm and Sensor used for at least 10 seconds. I/O Terminal Connector: Input/Output to work completely 1 minute after you release the Reset button. then press and hold the Reset Button for motion detection, event triggering and alarm notification, etc. Network Connector: For connection to the Ethernet via RJ45 standard. 4
The CPU of the camera starts to support External Alarm and Sensor used for at least 10 seconds. I/O Terminal Connector: Input/Output to work completely 1 minute after you release the Reset button. then press and hold the Reset Button for motion detection, event triggering and alarm notification, etc. Network Connector: For connection to the Ethernet via RJ45 standard. 4
User Guide
Page 27
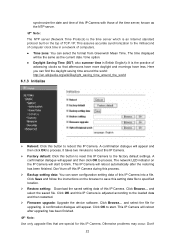
... this IP Camera. ¾ Factory default: Click this button to process. and select the saved file. A confirmation dialogue will appear and then click OK to reset this IP Camera. synchronize the date and time of this IP Camera with those of the time server, known as the current date / time option...
... this IP Camera. ¾ Factory default: Click this button to process. and select the saved file. A confirmation dialogue will appear and then click OK to reset this IP Camera. synchronize the date and time of this IP Camera with those of the time server, known as the current date / time option...

User Guide
Page 37
... for encapsulating Point-to your server by entering your domain name no matter what your friends can reset the camera to Section 6.1.3 Initialize. 3) The IP Camera with a fixed domain name (named by pressing the Reset button. ¾ Use the following DNS server address: Select this feature, you need to the ADSL transceiver...
... for encapsulating Point-to your server by entering your domain name no matter what your friends can reset the camera to Section 6.1.3 Initialize. 3) The IP Camera with a fixed domain name (named by pressing the Reset button. ¾ Use the following DNS server address: Select this feature, you need to the ADSL transceiver...

User Guide
Page 89
... in the IP camera. Please adjust the IP Camera's focus by rotating the Lens. Press and hold the Reset button on the bottom panel with a pin or paperclip. Please continue holding down the Reset button for approximately 15 seconds. First, please make sure that you are admin. If you log in the...
... in the IP camera. Please adjust the IP Camera's focus by rotating the Lens. Press and hold the Reset button on the bottom panel with a pin or paperclip. Please continue holding down the Reset button for approximately 15 seconds. First, please make sure that you are admin. If you log in the...


