User Guide
Page 15
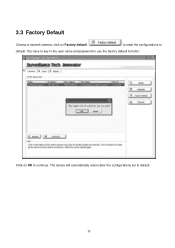
You have to key in the user name and password to default. 13 The device will automatically reboot after the configurations set to use the factory default function. Click on Factory default to reset the configurations to default. 3.3 Factory Default Choose a network camera, click on OK to continue.
You have to key in the user name and password to default. 13 The device will automatically reboot after the configurations set to use the factory default function. Click on Factory default to reset the configurations to default. 3.3 Factory Default Choose a network camera, click on OK to continue.

User Guide
Page 21
...access right of each group. ¾ Username:Set a user name between 5 and 16 characters. ¾ Password:Set a password between 5 and 16 characters. ¾ Confirm:Re-type the password to confirm. ¾ Mode:Set a user to Admin, Operator or Viewer mode. ¾ Viewer authentication...:Allows any viewer direct access to be accessed by others. Intelligent IP Installer provides to assign a password if the Network Camera is "admin/admin". 4.2 User The Network Camera default account and password setting is intended to Live View. 19
...access right of each group. ¾ Username:Set a user name between 5 and 16 characters. ¾ Password:Set a password between 5 and 16 characters. ¾ Confirm:Re-type the password to confirm. ¾ Mode:Set a user to Admin, Operator or Viewer mode. ¾ Viewer authentication...:Allows any viewer direct access to be accessed by others. Intelligent IP Installer provides to assign a password if the Network Camera is "admin/admin". 4.2 User The Network Camera default account and password setting is intended to Live View. 19
User Guide
Page 11
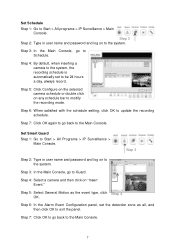
... a day, always record. Step 6: In the Alarm Event Configuration panel, set to exit the panel. Step 3 Step 2: Type in user name and password and log on to Schedule. Set Smart Guard Step 1: Go to Start > All programs > IP Surveillance > Main Console. Step 7: Click OK to ...go to the system. Set Schedule Step 1: Go to Start > All Programs > IP Surveillance > Main Console. Step 4: By default, when inserting a camera to modify the recording mode. Step 6: When satisfied with the schedule setting, click OK to the Main Console. 7 Step 4: Select a...
... a day, always record. Step 6: In the Alarm Event Configuration panel, set to exit the panel. Step 3 Step 2: Type in user name and password and log on to Schedule. Set Smart Guard Step 1: Go to Start > All programs > IP Surveillance > Main Console. Step 7: Click OK to ...go to the system. Set Schedule Step 1: Go to Start > All Programs > IP Surveillance > Main Console. Step 4: By default, when inserting a camera to modify the recording mode. Step 6: When satisfied with the schedule setting, click OK to the Main Console. 7 Step 4: Select a...

Quick Installation Guide
Page 2
...default. Click "Security" -> "Internet" -> "Custom Level...". Select the relevant camera from the list and click "Link to continue the program. waiting M=IMENIE Information Bar Help Setting O Click "Install". Wireless -Wet Audio Surveillance Camera Your surveillance Camera Installation is admin / admin) Wireless IP Camera User name: Password: VV... A warning page will appear. www.tp-link... troubleshooting help, go to www.tp-link.com/support/faq.asp • To download the latest Firmware, Driver, Utility and User Guide, go to the TL-SC3130G's manual on the computer's Desktop...
...default. Click "Security" -> "Internet" -> "Custom Level...". Select the relevant camera from the list and click "Link to continue the program. waiting M=IMENIE Information Bar Help Setting O Click "Install". Wireless -Wet Audio Surveillance Camera Your surveillance Camera Installation is admin / admin) Wireless IP Camera User name: Password: VV... A warning page will appear. www.tp-link... troubleshooting help, go to www.tp-link.com/support/faq.asp • To download the latest Firmware, Driver, Utility and User Guide, go to the TL-SC3130G's manual on the computer's Desktop...

User Guide
Page 9
...10/index2.htm" as your web URL to view the video without setting page, enter "http:///index2.htm" as shown below. ) Note: The default User name "admin" and Password "admin" are Setting, Client Setting, and Image Setup. For example, you can change them in the Location / Address field of the web-...based management page are set at the factory for the administrator. Enter the default User name "admin" and password "admin" in the login window as your web URL . On the leftmost column of your screen. Chapter 3 Using IP Camera via Web...
...10/index2.htm" as your web URL to view the video without setting page, enter "http:///index2.htm" as shown below. ) Note: The default User name "admin" and Password "admin" are Setting, Client Setting, and Image Setup. For example, you can change them in the Location / Address field of the web-...based management page are set at the factory for the administrator. Enter the default User name "admin" and password "admin" in the login window as your web URL . On the leftmost column of your screen. Chapter 3 Using IP Camera via Web...

User Guide
Page 12
You can change them in the dialog box as shown below. ) Note: The default Name "admin" and Password "admin" are set at the factory for the administrator. Enter the default User name "admin" and password "admin" in the Account Menu. (Please check "SETTING → BASIC → Security → Account") 7 2.
You can change them in the dialog box as shown below. ) Note: The default Name "admin" and Password "admin" are set at the factory for the administrator. Enter the default User name "admin" and password "admin" in the Account Menu. (Please check "SETTING → BASIC → Security → Account") 7 2.
User Guide
Page 15
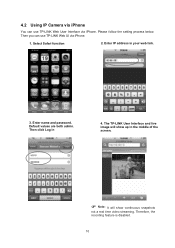
Then you can use TP-LINK Web UI via iPhone. Default values are both admin. Select Safari function 2. Then click Log in your web link. 3. Please follow the setting process below. Enter IP address in 4. 4.2 Using IP Camera via iPhone You can use TP-LINK Web User Interface via iPhone. 1. Therefore, the recording feature is disabled. 10 Enter name and password. The TP-LINK User Interface and live image will show up in the middle of the screen. ) Note: It will show continuous snapshots not a real time video streaming.
Then you can use TP-LINK Web UI via iPhone. Default values are both admin. Select Safari function 2. Then click Log in your web link. 3. Please follow the setting process below. Enter IP address in 4. 4.2 Using IP Camera via iPhone You can use TP-LINK Web User Interface via iPhone. 1. Therefore, the recording feature is disabled. 10 Enter name and password. The TP-LINK User Interface and live image will show up in the middle of the screen. ) Note: It will show continuous snapshots not a real time video streaming.

User Guide
Page 26
... authentication is On, please check "SETTING → BASIC → Camera → General") z RTSP Port: Specify the transmission port number of RTP streaming video. The default value is On, please check "SETTING → BASIC→ Camera → General") z Unicast Streaming Video / Audio Port Range: Specify the transmission port range of ... (if RTSP mode is On, the users will select a port randomly from this range. 21 RTP will be requested to type in username and password when viewing through RTSP. ¾ RTP (if RTSP mode is 8554. Also, you can change the background color.
... authentication is On, please check "SETTING → BASIC → Camera → General") z RTSP Port: Specify the transmission port number of RTP streaming video. The default value is On, please check "SETTING → BASIC→ Camera → General") z Unicast Streaming Video / Audio Port Range: Specify the transmission port range of ... (if RTSP mode is On, the users will select a port randomly from this range. 21 RTP will be requested to type in username and password when viewing through RTSP. ¾ RTP (if RTSP mode is 8554. Also, you can change the background color.

User Guide
Page 32
... the user ID for authentication necessary for PPPoE connections. Type it up to -Point Protocol over Ethernet) If your computer directly, the default network domain of DNS server automatically. 27 When you use the PPPoE function, you connect the IP Camera with your ISP provides Dynamic ... The IP address obtained when the IP camera connecting with authentication by username and password, enter all PPPoE information in this part. Type it up to 32 characters. ¾ Re-type password: Re-type the password to confirm. ¾ Obtain DNS server address automatically: Select this to obtain ...
... the user ID for authentication necessary for PPPoE connections. Type it up to -Point Protocol over Ethernet) If your computer directly, the default network domain of DNS server automatically. 27 When you use the PPPoE function, you connect the IP Camera with your ISP provides Dynamic ... The IP address obtained when the IP camera connecting with authentication by username and password, enter all PPPoE information in this part. Type it up to 32 characters. ¾ Re-type password: Re-type the password to confirm. ¾ Obtain DNS server address automatically: Select this to obtain ...
User Guide
Page 41
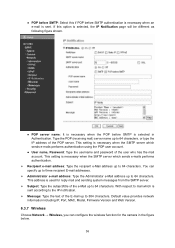
... characters, or type the IP address of the e-Mail up to 64 characters. With respect to mail which is sent according to 384 characters. Default value provides network information including IP, Port, MAC, Model, Firmware Version and Web Version. 6.3.7 Wireless Choose Network → Wireless, you can ... necessary when the POP before SMTP authentication is necessary when an e-mail is selected in the figure below. 36 z User name, Password: Type the username and password of the E-mail up to 64 characters. If this if POP before SMTP is sent. Type the POP (receiving mail) server ...
... characters, or type the IP address of the e-Mail up to 64 characters. With respect to mail which is sent according to 384 characters. Default value provides network information including IP, Port, MAC, Model, Firmware Version and Web Version. 6.3.7 Wireless Choose Network → Wireless, you can ... necessary when the POP before SMTP authentication is necessary when an e-mail is selected in the figure below. 36 z User name, Password: Type the username and password of the E-mail up to 64 characters. If this if POP before SMTP is sent. Type the POP (receiving mail) server ...

User Guide
Page 51
6.4.1 Account The device default account and password setting is intended to be accessed by others. ¾ User name: Set a user name between 4-16 characters. ¾ Password: Set a password between 4-16 characters. ¾ Re-type Password: Re-type the password to confirm. ¾ Viewer Mode: Set the user mode among Admin, Operator, and Viewer. That means everyone ...configuration. z The Admin mode has all configuration. z The Operator mode can access the device including all authority of authority. Therefore, it is necessary to assign a password if the device is "admin / admin".
6.4.1 Account The device default account and password setting is intended to be accessed by others. ¾ User name: Set a user name between 4-16 characters. ¾ Password: Set a password between 4-16 characters. ¾ Re-type Password: Re-type the password to confirm. ¾ Viewer Mode: Set the user mode among Admin, Operator, and Viewer. That means everyone ...configuration. z The Admin mode has all configuration. z The Operator mode can access the device including all authority of authority. Therefore, it is necessary to assign a password if the device is "admin / admin".
User Guide
Page 52
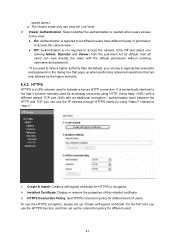
... camera through HTTPS easily by the higher authority. 6.4.2 HTTPS HTTPS is required to let different users have a higher authority than the default, you want to have different levels of the installed certificate. ¾ HTTPS Connection Policy: Set HTTPS connection policy for HTTPS to live...box that pops up when performing advanced operations that are only allowed by using HTTP. Using https: //URL/ with the default permission without entering username and password. * If you can view the Live View. ¾ Viewer Authentication: Select whether the authentication is not required to ...
... camera through HTTPS easily by the higher authority. 6.4.2 HTTPS HTTPS is required to let different users have a higher authority than the default, you want to have different levels of the installed certificate. ¾ HTTPS Connection Policy: Set HTTPS connection policy for HTTPS to live...box that pops up when performing advanced operations that are only allowed by using HTTP. Using https: //URL/ with the default permission without entering username and password. * If you can view the Live View. ¾ Viewer Authentication: Select whether the authentication is not required to ...

User Guide
Page 61
... sends e-mails performs authentication. 56 This setting is necessary when the SMTP server which sends e-mails performs authentication using the POP user account. z User name, Password: Type the user name and Password of the POP server. The default value is sent.
... sends e-mails performs authentication. 56 This setting is necessary when the SMTP server which sends e-mails performs authentication using the POP user account. z User name, Password: Type the user name and Password of the POP server. The default value is sent.

User Guide
Page 78
... ActiveX plug-in the IP camera. Please adjust the IP Camera's focus by rotating the Lens. Double click your IP Camera. 73 Both the default username and password are using the web browser that box, the ActiveX plug-in program would prompt automatically when you are admin. As to install it is...? This software will require 45 seconds. Please continue holding down the Reset button for approximately 15 seconds. Q2. What can 't I forgot the login name and password?
... ActiveX plug-in the IP camera. Please adjust the IP Camera's focus by rotating the Lens. Double click your IP Camera. 73 Both the default username and password are using the web browser that box, the ActiveX plug-in program would prompt automatically when you are admin. As to install it is...? This software will require 45 seconds. Please continue holding down the Reset button for approximately 15 seconds. Q2. What can 't I forgot the login name and password?

Mobile View Guide
Page 5
Enter name and password. Then click Log in the middle of the screen. ) Note It will show continuous snapshots not a real time video streaming. Therefore, the recording feature is disabled. 4 Default values are both admin. The TP-LINK User Interface and live image will show up in 4. Enter IP address in your web link. 3. 1. Select Safari function 2.
Enter name and password. Then click Log in the middle of the screen. ) Note It will show continuous snapshots not a real time video streaming. Therefore, the recording feature is disabled. 4 Default values are both admin. The TP-LINK User Interface and live image will show up in 4. Enter IP address in your web link. 3. 1. Select Safari function 2.

