
User Guide
Page 2
User ...15 4.1 Info ...18 4.2 User ...19 4.3 Date/Time ...20 4.4 TCP/IP ...21 4.5 PPPoE...23 4.6 DDNS ...24 5. Initial use Intelligent IP Installer 2 2. About...25 How to Use Intelligent IP Installer 1 1. Configuration of Main Menu 3 3. Camera ...4 3.1 Setup...5 3.2 Upgrade ...12 3.3 Factory Default ...13 3.4 Reboot ...14 4.
User ...15 4.1 Info ...18 4.2 User ...19 4.3 Date/Time ...20 4.4 TCP/IP ...21 4.5 PPPoE...23 4.6 DDNS ...24 5. Initial use Intelligent IP Installer 2 2. About...25 How to Use Intelligent IP Installer 1 1. Configuration of Main Menu 3 3. Camera ...4 3.1 Setup...5 3.2 Upgrade ...12 3.3 Factory Default ...13 3.4 Reboot ...14 4.

User Guide
Page 21
Intelligent IP Installer provides to assign a password if the Network Camera is "admin/admin". 4.2 User The Network Camera default account and password setting is intended to be accessed by others. Use this menu to set the username and password of Administrator and up to 9 ...
Intelligent IP Installer provides to assign a password if the Network Camera is "admin/admin". 4.2 User The Network Camera default account and password setting is intended to be accessed by others. Use this menu to set the username and password of Administrator and up to 9 ...

User Guide
Page 24
...default gateway. z IP Address:Enter the IP address of the secondary DNS server, if necessary. 22 DNS Setting ¾ Obtain DNS server automatically:If a DHCP server is installed on the network, to select this while the DNS server is assigned by the DHCP server. ) Note: When you set Obtain IP... automatically (DHCP), make sure that the DHCP server is working on the network, to select this while the IP address is assigned by the DHCP server. ¾ Use the following DNS server:Select...
...default gateway. z IP Address:Enter the IP address of the secondary DNS server, if necessary. 22 DNS Setting ¾ Obtain DNS server automatically:If a DHCP server is installed on the network, to select this while the DNS server is assigned by the DHCP server. ) Note: When you set Obtain IP... automatically (DHCP), make sure that the DHCP server is working on the network, to select this while the IP address is assigned by the DHCP server. ¾ Use the following DNS server:Select...

User Guide
Page 3
Always Record 28 4.7.2. Record on Motion 28 4.7.3. IP Camera / Video Server Setting Panel 40 6.3 Setting - Monitor Display 42 6.7 Save/ Load Configuration 43 6.8 Log Viewer...44 6.8.1. Startup ...... 39 6.2.3. I/O Device 40 6.4 Setting - Log Viewer - 4.2 Load Preset Modes 24 4.3 Insert a New Schedule Manually 25 4.4 Copy Schedule ...26 4.5 Week Mode ...26 4.5.1. Default: ...27 4.5.2. PTZ Config 41 6.5 Setting - User Account 42 6.6 Setting - Custom: ...27 4.6 Adjust the Scheduled Setting 27 4.7 Encoding Option Panel 28 4.7.1. Assign a Camera Event...
Always Record 28 4.7.2. Record on Motion 28 4.7.3. IP Camera / Video Server Setting Panel 40 6.3 Setting - Monitor Display 42 6.7 Save/ Load Configuration 43 6.8 Log Viewer...44 6.8.1. Startup ...... 39 6.2.3. I/O Device 40 6.4 Setting - Log Viewer - 4.2 Load Preset Modes 24 4.3 Insert a New Schedule Manually 25 4.4 Copy Schedule ...26 4.5 Week Mode ...26 4.5.1. Default: ...27 4.5.2. PTZ Config 41 6.5 Setting - User Account 42 6.6 Setting - Custom: ...27 4.6 Adjust the Scheduled Setting 27 4.7 Encoding Option Panel 28 4.7.1. Assign a Camera Event...
User Guide
Page 11
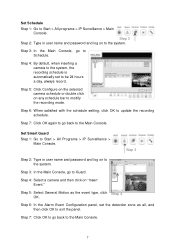
Step 4: By default, when inserting a camera to the system, the recording schedule is automatically set the detection zone as the event type, click ...Step 4: Select a camera and then click on to Schedule. Step 6: When satisfied with the schedule setting, click OK to Start > All Programs > IP Surveillance > Main Console. Step 7: Click OK to go to the system. Step 3 Step 2: Type in user name and password and log on any..., go back to Guard. Step 5: Click Configure on the selected camera schedule or double click on to Start > All programs > IP Surveillance > Main Console.
Step 4: By default, when inserting a camera to the system, the recording schedule is automatically set the detection zone as the event type, click ...Step 4: Select a camera and then click on to Schedule. Step 6: When satisfied with the schedule setting, click OK to Start > All Programs > IP Surveillance > Main Console. Step 7: Click OK to go to the system. Step 3 Step 2: Type in user name and password and log on any..., go back to Guard. Step 5: Click Configure on the selected camera schedule or double click on to Start > All programs > IP Surveillance > Main Console.
User Guide
Page 55
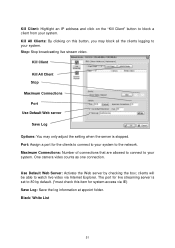
... Server: Activate the Web server by default. (*must check this button, you may only adjust the setting when the server is set to your system. Black/ White List 51 Kill Client: Highlight an IP address and click on this item for live streaming server is stopped. clients will be able ...to your system. Kill Client Kill All Client Stop Maximum Connections Port Use Default Web server Save Log Options: You may block all the ...
... Server: Activate the Web server by default. (*must check this button, you may only adjust the setting when the server is set to your system. Black/ White List 51 Kill Client: Highlight an IP address and click on this item for live streaming server is stopped. clients will be able ...to your system. Kill Client Kill All Client Stop Maximum Connections Port Use Default Web server Save Log Options: You may block all the ...
User Guide
Page 63
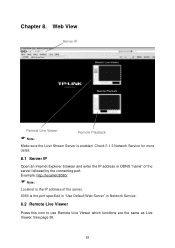
Chapter 8. Check 5.1.3 Network Service for more detail. 8.1 Server IP Open an Internet Explorer browser and enter the IP address or DDNS "name" of the server. 8080 is the port specified in "Use Default Web Server" in Network Service. 8.2 Remote Live Viewer Press this icon to use Remote Live ...Viewer which functions are the same as Live Viewer. Example: http://localnet:8080/ Note: Localnet is enabled. See page 55. 59 Web View Server IP Remote Live Viewer...
Chapter 8. Check 5.1.3 Network Service for more detail. 8.1 Server IP Open an Internet Explorer browser and enter the IP address or DDNS "name" of the server. 8080 is the port specified in "Use Default Web Server" in Network Service. 8.2 Remote Live Viewer Press this icon to use Remote Live ...Viewer which functions are the same as Live Viewer. Example: http://localnet:8080/ Note: Localnet is enabled. See page 55. 59 Web View Server IP Remote Live Viewer...

Quick Installation Guide
Page 2
...I Privacy I Content Connections I Programsp Advanc di Select a Web content zone to the TL-SC3130G's manual on our o... 0 rusted cles Restricted sires Security love L. For more troubleshooting help, go to www.tp-link.com/support/faq.asp • To download the latest Firmware, Driver, Utility and User ...Guide, go to www.tp-link.com/support/download.asp • For all active TP-LINK camera devices. Select the relevant camera from the list and click "Link to our Technical Support Website. Security Warning rDo you want to the IP Camera. (Default is not installed in your ...
...I Privacy I Content Connections I Programsp Advanc di Select a Web content zone to the TL-SC3130G's manual on our o... 0 rusted cles Restricted sires Security love L. For more troubleshooting help, go to www.tp-link.com/support/faq.asp • To download the latest Firmware, Driver, Utility and User ...Guide, go to www.tp-link.com/support/download.asp • For all active TP-LINK camera devices. Select the relevant camera from the list and click "Link to our Technical Support Website. Security Warning rDo you want to the IP Camera. (Default is not installed in your ...

User Guide
Page 4
... ...9 4.1.1 3G Mobile Phone Streaming Viewing 9 4.1.2 2.5G Mobile Phone WAP Viewing 9 4.1.3 2.5G Mobile Phone Browser Viewing 9 4.2 Using IP Camera via iPhone ...10 Chapter 5 Configuration of Main Menu 11 5.1 Live View ...11 5.1.1 Snapshot...11 5.1.2 Zoom in / out the image...5.3.3 Protocol...15 5.3.4 Video Buffer ...15 5.4 Image Setup ...15 5.4.1 Brightness...16 5.4.2 Contrast ...16 5.4.3 Saturation ...16 5.4.4 Hue ...16 5.4.5 Default ...16 Chapter 6 Setting-Basic...17 6.1 System...17 6.1.1 Information...17 6.1.2 Date / Time ...18 6.1.3 Initialize...19 6.2 Camera...19 6.2.1 General ...20
... ...9 4.1.1 3G Mobile Phone Streaming Viewing 9 4.1.2 2.5G Mobile Phone WAP Viewing 9 4.1.3 2.5G Mobile Phone Browser Viewing 9 4.2 Using IP Camera via iPhone ...10 Chapter 5 Configuration of Main Menu 11 5.1 Live View ...11 5.1.1 Snapshot...11 5.1.2 Zoom in / out the image...5.3.3 Protocol...15 5.3.4 Video Buffer ...15 5.4 Image Setup ...15 5.4.1 Brightness...16 5.4.2 Contrast ...16 5.4.3 Saturation ...16 5.4.4 Hue ...16 5.4.5 Default ...16 Chapter 6 Setting-Basic...17 6.1 System...17 6.1.1 Information...17 6.1.2 Date / Time ...18 6.1.3 Initialize...19 6.2 Camera...19 6.2.1 General ...20

User Guide
Page 8
... the power adapter. It flashes when there are data being transmitted. Power LED Indicator: It lights up when the IP Camera is powered on , then press and hold the Reset Button for at least 10 seconds. Reset: To successfully...the voice from your computer or the other Ethernet network devices. 3 Network LED Indicator: It lights up when the IP Camera is well connected to the network. The CPU of the camera starts to your partner comes out. 2.2 Bottom ...Physical Overview 2.1 Front View Focus Adjustment Ring: Adjust the focus ring to factory defaults, please keep the device powered on .
... the power adapter. It flashes when there are data being transmitted. Power LED Indicator: It lights up when the IP Camera is powered on , then press and hold the Reset Button for at least 10 seconds. Reset: To successfully...the voice from your computer or the other Ethernet network devices. 3 Network LED Indicator: It lights up when the IP Camera is well connected to the network. The CPU of the camera starts to your partner comes out. 2.2 Bottom ...Physical Overview 2.1 Front View Focus Adjustment Ring: Adjust the focus ring to factory defaults, please keep the device powered on .

User Guide
Page 9
...Setting, Section 5.3 Client Setting and Section 5.4 Image Setup. 4 Enter the default User name "admin" and password "admin" in the Location / Address field of the IP camera in the login window as your screen. Chapter 3 Using IP Camera via Web Browser 3.1 Windows Web Browser 1. You can refer to view... the video without setting page. 2. Launch your web browser, and enter the IP address (the default value is 192.168.1.10) of your browser. ) Note: If you can change them in the Account Menu. (Please check "SETTING &#...
...Setting, Section 5.3 Client Setting and Section 5.4 Image Setup. 4 Enter the default User name "admin" and password "admin" in the Location / Address field of the IP camera in the login window as your screen. Chapter 3 Using IP Camera via Web Browser 3.1 Windows Web Browser 1. You can refer to view... the video without setting page. 2. Launch your web browser, and enter the IP address (the default value is 192.168.1.10) of your browser. ) Note: If you can change them in the Account Menu. (Please check "SETTING &#...

User Guide
Page 10
3.2 Mac Web Browser 1. For example, you only want to view the video without setting page, enter "http:///index2.htm" as your web URL. Click the Safari icon on the screen as the figure below shown, and enter the IP address (the default value is 192.168.1.10) of the IP camera in the Location / Address field of your browser. ) Note: If you can enter "http://192.168.1.10/index2.htm" as your web URL to view the video without setting page. 5
3.2 Mac Web Browser 1. For example, you only want to view the video without setting page, enter "http:///index2.htm" as your web URL. Click the Safari icon on the screen as the figure below shown, and enter the IP address (the default value is 192.168.1.10) of the IP camera in the Location / Address field of your browser. ) Note: If you can enter "http://192.168.1.10/index2.htm" as your web URL to view the video without setting page. 5

User Guide
Page 14
... your 2.5G Web Browser. is the RTSP port of your IP camera (Default value is the Public IP address of your IP camera. 4.1.3 2.5G Mobile Phone Browser Viewing For 2.5G mobile phone viewing, type "http:///mobile.htm" into your IP camera; is 554.) Example: rtsp://100.10.10.1:554/video... the Player URL. 4.1.2 2.5G Mobile Phone WAP Viewing For 2.5G mobile phone viewing, type "http:///mobile.wml" into your 3G Streaming Link. Chapter 4 Operating IP Camera via Mobile Phone 4.1 Mobile Phone Viewing 4.1.1 3G Mobile Phone Streaming Viewing For 3G mobile phone viewing, type "rtsp://:/video.3gp " ...
... your 2.5G Web Browser. is the RTSP port of your IP camera (Default value is the Public IP address of your IP camera. 4.1.3 2.5G Mobile Phone Browser Viewing For 2.5G mobile phone viewing, type "http:///mobile.htm" into your IP camera; is 554.) Example: rtsp://100.10.10.1:554/video... the Player URL. 4.1.2 2.5G Mobile Phone WAP Viewing For 2.5G mobile phone viewing, type "http:///mobile.wml" into your 3G Streaming Link. Chapter 4 Operating IP Camera via Mobile Phone 4.1 Mobile Phone Viewing 4.1.1 3G Mobile Phone Streaming Viewing For 3G mobile phone viewing, type "rtsp://:/video.3gp " ...
User Guide
Page 15
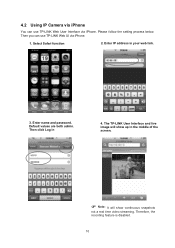
Then you can use TP-LINK Web UI via iPhone. Enter name and password. Therefore, the recording feature is disabled. 10 Then click Log in your web link. 3. 4.2 Using IP Camera via iPhone You can use TP-LINK Web User Interface via iPhone. 1. Please follow the setting process below. Select Safari function 2. Enter IP address in 4. The TP-LINK User Interface and live image will show up in the middle of the screen. ) Note: It will show continuous snapshots not a real time video streaming. Default values are both admin.
Then you can use TP-LINK Web UI via iPhone. Enter name and password. Therefore, the recording feature is disabled. 10 Then click Log in your web link. 3. 4.2 Using IP Camera via iPhone You can use TP-LINK Web User Interface via iPhone. 1. Please follow the setting process below. Select Safari function 2. Enter IP address in 4. The TP-LINK User Interface and live image will show up in the middle of the screen. ) Note: It will show continuous snapshots not a real time video streaming. Default values are both admin.

User Guide
Page 24
... General, MPEG4 and MJPEG. 19 6.1.3 Initialize ¾ Reboot: Click this button to the factory default settings. It takes two minutes to reboot this IP Camera. ¾ Factory Default: Click this button to reset this IP Camera to reboot this setting data file to process. Don't turn off this... IP Camera during this process. ¾ Backup Setting: You can save this IP Camera. A confirmation dialogue will reboot...
... General, MPEG4 and MJPEG. 19 6.1.3 Initialize ¾ Reboot: Click this button to the factory default settings. It takes two minutes to reboot this IP Camera. ¾ Factory Default: Click this button to reset this IP Camera to reboot this setting data file to process. Don't turn off this... IP Camera during this process. ¾ Backup Setting: You can save this IP Camera. A confirmation dialogue will reboot...

User Guide
Page 29
... specify an even number from 5, 10, 15 fps. You can choose values from 1024 to display the submenus including Information, PPPoE, DDNS, UPnP, Bonjour, IP Notification. 24 You can select the value of the MJPEG image. z Fixed Quality: You can choose among 640 x 480, 320 x 240, and 160...for "frames per second". ¾ Quality: z Auto: The quality will change the setting of Video / Audio Port Number, the setting of the video data (the default value is 8070). 6.2.3 MJPEG ¾ MJPEG Viewer Port ( If RTSP is off, please check "SETTING → BASIC → Camera → General") z ...
... specify an even number from 5, 10, 15 fps. You can choose values from 1024 to display the submenus including Information, PPPoE, DDNS, UPnP, Bonjour, IP Notification. 24 You can select the value of the MJPEG image. z Fixed Quality: You can choose among 640 x 480, 320 x 240, and 160...for "frames per second". ¾ Quality: z Auto: The quality will change the setting of Video / Audio Port Number, the setting of the video data (the default value is 8070). 6.2.3 MJPEG ¾ MJPEG Viewer Port ( If RTSP is off, please check "SETTING → BASIC → Camera → General") z ...
User Guide
Page 31
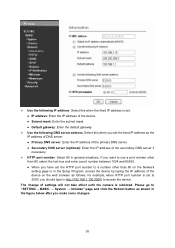
... setting page or in the Setup Program, access the device by typing the IP address of the device on the web browser as the IP address of DNS server. z Default gateway: Enter the default gateway. ¾ Use the following IP address: Select this when you make some changes. 26 z Secondary DNS server... (optional): Enter the IP address of the primary DNS server. If you should ...
... setting page or in the Setup Program, access the device by typing the IP address of the device on the web browser as the IP address of DNS server. z Default gateway: Enter the default gateway. ¾ Use the following IP address: Select this when you make some changes. 26 z Secondary DNS server... (optional): Enter the IP address of the primary DNS server. If you should ...

User Guide
Page 32
... you connect the IP Camera with your computer directly, the default network domain of camera is 192.168.1.x. 6.3.2 PPPoE (Point-to-Point Protocol over Ethernet) If your ISP provides Dynamic IP with network at the same time. ¾ IP address: The IP address obtained when the IP camera connecting with authentication... PPPoE information in this to obtain the address of DNS server automatically. 27 ) Note: If you need to turn on the DDNS or IP Notification function at PPPoE. ¾ User ID: Enter the user ID for authentication necessary for PPPoE connections. Type it up to 32 characters...
... you connect the IP Camera with your computer directly, the default network domain of camera is 192.168.1.x. 6.3.2 PPPoE (Point-to-Point Protocol over Ethernet) If your ISP provides Dynamic IP with network at the same time. ¾ IP address: The IP address obtained when the IP camera connecting with authentication... PPPoE information in this to obtain the address of DNS server automatically. 27 ) Note: If you need to turn on the DDNS or IP Notification function at PPPoE. ¾ User ID: Enter the user ID for authentication necessary for PPPoE connections. Type it up to 32 characters...

User Guide
Page 33
... refer to Section 6.1.3 Initialize. 3) The IP Camera with ADSL service where individual users connect to the ADSL transceiver (modem) over Ethernet): PPPoE is rebooted. Then the camera can reset the camera to its factory default settings by Intelligent IP Installer. PPPoE connection is not configured to... report the IP address of the primary DNS server. ¾ Use the following DNS server address: Select this ...
... refer to Section 6.1.3 Initialize. 3) The IP Camera with ADSL service where individual users connect to the ADSL transceiver (modem) over Ethernet): PPPoE is rebooted. Then the camera can reset the camera to its factory default settings by Intelligent IP Installer. PPPoE connection is not configured to... report the IP address of the primary DNS server. ¾ Use the following DNS server address: Select this ...

User Guide
Page 39
... a set of computer network protocol. Please check the link below: http://www.apple.com/support/downloads/bonjourforwindows.html 34 It allows devices to "My Network Place" if it also enables on IP networks. Bonjour uses industry standard IP protocols to allow devices to automatically discover each other without... Port Forwarding for mobile view. ) Note: UPnP (Universal Plug and Play): UPnP is enabled by default. ¾ MPEG4 viewer port (SSL): Enter the MPEG4 SSL viewer port and the default MPEG4 viewer port number is 8091. ¾ MJPEG viewer port: Enter the MJPEG viewer port number and...
... a set of computer network protocol. Please check the link below: http://www.apple.com/support/downloads/bonjourforwindows.html 34 It allows devices to "My Network Place" if it also enables on IP networks. Bonjour uses industry standard IP protocols to allow devices to automatically discover each other without... Port Forwarding for mobile view. ) Note: UPnP (Universal Plug and Play): UPnP is enabled by default. ¾ MPEG4 viewer port (SSL): Enter the MPEG4 SSL viewer port and the default MPEG4 viewer port number is 8091. ¾ MJPEG viewer port: Enter the MJPEG viewer port number and...


