User Guide
Page 2
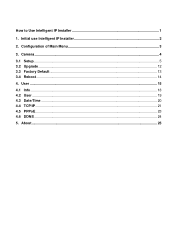
How to Use Intelligent IP Installer 1 1. About...25 Initial use Intelligent IP Installer 2 2. Camera ...4 3.1 Setup...5 3.2 Upgrade ...12 3.3 Factory Default ...13 3.4 Reboot ...14 4. User ...15 4.1 Info ...18 4.2 User ...19 4.3 Date/Time ...20 4.4 TCP/IP ...21 4.5 PPPoE...23 4.6 DDNS ...24 5. Configuration of Main Menu 3 3.
How to Use Intelligent IP Installer 1 1. About...25 Initial use Intelligent IP Installer 2 2. Camera ...4 3.1 Setup...5 3.2 Upgrade ...12 3.3 Factory Default ...13 3.4 Reboot ...14 4. User ...15 4.1 Info ...18 4.2 User ...19 4.3 Date/Time ...20 4.4 TCP/IP ...21 4.5 PPPoE...23 4.6 DDNS ...24 5. Configuration of Main Menu 3 3.

User Guide
Page 3
If you want to know how to use IP cameras with Microsoft web browsers and Intelligent IP Installer in Windows operating systems. This document focuses on introducing you to monitor the image from the camera using Intelligent IP Installer. The IP cameras can be used with Microsoft web browsers, please check the camera user manuals. 1 How to Use Intelligent IP Installer This chapter introduces how to Intelligent IP Installer.
If you want to know how to use IP cameras with Microsoft web browsers and Intelligent IP Installer in Windows operating systems. This document focuses on introducing you to monitor the image from the camera using Intelligent IP Installer. The IP cameras can be used with Microsoft web browsers, please check the camera user manuals. 1 How to Use Intelligent IP Installer This chapter introduces how to Intelligent IP Installer.
User Guide
Page 4
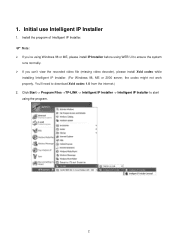
Click Start -> Program Files ->TP-LINK -> Intelligent IP Installer -> Intelligent IP Installer to start using WEB UI to download Xvid codec 1.0 from the internet.) 2. You'll need to ensure the system runs normally. ¾ If you 're using Windows 98 or ME, please install IP Installer before using the program. 2 Install the program of Intelligent IP Installer. ) Note: ¾...
Click Start -> Program Files ->TP-LINK -> Intelligent IP Installer -> Intelligent IP Installer to start using WEB UI to download Xvid codec 1.0 from the internet.) 2. You'll need to ensure the system runs normally. ¾ If you 're using Windows 98 or ME, please install IP Installer before using the program. 2 Install the program of Intelligent IP Installer. ) Note: ¾...

User Guide
Page 5
... Network Cameras in local network. Configuration of Main Menu Main Menu Main Menu Camera Click this button to get into common information of Intelligent IP Installer. 3 User Click this button to get into user basic setting information of all Network Cameras in network. You can connect the specific Network Cameras to...
... Network Cameras in local network. Configuration of Main Menu Main Menu Main Menu Camera Click this button to get into common information of Intelligent IP Installer. 3 User Click this button to get into user basic setting information of all Network Cameras in network. You can connect the specific Network Cameras to...
User Guide
Page 19
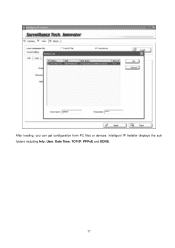
Intelligent IP Installer displays the sub folders including Info, User, Date Time, TCP/IP, PPPoE and DDNS. 17 After loading, you can get configuration from PC files or devices.
Intelligent IP Installer displays the sub folders including Info, User, Date Time, TCP/IP, PPPoE and DDNS. 17 After loading, you can get configuration from PC files or devices.

User Guide
Page 21
Intelligent IP Installer provides to assign a password if the Network Camera is "admin/admin". Use this menu to set the username and password of Administrator and up to 9 ...
Intelligent IP Installer provides to assign a password if the Network Camera is "admin/admin". Use this menu to set the username and password of Administrator and up to 9 ...

User Guide
Page 23
... to 64 characters. ¾ Time zone:Select the time zone and time difference from Greenwich Mean Time in the area where the camera is installed from the pulldown box. 4.4 TCP/IP ¾ HTTP Port: Select port 80 in the Setup Program, access the camera by typing the IP address of...
... to 64 characters. ¾ Time zone:Select the time zone and time difference from Greenwich Mean Time in the area where the camera is installed from the pulldown box. 4.4 TCP/IP ¾ HTTP Port: Select port 80 in the Setup Program, access the camera by typing the IP address of...

User Guide
Page 24
...primary DNS server. z IP Address:Enter the IP address of DNS server. IP Address: ¾ Obtain IP automatically (DHCP): If a DHCP server is installed on the network. ¾ Use the following DNS server:Select this when a fixed IP address is assigned by the DHCP server. ) Note: ...When you set . DNS Setting ¾ Obtain DNS server automatically:If a DHCP server is installed on the network, to select this while the DNS server is assigned by the DHCP server. ¾ Use the following IP:Select this when...
...primary DNS server. z IP Address:Enter the IP address of DNS server. IP Address: ¾ Obtain IP automatically (DHCP): If a DHCP server is installed on the network. ¾ Use the following DNS server:Select this when a fixed IP address is assigned by the DHCP server. ) Note: ...When you set . DNS Setting ¾ Obtain DNS server automatically:If a DHCP server is installed on the network, to select this while the DNS server is assigned by the DHCP server. ¾ Use the following IP:Select this when...
User Guide
Page 27
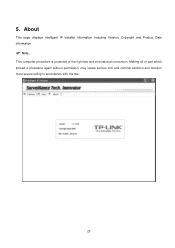
About This page displays Intelligent IP Installer information including Version, Copyright and Product Date information ) Note: This computer procedure is protected of the right law and international convention. Making all or part which spread a procedure again without permission, may cause serious civil and criminal sanction and mention most severe telling in accordance with the law. 25 5.
About This page displays Intelligent IP Installer information including Version, Copyright and Product Date information ) Note: This computer procedure is protected of the right law and international convention. Making all or part which spread a procedure again without permission, may cause serious civil and criminal sanction and mention most severe telling in accordance with the law. 25 5.

User Guide
Page 2
... ...20 3.9 Print ...20 3.10 Backup ...20 3.11 Log Viewer...22 3.11.1. Show Camera: ...15 2.4.4. Snapshot:...15 2.4.5. Manual Record 15 2.4.6. Enable Talk:...14 2.4.2. CONTENTS 1.1 System Requirement 1 1.2 Installation ...1 1.3 Quick Start...5 2.1 Start ...11 2.2 Information Window 13 2.3 PTZ Camera Control 13 2.3.1. Connect/ Disconnect 14 2.4.3.
... ...20 3.9 Print ...20 3.10 Backup ...20 3.11 Log Viewer...22 3.11.1. Show Camera: ...15 2.4.4. Snapshot:...15 2.4.5. Manual Record 15 2.4.6. Enable Talk:...14 2.4.2. CONTENTS 1.1 System Requirement 1 1.2 Installation ...1 1.3 Quick Start...5 2.1 Start ...11 2.2 Information Window 13 2.3 PTZ Camera Control 13 2.3.1. Connect/ Disconnect 14 2.4.3.
User Guide
Page 5
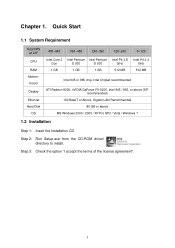
Step 2: Run Setup.exe from the CD-ROM driver/ directory to install. Quick Start 1.1 System Requirement Total FPS at CIF CPU RAM Motherboard Display Ethernet Hard Disk OS 480~640 360~480 240~360 120~240 0~120 ... / 965, or above (ATI recommended) 100 BaseT or Above, Gigabit LAN Recommended 80 GB or above MS Windows 2000 / 2003 / XP Pro SP2 / Vista / Windows 7 1.2 Installation Step 1: Insert the Installation CD. Step 3: Check the option "I accept the terms of the license agreement". 1 Chapter 1.
Step 2: Run Setup.exe from the CD-ROM driver/ directory to install. Quick Start 1.1 System Requirement Total FPS at CIF CPU RAM Motherboard Display Ethernet Hard Disk OS 480~640 360~480 240~360 120~240 0~120 ... / 965, or above (ATI recommended) 100 BaseT or Above, Gigabit LAN Recommended 80 GB or above MS Windows 2000 / 2003 / XP Pro SP2 / Vista / Windows 7 1.2 Installation Step 1: Insert the Installation CD. Step 3: Check the option "I accept the terms of the license agreement". 1 Chapter 1.
User Guide
Page 7
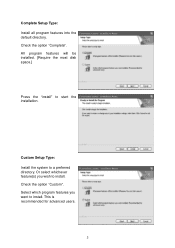
Custom Setup Type: Install the system to install. Check the option "Custom". This is recommended for advanced users. 3 Check the option "Complete". Select which program features you wish to start the installation. Or select whichever feature(s) you want to a preferred directory. All program features will be installed. [Require the most disk space.] Press the "install" to install. Complete Setup Type: Install all program features into the default directory.
Custom Setup Type: Install the system to install. Check the option "Custom". This is recommended for advanced users. 3 Check the option "Complete". Select which program features you wish to start the installation. Or select whichever feature(s) you want to a preferred directory. All program features will be installed. [Require the most disk space.] Press the "install" to install. Complete Setup Type: Install all program features into the default directory.

User Guide
Page 8
Install and use only these features on multiple remote sites at home or anywhere with a PC. Press "Finish" to finish the installation. 4 Hint: For example, select only Playback and LiveView for installation. Select the features setup will install files. Select folder where setup will install.
Install and use only these features on multiple remote sites at home or anywhere with a PC. Press "Finish" to finish the installation. 4 Hint: For example, select only Playback and LiveView for installation. Select the features setup will install files. Select folder where setup will install.

User Guide
Page 9
... Console, go to Config > Setting to the system following by the instruction manual provided by the manufacturer. Now enjoy our Intelligent Surveillance Solution. 1.3 Quick Start Install IP camera(s) Step 1: Setup the IP camera(s) following below steps. Step 2: Check the network between the IP camera(s) and the system. Step 3 5 And then press...
... Console, go to Config > Setting to the system following by the instruction manual provided by the manufacturer. Now enjoy our Intelligent Surveillance Solution. 1.3 Quick Start Install IP camera(s) Step 1: Setup the IP camera(s) following below steps. Step 2: Check the network between the IP camera(s) and the system. Step 3 5 And then press...
User Guide
Page 45
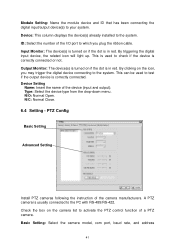
This can be used to your system. N/C: Normal Close. 6.4 Setting - PTZ Config Basic Setting Advanced Setting Install PTZ cameras following the instruction of the device (input and output). Input Monitor: The device(s) is turned on if the dot is usually connected to ... if the dot is correctly connected. Device Setting Name: Insert the name of the camera manufacturers. N/O: Normal Open. Device: This column displays the device(s) already installed to the system. By clicking on the camera list to activate the PTZ control function of the I/O port to the PC with RS-485/RS...
This can be used to your system. N/C: Normal Close. 6.4 Setting - PTZ Config Basic Setting Advanced Setting Install PTZ cameras following the instruction of the device (input and output). Input Monitor: The device(s) is turned on if the dot is usually connected to ... if the dot is correctly connected. Device Setting Name: Insert the name of the camera manufacturers. N/O: Normal Open. Device: This column displays the device(s) already installed to the system. By clicking on the camera list to activate the PTZ control function of the I/O port to the PC with RS-485/RS...

Quick Installation Guide
Page 1
... Indicator • Solid. TP-LINK® The Reliable Choice • Package Contents Note:The product model shown in this QIG is traffic between the Camera and the network. • Off. The electrical power is no activity. • Blinking.There is TL-SC3130G, as an oven x ...O • Do not place the Camera in high humidity • environments such as • a kitchen Quick Installation Guide TL-SC3130 2-Way Audio Surveillance Camera TL-SC3130G Wireless 2-Way Audio Surveillance Camera 7106503244 (The antenna is much better, see the illustration below: O Connect the camera ...
... Indicator • Solid. TP-LINK® The Reliable Choice • Package Contents Note:The product model shown in this QIG is traffic between the Camera and the network. • Off. The electrical power is no activity. • Blinking.There is TL-SC3130G, as an oven x ...O • Do not place the Camera in high humidity • environments such as • a kitchen Quick Installation Guide TL-SC3130 2-Way Audio Surveillance Camera TL-SC3130G Wireless 2-Way Audio Surveillance Camera 7106503244 (The antenna is much better, see the illustration below: O Connect the camera ...

Quick Installation Guide
Page 2
...Next" button to the TL-SC3130G's manual on resource CD. Click "Finish". waiting M=IMENIE Information Bar Help Setting O Click "Install". Ed More options Install I Don't Install I Ile Ornerier ft eXiia...ere g O Select the optional program including our innovative MSN Function, TP-LINK strongly recommends that you ... Tel: +44 (0) 845 147 0017 E-mail: support.uk@tp-link.com Service time: 24hrs, 7days a week TP-LINK TECHNOLOGIES CO., LTD. Select the relevant camera from the list and click "Link to install this tile type can potentially harm your computer.You can change it...
...Next" button to the TL-SC3130G's manual on resource CD. Click "Finish". waiting M=IMENIE Information Bar Help Setting O Click "Install". Ed More options Install I Don't Install I Ile Ornerier ft eXiia...ere g O Select the optional program including our innovative MSN Function, TP-LINK strongly recommends that you ... Tel: +44 (0) 845 147 0017 E-mail: support.uk@tp-link.com Service time: 24hrs, 7days a week TP-LINK TECHNOLOGIES CO., LTD. Select the relevant camera from the list and click "Link to install this tile type can potentially harm your computer.You can change it...
User Guide
Page 3
...interference to radio or television reception, which can radiate radio frequency energy and, if not in-stalled and used in a particular installation. Operation is subject to the following measures: ¾ Reorient or relocate the receiving antenna. ¾ Increase the separation between ... limits are designed to operate the equipment. This device complies with the instructions, may cause radio interference, in a residential installation. Such modifications could void the user's authority to pro-vide reasonable protection against harmful interference in which the receiver is not...
...interference to radio or television reception, which can radiate radio frequency energy and, if not in-stalled and used in a particular installation. Operation is subject to the following measures: ¾ Reorient or relocate the receiving antenna. ¾ Increase the separation between ... limits are designed to operate the equipment. This device complies with the instructions, may cause radio interference, in a residential installation. Such modifications could void the user's authority to pro-vide reasonable protection against harmful interference in which the receiver is not...
User Guide
Page 6
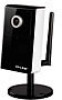
Package Contents The follow items should be found in your package: ¾ TL-SC3130G Wireless 2-Way Audio Surveillance Camera ¾ Power Adapter ¾ Mounting Bracket with three screws, a Lock Ring, a Brace and a Base Plate ¾ RJ45 Cable ¾ Quick Installation Guide ¾ Resource CD, including: z This User Guide z Application Guide z Other helpful information ) Note: Make sure that the package contains the above items. If any of the listed items are damaged or missing, please contact your distributor. 1
Package Contents The follow items should be found in your package: ¾ TL-SC3130G Wireless 2-Way Audio Surveillance Camera ¾ Power Adapter ¾ Mounting Bracket with three screws, a Lock Ring, a Brace and a Base Plate ¾ RJ45 Cable ¾ Quick Installation Guide ¾ Resource CD, including: z This User Guide z Application Guide z Other helpful information ) Note: Make sure that the package contains the above items. If any of the listed items are damaged or missing, please contact your distributor. 1

User Guide
Page 7
...ActiveX Security) 2 You'll need to ensure the system runs normally. 2. If you are using Windows 98 or Windows ME, please install IP Installer before using WEB UI to download Xvid codec 1.0 from the Internet.) 3. Chapter 1 Minimum System Requirements We strongly recommend your computer ...doesn't meet these requirements below, it might not work properly. If you can't view the record video file, please install Xvid codec while installing Intelligent IP Installer. (For Windows 98, ME or 2000 server, the codec might cause some problems. Item Requirements CPU Pentium 4 1600MHz ...
...ActiveX Security) 2 You'll need to ensure the system runs normally. 2. If you are using Windows 98 or Windows ME, please install IP Installer before using WEB UI to download Xvid codec 1.0 from the Internet.) 3. Chapter 1 Minimum System Requirements We strongly recommend your computer ...doesn't meet these requirements below, it might not work properly. If you can't view the record video file, please install Xvid codec while installing Intelligent IP Installer. (For Windows 98, ME or 2000 server, the codec might cause some problems. Item Requirements CPU Pentium 4 1600MHz ...


