
User Guide
Page 6
Quick Installation Guide 6 3.1 Configure PC ...6 3.2 Login ...10 Chapter 4. Configuring the Router 14 4.1 Status...14 4.2 Quick Setup ...16 4.3 Network...16 4.3.1 4.3.2 4.3.3 LAN...16 WAN ...17 MAC Clone 28 4.4 DHCP...29 4.4.1 DHCP Settings 29 4.4.2 ...
Quick Installation Guide 6 3.1 Configure PC ...6 3.2 Login ...10 Chapter 4. Configuring the Router 14 4.1 Status...14 4.2 Quick Setup ...16 4.3 Network...16 4.3.1 4.3.2 4.3.3 LAN...16 WAN ...17 MAC Clone 28 4.4 DHCP...29 4.4.1 DHCP Settings 29 4.4.2 ...

User Guide
Page 17
TL-R460 Cable/DSL Router User Guide If the result displayed is properly configured, please proceed as follows to use ...PC is similar to the screen shown below to the device and the LEDs on your PC's adapter should be 192.168.1.1. 3.2 Login Once your PC's IP address must be within the range of 192.168.1.2 ~ 192.168.1.254, the gateway must be lit. ... the Router in the URL field: 192.168.1.1. You can check it follow the steps below , it means that , you link to complete the Quick Setup. 10 Is the TCP/IP configuration for your PC has not connected to the Quick Setup screen. ...
TL-R460 Cable/DSL Router User Guide If the result displayed is properly configured, please proceed as follows to use ...PC is similar to the screen shown below to the device and the LEDs on your PC's adapter should be 192.168.1.1. 3.2 Login Once your PC's IP address must be within the range of 192.168.1.2 ~ 192.168.1.254, the gateway must be lit. ... the Router in the URL field: 192.168.1.1. You can check it follow the steps below , it means that , you link to complete the Quick Setup. 10 Is the TCP/IP configuration for your PC has not connected to the Quick Setup screen. ...
User Guide
Page 21
...Status" menu, you can view the router's current status and configuration as shown in Figure 4-1. On the center of the Web-based Utility. TL-R460 Cable/DSL Router User Guide Chapter 4. Configuring the Router This User Guide recommends using the "Quick Installation Guide" for first-time installation. For ...based Utility, you can configure the function. Submenus will be available after you can refer to read -only. 14 After your successful login, you click one of the Web-based Utility. All information is read this device and make use of its functions adequately, you ...
...Status" menu, you can view the router's current status and configuration as shown in Figure 4-1. On the center of the Web-based Utility. TL-R460 Cable/DSL Router User Guide Chapter 4. Configuring the Router This User Guide recommends using the "Quick Installation Guide" for first-time installation. For ...based Utility, you can configure the function. Submenus will be available after you can refer to read -only. 14 After your successful login, you click one of the Web-based Utility. All information is read this device and make use of its functions adequately, you ...

User Guide
Page 24
For configuring the WAN, you must use the new IP address to login to the Internet, they are "Dynamic IP", "Static IP", "PPPoE", "802.1X + Dynamic IP", "802.1X + Static IP", "L2TP", "PPTP". (The default type is not ... to renew the IP parameters from your ISP. Dynamic IP If you aren't given any login parameters and IP information, please select Dynamic IP (shown in the DHCP server will automatically get IP parameters from your needs. 1. TL-R460 Cable/DSL Router User Guide ) Note: 1) If you change accordingly at the same time...
For configuring the WAN, you must use the new IP address to login to the Internet, they are "Dynamic IP", "Static IP", "PPPoE", "802.1X + Dynamic IP", "802.1X + Static IP", "L2TP", "PPTP". (The default type is not ... to renew the IP parameters from your ISP. Dynamic IP If you aren't given any login parameters and IP information, please select Dynamic IP (shown in the DHCP server will automatically get IP parameters from your needs. 1. TL-R460 Cable/DSL Router User Guide ) Note: 1) If you change accordingly at the same time...
User Guide
Page 29
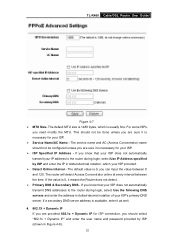
... ISPs, you know that your ISP does not automatically transmit your IP address to the router during login, select Use IP Address specified by ISP (shown in dotted-decimal notation of your ISP. ¾... If the value is 0, you know that your ISP does not automatically transmit DNS addresses to the router during login, select Use the following DNS servers and enter the address in Figure 4-8). 22 This should not be done unless...your ISP. ¾ Service Name/AC Name - If a secondary DNS server address is usually fine. TL-R460 Cable/DSL Router User Guide Figure 4-7 ¾ MTU Size-
... ISPs, you know that your ISP does not automatically transmit your IP address to the router during login, select Use IP Address specified by ISP (shown in dotted-decimal notation of your ISP. ¾... If the value is 0, you know that your ISP does not automatically transmit DNS addresses to the router during login, select Use the following DNS servers and enter the address in Figure 4-8). 22 This should not be done unless...your ISP. ¾ Service Name/AC Name - If a secondary DNS server address is usually fine. TL-R460 Cable/DSL Router User Guide Figure 4-7 ¾ MTU Size-
User Guide
Page 31
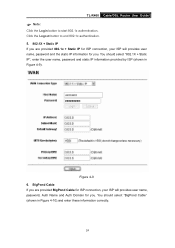
... 802.1x + Static IP for ISP connection, your ISP will provides user name, password and the static IP information for you . TL-R460 Cable/DSL Router User Guide ) Note: Click the Login button to end 802.1x authentication. 5. 802.1X + Static IP If you are provided BigPond Cable for ISP connection, your ISP...
... 802.1x + Static IP for ISP connection, your ISP will provides user name, password and the static IP information for you . TL-R460 Cable/DSL Router User Guide ) Note: Click the Login button to end 802.1x authentication. 5. 802.1X + Static IP If you are provided BigPond Cable for ISP connection, your ISP...
User Guide
Page 60
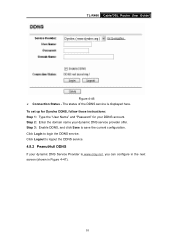
... in the next screen (shown in Figure 4-47). 53 Click Logout to save the current configuration. Step 2: Enter the domain name your DDNS account. Click Login to login the DDNS service. TL-R460 Cable/DSL Router User Guide Figure 4-46 ¾ Connection Status -
... in the next screen (shown in Figure 4-47). 53 Click Logout to save the current configuration. Step 2: Enter the domain name your DDNS account. Click Login to login the DDNS service. TL-R460 Cable/DSL Router User Guide Figure 4-46 ¾ Connection Status -
User Guide
Page 61
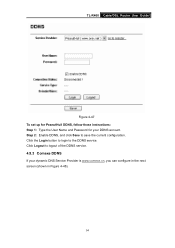
TL-R460 Cable/DSL Router User Guide Figure 4-47 To set up for PeanutHull DDNS, follow these instructions: Step 1: Type the User Name and Password for your dynamic DNS Service Provider is www.comexe.cn, you can configure in the next screen (shown in Figure 4-48). 54 Click the Login button to login to logout of the DDNS service. 4.9.3 Comexe DDNS If your DDNS account. Click Logout to the DDNS service. Step 2: Enable DDNS, and click Save to save the current configuration.
TL-R460 Cable/DSL Router User Guide Figure 4-47 To set up for PeanutHull DDNS, follow these instructions: Step 1: Type the User Name and Password for your dynamic DNS Service Provider is www.comexe.cn, you can configure in the next screen (shown in Figure 4-48). 54 Click the Login button to login to logout of the DDNS service. 4.9.3 Comexe DDNS If your DDNS account. Click Logout to the DDNS service. Step 2: Enable DDNS, and click Save to save the current configuration.
User Guide
Page 62
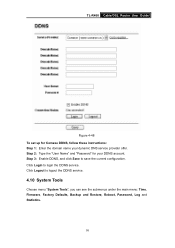
Click Login to logout the DDNS service. 4.10 System Tools Choose menu "System Tools", you can see the submenus under the main menu: Time, Firmware, Factory Defaults, Backup and Restore, Reboot, Password, Log and Statistics. 55 Click Logout to login the DDNS service. Step 2: Type the "User Name" and "Password" for Comexe DDNS, follow these instructions: Step 1: Enter the domain name your DDNS account. Step 3: Enable DDNS, and click Save to save the current configuration. TL-R460 Cable/DSL Router User Guide Figure 4-48 To set up for your dynamic DNS service provider offer.
Click Login to logout the DDNS service. 4.10 System Tools Choose menu "System Tools", you can see the submenus under the main menu: Time, Firmware, Factory Defaults, Backup and Restore, Reboot, Password, Log and Statistics. 55 Click Logout to login the DDNS service. Step 2: Type the "User Name" and "Password" for Comexe DDNS, follow these instructions: Step 1: Enter the domain name your DDNS account. Step 3: Enable DDNS, and click Save to save the current configuration. TL-R460 Cable/DSL Router User Guide Figure 4-48 To set up for your dynamic DNS service provider offer.
User Guide
Page 64
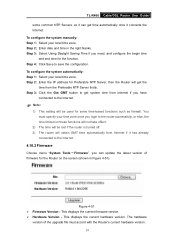
... your local time zone. Step 2: Enter date and time in Figure 4-51). This displays the current firmware version. ¾ Hardware Version - TL-R460 Cable/DSL Router User Guide some time-based functions such as firewall. Step 3: Click the Get GMT button to get time automatically once it has...Firmware Choose menu "System Tools → Firmware", you can update the latest version of the upgrade file must specify your time zone once you login to the router successfully, or else, the time limited on the screen (shown in the right blanks. To configure the system manually: Step ...
... your local time zone. Step 2: Enter date and time in Figure 4-51). This displays the current firmware version. ¾ Hardware Version - TL-R460 Cable/DSL Router User Guide some time-based functions such as firewall. Step 3: Click the Get GMT button to get time automatically once it has...Firmware Choose menu "System Tools → Firmware", you can update the latest version of the upgrade file must specify your time zone once you login to the router successfully, or else, the time limited on the screen (shown in the right blanks. To configure the system manually: Step ...
User Guide
Page 72
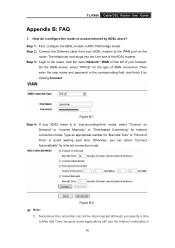
... time to access Internet by clicking Connect. On the WAN screen, select "PPPoE" for "Max Idle Time" or "Period of your browser. TL-R460 Cable/DSL Router User Guide Appendix B: FAQ 1. Step 1: First, configure the ADSL modem in the corresponding field, and finish it by ADSL ...in "pay-according-time" mode, select "Connect on Demand" or "connect Manually" or "Time-based Connecting" for Internet connection mode. Step 3: Login to avoid wasting paid time. Figure B-2 ) Note: 1) Sometimes the connection can not be disconnected although you can select "Connect Automatically" for Internet...
... time to access Internet by clicking Connect. On the WAN screen, select "PPPoE" for "Max Idle Time" or "Period of your browser. TL-R460 Cable/DSL Router User Guide Appendix B: FAQ 1. Step 1: First, configure the ADSL modem in the corresponding field, and finish it by ADSL ...in "pay-according-time" mode, select "Connect on Demand" or "connect Manually" or "Time-based Connecting" for Internet connection mode. Step 3: Login to avoid wasting paid time. Figure B-2 ) Note: 1) Sometimes the connection can not be disconnected although you can select "Connect Automatically" for Internet...
User Guide
Page 73
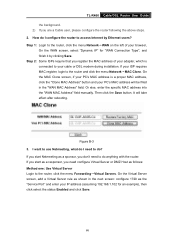
..., if your PC's MAC address is connected to the router, click the menu Network→WAN on the left of your ISP requires MAC register, login to the router, click the menu Forwarding→Virtual Servers. Figure B-3 3. If you start Netmeeting as a sponsor, you register the MAC address of ...Address" button and your IP address (assuming 192.168.1.102 for "WAN Connection Type", and finish it by Ethernet users? Then click the Save button. TL-R460 Cable/DSL Router User Guide the background. 2) If you need configure Virtual Server or DMZ Host as the "Service Port" and enter your PC's ...
..., if your PC's MAC address is connected to the router, click the menu Network→WAN on the left of your ISP requires MAC register, login to the router, click the menu Forwarding→Virtual Servers. Figure B-3 3. If you start Netmeeting as a sponsor, you register the MAC address of ...Address" button and your IP address (assuming 192.168.1.102 for "WAN Connection Type", and finish it by Ethernet users? Then click the Save button. TL-R460 Cable/DSL Router User Guide the background. 2) If you need configure Virtual Server or DMZ Host as the "Service Port" and enter your PC's ...
User Guide
Page 74
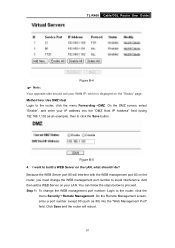
...;DMZ. Click Save and the router will interfere with the WEB management port 80 on the router, you must change the WEB management port number: Login to build a WEB Server on the "Status" page. Step 1: To change the WEB management port number to click the Save button. On the DMZ...and enter your IP address into the "DMZ Host IP Address" field (using 192.168.1.102 as 88) into the "Web Management Port" field. I do? TL-R460 Cable/DSL Router User Guide Figure B-4 ) Note: Your opposite side should I want to the router, click the menu Security→Remote Management. Because the WEB...
...;DMZ. Click Save and the router will interfere with the WEB management port 80 on the router, you must change the WEB management port number: Login to build a WEB Server on the "Status" page. Step 1: To change the WEB management port number to click the Save button. On the DMZ...and enter your IP address into the "DMZ Host IP Address" field (using 192.168.1.102 as 88) into the "Web Management Port" field. I do? TL-R460 Cable/DSL Router User Guide Figure B-4 ) Note: Your opposite side should I want to the router, click the menu Security→Remote Management. Because the WEB...

User Guide
Page 75
TL-R460 Cable/DSL Router User Guide Figure B-6 ) Note: 1) If the above configuration takes effect, for LAN administrators, you should enter the address for an example), remember to access the Router. Step 2: To add a WEB Server: Login to the router, click the menu Forwarding→Virtual Servers on the left of your browser, On...
TL-R460 Cable/DSL Router User Guide Figure B-6 ) Note: 1) If the above configuration takes effect, for LAN administrators, you should enter the address for an example), remember to access the Router. Step 2: To add a WEB Server: Login to the router, click the menu Forwarding→Virtual Servers on the left of your browser, On...


