
Quick Installation Guide
Page 1
... following items ¾ Windows 2000/XP/Vista/7 computer with print server setup CD ¾ One USB device with a default password. 1 When the Link LED lights up, the TL-PS310U is correctly connected to the TL-PS310U. Factory Default Settings ¾ IP address: 192.168.0.10/255.255.255.0 ¾ Password: the TL-PS310U does not come with USB port Hardware Installation 1. Connect your USB device to the router or switch/HUB with the Ethernet cable. 4. Turn off the USB device's power. 2. Connect the TL-PS310U to the TL-PS310U. 3.
... following items ¾ Windows 2000/XP/Vista/7 computer with print server setup CD ¾ One USB device with a default password. 1 When the Link LED lights up, the TL-PS310U is correctly connected to the TL-PS310U. Factory Default Settings ¾ IP address: 192.168.0.10/255.255.255.0 ¾ Password: the TL-PS310U does not come with USB port Hardware Installation 1. Connect your USB device to the router or switch/HUB with the Ethernet cable. 4. Turn off the USB device's power. 2. Connect the TL-PS310U to the TL-PS310U. 3.
Quick Installation Guide
Page 3
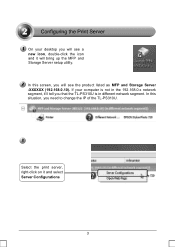
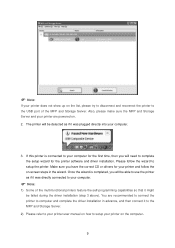
Select the print server, right-click on it 'll tell you will bring up the MFP and Storage Server setup utility. In this screen, you that the TL-PS310U is not in different network segment. In this situation, you will see a new icon, double-click the icon and it will see the product listed as MFP and Storage Server -XXXXXX (192.168.0.10). If your desktop you need to change the IP of the TL-PS310U. On your computer is in the 192.168.0.x network segment, it and select Server Configurations 3
Select the print server, right-click on it 'll tell you will bring up the MFP and Storage Server setup utility. In this screen, you that the TL-PS310U is not in different network segment. In this situation, you will see a new icon, double-click the icon and it will see the product listed as MFP and Storage Server -XXXXXX (192.168.0.10). If your desktop you need to change the IP of the TL-PS310U. On your computer is in the 192.168.0.x network segment, it and select Server Configurations 3
Quick Installation Guide
Page 4
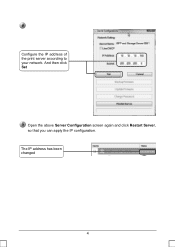
Configure the IP address of the print server according to your network. The IP address has been changed 4 And then click Set Open the above Server Configuration screen again and click Restart Server, so that you can apply the IP configuration.
Configure the IP address of the print server according to your network. The IP address has been changed 4 And then click Set Open the above Server Configuration screen again and click Restart Server, so that you can apply the IP configuration.

Quick Installation Guide
Page 5
The MFP and Storage Server will auto-detect the USB device connecting to connect and click Connect Device Because the "Disconnect Printer when Idle" option is enabled by default, the server will detect the printer and install its driver automatically 5 Connecting to an USB Printer Select the USB printer you this. Just click OK You can disable the "Disconnect Printer when Idle" in the Option menu. The windows will tell you want to the USB port of the TL-PS310U.
The MFP and Storage Server will auto-detect the USB device connecting to connect and click Connect Device Because the "Disconnect Printer when Idle" option is enabled by default, the server will detect the printer and install its driver automatically 5 Connecting to an USB Printer Select the USB printer you this. Just click OK You can disable the "Disconnect Printer when Idle" in the Option menu. The windows will tell you want to the USB port of the TL-PS310U.

Quick Installation Guide
Page 6
And then right-click the printer icon, you can use this function for printing. You're highly recommended to use the "Connect Automatically for Printing" function 6 After the driver is installed, the printer will be in your system After finish installing the printer driver, please disconnect the printer manually. Enable the "Connect Automatically for Printing" function.
And then right-click the printer icon, you can use this function for printing. You're highly recommended to use the "Connect Automatically for Printing" function 6 After the driver is installed, the printer will be in your system After finish installing the printer driver, please disconnect the printer manually. Enable the "Connect Automatically for Printing" function.

Quick Installation Guide
Page 9
... Support „ For more troubleshooting help, go to: www.tp-link.com/support/faq.asp „ To download the latest Firmware, Driver, Utility and User Guide, go to: www.tp-link.com/support/download.asp „ For all other technical support, please contact us by using the following details: Global Tel: +86 755 26504400 E-mail: support@tp-link.com Service time: 24hrs, 7days a week Singapore Tel: +65 62840493 E-mail: support.sg@tp-link.com Service...
... Support „ For more troubleshooting help, go to: www.tp-link.com/support/faq.asp „ To download the latest Firmware, Driver, Utility and User Guide, go to: www.tp-link.com/support/download.asp „ For all other technical support, please contact us by using the following details: Global Tel: +86 755 26504400 E-mail: support@tp-link.com Service time: 24hrs, 7days a week Singapore Tel: +65 62840493 E-mail: support.sg@tp-link.com Service...
User Guide
Page 3
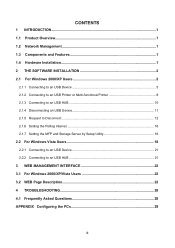
... SOFTWARE INSTALLATION 2 2.1 For Windows 2000/XP Users 2 2.1.1 Connecting to an USB Device 5 2.1.2 Connecting to an USB Printer or Multi-functional Printer 8 2.1.3 Connecting to an USB HUB 10 2.1.4 Disconnecting an USB Device 11 2.1.5 Request to Disconnect ...12 2.1.6 Setting the Polling Interval 16 2.1.7 Setting the MFP and Storage Server by Setup Utility 16 2.2 For Windows Vista Users 18 2.2.1 Connecting to an USB Device 21 2.2.2 Connecting to an USB HUB 21 3 WEB MANAGEMENT INTERFACE 22 3.1 For Windows 2000/XP/Vista Users 22 3.2 WEB Page Description 22 4 TROUBLESHOOTING...
... SOFTWARE INSTALLATION 2 2.1 For Windows 2000/XP Users 2 2.1.1 Connecting to an USB Device 5 2.1.2 Connecting to an USB Printer or Multi-functional Printer 8 2.1.3 Connecting to an USB HUB 10 2.1.4 Disconnecting an USB Device 11 2.1.5 Request to Disconnect ...12 2.1.6 Setting the Polling Interval 16 2.1.7 Setting the MFP and Storage Server by Setup Utility 16 2.2 For Windows Vista Users 18 2.2.1 Connecting to an USB Device 21 2.2.2 Connecting to an USB HUB 21 3 WEB MANAGEMENT INTERFACE 22 3.1 For Windows 2000/XP/Vista Users 22 3.2 WEB Page Description 22 4 TROUBLESHOOTING...
User Guide
Page 4
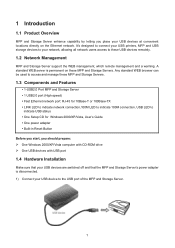
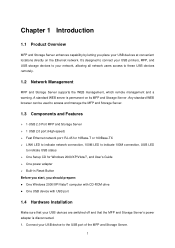
... standard WEB browser can be used to access and manage these MFP and Storage Servers. 1.3 Components and Features y 1-USB2.0 Port MFP and Storage Server y 1 USB2.0 port (High-speed) y Fast Ethernet network port: RJ-45 for 10Base-T or 100Base-TX y LINK LED to indicate network connection,100M LED to indicate 100M connection, USB LED to indicate USB status y One Setup CD for Windows 2000/XP/Vista, User's Guide y One power adapter y Built-in Reset Button Before you start, you place your USB device to these MFP...
... standard WEB browser can be used to access and manage these MFP and Storage Servers. 1.3 Components and Features y 1-USB2.0 Port MFP and Storage Server y 1 USB2.0 port (High-speed) y Fast Ethernet network port: RJ-45 for 10Base-T or 100Base-TX y LINK LED to indicate network connection,100M LED to indicate 100M connection, USB LED to indicate USB status y One Setup CD for Windows 2000/XP/Vista, User's Guide y One power adapter y Built-in Reset Button Before you start, you place your USB device to these MFP...
User Guide
Page 5
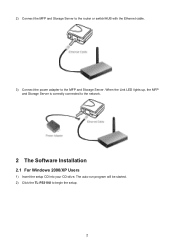
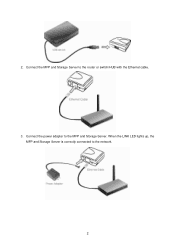
2) Connect the MFP and Storage Server to the router or switch/HUB with the Ethernet cable. 3) Connect the power adapter to the network. 2 The Software Installation 2.1 For Windows 2000/XP Users 1) Insert the setup CD into your CD-drive. When the Link LED lights up, the MFP and Storage Server is correctly connected to the MFP and Storage Server. The auto-run program will be started. 2) Click the TL-PS310U to begin the setup. 2
2) Connect the MFP and Storage Server to the router or switch/HUB with the Ethernet cable. 3) Connect the power adapter to the network. 2 The Software Installation 2.1 For Windows 2000/XP Users 1) Insert the setup CD into your CD-drive. When the Link LED lights up, the MFP and Storage Server is correctly connected to the MFP and Storage Server. The auto-run program will be started. 2) Click the TL-PS310U to begin the setup. 2
User Guide
Page 11
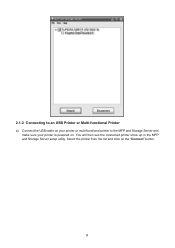
You will then see the connected printer show up in the MFP and Storage Server setup utility. 2.1.2 Connecting to an USB Printer or Multi-functional Printer a) Connect the USB cable on your printer or multi-functional printer to the MFP and Storage Server and make sure your printer is powered on the "Connect" button. 8 Select the printer from the list and click on .
You will then see the connected printer show up in the MFP and Storage Server setup utility. 2.1.2 Connecting to an USB Printer or Multi-functional Printer a) Connect the USB cable on your printer or multi-functional printer to the MFP and Storage Server and make sure your printer is powered on the "Connect" button. 8 Select the printer from the list and click on .
User Guide
Page 12
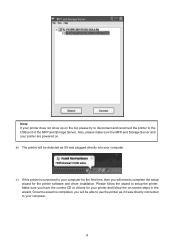
... the MFP and Storage Server and your printer does not show up on the list, please try to disconnect and reconnect the printer to your computer. Once the wizard is connected to your computer for the printer software and driver installation. Note: If your printer are powered on. Please follow the on-screen steps in the wizard. b) The printer will need to use the printer as...
... the MFP and Storage Server and your printer does not show up on the list, please try to disconnect and reconnect the printer to your computer. Once the wizard is connected to your computer for the printer software and driver installation. Note: If your printer are powered on. Please follow the on-screen steps in the wizard. b) The printer will need to use the printer as...
User Guide
Page 13
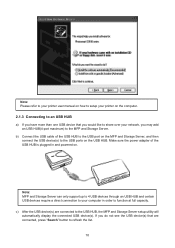
c) After the USB device(s) are connected, press "Search" button to refresh the list. 10 Note: MFP and Storage Server can only support up to 4 USB devices through an USB HUB and certain USB devices require a direct connection to your network, you may add an USB HUB(4-port maximum) to the MFP and Storage Server. Note: Please refer to your printer user manual on how to setup your printer on the computer. 2.1.3 Connecting to an USB HUB a) If you have...
c) After the USB device(s) are connected, press "Search" button to refresh the list. 10 Note: MFP and Storage Server can only support up to 4 USB devices through an USB HUB and certain USB devices require a direct connection to your network, you may add an USB HUB(4-port maximum) to the MFP and Storage Server. Note: Please refer to your printer user manual on how to setup your printer on the computer. 2.1.3 Connecting to an USB HUB a) If you have...
User Guide
Page 28
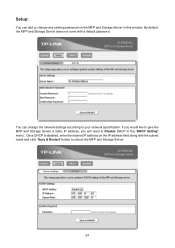
If you would like to give the MFP and Storage Server a static IP address, you will need to Disable DHCP in this window. By default, the MFP and Storage Server does not come with the subnet mask and click "Save & Restart" button to reboot the MFP and Storage Server. 24 Setup: You can change any existing password on the IP address field along with a default password. Once DHCP is disabled, enter the desired IP address on the MFP and Storage Server in the "DHCP Setting" menu". You can add or change the network settings according to your network specification.
If you would like to give the MFP and Storage Server a static IP address, you will need to Disable DHCP in this window. By default, the MFP and Storage Server does not come with the subnet mask and click "Save & Restart" button to reboot the MFP and Storage Server. 24 Setup: You can change any existing password on the IP address field along with a default password. Once DHCP is disabled, enter the desired IP address on the MFP and Storage Server in the "DHCP Setting" menu". You can add or change the network settings according to your network specification.
User Guide
Page 31
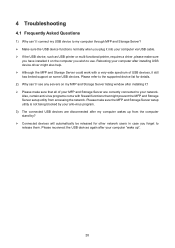
... to your anti-virus program. 3) The connected USB devices are disconnected after installing USB device driver might also help. ¾ Although the MFP and Storage Server could work with firewall functions that might prevent the MFP and Storage Server setup utility from accessing the network. Rebooting your computer via USB cable. ¾ If the USB device, such as USB printer or multi-functional printer, requires a driver, please make sure that all of USB devices, it into your...
... to your anti-virus program. 3) The connected USB devices are disconnected after installing USB device driver might also help. ¾ Although the MFP and Storage Server could work with firewall functions that might prevent the MFP and Storage Server setup utility from accessing the network. Rebooting your computer via USB cable. ¾ If the USB device, such as USB printer or multi-functional printer, requires a driver, please make sure that all of USB devices, it into your...
Instruction Manual
Page 5
... WEB browser can be used to access and manage the MFP and Storage Server. 1.3 Components and Features ¾ 1-USB 2.0 Port MFP and Storage Server ¾ 1 USB 2.0 port (High-speed) ¾ Fast Ethernet network port: RJ-45 for 10Base-T or 100Base-TX ¾ LINK LED to indicate network connection, 100M LED to indicate 100M connection, USB LED to indicate USB status ¾ One Setup CD for Windows 2000/XP/Vista/7, and User's Guide ¾ One power adapter ¾ Built-in Reset Button Before you start...
... WEB browser can be used to access and manage the MFP and Storage Server. 1.3 Components and Features ¾ 1-USB 2.0 Port MFP and Storage Server ¾ 1 USB 2.0 port (High-speed) ¾ Fast Ethernet network port: RJ-45 for 10Base-T or 100Base-TX ¾ LINK LED to indicate network connection, 100M LED to indicate 100M connection, USB LED to indicate USB status ¾ One Setup CD for Windows 2000/XP/Vista/7, and User's Guide ¾ One power adapter ¾ Built-in Reset Button Before you start...
Instruction Manual
Page 6
Connect the MFP and Storage Server to the network. 2 When the LINK LED lights up, the MFP and Storage Server is correctly connected to the router or switch/HUB with the Ethernet cable. 3. Connect the power adapter to the MFP and Storage Server. 2.
Connect the MFP and Storage Server to the network. 2 When the LINK LED lights up, the MFP and Storage Server is correctly connected to the router or switch/HUB with the Ethernet cable. 3. Connect the power adapter to the MFP and Storage Server. 2.

Instruction Manual
Page 9
... need to change the IP of the MFP and Storage Server's MAC address, and the "192.168.0.10" is not in different network segment. In this situation, you the TL-PS310U is the last 6 digits of TL-PS310U. 6. Select the print server, right-click on your computer is the MFP and Storage Server's default IP address. 7. "C7641B" is in the 192.168.0.X network segment, it and select "Server Configurations". 5 The setup utility...
... need to change the IP of the MFP and Storage Server's MAC address, and the "192.168.0.10" is not in different network segment. In this situation, you the TL-PS310U is the last 6 digits of TL-PS310U. 6. Select the print server, right-click on your computer is the MFP and Storage Server's default IP address. 7. "C7641B" is in the 192.168.0.X network segment, it and select "Server Configurations". 5 The setup utility...

Instruction Manual
Page 12
... on your computer, and you can use this USB device as if it was directly connected to indicate that the connection has been established. You will turn green ( ) to your printer is powered on the Connect Device button. 8 3. Select the printer from the list and click on . Once the USB device has been connected, the blue icon ( ) will then see the connected printer show up in the MFP and Storage Server setup utility.
... on your computer, and you can use this USB device as if it was directly connected to indicate that the connection has been established. You will turn green ( ) to your printer is powered on the Connect Device button. 8 3. Select the printer from the list and click on . Once the USB device has been connected, the blue icon ( ) will then see the connected printer show up in the MFP and Storage Server setup utility.
Instruction Manual
Page 13
... or drivers for the printer software and driver installation. You are powered on the list, please try to disconnect and reconnect the printer to setup the printer. Please follow the on the computer。 9 Also, please make sure the MFP and Storage Server and your printer are recommended to connect the printer to complete the setup wizard for your printer and follow the wizard to the USB port of...
... or drivers for the printer software and driver installation. You are powered on the list, please try to disconnect and reconnect the printer to setup the printer. Please follow the on the computer。 9 Also, please make sure the MFP and Storage Server and your printer are recommended to connect the printer to complete the setup wizard for your printer and follow the wizard to the USB port of...
Instruction Manual
Page 29
... as USB printer or multi-functional printer, requires a driver, please make sure you have installed it into your computer "wake up from accessing the network. Rebooting your anti-virus program. 3. The connected USB devices are correctly connected to release them. Please refer to the supported device list for other network users in case you plug it on the computer you wish to my computer through MFP and Storage Server...
... as USB printer or multi-functional printer, requires a driver, please make sure you have installed it into your computer "wake up from accessing the network. Rebooting your anti-virus program. 3. The connected USB devices are correctly connected to release them. Please refer to the supported device list for other network users in case you plug it on the computer you wish to my computer through MFP and Storage Server...


