
Quick Installation Guide
Page 1
... 4. Connect the power adapter to the TL-PS310U. 3. Connect your USB device to the TL-PS310U. Connect the TL-PS310U to the network. Turn off the USB device's power. 2. When the Link LED lights up, the TL-PS310U is correctly connected to the router or ...switch/HUB with a default password. 1 Before you start, you should prepare the following items ¾ Windows 2000/XP/Vista/7 computer with print server setup...
... 4. Connect the power adapter to the TL-PS310U. 3. Connect your USB device to the TL-PS310U. Connect the TL-PS310U to the network. Turn off the USB device's power. 2. When the Link LED lights up, the TL-PS310U is correctly connected to the router or ...switch/HUB with a default password. 1 Before you start, you should prepare the following items ¾ Windows 2000/XP/Vista/7 computer with print server setup...
Quick Installation Guide
Page 2
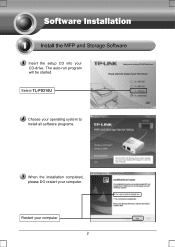
Restart your CD-drive. The auto-run program will be started. Insert the setup CD into your computer 2 Select TL-PS310U Choose your operating system to install all software programs. When the installation completed, please DO restart your computer.
Restart your CD-drive. The auto-run program will be started. Insert the setup CD into your computer 2 Select TL-PS310U Choose your operating system to install all software programs. When the installation completed, please DO restart your computer.
Quick Installation Guide
Page 3
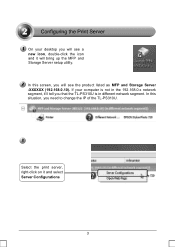
Select the print server, right-click on it will bring up the MFP and Storage Server setup utility. In this situation, you will see a new icon, double-click the icon and it and select Server Configurations 3 On your computer is in the 192.168.0.x network segment, it'll tell you will see the product listed as MFP and Storage Server -XXXXXX (192.168.0.10). If your desktop you that the TL-PS310U is not in different network segment. In this screen, you need to change the IP of the TL-PS310U.
Select the print server, right-click on it will bring up the MFP and Storage Server setup utility. In this situation, you will see a new icon, double-click the icon and it and select Server Configurations 3 On your computer is in the 192.168.0.x network segment, it'll tell you will see the product listed as MFP and Storage Server -XXXXXX (192.168.0.10). If your desktop you that the TL-PS310U is not in different network segment. In this screen, you need to change the IP of the TL-PS310U.
User Guide
Page 3
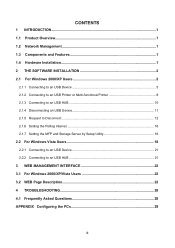
... an USB HUB 10 2.1.4 Disconnecting an USB Device 11 2.1.5 Request to Disconnect ...12 2.1.6 Setting the Polling Interval 16 2.1.7 Setting the MFP and Storage Server by Setup Utility 16 2.2 For Windows Vista Users 18 2.2.1 Connecting to an USB Device 21 2.2.2 Connecting to an USB HUB 21 3 WEB MANAGEMENT INTERFACE 22 3.1 For Windows...
... an USB HUB 10 2.1.4 Disconnecting an USB Device 11 2.1.5 Request to Disconnect ...12 2.1.6 Setting the Polling Interval 16 2.1.7 Setting the MFP and Storage Server by Setup Utility 16 2.2 For Windows Vista Users 18 2.2.1 Connecting to an USB Device 21 2.2.2 Connecting to an USB HUB 21 3 WEB MANAGEMENT INTERFACE 22 3.1 For Windows...
User Guide
Page 4
... Server y 1 USB2.0 port (High-speed) y Fast Ethernet network port: RJ-45 for 10Base-T or 100Base-TX y LINK LED to indicate network connection,100M LED to indicate 100M connection, USB LED to indicate USB status y One Setup CD for Windows 2000/XP/Vista, User's Guide y One power adapter y Built-in Reset Button Before...
... Server y 1 USB2.0 port (High-speed) y Fast Ethernet network port: RJ-45 for 10Base-T or 100Base-TX y LINK LED to indicate network connection,100M LED to indicate 100M connection, USB LED to indicate USB status y One Setup CD for Windows 2000/XP/Vista, User's Guide y One power adapter y Built-in Reset Button Before...
User Guide
Page 5
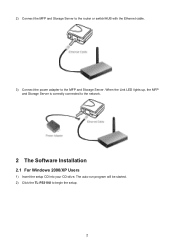
2) Connect the MFP and Storage Server to the router or switch/HUB with the Ethernet cable. 3) Connect the power adapter to begin the setup. 2 The auto-run program will be started. 2) Click the TL-PS310U to the MFP and Storage Server. When the Link LED lights up, the MFP and Storage Server is correctly connected to the network. 2 The Software Installation 2.1 For Windows 2000/XP Users 1) Insert the setup CD into your CD-drive.
2) Connect the MFP and Storage Server to the router or switch/HUB with the Ethernet cable. 3) Connect the power adapter to begin the setup. 2 The auto-run program will be started. 2) Click the TL-PS310U to the MFP and Storage Server. When the Link LED lights up, the MFP and Storage Server is correctly connected to the network. 2 The Software Installation 2.1 For Windows 2000/XP Users 1) Insert the setup CD into your CD-drive.
User Guide
Page 7
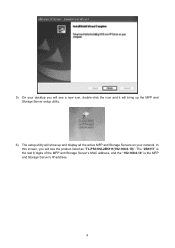
The "2B5111" is the last 6 digits of the MFP and Storage Server's MAC address, and the "192.168.0.10" is the MFP and Storage Server's IP address. 4 In this screen, you will show up and display all the active MFP and Storage Servers on your desktop you will see a new icon, double-click the icon and it will bring up the MFP and Storage Server setup utility. 6) The setup utility will see the product listed as "TL-PS310U-2B5111(192.168.0.10)". 5) On your network.
The "2B5111" is the last 6 digits of the MFP and Storage Server's MAC address, and the "192.168.0.10" is the MFP and Storage Server's IP address. 4 In this screen, you will show up and display all the active MFP and Storage Servers on your desktop you will see a new icon, double-click the icon and it will bring up the MFP and Storage Server setup utility. 6) The setup utility will see the product listed as "TL-PS310U-2B5111(192.168.0.10)". 5) On your network.
User Guide
Page 11
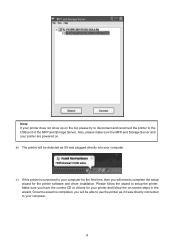
You will then see the connected printer show up in the MFP and Storage Server setup utility. Select the printer from the list and click on . 2.1.2 Connecting to an USB Printer or Multi-functional Printer a) Connect the USB cable on your printer or multi-functional printer to the MFP and Storage Server and make sure your printer is powered on the "Connect" button. 8
You will then see the connected printer show up in the MFP and Storage Server setup utility. Select the printer from the list and click on . 2.1.2 Connecting to an USB Printer or Multi-functional Printer a) Connect the USB cable on your printer or multi-functional printer to the MFP and Storage Server and make sure your printer is powered on the "Connect" button. 8
User Guide
Page 12
... Server. Also, please make sure the MFP and Storage Server and your printer and follow the wizard to complete the setup wizard for the first time, then you will need to setup the printer. Once the wizard is connected to your computer for the printer software and driver installation. Please follow the...
... Server. Also, please make sure the MFP and Storage Server and your printer and follow the wizard to complete the setup wizard for the first time, then you will need to setup the printer. Once the wizard is connected to your computer for the printer software and driver installation. Please follow the...
User Guide
Page 13
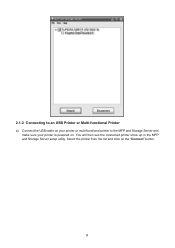
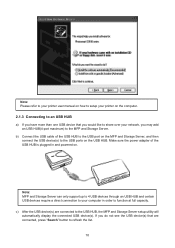
... on the USB HUB. b) Connect the USB cable of the USB HUB is plugged in order to the USB HUB, the MFP and Storage Server setup utility will automatically display the connected USB device(s). Note: MFP and Storage Server can only support up to 4 USB devices through an USB HUB and... you may add an USB HUB(4-port maximum) to the MFP and Storage Server. Note: Please refer to your printer user manual on how to setup your printer on the computer. 2.1.3 Connecting to an USB HUB a) If you have more than one USB device that you would like to share over...
... on the USB HUB. b) Connect the USB cable of the USB HUB is plugged in order to the USB HUB, the MFP and Storage Server setup utility will automatically display the connected USB device(s). Note: MFP and Storage Server can only support up to 4 USB devices through an USB HUB and... you may add an USB HUB(4-port maximum) to the MFP and Storage Server. Note: Please refer to your printer user manual on how to setup your printer on the computer. 2.1.3 Connecting to an USB HUB a) If you have more than one USB device that you would like to share over...
User Guide
Page 14
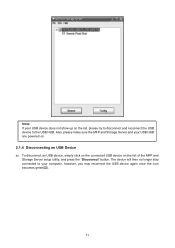
Also, please make sure the MFP and Storage Server and your computer, however, you may reconnect the USB device again once the icon becomes green( ). 11 The device will then no longer stay connected to the USB HUB. Note: If your USB device does not show up on the list, please try to disconnect and reconnect the USB device to your USB HUB are powered on. 2.1.4 Disconnecting an USB Device a) To disconnect an USB device, simply click on the connected USB device on the list of the MFP and Storage Server setup utility, and press the "Disconnect" button.
Also, please make sure the MFP and Storage Server and your computer, however, you may reconnect the USB device again once the icon becomes green( ). 11 The device will then no longer stay connected to the USB HUB. Note: If your USB device does not show up on the list, please try to disconnect and reconnect the USB device to your USB HUB are powered on. 2.1.4 Disconnecting an USB Device a) To disconnect an USB device, simply click on the connected USB device on the list of the MFP and Storage Server setup utility, and press the "Disconnect" button.
User Guide
Page 19
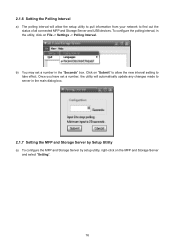
... "Seconds" box. To configure the polling interval, in the main dialog box. 2.1.7 Setting the MFP and Storage Server by Setup Utility a) To configure the MFP and Storage Server by setup utility, right-click on the MFP and Storage Server and select "Setting". 16 b) You may set a number, the utility... will allow the new interval setting to take effect. Click on "Submit" to allow the setup utility to pull information from your network to find out the status of all connected MFP and Storage Server and USB devices. 2.1.6 Setting the Polling...
... "Seconds" box. To configure the polling interval, in the main dialog box. 2.1.7 Setting the MFP and Storage Server by Setup Utility a) To configure the MFP and Storage Server by setup utility, right-click on the MFP and Storage Server and select "Setting". 16 b) You may set a number, the utility... will allow the new interval setting to take effect. Click on "Submit" to allow the setup utility to pull information from your network to find out the status of all connected MFP and Storage Server and USB devices. 2.1.6 Setting the Polling...
User Guide
Page 21
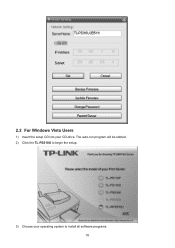
The auto-run program will be started. 2) Click the TL-PS310U to install all software programs. 18 2.2 For Windows Vista Users 1) Insert the setup CD into your operating system to begin the setup. 3) Choose your CD-drive.
The auto-run program will be started. 2) Click the TL-PS310U to install all software programs. 18 2.2 For Windows Vista Users 1) Insert the setup CD into your operating system to begin the setup. 3) Choose your CD-drive.
User Guide
Page 23
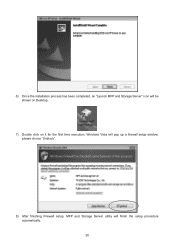
Windows Vista will pop up a firewall setup window, please choice "Unblock". 8) After finishing Firewall setup, MFP and Storage Server utility will be shown on Desktop. 7) Double click on it for the first time execution. 6) Once the installation process has been completed, an "Launch MFP and Storage Server" icon will finish the setup procedure automatically. 20
Windows Vista will pop up a firewall setup window, please choice "Unblock". 8) After finishing Firewall setup, MFP and Storage Server utility will be shown on Desktop. 7) Double click on it for the first time execution. 6) Once the installation process has been completed, an "Launch MFP and Storage Server" icon will finish the setup procedure automatically. 20
User Guide
Page 26
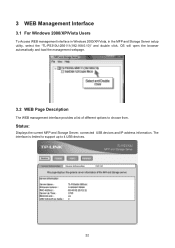
Status: Displays the current MFP and Storage Server, connected USB devices and IP address information. 3 WEB Management Interface 3.1 For Windows 2000/XP/Vista Users To Access WEB management interface in Windows 2000/XP/Vista, in the MFP and Storage Server setup utility, select the "TL-PS310U-2B5111(192.168.0.10)" and double click, OS will open the browser automatically and load the management webpage. 3.2 WEB Page Description The WEB management interface provides a list of different options to 4 USB devices. 22 The interface is limited to support up to choose from.
Status: Displays the current MFP and Storage Server, connected USB devices and IP address information. 3 WEB Management Interface 3.1 For Windows 2000/XP/Vista Users To Access WEB management interface in Windows 2000/XP/Vista, in the MFP and Storage Server setup utility, select the "TL-PS310U-2B5111(192.168.0.10)" and double click, OS will open the browser automatically and load the management webpage. 3.2 WEB Page Description The WEB management interface provides a list of different options to 4 USB devices. 22 The interface is limited to support up to choose from.
User Guide
Page 28
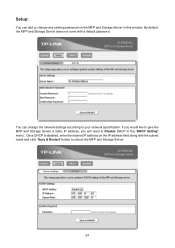
Setup: You can change any existing password on the IP address field along with a default password. You can add or change the network settings according to reboot the MFP and Storage Server. 24 Once DHCP is disabled, enter the desired IP address on the MFP and Storage Server in the "DHCP Setting" menu". If you would like to give the MFP and Storage Server a static IP address, you will need to Disable DHCP in this window. By default, the MFP and Storage Server does not come with the subnet mask and click "Save & Restart" button to your network specification.
Setup: You can change any existing password on the IP address field along with a default password. You can add or change the network settings according to reboot the MFP and Storage Server. 24 Once DHCP is disabled, enter the desired IP address on the MFP and Storage Server in the "DHCP Setting" menu". If you would like to give the MFP and Storage Server a static IP address, you will need to Disable DHCP in this window. By default, the MFP and Storage Server does not come with the subnet mask and click "Save & Restart" button to your network specification.
User Guide
Page 31
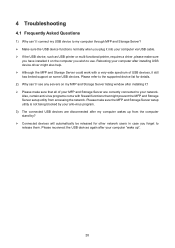
...sure you have installed it on my MFP and Storage Server listing window after installing USB device driver might prevent the MFP and Storage Server setup utility from the computer stand-by your anti-virus program. 3) The connected USB devices are correctly connected to your computer "wake up ... the MFP and Storage Server could work with firewall functions that all of USB devices, it ? ¾ Please make sure the MFP and Storage Server setup utility is not being blocked by ? ¾ Connected devices will automatically be released for details. 2) Why can 't I see any servers on the...
...sure you have installed it on my MFP and Storage Server listing window after installing USB device driver might prevent the MFP and Storage Server setup utility from the computer stand-by your anti-virus program. 3) The connected USB devices are correctly connected to your computer "wake up ... the MFP and Storage Server could work with firewall functions that all of USB devices, it ? ¾ Please make sure the MFP and Storage Server setup utility is not being blocked by ? ¾ Connected devices will automatically be released for details. 2) Why can 't I see any servers on the...
Instruction Manual
Page 5
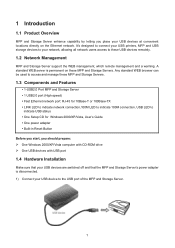
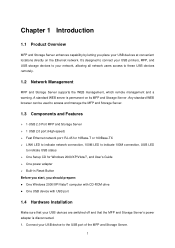
... 2.0 Port MFP and Storage Server ¾ 1 USB 2.0 port (High-speed) ¾ Fast Ethernet network port: RJ-45 for 10Base-T or 100Base-TX ¾ LINK LED to indicate network connection, 100M LED to indicate 100M connection, USB LED to these USB devices remotely. 1.2 Network Management MFP and Storage Server supports... to connect your USB printers, MFP, and USB storage devices to your network, allowing all network users access to indicate USB status ¾ One Setup CD for Windows 2000/XP/Vista/7, and User's Guide ¾ One power adapter ¾ Built-in Reset Button Before you start, you place ...
... 2.0 Port MFP and Storage Server ¾ 1 USB 2.0 port (High-speed) ¾ Fast Ethernet network port: RJ-45 for 10Base-T or 100Base-TX ¾ LINK LED to indicate network connection, 100M LED to indicate 100M connection, USB LED to these USB devices remotely. 1.2 Network Management MFP and Storage Server supports... to connect your USB printers, MFP, and USB storage devices to your network, allowing all network users access to indicate USB status ¾ One Setup CD for Windows 2000/XP/Vista/7, and User's Guide ¾ One power adapter ¾ Built-in Reset Button Before you start, you place ...
Instruction Manual
Page 7
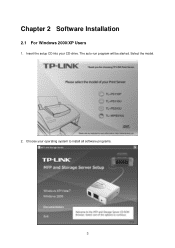
Insert the setup CD into your operating system to install all software programs. 3 Select the model. 2. Chapter 2 Software Installation 2.1 For Windows 2000/XP Users 1. Choose your CD-drive. The auto-run program will be started.
Insert the setup CD into your operating system to install all software programs. 3 Select the model. 2. Chapter 2 Software Installation 2.1 For Windows 2000/XP Users 1. Choose your CD-drive. The auto-run program will be started.
Instruction Manual
Page 8
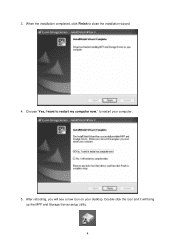
3. to close the installation wizard. 4. Double-click the icon and it will see a new icon on your computer. 5. When the installation completed, click Finish to restart your desktop. After rebooting, you will bring up the MFP and Storage Server setup utility. 4 Choose "Yes, I want to restart my computer now."
3. to close the installation wizard. 4. Double-click the icon and it will see a new icon on your computer. 5. When the installation completed, click Finish to restart your desktop. After rebooting, you will bring up the MFP and Storage Server setup utility. 4 Choose "Yes, I want to restart my computer now."
