Owners Manual
Page 2
.... 2 "Note to CATV system installer: This reminder is connected to be retained for long periods of power source indicated on the product. 19) Servicing - Refer all servicing to lightning and power-line surges. 16) Power Lines - e ) if the product has been dropped or damaged in damage and will fit into the product. When replacement parts are unable to its normal operation. Use a damp cloth for...
.... 2 "Note to CATV system installer: This reminder is connected to be retained for long periods of power source indicated on the product. 19) Servicing - Refer all servicing to lightning and power-line surges. 16) Power Lines - e ) if the product has been dropped or damaged in damage and will fit into the product. When replacement parts are unable to its normal operation. Use a damp cloth for...
Owners Manual
Page 3
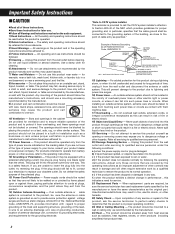
IN NORTH AMERICA USE ONLY ON 120 V SUPPLY. Using a flat-bladed screwdriver, set to the appropriate 230V or 120V position according to remove the power cord from the AC outlet before repositioning the voltage converter switch. 1. WARNING: TO PREVENT FIRE OR SHOCK HAZARD, ... (General export models only) Be sure to your area. NO USER-SERVICEABLE PARTS INSIDE. For CANADA AC POWER CORD CONNECTION CAUTION: TO PREVENT ELECTRIC SHOCK, MATCH WIDE BLADE OF PLUG TO WIDE SLOT, FULLY INSERT. REFER SERVICING TO QUALIFIED SERVICE PERSONNEL. ÿ THE LIGHTNING FLASH WITH ARROWHEAD SYMBOL...
IN NORTH AMERICA USE ONLY ON 120 V SUPPLY. Using a flat-bladed screwdriver, set to the appropriate 230V or 120V position according to remove the power cord from the AC outlet before repositioning the voltage converter switch. 1. WARNING: TO PREVENT FIRE OR SHOCK HAZARD, ... (General export models only) Be sure to your area. NO USER-SERVICEABLE PARTS INSIDE. For CANADA AC POWER CORD CONNECTION CAUTION: TO PREVENT ELECTRIC SHOCK, MATCH WIDE BLADE OF PLUG TO WIDE SLOT, FULLY INSERT. REFER SERVICING TO QUALIFIED SERVICE PERSONNEL. ÿ THE LIGHTNING FLASH WITH ARROWHEAD SYMBOL...
Owners Manual
Page 4
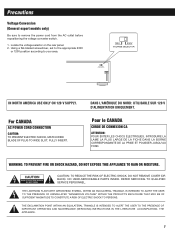
... finish. Near speakers, on the plug, never yank the cord. ... Where humidity is high and in the following places: ... Fingerprints attract dust and dirt. 2. Gently close to a source of each component you intend to strong magnetic fields. ... REC PLAY Amplifier NormCalrOM(T2eypt(Taely%p(T)ey#pe) %^) W-860R AC Power 4 Choose the installation location of all equipment before making connections. ... Keep away...
... finish. Near speakers, on the plug, never yank the cord. ... Where humidity is high and in the following places: ... Fingerprints attract dust and dirt. 2. Gently close to a source of each component you intend to strong magnetic fields. ... REC PLAY Amplifier NormCalrOM(T2eypt(Taely%p(T)ey#pe) %^) W-860R AC Power 4 Choose the installation location of all equipment before making connections. ... Keep away...
Owners Manual
Page 5
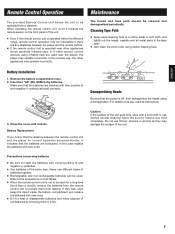
... the player for a long time (more than a month), remove the batteries from a distance. In the reverse way, the other remote control devices using rubber cleaning fluid. Cleaning Tape Path ... Use batteries of its use, read its instructions. 3. Rechargeable and non-rechargeable batteries can be operated from the remote control unit to prevent them in the tape path. ... ENGLISH Remote Control Operation The provided Remote Control Unit allows the unit to be used. For details of the same type...
... the player for a long time (more than a month), remove the batteries from a distance. In the reverse way, the other remote control devices using rubber cleaning fluid. Cleaning Tape Path ... Use batteries of its use, read its instructions. 3. Rechargeable and non-rechargeable batteries can be operated from the remote control unit to prevent them in the tape path. ... ENGLISH Remote Control Operation The provided Remote Control Unit allows the unit to be used. For details of the same type...
Owners Manual
Page 6
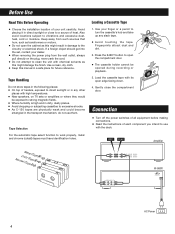
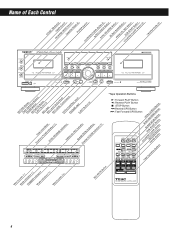
Name of Each Control DOLBY NR SwRTiEItMcVhEERRSSEwMitcOhDECaSswsietctthe Holder (I) POWER Switch COUNTER CLEIANRTRBOuCttoHSnEYC(NI)KCBRuEtVtoEnRSBELBAuNtKtoSnCPAARNABLuLtEtoLnRCEDOCUUBBNuTStEtToRAnRCTLEBAuRttoBnutton (II) Cassette Holder (II) RECOR*TDaBpuetOtPopAneUrSatEioRBnEuBCttuoMtntEoUJnTEsECBTuBttuoMtntoICn (I) Jack MIC LeveRlECCoLnEtrVoEl KLnCoobnPtIrToCl KHnCobONPHTROONLESKnJoabckEJECT Button (II) DiPreecatikonLe&vPeAl MUSeEteIrndiScaYtNorCs ( I ) REVERSE Indicators PARALLEL REC InBdLiAcaNtKoDrSirCecAtiNonIn&dPicAaUtoSrEsIndicators ( II ) SYNC REV BLANK SCAN ...
Name of Each Control DOLBY NR SwRTiEItMcVhEERRSSEwMitcOhDECaSswsietctthe Holder (I) POWER Switch COUNTER CLEIANRTRBOuCttoHSnEYC(NI)KCBRuEtVtoEnRSBELBAuNtKtoSnCPAARNABLuLtEtoLnRCEDOCUUBBNuTStEtToRAnRCTLEBAuRttoBnutton (II) Cassette Holder (II) RECOR*TDaBpuetOtPopAneUrSatEioRBnEuBCttuoMtntEoUJnTEsECBTuBttuoMtntoICn (I) Jack MIC LeveRlECCoLnEtrVoEl KLnCoobnPtIrToCl KHnCobONPHTROONLESKnJoabckEJECT Button (II) DiPreecatikonLe&vPeAl MUSeEteIrndiScaYtNorCs ( I ) REVERSE Indicators PARALLEL REC InBdLiAcaNtKoDrSirCecAtiNonIn&dPicAaUtoSrEsIndicators ( II ) SYNC REV BLANK SCAN ...
Owners Manual
Page 7
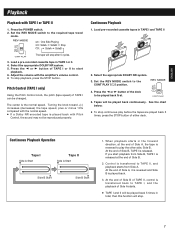
... B. Press the Ó or Á button of Side A, the tape is played back. 3. See the chart below; ... If you start playback. 6. Set the REV MODE switch to play before the tapes are played back 5 times, press the STOP button of Side B, TAPE I or TAPE Il 1. At the end of either deck. Adjust the volume with the normal speed. ... To stop playback, press the STOP button. The center is released. ENGLISH Playback Playback with TAPE I is the normal...
... B. Press the Ó or Á button of Side A, the tape is played back. 3. See the chart below; ... If you start playback. 6. Set the REV MODE switch to play before the tapes are played back 5 times, press the STOP button of Side B, TAPE I or TAPE Il 1. At the end of either deck. Adjust the volume with the normal speed. ... To stop playback, press the STOP button. The center is released. ENGLISH Playback Playback with TAPE I is the normal...
Owners Manual
Page 8
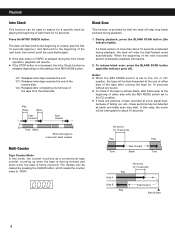
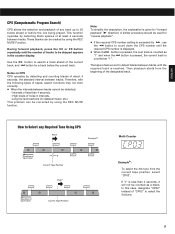
... display can be used to search for a specific track by pressing the CLEAR button, which point the cycle starts again. ... Blank Scan This function is detected during playback, the deck will skip long blank portions during the Intro Check operation, playback will resume. 2. If a blank section of the next track, from the initial side. No sound for 10 seconds Play Tune Fast-forward Blank Play...
... display can be used to search for a specific track by pressing the CLEAR button, which point the cycle starts again. ... Blank Scan This function is detected during playback, the deck will skip long blank portions during the Intro Check operation, playback will resume. 2. If a blank section of the next track, from the initial side. No sound for 10 seconds Play Tune Fast-forward Blank Play...
Owners Manual
Page 9
... skipped appears in classical music, etc.) This problem can be detected. - When the button is pressed, the next track is counted as "1" and when theÔ button is pressed, the current track is counted as a blank. The tape is displayed. ... This function operates by using the REC MUTE Function. When the intervals between tracks until the required CPS number is fast-wound to detect blanks...
... skipped appears in classical music, etc.) This problem can be detected. - When the button is pressed, the next track is counted as "1" and when theÔ button is pressed, the current track is counted as a blank. The tape is displayed. ... This function operates by using the REC MUTE Function. When the intervals between tracks until the required CPS number is fast-wound to detect blanks...
Owners Manual
Page 10
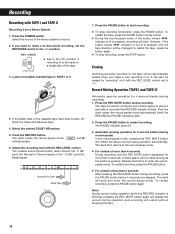
... the REC LEVEL control set the REV MODE switch to "‹". Recording Recording with the REC LEVEL control. Select the source of about 4 seconds is blinking), pressing the REC MUTE button again will release the record muting operation and recording will be erased by "recording" on ä a single side of more than 4 seconds. Load a recordable cassette tape in TAPE I and TAPE Il) Automatic spacing operation for 4-second blanks (during recording) 1. to start . Press the REC MUTE button during recording, press...
... the REC LEVEL control set the REV MODE switch to "‹". Recording Recording with the REC LEVEL control. Select the source of about 4 seconds is blinking), pressing the REC MUTE button again will release the record muting operation and recording will be erased by "recording" on ä a single side of more than 4 seconds. Load a recordable cassette tape in TAPE I and TAPE Il) Automatic spacing operation for 4-second blanks (during recording) 1. to start . Press the REC MUTE button during recording, press...
Owners Manual
Page 11
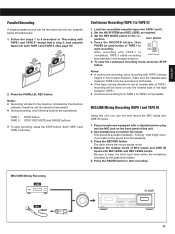
... sound from TAPE II to start recording. ä After recording with TAPE II always begins in the forward direction, make sure the cassette tape loaded in the forward direction. 5. Press the PAUSE button to TAPE I is set the direction beforehand. ... MIC/LINE Mixing Recording LINE W-860R MIC 11 therefore, set to reverse side of TAPE l, recording will stop recording, press the STOP button. During recording, only following buttons are operational: TAPE I and ll. 2. Set the REV MODE switch to monitor the inputs. If the tape...
... sound from TAPE II to start recording. ä After recording with TAPE II always begins in the forward direction, make sure the cassette tape loaded in the forward direction. 5. Press the PAUSE button to TAPE I is set the direction beforehand. ... MIC/LINE Mixing Recording LINE W-860R MIC 11 therefore, set to reverse side of TAPE l, recording will stop recording, press the STOP button. During recording, only following buttons are operational: TAPE I and ll. 2. Set the REV MODE switch to monitor the inputs. If the tape...

Owners Manual
Page 12
... entire recorded section of TAPE Il to start dubbing. TAPE l continues playback. The sound quality of TAPE I signal levels. Check before recording. 12 To stop . ... During HIGH speed dubbing, only the STOP button works. ... In this reason, multigeneration dubbing is completed, both sides have no effect. ... If there is a TV set to the Á direction. 4. CAUTION: Recording pre-recorded tapes, records, or other published or broadcast material may be changed. Set the REV MODE switch...
... entire recorded section of TAPE Il to start dubbing. TAPE l continues playback. The sound quality of TAPE I signal levels. Check before recording. 12 To stop . ... During HIGH speed dubbing, only the STOP button works. ... In this reason, multigeneration dubbing is completed, both sides have no effect. ... If there is a TV set to the Á direction. 4. CAUTION: Recording pre-recorded tapes, records, or other published or broadcast material may be changed. Set the REV MODE switch...

Owners Manual
Page 13
... the same time during dubbing. TAPE l starts reverse play and TAPE II starts recording . ➂ When TAPE Il reaches the end of the dubbed tape. Set the tape running direction of tapes are reversed simultaneously. To prevent this, use tapes with the same length as far as possible. ENGLISH Synchro Reverse Dubbing The SYNC REV button reverses both decks to the Á (forward) direction, and set the REV MODE switch to the...
... the same time during dubbing. TAPE l starts reverse play and TAPE II starts recording . ➂ When TAPE Il reaches the end of the dubbed tape. Set the tape running direction of tapes are reversed simultaneously. To prevent this, use tapes with the same length as far as possible. ENGLISH Synchro Reverse Dubbing The SYNC REV button reverses both decks to the Á (forward) direction, and set the REV MODE switch to the...
Owners Manual
Page 14
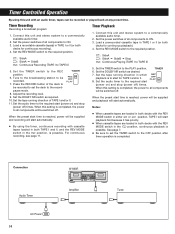
.... Connect this unit and stereo system to a commercially available audio timer. 2. Load a prerecorded cassette tape in TAPE I or ll (or both decks for continuous recording). 4. Set the audio timer to the required start time is completed. Notes: ... Be sure to set the deck to the recordpause mode. 8. Timer Recording Recording a broadcast program 1. Tune to the broadcasting station to the PLAY position. 6. When the preset start (power on ) and stop (power off ) times. Timer Controlled Operation By using the...
.... Connect this unit and stereo system to a commercially available audio timer. 2. Load a prerecorded cassette tape in TAPE I or ll (or both decks for continuous recording). 4. Set the audio timer to the required start time is completed. Notes: ... Be sure to set the deck to the recordpause mode. 8. Timer Recording Recording a broadcast program 1. Tune to the broadcasting station to the PLAY position. 6. When the preset start (power on ) and stop (power off ) times. Timer Controlled Operation By using the...
Owners Manual
Page 15
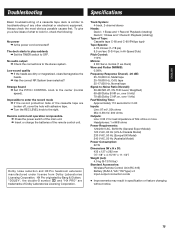
... 2 Input-output connection cords ... Strange Sound ® Set the PITCH CONTROL knob to OFF. Remote control unit operation is similar to the right. Dolby noise reduction and HX Pro headroom extension manufactured under license from Dolby Laboratories Licensing Corporation. Track System: 4-track, 2-channel stereo Heads: Deck l; 1 Erase and 1 Record/ Playback (rotating) Deck II; 1 Erase and 1 Record/ Playback (rotating) Type of Dolby Laboratories Licensing Corporation. Deck) Wow and Flutter (WRMS): 0.09%. ENGLISH Troubleshooting Specifications Basic troubleshooting of a cassette...
... 2 Input-output connection cords ... Strange Sound ® Set the PITCH CONTROL knob to OFF. Remote control unit operation is similar to the right. Dolby noise reduction and HX Pro headroom extension manufactured under license from Dolby Laboratories Licensing Corporation. Track System: 4-track, 2-channel stereo Heads: Deck l; 1 Erase and 1 Record/ Playback (rotating) Deck II; 1 Erase and 1 Record/ Playback (rotating) Type of Dolby Laboratories Licensing Corporation. Deck) Wow and Flutter (WRMS): 0.09%. ENGLISH Troubleshooting Specifications Basic troubleshooting of a cassette...


