Owners Manual
Page 1
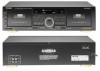
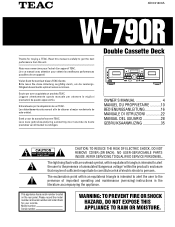
... attentamente questo manuale per aver acquistato un prodotto TEAC. NO USER-SERVICEABLE PARTS INSIDE. Lees deze gebruiksaanwijzing aandachtig door teneinde de beste prestaties van dit toestel te verkrijgen. Double Cassette Deck OWNER'S MANUAL 4 MANUEL DU PROPRIETAIRE ...........10... BEDIENUNGSANLEITUNG 16 MANUALE DI ISTRUZIONI 22 MANUAL DEL USUARIO 28 GEBRUIKSAANWIJZING 35 CAUTION RISK OF ELECTRIC SHOCK DO NOT OPEN CAUTION: TO REDUCE THE RISK OF ELECTRIC SHOCK, DO NOT REMOVE COVER (OR BACK). ` 3D0021400A w-790r...
... attentamente questo manuale per aver acquistato un prodotto TEAC. NO USER-SERVICEABLE PARTS INSIDE. Lees deze gebruiksaanwijzing aandachtig door teneinde de beste prestaties van dit toestel te verkrijgen. Double Cassette Deck OWNER'S MANUAL 4 MANUEL DU PROPRIETAIRE ...........10... BEDIENUNGSANLEITUNG 16 MANUALE DI ISTRUZIONI 22 MANUAL DEL USUARIO 28 GEBRUIKSAANWIJZING 35 CAUTION RISK OF ELECTRIC SHOCK DO NOT OPEN CAUTION: TO REDUCE THE RISK OF ELECTRIC SHOCK, DO NOT REMOVE COVER (OR BACK). ` 3D0021400A w-790r...
Owners Manual
Page 4
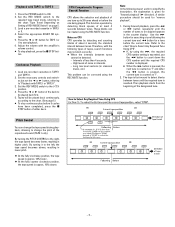
.... "DOLBY", the double-D symbol ∂ and "HX PRO" are trademarks of all equipment before switching it on the amplifier/receiver. Cassette Tape (Fig.2) Tape Selection: For the automatic tape select function to work properly, metal and chrome (cobalt) tapes must be connected to...must be connected to the terminal which is not provided with Dolby C NR. 3 TIMER Switch (See page 8.) 4 REV (Reverse) MODE Switch (See page 5.) 5 Cassette Holder (TAPE I/TAPE II) (See page 5.) 6 SYNC REV (Reverse) Button (See page 7.) 7 REMOTE SENSOR (Infrared Signal Reception Window) 8 COUNTER CLEAR Button ...
.... "DOLBY", the double-D symbol ∂ and "HX PRO" are trademarks of all equipment before switching it on the amplifier/receiver. Cassette Tape (Fig.2) Tape Selection: For the automatic tape select function to work properly, metal and chrome (cobalt) tapes must be connected to...must be connected to the terminal which is not provided with Dolby C NR. 3 TIMER Switch (See page 8.) 4 REV (Reverse) MODE Switch (See page 5.) 5 Cassette Holder (TAPE I/TAPE II) (See page 5.) 6 SYNC REV (Reverse) Button (See page 7.) 7 REMOTE SENSOR (Infrared Signal Reception Window) 8 COUNTER CLEAR Button ...
Owners Manual
Page 5
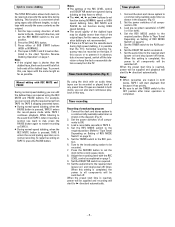
.... ●If the power has been switched off during play or recording, ejecting the cassette may be impossible. Fingerprints attract dust and dirt. 2. Load the cassette tape with its open the cassette compartment door. 3. Use your finger or a pencil to this jack for private listening ...or monitoring. Press the eject button (∫)* to open edge facing down. 4. Operations Loading a Cassette Tape 1. w PAUSE Button (TAPE II only) e REC (Record) MUTE Button (TAPE II only) (See page 7.) r EJECT Button (TAPE I/TAPE II) t...
.... ●If the power has been switched off during play or recording, ejecting the cassette may be impossible. Fingerprints attract dust and dirt. 2. Load the cassette tape with its open the cassette compartment door. 3. Use your finger or a pencil to this jack for private listening ...or monitoring. Press the eject button (∫)* to open edge facing down. 4. Operations Loading a Cassette Tape 1. w PAUSE Button (TAPE II only) e REC (Record) MUTE Button (TAPE II only) (See page 7.) r EJECT Button (TAPE I/TAPE II) t...
Owners Manual
Page 6
... 4 seconds, the standard interval between tunes. The tape is reached. Playback with TAPE I or TAPE II" . 3. Load a pre-recorded cassette in the counter display. Continuous Playback 1. Therefore, with the amplifier's volume control. ● To stop continuous play before 5 cycles have been completed... Control You can be detected. - O At the fully counter clockwise position, the tape speed is approx. 10% faster . Load pre-recorded cassettes in lower pitch. Select the appropriate DOLBY NR system. 5. O At the fully clockwise position, the tape speed is approx. 10% slower. ...
... 4 seconds, the standard interval between tunes. The tape is reached. Playback with TAPE I or TAPE II" . 3. Load a pre-recorded cassette in the counter display. Continuous Playback 1. Therefore, with the amplifier's volume control. ● To stop continuous play before 5 cycles have been completed... Control You can be detected. - O At the fully counter clockwise position, the tape speed is approx. 10% faster . Load pre-recorded cassettes in lower pitch. Select the appropriate DOLBY NR system. 5. O At the fully clockwise position, the tape speed is approx. 10% slower. ...

Owners Manual
Page 7
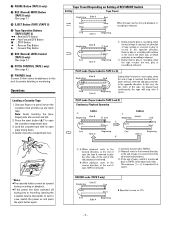
...to the button pressed will stop recording, press the ∑ STOP button. mal speed. The peak level meter indicates the TAPE I and a recordable cassette into TAPE I signal levels; the recording levels of TAPE II will be left reels. 4. If they have been dubbed. 5. The deck then ...restart the tape, press it . Recording with TAPE II Recording from TAPE I to TAPE II) To dub the entire recorded section of a pre-recorded cassette 1. Press the RECORD button and the deck enters the record-pause mode. ( REC and ƒ indicators light.) 6. Press the PAUSE button again to ...
...to the button pressed will stop recording, press the ∑ STOP button. mal speed. The peak level meter indicates the TAPE I and a recordable cassette into TAPE I signal levels; the recording levels of TAPE II will be left reels. 4. If they have been dubbed. 5. The deck then ...restart the tape, press it . Recording with TAPE II Recording from TAPE I to TAPE II) To dub the entire recorded section of a pre-recorded cassette 1. Press the RECORD button and the deck enters the record-pause mode. ( REC and ƒ indicators light.) 6. Press the PAUSE button again to ...
Owners Manual
Page 8
...be recorded or played back at exactly the same time during HIGH speed dubbing. ● The sound quality of the original tape. Load pre-recorded cassette(s) in TAPE I and II travel as the original. 1. Press the SYNC REV button. 3. Connect the deck and stereo system to " Tape Travel...Setting of the dubbed tape. Set the DOLBY NR switch as desired. 7. Set the audio timer to the REC position. 6. Notes: ● When cassettes are loaded in both decks, TAPE I will start continuous playback in TAPE II. 4. This function is pressed, TAPE II enters the record muting operation ...
...be recorded or played back at exactly the same time during HIGH speed dubbing. ● The sound quality of the original tape. Load pre-recorded cassette(s) in TAPE I and II travel as the original. 1. Press the SYNC REV button. 3. Connect the deck and stereo system to " Tape Travel...Setting of the dubbed tape. Set the DOLBY NR switch as desired. 7. Set the audio timer to the REC position. 6. Notes: ● When cassettes are loaded in both decks, TAPE I will start continuous playback in TAPE II. 4. This function is pressed, TAPE II enters the record muting operation ...
Owners Manual
Page 9
...: Are the heads dirty or magnetized? Deck I; 1 Playback (rotating) Deck II; 1 Erase and 1 Record/Playback (rotating) Type of the cassette in the U.S.A. To give you using metal tape except as they may result in the tape path. ● Also clean the pinch roller using rubber... Tape Path ● Apply head cleaning fluid* to -Noise Ratio (Overall) : 58 dB (NR off , then demagnetize the heads using a TEAC E-3 demagnetizer. Has the correct NR System been selected? ● Impossible to be cleaned and demagnetized periodically. Remote-Controlled Operation When operating the remote ...
...: Are the heads dirty or magnetized? Deck I; 1 Playback (rotating) Deck II; 1 Erase and 1 Record/Playback (rotating) Type of the cassette in the U.S.A. To give you using metal tape except as they may result in the tape path. ● Also clean the pinch roller using rubber... Tape Path ● Apply head cleaning fluid* to -Noise Ratio (Overall) : 58 dB (NR off , then demagnetize the heads using a TEAC E-3 demagnetizer. Has the correct NR System been selected? ● Impossible to be cleaned and demagnetized periodically. Remote-Controlled Operation When operating the remote ...
