Owners Manual
Page 1
... manual carefully to persons. Enhorabuena por la adquisición de un TEAC. Please record the model number and serial number and retain them for buying a TEAC. ` 3D0021400A w-790r Thanks for your records. Grazie per ottenere le migliori prestazioni da questo apparecchio. Lees deze gebruiksaanwijzing aandachtig door teneinde de beste prestaties van dit toestel te verkrijgen. Dank u voor de aanschaf van een TEAC. NO USER-SERVICEABLE PARTS...
... manual carefully to persons. Enhorabuena por la adquisición de un TEAC. Please record the model number and serial number and retain them for buying a TEAC. ` 3D0021400A w-790r Thanks for your records. Grazie per ottenere le migliori prestazioni da questo apparecchio. Lees deze gebruiksaanwijzing aandachtig door teneinde de beste prestaties van dit toestel te verkrijgen. Dank u voor de aanschaf van een TEAC. NO USER-SERVICEABLE PARTS...
Owners Manual
Page 4
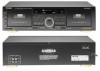
... mode using the remote control, press the two DUB START buttons simultaneously. 0 Display Window ` Peak Level Meter 1 Direction & Pause Indicators 2 Multi Counter 3 SYNC REV Indicator 4 Mode Indicators 5 Dubbing Indicators q RECORD Button (TAPE II only) (See page 7.) To enter the record mode using the Dolby B noise reduction system, or playing back tapes recorded with Dolby C NR. 3 TIMER Switch (See page 8.) 4 REV (Reverse) MODE Switch (See page 5.) 5 Cassette Holder (TAPE I/TAPE II) (See page 5.) 6 SYNC REV (Reverse) Button (See page 7.) 7 REMOTE SENSOR (Infrared Signal Reception Window...
... mode using the remote control, press the two DUB START buttons simultaneously. 0 Display Window ` Peak Level Meter 1 Direction & Pause Indicators 2 Multi Counter 3 SYNC REV Indicator 4 Mode Indicators 5 Dubbing Indicators q RECORD Button (TAPE II only) (See page 7.) To enter the record mode using the Dolby B noise reduction system, or playing back tapes recorded with Dolby C NR. 3 TIMER Switch (See page 8.) 4 REV (Reverse) MODE Switch (See page 5.) 5 Cassette Holder (TAPE I/TAPE II) (See page 5.) 6 SYNC REV (Reverse) Button (See page 7.) 7 REMOTE SENSOR (Infrared Signal Reception Window...
Owners Manual
Page 5
...7.) r EJECT Button (TAPE I/TAPE II) t Tape Operation Buttons (TAPE I/TAPE II) : Rewind/CPS Button Ò : Fast Forward/CPS Button ∑ : STOP Button " : Reverse Play Button ∏ : Forward Play Button y REC (Record) LEVEL Control (TAPE II only) (See page 7.) u PITCH CONTROL (TAPE I only) (See page 6.) i PHONES Jack Connect 8-ohm stereo headphones to turn the cassette's hub and take up any slack tape. Operations Loading a Cassette Tape 1. Gently close the compartment door. *Notes: ●The cassette holder cannot be opened during recording or playback. ●If the power has...
...7.) r EJECT Button (TAPE I/TAPE II) t Tape Operation Buttons (TAPE I/TAPE II) : Rewind/CPS Button Ò : Fast Forward/CPS Button ∑ : STOP Button " : Reverse Play Button ∏ : Forward Play Button y REC (Record) LEVEL Control (TAPE II only) (See page 7.) u PITCH CONTROL (TAPE I only) (See page 6.) i PHONES Jack Connect 8-ohm stereo headphones to turn the cassette's hub and take up any slack tape. Operations Loading a Cassette Tape 1. Gently close the compartment door. *Notes: ●The cassette holder cannot be opened during recording or playback. ●If the power has...
Owners Manual
Page 6
...; button for "forward playback" (∏ direction). Adjust the volume with the amplifier's volume control. ● To stop continuous play before 5 cycles have been completed, press the ∑ STOP button of the reproduced sound (TAPE I only). Notes on page 5. 3. Then playback starts from the beginning of tapes, search functions may not work correctly. ● When the intervals between tunes. Pitch Control You can change the pitch of either deck. Playback with TAPE I or...
...; button for "forward playback" (∏ direction). Adjust the volume with the amplifier's volume control. ● To stop continuous play before 5 cycles have been completed, press the ∑ STOP button of the reproduced sound (TAPE I only). Notes on page 5. 3. Then playback starts from the beginning of tapes, search functions may not work correctly. ● When the intervals between tunes. Pitch Control You can change the pitch of either deck. Playback with TAPE I or...

Owners Manual
Page 7
... loudest sound to be erased when you want to make a new recording on the spine of more than 4 seconds During recording, hold the REC MUTE button depressed for Metal tapes). 7. Press the DUB START HIGH or NORMAL button to start recording. ● To stop recording, press the ∑ STOP button. Adjust the recording level with adhesive tape. 4. Note: ● During record muting operation (while the RECORD indicator is recorded (the RECORD indicator blinks). Dubbing (Copying from a stereo system: 1. To stop automatically...
... loudest sound to be erased when you want to make a new recording on the spine of more than 4 seconds During recording, hold the REC MUTE button depressed for Metal tapes). 7. Press the DUB START HIGH or NORMAL button to start recording. ● To stop recording, press the ∑ STOP button. Adjust the recording level with adhesive tape. 4. Note: ● During record muting operation (while the RECORD indicator is recorded (the RECORD indicator blinks). Dubbing (Copying from a stereo system: 1. To stop automatically...
Owners Manual
Page 8
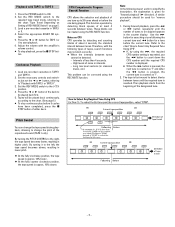
... stop (power off) times. Connect the deck and stereo system to a commercially available audio timer as required. 10. Set the audio timer to the required start (power on TAPE II. ● During normal-speed dubbing, when the REC MUTE button is a TV set the REV MODE switch to the π position. 2. For example, you can also start time is reached, power will be switched off. Also, REC MUTE and PAUSE do not function...
... stop (power off) times. Connect the deck and stereo system to a commercially available audio timer as required. 10. Set the audio timer to the required start (power on TAPE II. ● During normal-speed dubbing, when the REC MUTE button is a TV set the REV MODE switch to the π position. 2. For example, you can also start time is reached, power will be switched off. Also, REC MUTE and PAUSE do not function...
Owners Manual
Page 9
... lbs.) Standard Accessories : Remote control unit (RC-707) x 1, Battery (SUM-3, "AA", "R6" type) x 2, Input-output connection cord x 1 ● Specifications were determined using a TEAC E-3 demagnetizer. poles positioned correctly. 3. Battery replacement If the operation range from the unit to the amplifier begins to decrease, the batteries are available in TEAC Tape Recorder Cleaning Kits HC-2 and RC-2 in other electrical or electronic equipment. For details of Tape : Cassette tape C-60 and C-90(Philips type) Tape Speeds : 4.76 cm...
... lbs.) Standard Accessories : Remote control unit (RC-707) x 1, Battery (SUM-3, "AA", "R6" type) x 2, Input-output connection cord x 1 ● Specifications were determined using a TEAC E-3 demagnetizer. poles positioned correctly. 3. Battery replacement If the operation range from the unit to the amplifier begins to decrease, the batteries are available in TEAC Tape Recorder Cleaning Kits HC-2 and RC-2 in other electrical or electronic equipment. For details of Tape : Cassette tape C-60 and C-90(Philips type) Tape Speeds : 4.76 cm...


