Owners Manual
Page 1
Read this unit. Leggere attentamente questo manuale per aver acquistato un prodotto TEAC. Double Cassette Deck OWNER'S MANUAL 4 MANUEL DU PROPRIETAIRE ...........10 BEDIENUNGSANLEITUNG 16 MANUALE DI ISTRUZIONI 22 MANUAL DEL USUARIO 28 GEBRUIKSAANWIJZING 35 ...SHOCK HAZARD, DO NOT EXPOSE THIS APPLIANCE TO RAIN OR MOISTURE. Nous vous remercions pour l'achat d'un appareil TEAC. REFER SERVICING TO QUALIFIED SERVICE PERSONNEL. ` 3D0021400A w-790r Thanks for your records. Lees deze gebruiksaanwijzing aandachtig door teneinde de beste prestaties van dit toestel te verkrijgen. ...
Read this unit. Leggere attentamente questo manuale per aver acquistato un prodotto TEAC. Double Cassette Deck OWNER'S MANUAL 4 MANUEL DU PROPRIETAIRE ...........10 BEDIENUNGSANLEITUNG 16 MANUALE DI ISTRUZIONI 22 MANUAL DEL USUARIO 28 GEBRUIKSAANWIJZING 35 ...SHOCK HAZARD, DO NOT EXPOSE THIS APPLIANCE TO RAIN OR MOISTURE. Nous vous remercions pour l'achat d'un appareil TEAC. REFER SERVICING TO QUALIFIED SERVICE PERSONNEL. ` 3D0021400A w-790r Thanks for your records. Lees deze gebruiksaanwijzing aandachtig door teneinde de beste prestaties van dit toestel te verkrijgen. ...
Owners Manual
Page 4
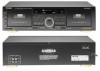
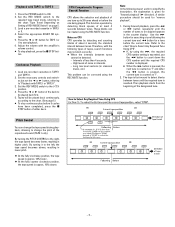
..., exposed to direct sunlight or in any other places with Dolby C NR. 3 TIMER Switch (See page 8.) 4 REV (Reverse) MODE Switch (See page 5.) 5 Cassette Holder (TAPE I/TAPE II) (See page 5.) 6 SYNC REV (Reverse) Button (See page 7.) 7 REMOTE SENSOR (Infrared Signal Reception Window) 8 COUNTER CLEAR Button (... use of each component you intend to use any connection to excessive shocks. If nonetheless the mains plug is not provided with the deck. Cassette Tape (Fig.2) Tape Selection: For the automatic tape select function to work properly, metal and chrome (cobalt) tapes must be sure...
..., exposed to direct sunlight or in any other places with Dolby C NR. 3 TIMER Switch (See page 8.) 4 REV (Reverse) MODE Switch (See page 5.) 5 Cassette Holder (TAPE I/TAPE II) (See page 5.) 6 SYNC REV (Reverse) Button (See page 7.) 7 REMOTE SENSOR (Infrared Signal Reception Window) 8 COUNTER CLEAR Button (... use of each component you intend to use any connection to excessive shocks. If nonetheless the mains plug is not provided with the deck. Cassette Tape (Fig.2) Tape Selection: For the automatic tape select function to work properly, metal and chrome (cobalt) tapes must be sure...
Owners Manual
Page 6
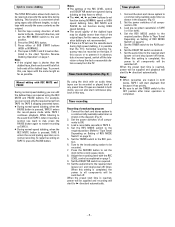
... STOP button of at least 4 seconds between tunes cannot be detected. - Load a pre-recorded cassette in TAPE I only). Adjust the volume with TAPE I or II. 4. Continuous Playback 1. Load pre-recorded cassettes in TAPE I or TAPE II 1. Tapes will be skipped appears in classical music, etc.) This... right, the tape speed becomes faster, resulting in intervals. - Press the " or ∏ button of noise in higher pitch. High levels of the deck to ON. 2. Notes on page 5. 3. The tape is reached. O At the fully counter clockwise position, the tape speed is approx. 10% faster...
... STOP button of at least 4 seconds between tunes cannot be detected. - Load a pre-recorded cassette in TAPE I only). Adjust the volume with TAPE I or II. 4. Continuous Playback 1. Load pre-recorded cassettes in TAPE I or TAPE II 1. Tapes will be skipped appears in classical music, etc.) This... right, the tape speed becomes faster, resulting in intervals. - Press the " or ∏ button of noise in higher pitch. High levels of the deck to ON. 2. Notes on page 5. 3. The tape is reached. O At the fully counter clockwise position, the tape speed is approx. 10% faster...

Owners Manual
Page 7
... 7. Check these laws before 4 seconds has elapsed. Set both decks to enter the record-pause mode. NORMAL: Dubbing is recorded (the RECORD indicator blinks). the recording levels of a pre-recorded cassette 1. Load a recordable cassette in place. If they have been broken off ). ● ...operation (while the RECORD indicator is pressed. Load the pre-recorded cassette into TAPE II. 3. The peak level meter indicates the TAPE I and a recordable cassette into TAPE I signal levels; Press the RECORD button and the deck enters the record-pause mode. ( REC and ƒ indicators...
... 7. Check these laws before 4 seconds has elapsed. Set both decks to enter the record-pause mode. NORMAL: Dubbing is recorded (the RECORD indicator blinks). the recording levels of a pre-recorded cassette 1. Load a recordable cassette in place. If they have been broken off ). ● ...operation (while the RECORD indicator is pressed. Load the pre-recorded cassette into TAPE II. 3. The peak level meter indicates the TAPE I and a recordable cassette into TAPE I signal levels; Press the RECORD button and the deck enters the record-pause mode. ( REC and ƒ indicators...
Owners Manual
Page 8
... occurs or to prevent it reaches a section you can also start playback first because it has priority. ● Be sure to set near the cassette deck during high speed dubbing, it is pressed, TAPE II enters the record-pause mode while TAPE I continues playback. Connect the... recordable cassette in TAPE I to TAPE II skipping unwanted tunes. ● During normal-speed dubbing, when the PAUSE button is possible that of DUB START buttons (HIGH or NORMAL). 4. While listening to the sound from TAPE I or II (or both). 4. Synchro reverse dubbing The SYNC REV button allows both decks to be...
... occurs or to prevent it reaches a section you can also start playback first because it has priority. ● Be sure to set near the cassette deck during high speed dubbing, it is pressed, TAPE II enters the record-pause mode while TAPE I continues playback. Connect the... recordable cassette in TAPE I to TAPE II skipping unwanted tunes. ● During normal-speed dubbing, when the PAUSE button is possible that of DUB START buttons (HIGH or NORMAL). 4. While listening to the sound from TAPE I or II (or both). 4. Synchro reverse dubbing The SYNC REV button allows both decks to be...
Owners Manual
Page 9
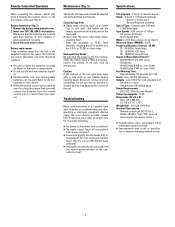
...on their positive ± and negative - Cleaning Tape Path ● Apply head cleaning fluid* to troubleshooting any fluid completely. For details of a cassette tape deck is similar to a cotton bud or soft cloth, and lightly rub the heads, capstan and all connections been made correctly? ● Low sound...use , read its instructions. Do not use thinner, benzine or alcohol as shown in the tape path. ● Also clean the pinch roller using a TEAC E-3 demagnetizer. Are you a few ideas of what to look for, check the following: ● No power: Is the power cord connected? ●...
...on their positive ± and negative - Cleaning Tape Path ● Apply head cleaning fluid* to troubleshooting any fluid completely. For details of a cassette tape deck is similar to a cotton bud or soft cloth, and lightly rub the heads, capstan and all connections been made correctly? ● Low sound...use , read its instructions. Do not use thinner, benzine or alcohol as shown in the tape path. ● Also clean the pinch roller using a TEAC E-3 demagnetizer. Are you a few ideas of what to look for, check the following: ● No power: Is the power cord connected? ●...
