Owners Manual
Page 4
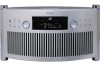
...LAITE SISÄLTÄÄ LASERDIODIN. nätströmställaren skiljer ej hela apparaten fran nätet. 4 Contents Thank you for choosing TEAC. The wires in the mains lead on this product are coloured in accordance with the following code: BLUE : NEUTRAL BROWN : LIVE As these colours may... EI SAA AVATA. DO NOT make any connection to the larger terminal which is cut off , remove the fuse and dispose of Each Control 8 Remote Control Unit 10 CD Playing a CD 11 Intro Check 13 Repeat Playback 14 Shuffle Playback 14 Programmed Playback 15 TUNER Listening to the Radio 17...
...LAITE SISÄLTÄÄ LASERDIODIN. nätströmställaren skiljer ej hela apparaten fran nätet. 4 Contents Thank you for choosing TEAC. The wires in the mains lead on this product are coloured in accordance with the following code: BLUE : NEUTRAL BROWN : LIVE As these colours may... EI SAA AVATA. DO NOT make any connection to the larger terminal which is cut off , remove the fuse and dispose of Each Control 8 Remote Control Unit 10 CD Playing a CD 11 Intro Check 13 Repeat Playback 14 Shuffle Playback 14 Programmed Playback 15 TUNER Listening to the Radio 17...

Owners Manual
Page 8
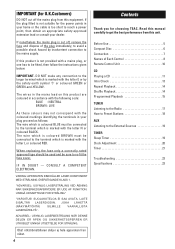
Names of Each Control TOP SIDE T A B FRONT C D E F GH I JK L M S RQ REAR P ON U REMOTE CONTROL S C E V D W O X R Q L Z F J M Y AB C 8
Names of Each Control TOP SIDE T A B FRONT C D E F GH I JK L M S RQ REAR P ON U REMOTE CONTROL S C E V D W O X R Q L Z F J M Y AB C 8
Owners Manual
Page 9
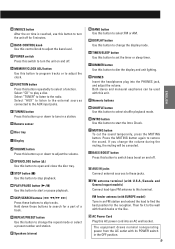
Select "AUX" to listen to the external sources connected to play a disc. G Remote sensor H Disc tray I Display J VOLUME button Press this button to open and close the disc tray. K OPEN/CLOSE button (L) Use this button up or down ...
Select "AUX" to listen to the external sources connected to play a disc. G Remote sensor H Disc tray I Display J VOLUME button Press this button to open and close the disc tray. K OPEN/CLOSE button (L) Use this button up or down ...
Owners Manual
Page 10
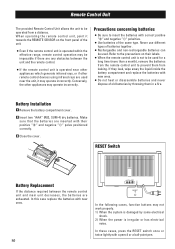
...by some electrical shock. 2) When the power is damaged by throwing them from leaking. Remote Control Unit The provided Remote Control Unit allows the unit to be operated from the remote control unit to prevent them in a fire. RESET Switch Battery Replacement If the distance required... new ones. < Do not heat or disassemble batteries and never dispose of the unit. < Even if the remote control unit is operated within the effective range, remote control operation may be used near the unit, it may operate incorrectly. Battery Installation 1 Remove the battery compartment cover...
...by some electrical shock. 2) When the power is damaged by throwing them from leaking. Remote Control Unit The provided Remote Control Unit allows the unit to be operated from the remote control unit to prevent them in a fire. RESET Switch Battery Replacement If the distance required... new ones. < Do not heat or disassemble batteries and never dispose of the unit. < Even if the remote control unit is operated within the effective range, remote control operation may be used near the unit, it may operate incorrectly. Battery Installation 1 Remove the battery compartment cover...

Owners Manual
Page 18
...a preset channel. 4 Within 10 seconds, select a preset channel to press the MEMORY/CLOCK ADJ button. If you press the numeric buttons (1-0) of the remote control unit, you can store the station directly. How to Preset Stations 35 2 11 In each band, up to 10 stations can be stored in... ADJ button. 2 Press the TUNING button and tune in a station to be stored as a preset station. < If you press the numeric buttons (1-0) of the remote control unit, you can select a preset channel directly. To store more stations, repeat steps 1 to 5 . 3 Press the MEMORY/CLOCK ADJ button. To select ...
...a preset channel. 4 Within 10 seconds, select a preset channel to press the MEMORY/CLOCK ADJ button. If you press the numeric buttons (1-0) of the remote control unit, you can store the station directly. How to Preset Stations 35 2 11 In each band, up to 10 stations can be stored in... ADJ button. 2 Press the TUNING button and tune in a station to be stored as a preset station. < If you press the numeric buttons (1-0) of the remote control unit, you can select a preset channel directly. To store more stations, repeat steps 1 to 5 . 3 Press the MEMORY/CLOCK ADJ button. To select ...

Owners Manual
Page 19
The sleep time can be switched off at 10-minute intervals. 90 80 70 10 (OFF) ENGLISH 19 Listening to the External Sources 12 Sleep Timer You can connect external sources such as VCR deck or TV to the AUX input jacks. 1 Press the POWER switch to select "AUX". TIMER/SLEEP The power can be changed at the specified time. When the power is on, press the TIMER/SLEEP (or the SLEEP button of the remote control unit) button repeatedly until the desired time appears on the display. 2 Press the FUNCTION button repeatedly to turn the unit ON.
The sleep time can be switched off at 10-minute intervals. 90 80 70 10 (OFF) ENGLISH 19 Listening to the External Sources 12 Sleep Timer You can connect external sources such as VCR deck or TV to the AUX input jacks. 1 Press the POWER switch to select "AUX". TIMER/SLEEP The power can be changed at the specified time. When the power is on, press the TIMER/SLEEP (or the SLEEP button of the remote control unit) button repeatedly until the desired time appears on the display. 2 Press the FUNCTION button repeatedly to turn the unit ON.
Owners Manual
Page 21
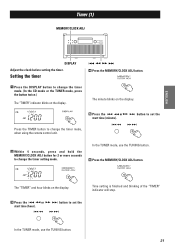
... the TUNER mode, use the TUNING button. 6 Press the MEMORY/CLOCK ADJ button. Press the TIMER button to change the timer mode, when using the remote control unit. 2 Within 4 seconds, press and hold the MEMORY/CLOCK ADJ button for 2 or more seconds to set the start time (hour). The minute blinks...
... the TUNER mode, use the TUNING button. 6 Press the MEMORY/CLOCK ADJ button. Press the TIMER button to change the timer mode, when using the remote control unit. 2 Within 4 seconds, press and hold the MEMORY/CLOCK ADJ button for 2 or more seconds to set the start time (hour). The minute blinks...
Owners Manual
Page 22
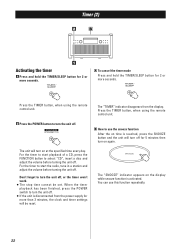
When the timer playback has been finished, press the POWER switch to turn off . Press the TIMER button, when using the remote control unit. 2 Press the POWER button to start the radio, tune in a station and adjust the volume before turning the unit off for 5 minutes then... display while snooze function is reached, press the SNOOZE button and the unit will turn the unit off . Press the TIMER button, when using the remote control unit. For the timer to start playback of a CD, press the FUNCTION button to use this function repeatedly. 22 B How to select "CD", ...
When the timer playback has been finished, press the POWER switch to turn off . Press the TIMER button, when using the remote control unit. 2 Press the POWER button to start the radio, tune in a station and adjust the volume before turning the unit off for 5 minutes then... display while snooze function is reached, press the SNOOZE button and the unit will turn the unit off . Press the TIMER button, when using the remote control unit. For the timer to start playback of a CD, press the FUNCTION button to use this function repeatedly. 22 B How to select "CD", ...

Owners Manual
Page 23
...of the disc. Tuner Cannot listen to the AC power supply. e Load a disc with your dealer or TEAC service center. e If the disc is noisy. Remote Control Unit Remote control doesn't work. e Use remote control unit within the range (5m/15ft) and point at the front panel. e Adjust the volume. ... without notice. < Illustrations may not be playable. eRotate the unit or antenna wire for the best reception position. e Clear obstacles between the remote control unit and the main unit. eThe unit is on the quality of the disc and/or the condition of the disc. e CD-RW...
...of the disc. Tuner Cannot listen to the AC power supply. e Load a disc with your dealer or TEAC service center. e If the disc is noisy. Remote Control Unit Remote control doesn't work. e Use remote control unit within the range (5m/15ft) and point at the front panel. e Adjust the volume. ... without notice. < Illustrations may not be playable. eRotate the unit or antenna wire for the best reception position. e Clear obstacles between the remote control unit and the main unit. eThe unit is on the quality of the disc and/or the condition of the disc. e CD-RW...