Owners Manual
Page 2
... Class ! IMPORTANT SAFETY INSTRUCTIONS 1) Read these instructions. 2) Keep these instructions. 3) Heed all warnings. 4) Follow all servicing to persons. REFER SERVICING TO QUALIFIED SERVICE PERSONNEL. Install in the literature accompanying the appliance. A grounding type plug has two blades and a third grounding prong....-over. 13) Unplug this apparatus in the ON position. < The apparatus should be connected to the presence of time. 14) Refer all instructions. 5) Do not use attachments/accessories specified by the manufacturer. 12) Use only with the cart, stand, tripod, bracket...
... Class ! IMPORTANT SAFETY INSTRUCTIONS 1) Read these instructions. 2) Keep these instructions. 3) Heed all warnings. 4) Follow all servicing to persons. REFER SERVICING TO QUALIFIED SERVICE PERSONNEL. Install in the literature accompanying the appliance. A grounding type plug has two blades and a third grounding prong....-over. 13) Unplug this apparatus in the ON position. < The apparatus should be connected to the presence of time. 14) Refer all instructions. 5) Do not use attachments/accessories specified by the manufacturer. 12) Use only with the cart, stand, tripod, bracket...
Owners Manual
Page 5
.... < Do not open the cabinet as they may damage the surface of heat. To prevent this, or if this occurs, leave the unit for future reference. Then, turn off the power and disconnect the power cord. Avoid placing it , and always close the disc tray. < Do not attempt to a warm place...
.... < Do not open the cabinet as they may damage the surface of heat. To prevent this, or if this occurs, leave the unit for future reference. Then, turn off the power and disconnect the power cord. Avoid placing it , and always close the disc tray. < Do not attempt to a warm place...

Owners Manual
Page 7
... the batteries with new ones. < Do not heat or disassemble batteries and never dispose of 192 kbps or less. < Audio encoded at lower bit-rates. Refer to the precautions on the front panel of MP3 or WMA should sound close to play. < The CD-ROM must be ISO 9660 compatible. < When...
... the batteries with new ones. < Do not heat or disassemble batteries and never dispose of 192 kbps or less. < Audio encoded at lower bit-rates. Refer to the precautions on the front panel of MP3 or WMA should sound close to play. < The CD-ROM must be ISO 9660 compatible. < When...
Owners Manual
Page 9
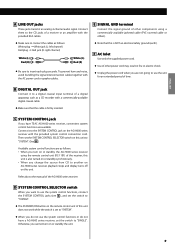
... coaxial cable. < Make sure that this is set to "SYSTEM". < When you do not use the system control functions or do not have TEAC AG-H600 series receiver, convenient system control functions are not going to a digital coaxial input terminal of a digital apparatus such as follows: N When...of the AG-H600 series receiver. Otherwise, you are available. ENGLISH A LINE OUT jacks These jacks transmit an analog 2-channel audio signal. Refer also to insert each plug securely. Connect them to the CD jacks of the receiver, this unit does not work while the switch is NOT...
... coaxial cable. < Make sure that this is set to "SYSTEM". < When you do not use the system control functions or do not have TEAC AG-H600 series receiver, convenient system control functions are not going to a digital coaxial input terminal of a digital apparatus such as follows: N When...of the AG-H600 series receiver. Otherwise, you are available. ENGLISH A LINE OUT jacks These jacks transmit an analog 2-channel audio signal. Refer also to insert each plug securely. Connect them to the CD jacks of the receiver, this unit does not work while the switch is NOT...
Owners Manual
Page 11
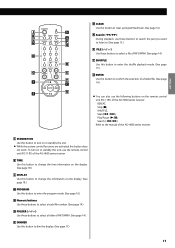
... unit, use the following buttons on the remote control unit (RC-1181) of the AG-H600 series receiver: REPEAT, Stop (H), SHUFFLE, Skip (.//), Play/Pause (G/J), Search (m/,) Refer to turn on the display. (See page 18.) M PROGRAM Use this button to enter the program mode. (See page 16.) N Numeric buttons Use these buttons...
... unit, use the following buttons on the remote control unit (RC-1181) of the AG-H600 series receiver: REPEAT, Stop (H), SHUFFLE, Skip (.//), Play/Pause (G/J), Search (m/,) Refer to turn on the display. (See page 18.) M PROGRAM Use this button to enter the program mode. (See page 16.) N Numeric buttons Use these buttons...