Owners Manual
Page 2
... damage to get the best performance from the AC outlet before operation < As the unit may damage the disc or the laser assembly. Read this manual carefully to this unit. Contents 2 Before Use 2 Discs 3 Connection 4 Wall Mounting 5 Names of Each Control 6 Remote Control Unit 7 Basic Operation 8 Listening... to a source of heat. Do NOT lift or move the unit during operation, always leave sufficient space around the unit for choosing TEAC. Contents Before Use Thank you are in any objects containing liquids such as vases, water glasses, potted plants, et cetera off the ...
... damage to get the best performance from the AC outlet before operation < As the unit may damage the disc or the laser assembly. Read this manual carefully to this unit. Contents 2 Before Use 2 Discs 3 Connection 4 Wall Mounting 5 Names of Each Control 6 Remote Control Unit 7 Basic Operation 8 Listening... to a source of heat. Do NOT lift or move the unit during operation, always leave sufficient space around the unit for choosing TEAC. Contents Before Use Thank you are in any objects containing liquids such as vases, water glasses, potted plants, et cetera off the ...
Owners Manual
Page 14
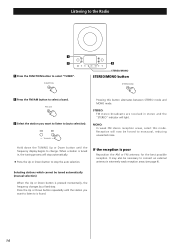
... the TUNING Up or Down button until the station you want to listen to monaural, reducing unwanted noise. Selecting stations which cannot be tuned automatically (manual selection) When the Up or Down button is tuned in stereo and the "STEREO" indicator will stop automatically. < Press the Up or Down button to...
... the TUNING Up or Down button until the station you want to listen to monaural, reducing unwanted noise. Selecting stations which cannot be tuned automatically (manual selection) When the Up or Down button is tuned in stereo and the "STEREO" indicator will stop automatically. < Press the Up or Down button to...
Owners Manual
Page 18
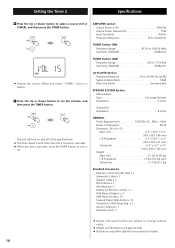
... use timer, press the TIMER button to turn on and off at the specified time. < The timer doesn't work when the unit is turned on manually. < When you select "TUNER", tune in a station. 7 Press the Up or Down button to set the volume, and then press the TIMER ...Antenna x 1 AM Antenna x 1 Battery for Remote Control x 1 Wall Mount Adaptor x 3 Wall Mount Screw x 10 Tapered Plastic Wall Anchor x 10 Template for Wall Mounting x 1 Owner's Manual x 1 Warranty Card x 1 < Design and specifications are subject to select a source (CD or TUNER), and then press the TIMER button. < Prepare the source.
... use timer, press the TIMER button to turn on and off at the specified time. < The timer doesn't work when the unit is turned on manually. < When you select "TUNER", tune in a station. 7 Press the Up or Down button to set the volume, and then press the TIMER ...Antenna x 1 AM Antenna x 1 Battery for Remote Control x 1 Wall Mount Adaptor x 3 Wall Mount Screw x 10 Tapered Plastic Wall Anchor x 10 Template for Wall Mounting x 1 Owner's Manual x 1 Warranty Card x 1 < Design and specifications are subject to select a source (CD or TUNER), and then press the TIMER button. < Prepare the source.


