LP-R550USB Brochure
Page 1
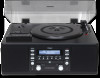
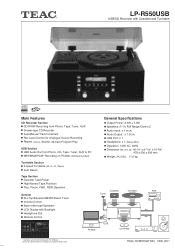
TEAC CORPORATION, FEB. 2011 Design and specifications are subject to PC MP3/WMA/PCM* Recording on PC/Mac (Sofware bundled) General Specifications Output Power: 3.5W + 3.5W ... Phono, Tape, Tuner, AUX Drawer-type CD Recorder Auto/Manual Track Increment Rec Level Control for Analogue Source Recording Repeat (1/ALL), Shuffle, 32-track Program Play USB Section USB Audio Out from Phono, CD, Tape, Tuner, AUX to change without notice. LP-R550USB USB/CD Recorder with Backlight Headphone Out Remote Control Tuner...
TEAC CORPORATION, FEB. 2011 Design and specifications are subject to PC MP3/WMA/PCM* Recording on PC/Mac (Sofware bundled) General Specifications Output Power: 3.5W + 3.5W ... Phono, Tape, Tuner, AUX Drawer-type CD Recorder Auto/Manual Track Increment Rec Level Control for Analogue Source Recording Repeat (1/ALL), Shuffle, 32-track Program Play USB Section USB Audio Out from Phono, CD, Tape, Tuner, AUX to change without notice. LP-R550USB USB/CD Recorder with Backlight Headphone Out Remote Control Tuner...
Owners Manual
Page 4
Read this manual carefully to a Cassette Tape 1 23 Before Recording 24 Recording 1 25 Finalizing 28 Erasing or Unfinalizing a CD-RW 29 REC OFF Timer 30 Recording into a computer ... Playback 20 Repeat Playback 21 Shuffle Playback 22 Time Display 22 Listening to get the best performance from this unit. Contents Thank you for choosing TEAC.
Read this manual carefully to a Cassette Tape 1 23 Before Recording 24 Recording 1 25 Finalizing 28 Erasing or Unfinalizing a CD-RW 29 REC OFF Timer 30 Recording into a computer ... Playback 20 Repeat Playback 21 Shuffle Playback 22 Time Display 22 Listening to get the best performance from this unit. Contents Thank you for choosing TEAC.

Owners Manual
Page 5
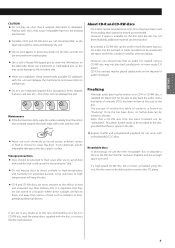
...If the unit is turned on, switching on the TV may cause lines to appear on the TV screen, depending on their edges. TEAC does not endorse any doubt regarding this might result in damage to the circuitry or electrical shock. If the record becomes dirty, gently ... electric waves of heat. This is more sensitive to extremes of these accessories are missing or have been damaged during transportation. If you purchased this manual in a safe place for future reference. Only handle records, by the edges or the label, with a commercially available record cleaner. < Commercial...
...If the unit is turned on, switching on the TV may cause lines to appear on the TV screen, depending on their edges. TEAC does not endorse any doubt regarding this might result in damage to the circuitry or electrical shock. If the record becomes dirty, gently ... electric waves of heat. This is more sensitive to extremes of these accessories are missing or have been damaged during transportation. If you purchased this manual in a safe place for future reference. Only handle records, by the edges or the label, with a commercially available record cleaner. < Commercial...
Owners Manual
Page 6
... the stylus is recommended that the stylus be replaced as soon as you notice a change in sound quality. CD-R CD-RW < Handle with this Owner's manual. 6 Prolonged use of a worn-out stylus may damage the record and cause the turntable to malfunction. < To avoid injury, do not conform to the ... < Depending on the quality of the disc and/or the condition of reproduction. Handling precautions < Always place the disc on the back of this unit, TEAC Corporation and its storage case, press down on the center of a bent or broken stylus may damage the record. Use of the case and lift...
... the stylus is recommended that the stylus be replaced as soon as you notice a change in sound quality. CD-R CD-RW < Handle with this Owner's manual. 6 Prolonged use of a worn-out stylus may damage the record and cause the turntable to malfunction. < To avoid injury, do not conform to the ... < Depending on the quality of the disc and/or the condition of reproduction. Handling precautions < Always place the disc on the back of this unit, TEAC Corporation and its storage case, press down on the center of a bent or broken stylus may damage the record. Use of the case and lift...
Owners Manual
Page 7
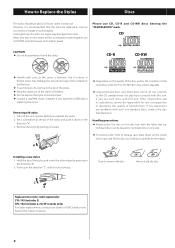
... of contents is available on the label side. Using commercially available CD stabilizers with a soft and dry cloth. However, if space is known as this manual, we use irregularly shaped discs (octagonal, heart shaped, business card size, etc.). Once this sort can be recorded once only. This allows further tracks to...
... of contents is available on the label side. Using commercially available CD stabilizers with a soft and dry cloth. However, if space is known as this manual, we use irregularly shaped discs (octagonal, heart shaped, business card size, etc.). Once this sort can be recorded once only. This allows further tracks to...
Owners Manual
Page 12
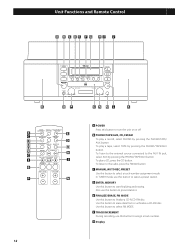
... PHONO/TAPE/ AUX button. Also use this button to assign a track number. F TRACK INCREMENT During recording, use this button to select a track-number-assignment mode. C MANUAL/AUTO REC, PRESET Use this button to select a preset station. In TUNER mode, use this button to preset stations. Use this button to the radio...
... PHONO/TAPE/ AUX button. Also use this button to assign a track number. F TRACK INCREMENT During recording, use this button to select a track-number-assignment mode. C MANUAL/AUTO REC, PRESET Use this button to select a preset station. In TUNER mode, use this button to preset stations. Use this button to the radio...
Owners Manual
Page 14
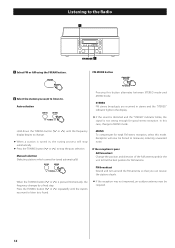
... button ( or you want to listen to stop the auto selection. FM MODE FM MODE button 2 Select the station you can receive the stations clearly. Manual selection (Selecting stations which cannot be tuned automatically) MONO To compensate for good stereo reception. FM broadcast Extend and turn around the FM antenna so...
... button ( or you want to listen to stop the auto selection. FM MODE FM MODE button 2 Select the station you can receive the stations clearly. Manual selection (Selecting stations which cannot be tuned automatically) MONO To compensate for good stereo reception. FM broadcast Extend and turn around the FM antenna so...

Owners Manual
Page 17
... arm automatically returns to the tone arm holder. tone arm 8 Gently lower the tone arm by slowly releasing the cue lever. To stop playback manually, slightly lift the tone arm using the cue lever and return it to the tone arm holder and the rotation stops. The turntable will prevent... dust from settling on the turntable. < Do not place anything on the record. You can lower the tone arm manually if the cue lever has not been raised. tone arm cue lever cue lever < Playing records with the dust cover down . < The tone arm ...
... arm automatically returns to the tone arm holder. tone arm 8 Gently lower the tone arm by slowly releasing the cue lever. To stop playback manually, slightly lift the tone arm using the cue lever and return it to the tone arm holder and the rotation stops. The turntable will prevent... dust from settling on the turntable. < Do not place anything on the record. You can lower the tone arm manually if the cue lever has not been raised. tone arm cue lever cue lever < Playing records with the dust cover down . < The tone arm ...

Owners Manual
Page 25
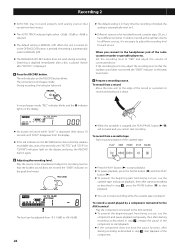
... below the threshold (-20dB, -30dB, or -40dB) for more track numbers may be assigned than 2 seconds, and sound has re-started. When the MANUAL/AUTO REC button is pressed once, the current mode is recommended for recording a noiseless source such as a record. "-40db" is suitable for recording an...track number is turned off. Press the OPEN/CLOSE button (L), place a disc on the disc tray with a lot of on the main unit. (The MANUAL/AUTO REC button on the display, or the RECORD button in step 1 . Use the TRACK INCREMENT button to trigger the track increment. When a source ...
... below the threshold (-20dB, -30dB, or -40dB) for more track numbers may be assigned than 2 seconds, and sound has re-started. When the MANUAL/AUTO REC button is pressed once, the current mode is recommended for recording a noiseless source such as a record. "-40db" is suitable for recording an...track number is turned off. Press the OPEN/CLOSE button (L), place a disc on the disc tray with a lot of on the main unit. (The MANUAL/AUTO REC button on the display, or the RECORD button in step 1 . Use the TRACK INCREMENT button to trigger the track increment. When a source ...
Owners Manual
Page 26
... analog sources that contain low-level noises. < The default setting is stopped, the PLAY/PAUSE button(y/J) will work while "bUSY" is MANUAL (off ). < The MANUAL/AUTO REC button does not work and you connect to "0dB" and adjust the volume of the component. To record from a record ...step 7 , release the pause of the cassette tape. 5 Adjusting the recording level. During recording, the indicator lights red. < Different sources to MANUAL (off ). The red indicator on the display. The level can not start recording while the cassette tape is row, adjust the recording level so that...
... analog sources that contain low-level noises. < The default setting is stopped, the PLAY/PAUSE button(y/J) will work while "bUSY" is MANUAL (off ). < The MANUAL/AUTO REC button does not work and you connect to "0dB" and adjust the volume of the component. To record from a record ...step 7 , release the pause of the cassette tape. 5 Adjusting the recording level. During recording, the indicator lights red. < Different sources to MANUAL (off ). The red indicator on the display. The level can not start recording while the cassette tape is row, adjust the recording level so that...
Owners Manual
Page 27
ENGLISH 7 Press the PLAY/PAUSE button (y/J) to stop recording. C Manual track division It is pressed while recording, the recorded sound will not stop or... recording is pressed within one . < The TRACK INCREMENT button works regardless of the MANUAL/AUTO REC setting. < You cannot divide the track manually to prevent unwanted noise from the tone arm or cassette tape being recorded, stop the recording... manually by one track. < The unit will be made on a disc depending on the ...
ENGLISH 7 Press the PLAY/PAUSE button (y/J) to stop recording. C Manual track division It is pressed while recording, the recorded sound will not stop or... recording is pressed within one . < The TRACK INCREMENT button works regardless of the MANUAL/AUTO REC setting. < You cannot divide the track manually to prevent unwanted noise from the tone arm or cassette tape being recorded, stop the recording... manually by one track. < The unit will be made on a disc depending on the ...
Owners Manual
Page 31
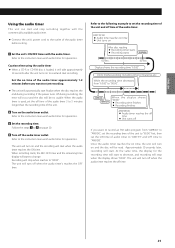
...operations. 3 Set the recording time. The unit will start to "65:00" first, then set the off the audio timer outlet. Refer to the instruction manual of the unit to change. Refer to 5 minutes longer than the recording time of audio timer for finalizing, etc. Follow the steps 1 to 5 on page... 30. 4 Turn off time of the audio timer 3 to the instruction manual of the unit. 2 Turn on and the recording will turn off during recording. AM7:59:00 < Audio timer reaches on time < Unit turns on and...
...operations. 3 Set the recording time. The unit will start to "65:00" first, then set the off the audio timer outlet. Refer to the instruction manual of the unit to change. Refer to 5 minutes longer than the recording time of audio timer for finalizing, etc. Follow the steps 1 to 5 on page... 30. 4 Turn off time of the audio timer 3 to the instruction manual of the unit. 2 Turn on and the recording will turn off during recording. AM7:59:00 < Audio timer reaches on time < Unit turns on and...

Owners Manual
Page 32
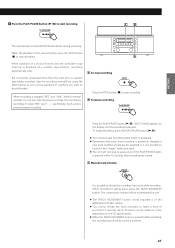
... then adjust the recording level on the unit and recognizes the port as shown above. N Unplug the USB cable. For detailed information, see the instruction manual for your recording software. 32 Selecting a recording source You can send the sound that sound signals from this unit to your computer.To select a source...
... then adjust the recording level on the unit and recognizes the port as shown above. N Unplug the USB cable. For detailed information, see the instruction manual for your recording software. 32 Selecting a recording source You can send the sound that sound signals from this unit to your computer.To select a source...
Owners Manual
Page 35
... Power consumption 25 W Dimensions (W x H x D 470 x 230 x 390 mm (18 1/2" x 9 1/16" X 15 3/8") Weight 11 kg (24 1/4 lb) Operating temperature range 5°C to 35°C Accessories Owner's manual Warranty card Quick Start Guide for recording 45 RPM adaptor Remote control unit (RC-1258) Battery (AA, alkaline or MN) x 2 FM antenna AM antenna Turntable...
... Power consumption 25 W Dimensions (W x H x D 470 x 230 x 390 mm (18 1/2" x 9 1/16" X 15 3/8") Weight 11 kg (24 1/4 lb) Operating temperature range 5°C to 35°C Accessories Owner's manual Warranty card Quick Start Guide for recording 45 RPM adaptor Remote control unit (RC-1258) Battery (AA, alkaline or MN) x 2 FM antenna AM antenna Turntable...


