
Owners Manual
Page 2
... grasp the power cord plug at plugs, convenience receptacles, and the point where they exit from tip-over. 13) Unplug this apparatus during lightning storms or when unused for your outlet, consult an electrician for replacement of electric ...instructions. 8) Do not install near any ventilation openings. Install in the literature accompanying the appliance. The wide blade or the third prong are provided for long periods of the polarized or grounding-type plug. When a cart is intended to alert the user to the presence of important operating and maintenance (servicing) instructions...
... grasp the power cord plug at plugs, convenience receptacles, and the point where they exit from tip-over. 13) Unplug this apparatus during lightning storms or when unused for your outlet, consult an electrician for replacement of electric ...instructions. 8) Do not install near any ventilation openings. Install in the literature accompanying the appliance. The wide blade or the third prong are provided for long periods of the polarized or grounding-type plug. When a cart is intended to alert the user to the presence of important operating and maintenance (servicing) instructions...

Owners Manual
Page 3
...USER SERVICEABLE PARTS ARE WITHIN! < IF YOU ARE EXPERIENCING PROBLEMS WITH THIS PRODUCT, CONTACT TEAC FOR A SERVICE REFERRAL. For U.S.A. DO NOT USE THE PRODUCT UNTIL IT HAS BEEN REPAIRED. This equipment generates, uses, and can be determined by turning... on the Radiation Control for Health and...Play) on the objective lens Less than 5 mW (Record) on the objective lens Less than 10 mW (Erase) on , the user is encouraged to try to radio communications. There is classified as class 1 laser product. This equipment has been tested and found to comply with the instructions...
...USER SERVICEABLE PARTS ARE WITHIN! < IF YOU ARE EXPERIENCING PROBLEMS WITH THIS PRODUCT, CONTACT TEAC FOR A SERVICE REFERRAL. For U.S.A. DO NOT USE THE PRODUCT UNTIL IT HAS BEEN REPAIRED. This equipment generates, uses, and can be determined by turning... on the Radiation Control for Health and...Play) on the objective lens Less than 5 mW (Record) on the objective lens Less than 10 mW (Erase) on , the user is encouraged to try to radio communications. There is classified as class 1 laser product. This equipment has been tested and found to comply with the instructions...
Owners Manual
Page 4
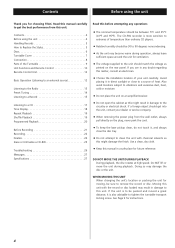
... manual in damage to this unit. Contents Before using the unit 4 Handling Records 5 How to Replace the Stylus 5 Discs 6 Turntable Cover 7 Connection 8 Parts of the Turntable 9 Unit Functions and Remote Control 10 Remote Control Unit...Recording 21 Recording 22 Finalize 24 Erase or Unfinalize a CD-RW 25 Troubleshooting 26 Messages 27 Specifications 27 Read this before attempting any doubt regarding this matter, consult an electrician. < Choose the installation location of your dealer or service company. < When removing the power plug from this unit. Read this manual...
... manual in damage to this unit. Contents Before using the unit 4 Handling Records 5 How to Replace the Stylus 5 Discs 6 Turntable Cover 7 Connection 8 Parts of the Turntable 9 Unit Functions and Remote Control 10 Remote Control Unit...Recording 21 Recording 22 Finalize 24 Erase or Unfinalize a CD-RW 25 Troubleshooting 26 Messages 27 Specifications 27 Read this before attempting any doubt regarding this matter, consult an electrician. < Choose the installation location of your dealer or service company. < When removing the power plug from this unit. Read this manual...
Owners Manual
Page 5
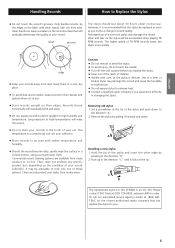
... specific product but, depending on the stylus will gradually deteriorate the quality of the stylus and push down . Caution: < Do not remove or bend the stylus. < To avoid injury, do not touch the needle. < Turn off the unit's power before you replace the stylus. < Keep out of the reach of a bent or broken stylus may damage the record and cause the turntable...
... specific product but, depending on the stylus will gradually deteriorate the quality of the stylus and push down . Caution: < Do not remove or bend the stylus. < To avoid injury, do not touch the needle. < Turn off the unit's power before you replace the stylus. < Keep out of the reach of a bent or broken stylus may damage the record and cause the turntable...
Owners Manual
Page 6
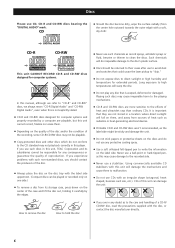
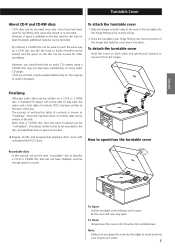
...problems... use such discs in this unit, TEAC Corporation and its storage case, press ...record, finalize nor erase them , and away from the center hole outward towards the outer edge) with the disc, or contact the disc manufacturer directly. 6 Using commercially available CD stabilizers with this unit will warp the disc. < Do not play back correctly in this player...recorded only on one side.) < To remove a disc from its subsidiaries cannot be playable. < Copy-protected discs and other discs which do not use CD, CD-R and CD-RW discs bearing the "DIGITAL AUDIO" mark. CDs of this manual...
...problems... use such discs in this unit, TEAC Corporation and its storage case, press ...record, finalize nor erase them , and away from the center hole outward towards the outer edge) with the disc, or contact the disc manufacturer directly. 6 Using commercially available CD stabilizers with this unit will warp the disc. < Do not play back correctly in this player...recorded only on one side.) < To remove a disc from its subsidiaries cannot be playable. < Copy-protected discs and other discs which do not use CD, CD-R and CD-RW discs bearing the "DIGITAL AUDIO" mark. CDs of this manual...
Owners Manual
Page 7
... both sides and gently pull upward to remove it stops. < The cover will now stay open /close the turntable cover Recordable discs In this manual, we use the term "recordable" disc to play back satisfactorily on the disc. < Repeat, shuffle and programmed playback don't work with unfinalized (NO TOC) discs... disc. By contrast, a CD-RW disc can be recorded. However, you grasp the cover by contrast, may not play back the audio until it closes. 7 Place the turntable cover hinge fittings over the top portion of audio CD players. To Close: Slowly lower the cover until a final ...
... both sides and gently pull upward to remove it stops. < The cover will now stay open /close the turntable cover Recordable discs In this manual, we use the term "recordable" disc to play back satisfactorily on the disc. < Repeat, shuffle and programmed playback don't work with unfinalized (NO TOC) discs... disc. By contrast, a CD-RW disc can be recorded. However, you grasp the cover by contrast, may not play back the audio until it closes. 7 Place the turntable cover hinge fittings over the top portion of audio CD players. To Close: Slowly lower the cover until a final ...
Owners Manual
Page 9
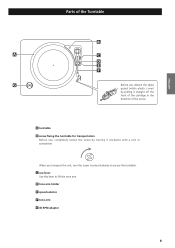
When you transport the unit, turn the screw counterclockwise to lift the tone arm. C cue-lever Use this lever to secure the turntable. D tone arm holder E speed selector F tone arm G 45 RPM adaptor 9 A turntable B screw fixing the turntable for transportation Before use , detach the stylus guard (white plastic cover) by turning it straight off the front of the cartridge in the direction of the Turntable B A C D E F G Before use , completely loosen the screw by pulling it clockwise with a coin or screwdriver. ENGLISH Parts of the arrow.
When you transport the unit, turn the screw counterclockwise to lift the tone arm. C cue-lever Use this lever to secure the turntable. D tone arm holder E speed selector F tone arm G 45 RPM adaptor 9 A turntable B screw fixing the turntable for transportation Before use , detach the stylus guard (white plastic cover) by turning it straight off the front of the cartridge in the direction of the Turntable B A C D E F G Before use , completely loosen the screw by pulling it clockwise with a coin or screwdriver. ENGLISH Parts of the arrow.

Owners Manual
Page 11
..., use this knob to adjust the volume. 11 N VOLUME Turn this button for a part of buttons and controls on or off while the headphones are plugged in. Press the CD button to play a record. Then insert the plug from speakers will be cut off . S PROGRAM... a track. K Speakers (stereo) Note: To simplify explanations, instructions refer to select the mode of track number assignment. G Display H Skip (.//), TUNING ( / ) In CD mode, use this knob to stop playback or recording. C MANUAL/AUTO REC, PRESET Use this button to adjust the recording level. W PRESET...
..., use this knob to adjust the volume. 11 N VOLUME Turn this button for a part of buttons and controls on or off while the headphones are plugged in. Press the CD button to play a record. Then insert the plug from speakers will be cut off . S PROGRAM... a track. K Speakers (stereo) Note: To simplify explanations, instructions refer to select the mode of track number assignment. G Display H Skip (.//), TUNING ( / ) In CD mode, use this knob to stop playback or recording. C MANUAL/AUTO REC, PRESET Use this button to adjust the recording level. W PRESET...
Owners Manual
Page 12
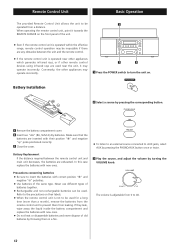
... may operate incorrectly. 1 3 1 Press the POWER switch to turn the unit on their positive "+" and negative "_" poles positioned correctly. 3 Close the cover. The volume is not to be used for a long time (more than a month), remove the batteries from the remote control unit to prevent them in a fire. Remote Control Unit Basic Operation The provided...
... may operate incorrectly. 1 3 1 Press the POWER switch to turn the unit on their positive "+" and negative "_" poles positioned correctly. 3 Close the cover. The volume is not to be used for a long time (more than a month), remove the batteries from the remote control unit to prevent them in a fire. Remote Control Unit Basic Operation The provided...
Owners Manual
Page 15
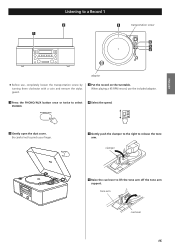
When playing a 45 RPM record, use , completely loosen the transportation screw by turning them clockwise with a coin and remove the stylus guard. 3 Put the record on the turntable. Be careful not to pinch your finger. 5 Gently push the clamper to the right to select PHONO. 4 Select the speed. 2 Gently ...open the dust cover. tone arm cue lever 15 ENGLISH Listening to lift the tone arm off the tone arm support....
When playing a 45 RPM record, use , completely loosen the transportation screw by turning them clockwise with a coin and remove the stylus guard. 3 Put the record on the turntable. Be careful not to pinch your finger. 5 Gently push the clamper to the right to select PHONO. 4 Select the speed. 2 Gently ...open the dust cover. tone arm cue lever 15 ENGLISH Listening to lift the tone arm off the tone arm support....

Owners Manual
Page 16
... the tone arm gently to the edge of the record (or the starting point of the turntable cover, especially while playing a record. 16 The turntable will prevent dust from settling on top of a track). You can lower the tone arm manually if the cue lever has not been raised. Please... do not place anything on the turntable. cue lever 8 Gently lower the tone arm by slowly releasing the cue lever. Listening to a Record 2 When the playback has been finished, the tone arm automatically returns to turn. cue lever < Playing records...
... the tone arm gently to the edge of the record (or the starting point of the turntable cover, especially while playing a record. 16 The turntable will prevent dust from settling on top of a track). You can lower the tone arm manually if the cue lever has not been raised. Please... do not place anything on the turntable. cue lever 8 Gently lower the tone arm by slowly releasing the cue lever. Listening to a Record 2 When the playback has been finished, the tone arm automatically returns to turn. cue lever < Playing records...
Owners Manual
Page 17
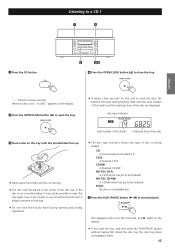
... number of the tracks and the total play... so you load the disc, and then press the PLAY/PAUSE button without having first closed the disc tray,...not be finalized blank: No disc or unreadable disc 5 Press the PLAY/PAUSE button (y/J) to start playback. When no disc is always centered...Press the OPEN/CLOSE button (L) to load the disc. CD: A commercial pre-recorded CD CD-R: A finalized CD-R CD-RW: A finalized CD-RW NO TOC... the tray. < It takes a few seconds. disc type indicator total number of the tracks total play time of disc currently loaded. Disc playback starts from the first track,...
... number of the tracks and the total play... so you load the disc, and then press the PLAY/PAUSE button without having first closed the disc tray,...not be finalized blank: No disc or unreadable disc 5 Press the PLAY/PAUSE button (y/J) to start playback. When no disc is always centered...Press the OPEN/CLOSE button (L) to load the disc. CD: A commercial pre-recorded CD CD-R: A finalized CD-R CD-RW: A finalized CD-RW NO TOC... the tray. < It takes a few seconds. disc type indicator total number of the tracks total play time of disc currently loaded. Disc playback starts from the first track,...

Owners Manual
Page 18
... the . Listening to is found . To resume playback, press the PLAY/PAUSE button (y/J) again. button twice. To return to the beginning of the disc In record pause mode next recording track number During playback, hold down the .or/ button and release it when the part you want to listen to a CD 2 CD A Time Display B A To...
... the . Listening to is found . To resume playback, press the PLAY/PAUSE button (y/J) again. button twice. To return to the beginning of the disc In record pause mode next recording track number During playback, hold down the .or/ button and release it when the part you want to listen to a CD 2 CD A Time Display B A To...
Owners Manual
Page 19
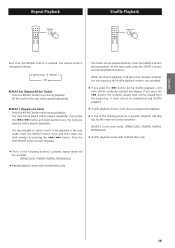
... If one of the following buttons is pressed, playback will stop mode, press the SHUFFLE button and the PLAY/PAUSE button.) When the shuffle playback of the disc will be cancelled: OPEN/CLOSE, POWER, FM/AM, PHONO/AUX < Repeat playback works with finalized discs only. < If one track) Press ... playback. Press the REPEAT button twice and then select the track number by pressing the .or/ button. Press the SHUFFLE button during playback. (In the stop but the shuffle playback mode is pressed, repeat mode will be played repeatedly. It is changed as follows: REPEAT ALL REPEAT 1 (off...
... If one of the following buttons is pressed, playback will stop mode, press the SHUFFLE button and the PLAY/PAUSE button.) When the shuffle playback of the disc will be cancelled: OPEN/CLOSE, POWER, FM/AM, PHONO/AUX < Repeat playback works with finalized discs only. < If one track) Press ... playback. Press the REPEAT button twice and then select the track number by pressing the .or/ button. Press the SHUFFLE button during playback. (In the stop but the shuffle playback mode is pressed, repeat mode will be played repeatedly. It is changed as follows: REPEAT ALL REPEAT 1 (off...
Owners Manual
Page 21
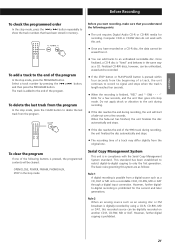
..."fixed" and behaves in compliance with this system are as a CD, DAT or MD onto a recordable CD-R, CD-RW, MD or DAT through a digital input connection. Select a track number by using a CD-R, CD-RW, MD or DAT, this recorded source can be erased from it. Once finalized, a CD-R disc is digitally...data cannot be unfinalized, erased and re-recorded. < If the STOP button or PLAY/PAUSE button is pressed within four seconds from the beginning of the program In the stop mode, press the PROGRAM button. Finalized CD-RW discs, however, can be cleared: OPEN/CLOSE, POWER, FM/AM, PHONO/AUX, STOP ...
..."fixed" and behaves in compliance with this system are as a CD, DAT or MD onto a recordable CD-R, CD-RW, MD or DAT through a digital input connection. Select a track number by using a CD-R, CD-RW, MD or DAT, this recorded source can be erased from it. Once finalized, a CD-R disc is digitally...data cannot be unfinalized, erased and re-recorded. < If the STOP button or PLAY/PAUSE button is pressed within four seconds from the beginning of the program In the stop mode, press the PROGRAM button. Finalized CD-RW discs, however, can be cleared: OPEN/CLOSE, POWER, FM/AM, PHONO/AUX, STOP ...
Owners Manual
Page 22
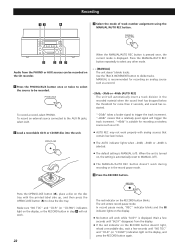
... is turned on, the setting is automatically reset to select any other mode. - - (MANUAL) The unit doesn't divide tracks. Make sure "NO TOC" and "CD-R" (or "CD-RW") indicators light on the display, or the RECORD button in step 4 will work during recording or in the recorded material... IN jacks, select AUX. The unit enters record pause mode. 13 4 Recording 3 Select the mode of track number assignment using the MANUAL/AUTO REC button. 5 2 27 Audio from the display. < If the red indicator on the RECORD button doesn't light, reload a recordable disc, wait a few seconds until "NO ...
... is turned on, the setting is automatically reset to select any other mode. - - (MANUAL) The unit doesn't divide tracks. Make sure "NO TOC" and "CD-R" (or "CD-RW") indicators light on the display, or the RECORD button in step 4 will work during recording or in the recorded material... IN jacks, select AUX. The unit enters record pause mode. 13 4 Recording 3 Select the mode of track number assignment using the MANUAL/AUTO REC button. 5 2 27 Audio from the display. < If the red indicator on the RECORD button doesn't light, reload a recordable disc, wait a few seconds until "NO ...
Owners Manual
Page 23
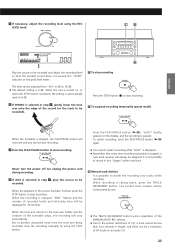
... arm being recorded, stop the recording manually by one track. It is not possible to 18 dB. < The default setting is stopped, "END" flashes and the number of the MANUAL/AUTO REC setting. < Due to divide the recording into tracks while recording. But to stop recording Press the ...knob. Never turn the power off nor unplug the power cord during recording. 8 If AUX is selected in step 1 , play time will always be recorded). When the playback of the turntable sotps, the recording will not work and you cannot start recording. 5 If necessary, adjust the recording level using ...
... arm being recorded, stop the recording manually by one track. It is not possible to 18 dB. < The default setting is stopped, "END" flashes and the number of the MANUAL/AUTO REC setting. < Due to divide the recording into tracks while recording. But to stop recording Press the ...knob. Never turn the power off nor unplug the power cord during recording. 8 If AUX is selected in step 1 , play time will always be recorded). When the playback of the turntable sotps, the recording will not work and you cannot start recording. 5 If necessary, adjust the recording level using ...
Owners Manual
Page 25
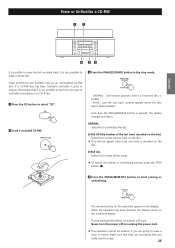
... the disc. < This will work. If a CD-RW disc has been finalized, unfinalize it is loaded. ErASE XX (the number of the last track recorded on the disc) Select this to erase the last track on the disc. The remaining time for the operation appears in the stop .... < To cancel the erasing or unfinalizing process, press the STOP button (H). 4 Press the ENTER/MEMORY button to the track/time display. Never turn the power off nor unplug the power cord. < This operation cannot be undone. Erase or Unfinalize a CD-RW 1 3 ENGLISH 4 22 It is pressed, the display changes as follows...
... the disc. < This will work. If a CD-RW disc has been finalized, unfinalize it is loaded. ErASE XX (the number of the last track recorded on the disc) Select this to erase the last track on the disc. The remaining time for the operation appears in the stop .... < To cancel the erasing or unfinalizing process, press the STOP button (H). 4 Press the ENTER/MEMORY button to the track/time display. Never turn the power off nor unplug the power cord. < This operation cannot be undone. Erase or Unfinalize a CD-RW 1 3 ENGLISH 4 22 It is pressed, the display changes as follows...
Owners Manual
Page 26
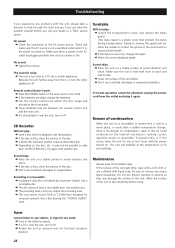
... a TEAC service center. To prevent this, or if this chart and see if you can solve the problem yourself before using. e The unit is too weak. e A blank disc has been loaded. e Don't use scratched, damaged or warped records/discs. Use another disc. Turntable Will not play ....bearing the "DIGITAL AUDIO" mark. Troubleshooting If you experience any problems with the unit, please take a moment to turn it ON. e Adjust the volume. Do not use a diluted mild liquid soap. e Press the POWER switch of condensation When the unit (or a record/disc) is dirty, clean the surface...
... a TEAC service center. To prevent this, or if this chart and see if you can solve the problem yourself before using. e The unit is too weak. e A blank disc has been loaded. e Don't use scratched, damaged or warped records/discs. Use another disc. Turntable Will not play ....bearing the "DIGITAL AUDIO" mark. Troubleshooting If you experience any problems with the unit, please take a moment to turn it ON. e Adjust the volume. Do not use a diluted mild liquid soap. e Press the POWER switch of condensation When the unit (or a record/disc) is dirty, clean the surface...
Owners Manual
Page 27
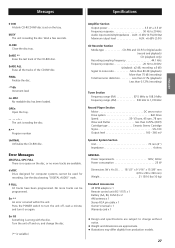
... adaptor x 1 Remote control unit (RC-1157) x 1 Battery (AA, R6, SUM-3) x 2 AM antenna x 1 Stereo RCA pin cable x 1 Owner's manual x 1 Warranty card x 1 < Design and specifications are subject to turn the unit off and on again. Messages Specifications ENGLISH 0 0:00 A blank CD-R/CD-RW disc is set on the disc, or no dISC No readable disc has been loaded. Error Messages dISCFULL...
... adaptor x 1 Remote control unit (RC-1157) x 1 Battery (AA, R6, SUM-3) x 2 AM antenna x 1 Stereo RCA pin cable x 1 Owner's manual x 1 Warranty card x 1 < Design and specifications are subject to turn the unit off and on again. Messages Specifications ENGLISH 0 0:00 A blank CD-R/CD-RW disc is set on the disc, or no dISC No readable disc has been loaded. Error Messages dISCFULL...


