

GT-R1 & DR-1 tested media list
Page 1
TASCAM DR-1/GT-R1 Tested media List Manufacture SanDisk Panasonic Lexar Model Parts# SDSDX3-004G-J31A Extreme 30MB/s ɹʢClass10ʣ ɹ SDSDX3-008G-J31A SDSDX3-016G-J31A ...
TASCAM DR-1/GT-R1 Tested media List Manufacture SanDisk Panasonic Lexar Model Parts# SDSDX3-004G-J31A Extreme 30MB/s ɹʢClass10ʣ ɹ SDSDX3-008G-J31A SDSDX3-016G-J31A ...

GT-R1 Release Notes v 2.00
Page 1
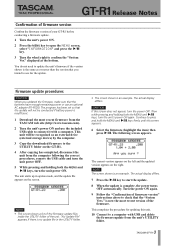
.... • A file cannot be divided if a new file name would be created if the number of files is now possible. D01072000A 1 TASCAM GT-R1 Press the REC/ PAUSE [-] key to open the REC SETTING screen and use the most recent firmware for the latest firmware. For example, if... you set the size to "2GB", the unit automatically creates a new file during recording when a file reaches 2GB in advance. GT-R1 Release Notes Contents Updates 1 New function 1 V2.00 additions 1 Confirmation of firmware version 3 Firmware update procedures 3 Updates Always use the SIZE item ...
.... • A file cannot be divided if a new file name would be created if the number of files is now possible. D01072000A 1 TASCAM GT-R1 Press the REC/ PAUSE [-] key to open the REC SETTING screen and use the most recent firmware for the latest firmware. For example, if... you set the size to "2GB", the unit automatically creates a new file during recording when a file reaches 2GB in advance. GT-R1 Release Notes Contents Updates 1 New function 1 V2.00 additions 1 Confirmation of firmware version 3 Firmware update procedures 3 Updates Always use the SIZE item ...

GT-R1 Release Notes v 2.00
Page 2
..., choose ALLDEL from the pop-up window, and choose the INFO item. Select the file that are not recognized by the unit are not deleted. 2 TASCAM GT-R1 Erase all the files in a folder at one time. NOTES • If the unit has been in record standby mode, you want to start recording...". recording icon. When this function, press the MENU key, open the REC SETTING screen, and set the DELAY item to open the pop-up window. GT-R1 Release Notes Pre-recording When in record standby for 0.3 seconds in a folder at once You can now check the digital value of the input level...
..., choose ALLDEL from the pop-up window, and choose the INFO item. Select the file that are not recognized by the unit are not deleted. 2 TASCAM GT-R1 Erase all the files in a folder at one time. NOTES • If the unit has been in record standby mode, you want to start recording...". recording icon. When this function, press the MENU key, open the REC SETTING screen, and set the DELAY item to open the pop-up window. GT-R1 Release Notes Pre-recording When in record standby for 0.3 seconds in a folder at once You can now check the digital value of the input level...
GT-R1 Release Notes v 2.00
Page 3
... starts up in the UTILITY folder. • The screen shown is now the most recent firmware from the unit's UTILITY folder. 3 TASCAM GT-R1 The following the correct procedures, remove the USB cable and turn the unit power OFF. 5 While pressing and holding both the MENU and...." The actual display differs. Continue to confirm the "System Ver." Turn the power ON again. 9 Follow the "Confirmation of the firmware. GT-R1 Release Notes Confirmation of firmware version Confirm the firmware version of the unit. NOTE • This screen shows a list of the firmware update files...
... starts up in the UTILITY folder. • The screen shown is now the most recent firmware from the unit's UTILITY folder. 3 TASCAM GT-R1 The following the correct procedures, remove the USB cable and turn the unit power OFF. 5 While pressing and holding both the MENU and...." The actual display differs. Continue to confirm the "System Ver." Turn the power ON again. 9 Follow the "Confirmation of the firmware. GT-R1 Release Notes Confirmation of firmware version Confirm the firmware version of the unit. NOTE • This screen shows a list of the firmware update files...
GT-R1 Manual Addendum v 2.00
Page 1
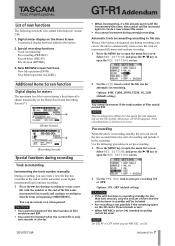
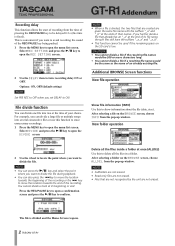
... on the Home Screen and Recording Screen (*). [Home Screen] [Recording Screen] Special functions during recording, you set PRE REC to ON. 1 TASCAM GT-R1 Moreover, 23:59:59 appears if the recording time is one higher (incremented) and continue recording. 1 Press the ≤ key during overdub recording...the total number of files would exceed 999. • You cannot increment when the current file is only two seconds or shorter. GT-R1 Addendum List of new functions The following procedures to set pre-recording. 1. Use the following functions were added with an incremented file...
... on the Home Screen and Recording Screen (*). [Home Screen] [Recording Screen] Special functions during recording, you set PRE REC to ON. 1 TASCAM GT-R1 Moreover, 23:59:59 appears if the recording time is one higher (incremented) and continue recording. 1 Press the ≤ key during overdub recording...the total number of files would exceed 999. • You cannot increment when the current file is only two seconds or shorter. GT-R1 Addendum List of new functions The following procedures to set pre-recording. 1. Use the following functions were added with an incremented file...
GT-R1 Manual Addendum v 2.00
Page 2
Select DIVIDE and press the Á/π key to open the DIVIDE screen NOTE • When a file is divided and the Home Screen reopens. 2 TASCAM GT-R1 CAUTION • You cannot divide a file if the resulting file names would be 200 or more characters long. • You cannot divide a file if a resulting... the end of the recording. NOTE • Subfolders are not erased. • Read-only files are not erased. Delete all the files in a folder. GT-R1 Addendum Recording delay This function allows the start of recording from the time of pressing the REC/PAUSE key to be the same as the...
Select DIVIDE and press the Á/π key to open the DIVIDE screen NOTE • When a file is divided and the Home Screen reopens. 2 TASCAM GT-R1 CAUTION • You cannot divide a file if the resulting file names would be 200 or more characters long. • You cannot divide a file if a resulting... the end of the recording. NOTE • Subfolders are not erased. • Read-only files are not erased. Delete all the files in a folder. GT-R1 Addendum Recording delay This function allows the start of recording from the time of pressing the REC/PAUSE key to be the same as the...

GT-R1 Owner's Manual
Page 2
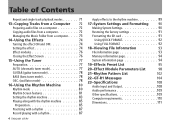
... time 12 Resetting the unit 12 3-Part Names and Functions 13 Top panel 13 Right side panel 17 Left side panel 19 Front panel 20 2 TASCAM GT-R1 Rear panel 20 Bottom panel 21 4-Screen Overview 22 Home Screen 22 Record Screen 25 Rhythm Screen 26 Setting Screens 27 Setting screen structure 27...
... time 12 Resetting the unit 12 3-Part Names and Functions 13 Top panel 13 Right side panel 17 Left side panel 19 Front panel 20 2 TASCAM GT-R1 Rear panel 20 Bottom panel 21 4-Screen Overview 22 Home Screen 22 Record Screen 25 Rhythm Screen 26 Setting Screens 27 Setting screen structure 27...
GT-R1 Owner's Manual
Page 3
... changing pitch 67 Changing pitch without changing speed 68 Reducing guitar and bass sounds 68 12-Loop, Repeat and Single Playback 70 Loop playback 70 3 TASCAM GT-R1
... changing pitch 67 Changing pitch without changing speed 68 Reducing guitar and bass sounds 68 12-Loop, Repeat and Single Playback 70 Loop playback 70 3 TASCAM GT-R1
GT-R1 Owner's Manual
Page 4
...rhythm machine 83 Playing along with the rhythm machine 85 Preparation 85 Practicing with a rhythm 87 Record playing with a rhythm 87 4 TASCAM GT-R1 Apply effects to the rhythm machine 89 17-System Settings and Formatting 90 Making System Settings 90 Restoring the factory settings 91 Formatting the... page 94 19-Effects Preset List 95 20-Effect Module Parameters List 98 21-Rhythm Pattern List 102 22-GT-R1 Messages 104 23-Specifications 108 Audio Input and Output 108 Audio performance 109 Other specifications 109 Computer requirements 110 Dimensions 111
...rhythm machine 83 Playing along with the rhythm machine 85 Preparation 85 Practicing with a rhythm 87 Record playing with a rhythm 87 4 TASCAM GT-R1 Apply effects to the rhythm machine 89 17-System Settings and Formatting 90 Making System Settings 90 Restoring the factory settings 91 Formatting the... page 94 19-Effects Preset List 95 20-Effect Module Parameters List 98 21-Rhythm Pattern List 102 22-GT-R1 Messages 104 23-Specifications 108 Audio Input and Output 108 Audio performance 109 Other specifications 109 Computer requirements 110 Dimensions 111
GT-R1 Owner's Manual
Page 5
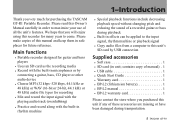
We hope that you will enjoy using this recorder for purchasing the TASCAM GT-R1 Portable Recorder. Please read this Owner's Manual carefully in order to come. Main functions •• Portable recorder designed for guitar and bass players •&#...-L2 warranty card 1 Please contact the store where you very much for many years to maximize your use of a recorded guitar or bass during transportation. 5 TASCAM GT-R1
We hope that you will enjoy using this recorder for purchasing the TASCAM GT-R1 Portable Recorder. Please read this Owner's Manual carefully in order to come. Main functions •• Portable recorder designed for guitar and bass players •&#...-L2 warranty card 1 Please contact the store where you very much for many years to maximize your use of a recorded guitar or bass during transportation. 5 TASCAM GT-R1

GT-R1 Owner's Manual
Page 6
... manipulated in ways similar to describe the push- Macintosh, Mac OS, and Mac OS X are written like this: MENU. •• Messages shown on the GT-R1 are written like this manual, we usually use the term "key" to files on a computer. In this : Are you have any questions, please contact us...
... manipulated in ways similar to describe the push- Macintosh, Mac OS, and Mac OS X are written like this: MENU. •• Messages shown on the GT-R1 are written like this manual, we usually use the term "key" to files on a computer. In this : Are you have any questions, please contact us...
GT-R1 Owner's Manual
Page 7
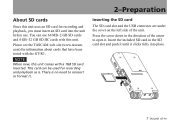
... TASCAM web site (www.tascam. com) for information about cards that have been tested with a 1GB SD card inserted. Press the cover down in the SD card slot and push it until it . Insert the included SD card in the direction of the unit. NOTE When new, this unit comes with the GT-R1... is . About SD cards Since this unit uses an SD card for recording and playback, you must insert an SD card into place. 7 TASCAM GT-R1 You can be used for recording and playback as is no need to reinsert or format it. 2-Preparation Inserting the SD card The SD card ...
... TASCAM web site (www.tascam. com) for information about cards that have been tested with a 1GB SD card inserted. Press the cover down in the SD card slot and push it until it . Insert the included SD card in the direction of the unit. NOTE When new, this unit comes with the GT-R1... is . About SD cards Since this unit uses an SD card for recording and playback, you must insert an SD card into place. 7 TASCAM GT-R1 You can be used for recording and playback as is no need to reinsert or format it. 2-Preparation Inserting the SD card The SD card ...

GT-R1 Owner's Manual
Page 8
CAUTION Do not remove the SD card during recording or playback, or when the unit is connected to save from the card before formatting it. 8 TASCAM GT-R1 When formatting finishes, the Home Screen appears. Press the ¥/π key to format the card so that you can be used with this unit. ...
CAUTION Do not remove the SD card during recording or playback, or when the unit is connected to save from the card before formatting it. 8 TASCAM GT-R1 When formatting finishes, the Home Screen appears. Press the ¥/π key to format the card so that you can be used with this unit. ...
GT-R1 Owner's Manual
Page 9
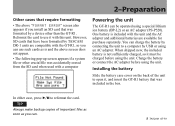
...install an SD card that have been formatted by connecting the unit to open it, and insert the GT-R1 battery that was included in the box. You can charge the battery by TASCAM DR-1 units are compatible with the unit and the AC adapter and additional batteries are available for ... require formatting • The above screen does not appear. • The following pop-up screen appears if a system file or other than the GT-R1. In either case, press ¥/π to use such cards as is included with the GT-R1, so you can. 9 TASCAM GT-R1 Reformat the card to reformat the card.
...install an SD card that have been formatted by connecting the unit to open it, and insert the GT-R1 battery that was included in the box. You can charge the battery by TASCAM DR-1 units are compatible with the unit and the AC adapter and additional batteries are available for ... require formatting • The above screen does not appear. • The following pop-up screen appears if a system file or other than the GT-R1. In either case, press ¥/π to use such cards as is included with the GT-R1, so you can. 9 TASCAM GT-R1 Reformat the card to reformat the card.
GT-R1 Owner's Manual
Page 10
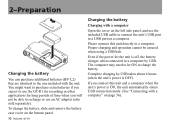
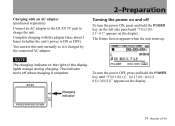
... is off, the battery charges when connected to a computer. To change the battery, slide and remove the battery case cover on the bottom panel. 10 TASCAM GT-R1 Charging the battery Charging with the unit. You might want to purchase extra batteries if you connect this unit directly to a computer by USB takes...
... is off, the battery charges when connected to a computer. To change the battery, slide and remove the battery case cover on the bottom panel. 10 TASCAM GT-R1 Charging the battery Charging with the unit. You might want to purchase extra batteries if you connect this unit directly to a computer by USB takes...
GT-R1 Owner's Manual
Page 11
... to the DC IN 5V jack to the right of the display lights orange during charging. Charging indicator 11 TASCAM GT-R1 To turn the power ON, press and hold the POWER key until "TASCAM GT-R1" appears on the display. 2-Preparation Charging with the adapter takes about 3 hours (whether the unit's power is ON or...
... to the DC IN 5V jack to the right of the display lights orange during charging. Charging indicator 11 TASCAM GT-R1 To turn the power ON, press and hold the POWER key until "TASCAM GT-R1" appears on the display. 2-Preparation Charging with the adapter takes about 3 hours (whether the unit's power is ON or...
GT-R1 Owner's Manual
Page 12
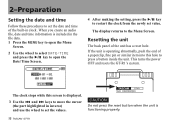
The clock stops while this hole to set value. This turns the power OFF and resets the GT-R1's system. Resetting the unit The back panel of a paperclip, fine pin or similar item into this screen is included in clock. When you create an ... has a reset hole. 2-Preparation Setting the date and time Follow these procedures to press a button inside the unit. If the unit is functioning properly. 12 TASCAM GT-R1 The display returns to the Menu Screen.
The clock stops while this hole to set value. This turns the power OFF and resets the GT-R1's system. Resetting the unit The back panel of a paperclip, fine pin or similar item into this screen is included in clock. When you create an ... has a reset hole. 2-Preparation Setting the date and time Follow these procedures to press a button inside the unit. If the unit is functioning properly. 12 TASCAM GT-R1 The display returns to the Menu Screen.

GT-R1 Owner's Manual
Page 13
... input source, select "INT/ MIC" on the rear panel, the built-in stereo microphone To use this key to return to the Home Screen. 13 TASCAM GT-R1
... input source, select "INT/ MIC" on the rear panel, the built-in stereo microphone To use this key to return to the Home Screen. 13 TASCAM GT-R1

GT-R1 Owner's Manual
Page 14
... move down a level. On the setting screens, use this case, stop playback to return to search backwards. In this button to move up a level. 14 TASCAM GT-R1 When the Rhythm Screen is open , use this key when a track is stopped at the end of the interval that is stopped to skip to...
... move down a level. On the setting screens, use this case, stop playback to return to search backwards. In this button to move up a level. 14 TASCAM GT-R1 When the Rhythm Screen is open , use this key when a track is stopped at the end of the interval that is stopped to skip to...
GT-R1 Owner's Manual
Page 15
... the Rhythm Setting Screen. 9 FX key Briefly press this key to open , press and hold this key to return to stop the rhythm machine. 15 TASCAM GT-R1
... the Rhythm Setting Screen. 9 FX key Briefly press this key to open , press and hold this key to return to stop the rhythm machine. 15 TASCAM GT-R1


