
CR-H260i Owner's Manual
Page 3
...as class laser product. Laser: Type: Manufacturer: Laser output: Wavelength: SF-P101N Sanyo Electric Co.,LTD Less than 1 mW on the Radiation Control for a long time (more than 0.3 mW Wavelength: 790±25nm Q Precautions concerning batteries Misuse of batteries could short circuit, leak or ...read and observe the following precautions carefully. Do not mix new batteries with correct positive (+) and negative (_) orientations. oo If the remote control is not used for Health and Safety Act of 1968", and is confirmed to insert the batteries with old ones or use different types...
...as class laser product. Laser: Type: Manufacturer: Laser output: Wavelength: SF-P101N Sanyo Electric Co.,LTD Less than 1 mW on the Radiation Control for a long time (more than 0.3 mW Wavelength: 790±25nm Q Precautions concerning batteries Misuse of batteries could short circuit, leak or ...read and observe the following precautions carefully. Do not mix new batteries with correct positive (+) and negative (_) orientations. oo If the remote control is not used for Health and Safety Act of 1968", and is confirmed to insert the batteries with old ones or use different types...
CR-H260i Owner's Manual
Page 6
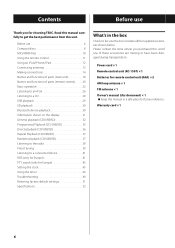
...get the best performance from this unit. Please contact the store where you for future reference. Read this unit if any of parts (remote control 20 Basic operation 22 Listening to an iPod 26 Listening to a CD 28 USB playback 29 SD playback 30 Bluetooth device playback 30 ...52 What's in a safe place for choosing TEAC. Before use Thank you purchased this manual carefully to be sure the box includes all the supplied accessories shown below. Contents Before use 6 Compact discs 8 MP3/WMA files 10 Using the remote control 11 Using an iPod/iPhone/iPad 12 Connecting ...
...get the best performance from this unit. Please contact the store where you for future reference. Read this unit if any of parts (remote control 20 Basic operation 22 Listening to an iPod 26 Listening to a CD 28 USB playback 29 SD playback 30 Bluetooth device playback 30 ...52 What's in a safe place for choosing TEAC. Before use Thank you purchased this manual carefully to be sure the box includes all the supplied accessories shown below. Contents Before use 6 Compact discs 8 MP3/WMA files 10 Using the remote control 11 Using an iPod/iPhone/iPad 12 Connecting ...

CR-H260i Owner's Manual
Page 11
...contact your local municipality, your waste disposal service or the point of the remote control decreases, the batteries have become exhausted. If that is operated near the unit, it . The other remote control devices using infrared rays are used near other devices that there are no ... that generate infrared rays, or if other devices might not function. Please carefully read and observe the precautions on the remote sensor, the remote control might also operate incorrectly. ppIf direct sunlight or strong artificial illumination shines on page 3. In this unit to fire, injury...
...contact your local municipality, your waste disposal service or the point of the remote control decreases, the batteries have become exhausted. If that is operated near the unit, it . The other remote control devices using infrared rays are used near other devices that there are no ... that generate infrared rays, or if other devices might not function. Please carefully read and observe the precautions on the remote sensor, the remote control might also operate incorrectly. ppIf direct sunlight or strong artificial illumination shines on page 3. In this unit to fire, injury...

CR-H260i Owner's Manual
Page 12
... antenna on a surface, insert the claw into the slot in the direction that gives the best reception. iPod/iPhone/iPad software If the unit or remote control buttons do not work properly with the iPod/iPhone/iPad. Place the antenna on a window frame, for your iPod/iPhone/iPad, updating its software might...
... antenna on a surface, insert the claw into the slot in the direction that gives the best reception. iPod/iPhone/iPad software If the unit or remote control buttons do not work properly with the iPod/iPhone/iPad. Place the antenna on a window frame, for your iPod/iPhone/iPad, updating its software might...

CR-H260i Owner's Manual
Page 16
... to enable communication between them , "Connected" will also need to pair this unit. ppIf using the remote control, press its Settings application, select the General category and then set the Bluetooth item to ON. 3 Select "CR-H260i" (this unit to listen wirelessly to music playing back on the display. ppWhen using an iOS device...
... to enable communication between them , "Connected" will also need to pair this unit. ppIf using the remote control, press its Settings application, select the General category and then set the Bluetooth item to ON. 3 Select "CR-H260i" (this unit to listen wirelessly to music playing back on the display. ppWhen using an iOS device...

CR-H260i Owner's Manual
Page 19
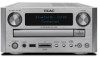
... tune to stations or select preset stations (page 38). In TUNER modes, use this button to open and close the disc tray. B Remote control signal receiver When using the remote control, point it in standby mode. M MENU/FM MODE button In iPod mode, use this knob to skip to the previous or next track...
... tune to stations or select preset stations (page 38). In TUNER modes, use this button to open and close the disc tray. B Remote control signal receiver When using the remote control, point it in standby mode. M MENU/FM MODE button In iPod mode, use this knob to skip to the previous or next track...

CR-H260i Owner's Manual
Page 20
... for a point in standby mode. In TUNER mode, use either of the buttons to select preset stations. When both the main unit and the remote control have buttons with the number buttons, see page 34. f PLAY/PAUSE button [7/9] In CD/USB/SD/iPod mode, use this button to use... the same manner. d Search buttons [m/,] In CD/USB/SD/iPod mode, use this button to search for at least 2 seconds. Names and functions of parts (remote control) (1) a b c d e gf h i j k l m n o p q rs t u v w x a STANDBY/ON button [¤] Press this button to turn the unit on or put it in a track, file or song....
... for a point in standby mode. In TUNER mode, use either of the buttons to select preset stations. When both the main unit and the remote control have buttons with the number buttons, see page 34. f PLAY/PAUSE button [7/9] In CD/USB/SD/iPod mode, use this button to use... the same manner. d Search buttons [m/,] In CD/USB/SD/iPod mode, use this button to search for at least 2 seconds. Names and functions of parts (remote control) (1) a b c d e gf h i j k l m n o p q rs t u v w x a STANDBY/ON button [¤] Press this button to turn the unit on or put it in a track, file or song....

CR-H260i Owner's Manual
Page 21
... off (page 46). In TUNER mode, use this button to turn the sleep timer on this button to select sources. Please ignore "INFO" on the remote control unit. (INFO function does not work at all on the next page e 21 k Source buttons [AUX 1 AUX 2, TUNER, CD, USB, SD, iPod] Use these buttons...
... off (page 46). In TUNER mode, use this button to turn the sleep timer on this button to select sources. Please ignore "INFO" on the remote control unit. (INFO function does not work at all on the next page e 21 k Source buttons [AUX 1 AUX 2, TUNER, CD, USB, SD, iPod] Use these buttons...

CR-H260i Owner's Manual
Page 23
..." will enter standby mode. Adjusting the tone and balance 3 Play the source, and gradually turn the vol- BASS TREBLE BALANCE Normal display Continued on the remote control (AUX1, AUX2, TUNER, CD, iPod/ USB, SD or Bluetooth). ppIf the source is set to USB when an iPod/iPhone/ iPad is not operated for...
..." will enter standby mode. Adjusting the tone and balance 3 Play the source, and gradually turn the vol- BASS TREBLE BALANCE Normal display Continued on the remote control (AUX1, AUX2, TUNER, CD, iPod/ USB, SD or Bluetooth). ppIf the source is set to USB when an iPod/iPhone/ iPad is not operated for...
CR-H260i Owner's Manual
Page 26
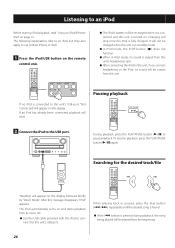
... the display. After this unit's headphones jack. When playing back or paused, press the Skip button (.//) repeatedly until the desired song is turned on the remote control unit. button is pressed during playback, the song being played will be recharged when it to the iPod, no sound is connected to this unit...
... the display. After this unit's headphones jack. When playing back or paused, press the Skip button (.//) repeatedly until the desired song is turned on the remote control unit. button is pressed during playback, the song being played will be recharged when it to the iPod, no sound is connected to this unit...
CR-H260i Owner's Manual
Page 27
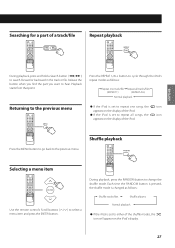
... e albums Normal playback ppIf the iPod is set to search forward or backward in the track or file. Shuffle playback Selecting a menu item Use the remote control's Scroll buttons (k/j) to change the shuffle mode. During playback, press the RANDOM button to select a menu item and press the ENTER button. Searching for a part...
... e albums Normal playback ppIf the iPod is set to search forward or backward in the track or file. Shuffle playback Selecting a menu item Use the remote control's Scroll buttons (k/j) to change the shuffle mode. During playback, press the RANDOM button to select a menu item and press the ENTER button. Searching for a part...

CR-H260i Owner's Manual
Page 28
.../Stop AM09:00 F031 T999 28 Be careful not to select "CD". "No disc" will be displayed if no buttons will work. When using the remote control, press its CD button. Wait until the total track number and total playback time of the disc are displayed. When an audio CD is loaded...
.../Stop AM09:00 F031 T999 28 Be careful not to select "CD". "No disc" will be displayed if no buttons will work. When using the remote control, press its CD button. Wait until the total track number and total playback time of the disc are displayed. When an audio CD is loaded...

CR-H260i Owner's Manual
Page 29
... unit can play MP3/WMA files stored on USB flash drives. ppIf you load a disc, and then press the Play/Pause but- When using the remote control, press its iPod/USB button. ppThe unit stops automatically when playback of up to 32 GB. 1 Press the SOURCE button repeatedly to the unit's USB...
... unit can play MP3/WMA files stored on USB flash drives. ppIf you load a disc, and then press the Play/Pause but- When using the remote control, press its iPod/USB button. ppThe unit stops automatically when playback of up to 32 GB. 1 Press the SOURCE button repeatedly to the unit's USB...

CR-H260i Owner's Manual
Page 30
... audio played back on the display. 2 Press the Play/Pause button (7/9). 3 Press the Play/Pause button (7/9). 30 Cautions for using the remote control, press its basic operations. If the unit does not detect the Bluetooth device, "Not Connected" will be displayed if no SD memory card is... memory cards. 1 Press the SOURCE button repeatedly to select "SD CARD". Some Bluetooth devices, however, might not respond to commands from the remote control or might respond to select Bluetooth. If the connected Bluetooth-enabled device is loaded. 2 Insert an SD memory card into the unit's SD ...
... audio played back on the display. 2 Press the Play/Pause button (7/9). 3 Press the Play/Pause button (7/9). 30 Cautions for using the remote control, press its basic operations. If the unit does not detect the Bluetooth device, "Not Connected" will be displayed if no SD memory card is... memory cards. 1 Press the SOURCE button repeatedly to select "SD CARD". Some Bluetooth devices, however, might not respond to commands from the remote control or might respond to select Bluetooth. If the connected Bluetooth-enabled device is loaded. 2 Insert an SD memory card into the unit's SD ...

CR-H260i Owner's Manual
Page 36
... the unit's PROGRAM button uu Pressing the unit's SOURCE button uu Pressing the AUX 1, AUX 2, TUNER, CD, iPod/USB, SD or Bluetooth button on the remote control uu Pressing the STANDBY/ON button uu Opening the disc tray uu Disconnecting the AC power cord Press the Number buttons to clear all program... Press the PROGRAM button when playback is stopped. Programmed Playback (CD/USB/SD) (3) Direct playback (CD/USB/SD) Clearing the program You can use the remote control's Number buttons to select a track/file during playback and when playback is stopped to select a track/file.
... the unit's PROGRAM button uu Pressing the unit's SOURCE button uu Pressing the AUX 1, AUX 2, TUNER, CD, iPod/USB, SD or Bluetooth button on the remote control uu Pressing the STANDBY/ON button uu Opening the disc tray uu Disconnecting the AC power cord Press the Number buttons to clear all program... Press the PROGRAM button when playback is stopped. Programmed Playback (CD/USB/SD) (3) Direct playback (CD/USB/SD) Clearing the program You can use the remote control's Number buttons to select a track/file during playback and when playback is stopped to select a track/file.
CR-H260i Owner's Manual
Page 38
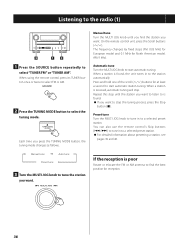
..., the unit tunes in to a selected preset station. Repeat this step until you find the best position for reception. 38 You can also use the remote control's Skip buttons (.//) to tune in to the station automatically. The frequency changes by fixed steps (FM: 0.05 MHz for European model and 0.1 MHz ...to tune in to is found . If the reception is received, automatic tuning will stop the tuning process, press the Stop button (8). When using the remote control, press its TUNER button once or twice to select FM or AM. 2 Press the TUNING MODE button to select "TUNER FM" or "TUNER AM...
..., the unit tunes in to a selected preset station. Repeat this step until you find the best position for reception. 38 You can also use the remote control's Skip buttons (.//) to tune in to the station automatically. The frequency changes by fixed steps (FM: 0.05 MHz for European model and 0.1 MHz ...to tune in to is found . If the reception is received, automatic tuning will stop the tuning process, press the Stop button (8). When using the remote control, press its TUNER button once or twice to select FM or AM. 2 Press the TUNING MODE button to select "TUNER FM" or "TUNER AM...
CR-H260i Owner's Manual
Page 41
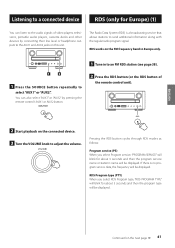
... 38). 2 Press the RDS button (or the RDS button of video players, televisions, portable audio players, cassette decks and other devices by pressing the remote control's AUX1 or AUX2 button. 1 Tune in Europe only. 1 3 1 Press the SOURCE button repeatedly to select "AUX1" or "AUX2". You can... listen to the audio signals of the remote control unit). 2 Start playback on the next page e 41 If there is a broadcasting service that allows stations to adjust the volume. The Radio Data System...
... 38). 2 Press the RDS button (or the RDS button of video players, televisions, portable audio players, cassette decks and other devices by pressing the remote control's AUX1 or AUX2 button. 1 Tune in Europe only. 1 3 1 Press the SOURCE button repeatedly to select "AUX1" or "AUX2". You can... listen to the audio signals of the remote control unit). 2 Start playback on the next page e 41 If there is a broadcasting service that allows stations to adjust the volume. The Radio Data System...
CR-H260i Owner's Manual
Page 43
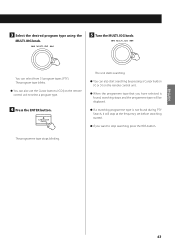
... , searching stops and the programme type will stop searching, press the RDS button. ppYou can also start searching by pressing a Cursor button (l or ;) on the remote control unit to stop at the frequency set before searching started. ppYou can select from 31 program types (PTY). ENGLISH 43 ppWhen the programme type that... displayed. 3 Select the desired program type using the MULTI JOG knob. 5 Turn the MULTI JOG knob. You can also use the Cursor buttons (l/;) on the remote control unit. The programme type stops blinking.
... , searching stops and the programme type will stop searching, press the RDS button. ppYou can also start searching by pressing a Cursor button (l or ;) on the remote control unit to stop at the frequency set before searching started. ppYou can select from 31 program types (PTY). ENGLISH 43 ppWhen the programme type that... displayed. 3 Select the desired program type using the MULTI JOG knob. 5 Turn the MULTI JOG knob. You can also use the Cursor buttons (l/;) on the remote control unit. The programme type stops blinking.
CR-H260i Owner's Manual
Page 49
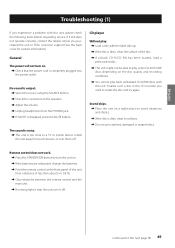
... does not operate correctly, contact the retailer where you purchased the unit or TEAC customer support (See the back cover for contact information). e The unit is output. Sound skips. e Clear obstacles between the remote control and the main unit. e Load a disc with this unit, please check... a disc in the CD recorder you experience a problem with this unit. e Do not use scratched, damaged or warped discs. Remote control does not work. e Point the remote control at the front panel of the unit from a distance of the disc. Continued on a stable place to the speakers. If it...
... does not operate correctly, contact the retailer where you purchased the unit or TEAC customer support (See the back cover for contact information). e The unit is output. Sound skips. e Clear obstacles between the remote control and the main unit. e Load a disc with this unit, please check... a disc in the CD recorder you experience a problem with this unit. e Do not use scratched, damaged or warped discs. Remote control does not work. e Point the remote control at the front panel of the unit from a distance of the disc. Continued on a stable place to the speakers. If it...
CR-H260i Owner's Manual
Page 51
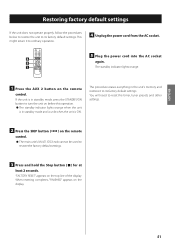
...timer, tuner presets and other settings. 2 Press the SKIP button (.) on the top line of the display. "FACTORY RESET" appears on the remote control. If the unit is ON. ppThe main unit's MULTI JOG knob cannot be used to restore the factory default settings. 3 Press and hold .... 5 Plug the power cord into the AC socket 3 2 again. 1 The standby indicator lights orange. 1 Press the AUX 2 button on the remote control. ENGLISH Restoring factory default settings If the unit does not operate properly, follow the procedures below to restore the unit to its factory default settings...
...timer, tuner presets and other settings. 2 Press the SKIP button (.) on the top line of the display. "FACTORY RESET" appears on the remote control. If the unit is ON. ppThe main unit's MULTI JOG knob cannot be used to restore the factory default settings. 3 Press and hold .... 5 Plug the power cord into the AC socket 3 2 again. 1 The standby indicator lights orange. 1 Press the AUX 2 button on the remote control. ENGLISH Restoring factory default settings If the unit does not operate properly, follow the procedures below to restore the unit to its factory default settings...
