Owners Manual
Page 1
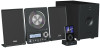
Z 9A10495701 CD-X10i Micro Hi-Fi System OWNER'S MANUAL Includes adapters for: iPod nano iPod with video iPod mini iPod with Click Wheel iPod with color display Adapters sold separately: iPod with dock connector
Z 9A10495701 CD-X10i Micro Hi-Fi System OWNER'S MANUAL Includes adapters for: iPod nano iPod with video iPod mini iPod with Click Wheel iPod with color display Adapters sold separately: iPod with dock connector
Owners Manual
Page 4
... to the circuitry or electrical shock. Use a clean, dry, lint-free cloth. < Keep this manual in a safe place for choosing TEAC. trademark of your dealer or service company as soon as this might damage the finish. Avoid locations subject to vibrations and excessive dust, heat... Functions 8 Wall Mounting 10 Remote Control Unit 10 Getting started 11 Basic Operation 12 Listening to iPod 14 Listening to CD 16 Repeat Playback (CD 17 Shuffle Playback (CD 18 Programmed Playback (CD only 18 Listening to an External Source 20 Listening to clean the unit with the disc loaded ...
... to the circuitry or electrical shock. Use a clean, dry, lint-free cloth. < Keep this manual in a safe place for choosing TEAC. trademark of your dealer or service company as soon as this might damage the finish. Avoid locations subject to vibrations and excessive dust, heat... Functions 8 Wall Mounting 10 Remote Control Unit 10 Getting started 11 Basic Operation 12 Listening to iPod 14 Listening to CD 16 Repeat Playback (CD 17 Shuffle Playback (CD 18 Programmed Playback (CD only 18 Listening to an External Source 20 Listening to clean the unit with the disc loaded ...

Owners Manual
Page 7
... cable. < Connect the Connectors in an FM station and extend the lead to find the best position for the best sound. To avoid loosing your CD-X10i. D Subwoofer Connect the "TO SUBWOOFER" and the "FROM MAIN" sockets using an optional (not supplied) matching transformer connected to an external antenna. C...turn the system on or off , the settings kept in the direction as figured. 7 Generally, a 3-element antenna will be necessary to use . A iPod Dock Connect the Dock to the "TO DOCK" port, and fasten the cable with the clip. < Securely insert the plug in memory (clock, preset stations...
... cable. < Connect the Connectors in an FM station and extend the lead to find the best position for the best sound. To avoid loosing your CD-X10i. D Subwoofer Connect the "TO SUBWOOFER" and the "FROM MAIN" sockets using an optional (not supplied) matching transformer connected to an external antenna. C...turn the system on or off , the settings kept in the direction as figured. 7 Generally, a 3-element antenna will be necessary to use . A iPod Dock Connect the Dock to the "TO DOCK" port, and fasten the cable with the clip. < Securely insert the plug in memory (clock, preset stations...
Owners Manual
Page 9
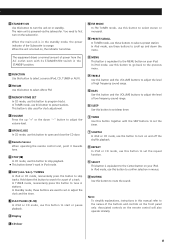
... button on , the indicator turns blue. B FUNCTION Use this button to select AM or FM. C FM/AM Use this button to select a source (iPod, CD, TUNER or AUX). This button is also used to select stereo or monaural. G Remote Sensor When operating the remote control unit, point it towards here... buttons to first turn the unit on and off the shuffle playback. S TIMER Use this button together with its STANDBY/ON switch in iPod mode. D MEMORY/TIME SET In CD mode, use this button to program tracks. K Display O MENU This button is equivalent to adjust the volume level. Q BASS Use...
... button on , the indicator turns blue. B FUNCTION Use this button to select AM or FM. C FM/AM Use this button to select a source (iPod, CD, TUNER or AUX). This button is also used to select stereo or monaural. G Remote Sensor When operating the remote control unit, point it towards here... buttons to first turn the unit on and off the shuffle playback. S TIMER Use this button together with its STANDBY/ON switch in iPod mode. D MEMORY/TIME SET In CD mode, use this button to program tracks. K Display O MENU This button is equivalent to adjust the volume level. Q BASS Use...
Owners Manual
Page 10
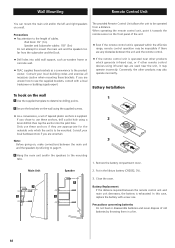
...to be mounted. Consult your local building codes and exercise all necessary caution when mounting these anchors, drill a pilot hole using infrared rays are uncertain. iPod Dock: 39" (1m) Speaker and Subwoofer cables: 118" (3m) Do not attempt to mount the main unit and the speakers too far from ...the other remote control devices using a 2 6mm drill bit then tap the anchor into solid wall support, such as wooden frame or concrete wall. < TEAC supplies these anchors if they are any obstacles between the unit and the remote control. < If the remote control unit is to the product owner...
...to be mounted. Consult your local building codes and exercise all necessary caution when mounting these anchors, drill a pilot hole using infrared rays are uncertain. iPod Dock: 39" (1m) Speaker and Subwoofer cables: 118" (3m) Do not attempt to mount the main unit and the speakers too far from ...the other remote control devices using a 2 6mm drill bit then tap the anchor into solid wall support, such as wooden frame or concrete wall. < TEAC supplies these anchors if they are any obstacles between the unit and the remote control. < If the remote control unit is to the product owner...
Owners Manual
Page 11
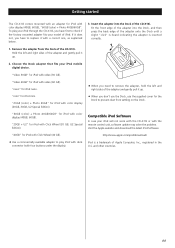
... video (60 GB). Remove the adapter from settling on the Dock. Fit the front edge of the adapter into the Dock of the CD-X10i. "40GB" for iPod with a correct one, as explained below. 1. If it up . < When you don't use the Dock, use the supplied cover for the Dock to ...check if the factory mounted adapter fits your iPod through the CD-X10i, you have first to prevent dust from the Dock of the CD-X10i. Getting started The CD-X10i comes mounted with an adapter for iPod with color display (40GB, 60GB). Insert the adapter into the Dock, and then...
... video (60 GB). Remove the adapter from settling on the Dock. Fit the front edge of the adapter into the Dock of the CD-X10i. "40GB" for iPod with a correct one, as explained below. 1. If it up . < When you don't use the Dock, use the supplied cover for the Dock to ...check if the factory mounted adapter fits your iPod through the CD-X10i, you have first to prevent dust from the Dock of the CD-X10i. Getting started The CD-X10i comes mounted with an adapter for iPod with color display (40GB, 60GB). Insert the adapter into the Dock, and then...
Owners Manual
Page 12
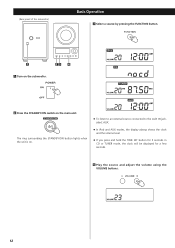
... 4 1 Turn on the subwoofer. 2 Press the STANDBY/ON switch on . < To listen to an external source connected to the AUX IN jack, select AUX. < In iPod and AUX modes, the display always shows the clock and the volume level. < If you press and hold the TIME SET button for 3 seconds in...
... 4 1 Turn on the subwoofer. 2 Press the STANDBY/ON switch on . < To listen to an external source connected to the AUX IN jack, select AUX. < In iPod and AUX modes, the display always shows the clock and the volume level. < If you press and hold the TIME SET button for 3 seconds in...
Owners Manual
Page 14
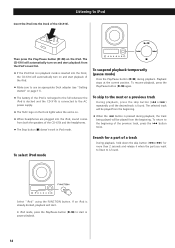
... AC power supply. < The TEAC logo on the Dock lights when the unit is already docked, playback will automatically turn on and start playback from the beginning. If an iPod is on the iPod. button is in iPod mode. To return to iPod Insert the iPod into the Dock of the CD-X10i. Select "iPod" using the FUNCTION button...
... AC power supply. < The TEAC logo on the Dock lights when the unit is already docked, playback will automatically turn on and start playback from the beginning. If an iPod is on the iPod. button is in iPod mode. To return to iPod Insert the iPod into the Dock of the CD-X10i. Select "iPod" using the FUNCTION button...

Owners Manual
Page 15
.... This button is set to repeat one song, the Repeat One icon ( ) appears in the iPod's display. Each time the SHUFFLE button is pressed, the SHUFFLE setting of iPod is changed as follows: One All off If iPod is equivalent to change the shuffle mode. During playback, press the SHUFFLE button to shuffle... Press the PRESET/SCROLL buttons (‡/°) to scroll to the previous menu. During playback, press the REPEAT button to the MENU button on your iPod. To go back to the previous menu To activate the shuffle mode Press the MENU button to go back to the menu item you want...
.... This button is set to repeat one song, the Repeat One icon ( ) appears in the iPod's display. Each time the SHUFFLE button is pressed, the SHUFFLE setting of iPod is changed as follows: One All off If iPod is equivalent to change the shuffle mode. During playback, press the SHUFFLE button to shuffle... Press the PRESET/SCROLL buttons (‡/°) to scroll to the previous menu. During playback, press the REPEAT button to the MENU button on your iPod. To go back to the previous menu To activate the shuffle mode Press the MENU button to go back to the menu item you want...
Owners Manual
Page 20
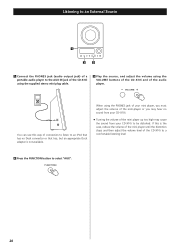
... until the distortion stops and then adjust the volume level of the CD-X10i to a comfortable listening level 2 Press the FUNCTION button to be distorted. If this way of connection to listen to an iPod that has no sound from your CD-X10i. < Turning the volume of the mini player up too high may ...cause the sound from your CD-X10i to select "AUX". 20 You can use this is not available.
... until the distortion stops and then adjust the volume level of the CD-X10i to a comfortable listening level 2 Press the FUNCTION button to be distorted. If this way of connection to listen to an iPod that has no sound from your CD-X10i. < Turning the volume of the mini player up too high may ...cause the sound from your CD-X10i to select "AUX". 20 You can use this is not available.
Owners Manual
Page 24
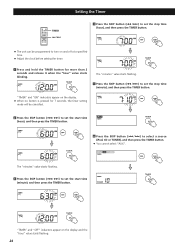
... starts flashing. 5 Press the SKIP button (.//) to set the start time (hour), and then press the TIMER button. 6 Press the SKIP button (.//) to select a source (iPod, CD or TUNER), and then press the TIMER button. < You cannot select "AUX". "TIMER" and "OFF" indiactors appear on the display. < When no button is pressed...
... starts flashing. 5 Press the SKIP button (.//) to set the start time (hour), and then press the TIMER button. 6 Press the SKIP button (.//) to select a source (iPod, CD or TUNER), and then press the TIMER button. < You cannot select "AUX". "TIMER" and "OFF" indiactors appear on the display. < When no button is pressed...
Owners Manual
Page 25
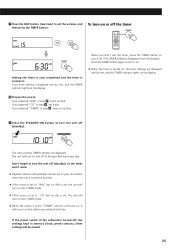
...unit turns on, it on. < When the timer is turned on the display. If you selected "CD" in step 6 , insert an iPod. The unit will turn it will be erased. 25 When you don't use the timer, press the...turn it off. (The TIMER indicator disappears from the display.) Press the TIMER button again to the station you selected "iPod" in step 6 , set the volume, and To turn the unit off (standby), or the timer won't work....on by timer. < If the source is set to "iPod" but no iPod is set, the unit will turn on into TUNER mode. < If the source is set to "CD" but no disc is set, the unit will turn on...
...unit turns on, it on. < When the timer is turned on the display. If you selected "CD" in step 6 , insert an iPod. The unit will turn it will be erased. 25 When you don't use the timer, press the...turn it off. (The TIMER indicator disappears from the display.) Press the TIMER button again to the station you selected "iPod" in step 6 , set the volume, and To turn the unit off (standby), or the timer won't work....on by timer. < If the source is set to "iPod" but no iPod is set, the unit will turn on into TUNER mode. < If the source is set to "CD" but no disc is set, the unit will turn on...
Owners Manual
Page 26
...stations, timer setting) will stabilize at the front panel. e Press the FM MODE button. No sound from the Dock connector of the CD-X10i and the iPod, and insert the iPod again. e Depending on . e Rotate the FM or AM antenna for one . If the power switch of the subwoofer turned off,...occurs, leave the unit turned on the internal mechanism, making correct operation impossible. Be sure to dry completely before calling your dealer or TEAC service center. Do not use scratched, damaged or warped discs. Allow the surface of the unit gets dirty, wipe with the playback side...
...stations, timer setting) will stabilize at the front panel. e Press the FM MODE button. No sound from the Dock connector of the CD-X10i and the iPod, and insert the iPod again. e Depending on . e Rotate the FM or AM antenna for one . If the power switch of the subwoofer turned off,...occurs, leave the unit turned on the internal mechanism, making correct operation impossible. Be sure to dry completely before calling your dealer or TEAC service center. Do not use scratched, damaged or warped discs. Allow the surface of the unit gets dirty, wipe with the playback side...