
AG-790A Manual
Page 2
Before Use 3 Remote Control Unit 4 Connecting Antennas 4 Connection 6 Names of Each Control 8 Basic Operation 10 Radio Reception 13 Preset Tuning 14 RDS 15 RDS (PTY 15 RDS (PTY Search 16 TroubleShooting 17 Specifications 18 Disposal of your ... chemical solvents as printed on the product. Do NOT place anything on each side of heat. Allow adequate air circulation around the unit for choosing TEAC.
Before Use 3 Remote Control Unit 4 Connecting Antennas 4 Connection 6 Names of Each Control 8 Basic Operation 10 Radio Reception 13 Preset Tuning 14 RDS 15 RDS (PTY 15 RDS (PTY Search 16 TroubleShooting 17 Specifications 18 Disposal of your ... chemical solvents as printed on the product. Do NOT place anything on each side of heat. Allow adequate air circulation around the unit for choosing TEAC.

AG-790A Manual
Page 3
...case replace the batteries with correct positive "+" and negative "_" polarities. < Use batteries of the receiver (or other TEAC component). < Even if the remote control unit is operated near the unit, it may operate incorrectly. Adjust the antenna in a suitable location like a ... a fire. 4 When operating the remote control unit, point it towards the REMOTE SENSOR on the front panel of the same type. Remote Control Unit Connecting Antennas The receiver and some other TEAC components which generate infrared rays, or if other remote control devices using an outdoor antenna. 3....
...case replace the batteries with correct positive "+" and negative "_" polarities. < Use batteries of the receiver (or other TEAC component). < Even if the remote control unit is operated near the unit, it may operate incorrectly. Adjust the antenna in a suitable location like a ... a fire. 4 When operating the remote control unit, point it towards the REMOTE SENSOR on the front panel of the same type. Remote Control Unit Connecting Antennas The receiver and some other TEAC components which generate infrared rays, or if other remote control devices using an outdoor antenna. 3....

AG-790A Manual
Page 8
... STANDBY indicator This indicator lights when the unit is output from the speakers. C REMOTE SENSOR When operating the remote control unit, point it towards the REMOTE SENSOR. U SPEAKERS buttons Use these buttons to operate TEAC components with its POWER switch in the standby mode. H VOLUME/JOG Turn this... with mark. I BALANCE button Press this button to scan preset channels. M LOUDNESS button Use this button and turn the unit on the remote control will also operate similarly. 9 b MEMORY SCAN button Use this jack, and adjust the volume by turning the VOLUME knob. f INPUT (...
... STANDBY indicator This indicator lights when the unit is output from the speakers. C REMOTE SENSOR When operating the remote control unit, point it towards the REMOTE SENSOR. U SPEAKERS buttons Use these buttons to operate TEAC components with its POWER switch in the standby mode. H VOLUME/JOG Turn this... with mark. I BALANCE button Press this button to scan preset channels. M LOUDNESS button Use this button and turn the unit on the remote control will also operate similarly. 9 b MEMORY SCAN button Use this jack, and adjust the volume by turning the VOLUME knob. f INPUT (...
AG-790A Manual
Page 9
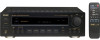
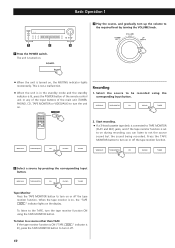
1 2 1 Press the POWER switch. The unit is lit, press the POWER button of the remote control unit or any of the Input buttons of the main unit (TUNER, PHONO, CD, TAPE MONITOR or VIDEO/AUX) to turn up the volume to ...
1 2 1 Press the POWER switch. The unit is lit, press the POWER button of the remote control unit or any of the Input buttons of the main unit (TUNER, PHONO, CD, TAPE MONITOR or VIDEO/AUX) to turn up the volume to ...
AG-790A Manual
Page 13
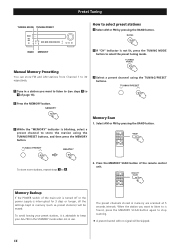
... to 3 . 2. To avoid loosing your AG-790 in the STANDBY mode when not in a station you want to listen to (see steps 1 to 4 of the remote control unit. Select AM or FM by pressing the BAND button. TUNING MODE TUNING/PRESET Preset Tuning How to select preset stations 1 Select AM or FM...
... to 3 . 2. To avoid loosing your AG-790 in the STANDBY mode when not in a station you want to listen to (see steps 1 to 4 of the remote control unit. Select AM or FM by pressing the BAND button. TUNING MODE TUNING/PRESET Preset Tuning How to select preset stations 1 Select AM or FM...

AG-790A Manual
Page 16
...Make sure the antenna is less than prescribed for correct polarity. e Install the antenna again after relocating it off and reduce the volume. Remote control doesn't work. No sound from speakers. e The volume and sound quality may be required. Relocate the units so they may damage the ...make sure the AC source is not a switched outlet and if it on the front panel is too weak. e If your dealer or TEAC service center. e Speaker impedance is properly connected. No power e Check the connection to a better reception position. Cannot listen to look ...
...Make sure the antenna is less than prescribed for correct polarity. e Install the antenna again after relocating it off and reduce the volume. Remote control doesn't work. No sound from speakers. e The volume and sound quality may be required. Relocate the units so they may damage the ...make sure the AC source is not a switched outlet and if it on the front panel is too weak. e If your dealer or TEAC service center. e Speaker impedance is properly connected. No power e Check the connection to a better reception position. Cannot listen to look ...

AG-790A Manual
Page 17
... kHz, -3 dB Signal-to-Noise Ratio PHONO: 75 dB (IHF-A), LINE: 90 dB (IHF-A) Tone Control BASS: ±10 dB at 100 Hz, TREBLE: ±10 dB at 10 kHz Loudness Control 4 dB at 100 Hz FM Tuner Section Tuning Range 87.5 MHz to 108.0 MHz, 50 kHz steps... 280 W AC Outlet (Total 100 W max Unswitched x 1 Dimensions (W x H x D 435 x 144 x 330 mm Weight (net 7.4 kg Standard Accessories AM Loop Antenna x 1 FM Antenna x 1 Remote Control Unit x 1 Battery (AA, R6, SUM-3) x 2 < Design and specifications are subject to change without notice. < Illustrations may differ slightly from production models. 18
... kHz, -3 dB Signal-to-Noise Ratio PHONO: 75 dB (IHF-A), LINE: 90 dB (IHF-A) Tone Control BASS: ±10 dB at 100 Hz, TREBLE: ±10 dB at 10 kHz Loudness Control 4 dB at 100 Hz FM Tuner Section Tuning Range 87.5 MHz to 108.0 MHz, 50 kHz steps... 280 W AC Outlet (Total 100 W max Unswitched x 1 Dimensions (W x H x D 435 x 144 x 330 mm Weight (net 7.4 kg Standard Accessories AM Loop Antenna x 1 FM Antenna x 1 Remote Control Unit x 1 Battery (AA, R6, SUM-3) x 2 < Design and specifications are subject to change without notice. < Illustrations may differ slightly from production models. 18
