Owners Manual
Page 1
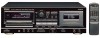
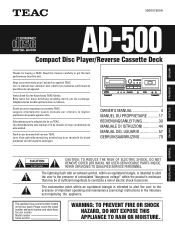
... number located on the rear panel. ` 3D0007500A ENGLISH FRANÇAIS DEUTSCH D ad-500 Compact Disc Player/Reverse Cassette Deck Thanks for your records. Grazie per ottenere le migliori prestazioni da questo apparecchio. Dank u voor de aanschaf van een TEAC. OWNER'S MANUAL 4 MANUEL DU PROPRIETAIRE ...........17 BEDIENUNGSANLEITUNG 30 MANUALE DI ISTRUZIONI 44 MANUAL...
... number located on the rear panel. ` 3D0007500A ENGLISH FRANÇAIS DEUTSCH D ad-500 Compact Disc Player/Reverse Cassette Deck Thanks for your records. Grazie per ottenere le migliori prestazioni da questo apparecchio. Dank u voor de aanschaf van een TEAC. OWNER'S MANUAL 4 MANUEL DU PROPRIETAIRE ...........17 BEDIENUNGSANLEITUNG 30 MANUALE DI ISTRUZIONI 44 MANUAL...
Owners Manual
Page 2
.... Example of time, unplug it is provided or the manufacturer's instructions have been adhered to qualified service personnel under the following the operating instructions. For added protection for this product on the audio equipment. 1) Read Instructions - Do not attempt to service this product, ask the service technician to perform safety checks...
.... Example of time, unplug it is provided or the manufacturer's instructions have been adhered to qualified service personnel under the following the operating instructions. For added protection for this product on the audio equipment. 1) Read Instructions - Do not attempt to service this product, ask the service technician to perform safety checks...
Owners Manual
Page 4
Keep away from the remote control unit to be carefully wiped off the disc's recorded surface with a soft cloth. O Do not open the cabinet as this case replace the batteries with correct positive ≠ and negative - Never insert a disc which has a crack on the surface of heaters, exposed to handle discs with new ones. O Near speakers, on their positive ≠ and negative - O Avoid dropping or subjecting cassettes to high temperatures can be exposed to clean the unit with chemical solvents as this manual in a safe place for future reference. O As C-120 tapes are ...
Keep away from the remote control unit to be carefully wiped off the disc's recorded surface with a soft cloth. O Do not open the cabinet as this case replace the batteries with correct positive ≠ and negative - Never insert a disc which has a crack on the surface of heaters, exposed to handle discs with new ones. O Near speakers, on their positive ≠ and negative - O Avoid dropping or subjecting cassettes to high temperatures can be exposed to clean the unit with chemical solvents as this manual in a safe place for future reference. O As C-120 tapes are ...
Owners Manual
Page 5
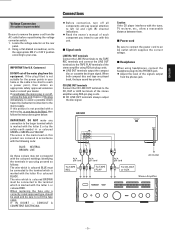
... RCA pin plug cords. O LINE OUT terminals output the compact disc or cassette deck tape signal. O CD LINE OUT terminals always output the disc signal. AD-500 Caution: If the CD player interferes with the letter E or by inadvertent connection to the CD, DAT or AUX terminals of the stereo amplifier using...
... RCA pin plug cords. O LINE OUT terminals output the compact disc or cassette deck tape signal. O CD LINE OUT terminals always output the disc signal. AD-500 Caution: If the CD player interferes with the letter E or by inadvertent connection to the CD, DAT or AUX terminals of the stereo amplifier using...
Owners Manual
Page 6
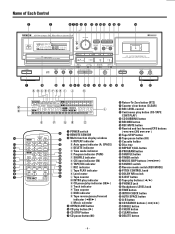
CHECK button / CLEAR button ! DELETE button _6_ Name of Each Control 1 POWER switch 2 REMOTE SENSOR 3 Multi-function display window a REPEAT indicator b Auto space indicator (A. Tape play button (CD-TAPE CONT PLAY) w CD DUBBING button e RECORD button r REC MUTE button t Rewind and fast forward/CPS buttons (Ú CPS ÆÒ) y Tape STOP button u Tape pause button (ƒ) i Cassette holder o Disc tray p REPEAT 1/ALL button a PROGRAM button s SHUFFLE button d TIMER switch f MUSIC SKIP buttons (Ú/Æ) g SOURCE switch h Reverse mode switch (REV MODE) j PITCH ...
CHECK button / CLEAR button ! DELETE button _6_ Name of Each Control 1 POWER switch 2 REMOTE SENSOR 3 Multi-function display window a REPEAT indicator b Auto space indicator (A. Tape play button (CD-TAPE CONT PLAY) w CD DUBBING button e RECORD button r REC MUTE button t Rewind and fast forward/CPS buttons (Ú CPS ÆÒ) y Tape STOP button u Tape pause button (ƒ) i Cassette holder o Disc tray p REPEAT 1/ALL button a PROGRAM button s SHUFFLE button d TIMER switch f MUSIC SKIP buttons (Ú/Æ) g SOURCE switch h Reverse mode switch (REV MODE) j PITCH ...
Owners Manual
Page 7
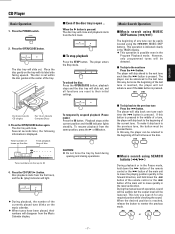
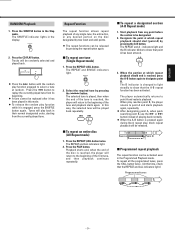
playback stops and the disc tray will slide out, and all functions are reset to the next tune Press the Æ button. Music Search Operation ∑ Music search using MUSIC SKIP buttons (Ú/Æ) The beginning of any required portion while checking the sound. However, only programmed tunes will not advance even if the Æ button is pressed. Press the CD PLAY (∏) button. Press the POWER switch. 2. The disc is set within the disc guides at the current position and the ƒ indicator lights steadily. ENGLISH For 8 cm (3-inch) CD singles For 12 cm (5-inch...
playback stops and the disc tray will slide out, and all functions are reset to the next tune Press the Æ button. Music Search Operation ∑ Music search using MUSIC SKIP buttons (Ú/Æ) The beginning of any required portion while checking the sound. However, only programmed tunes will not advance even if the Æ button is pressed. Press the CD PLAY (∏) button. Press the POWER switch. 2. The disc is set within the disc guides at the current position and the ƒ indicator lights steadily. ENGLISH For 8 cm (3-inch) CD singles For 12 cm (5-inch...
Owners Manual
Page 8
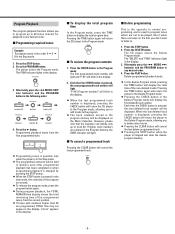
Program Playback The program playback function allows you to program up to track 20. The player enters the Program mode. The PGM indicator lights in the display. 3. O To release the program mode, press the program button again. Press the PLAY button. Pressing the TIME button again will be displayed on the disc you don't want to listen to. 1. O The programmed contents will return the player to 20 tunes (tracks) for playback in the display. 2. The first programmed track number will light and "P-01" will be held in memory even after programmed playback has been ...
Program Playback The program playback function allows you to program up to track 20. The player enters the Program mode. The PGM indicator lights in the display. 3. O To release the program mode, press the program button again. Press the PLAY button. Pressing the TIME button again will be displayed on the disc you don't want to listen to. 1. O The programmed contents will return the player to 20 tunes (tracks) for playback in the display. 2. The first programmed track number will light and "P-01" will be held in memory even after programmed playback has been ...
Owners Manual
Page 9
The SHUFFLE indicator lights in the Stop mode. O To release the random play function engaged to be replayed after it is pressed again during block repeat play, block repeat playback will play reaches point B, the player returns to show that the A-B repeat function has been activated. In this way, the selected tune will be played back repeatedly. ∑ To repeat an entire disc (All Repeat mode) 1. Press the REPEAT 1/ALL button twice. Designate the point at which repeat playback should end is reached, the player will return to designate point B. O After ...
The SHUFFLE indicator lights in the Stop mode. O To release the random play function engaged to be replayed after it is pressed again during block repeat play, block repeat playback will play reaches point B, the player returns to show that the A-B repeat function has been activated. In this way, the selected tune will be played back repeatedly. ∑ To repeat an entire disc (All Repeat mode) 1. Press the REPEAT 1/ALL button twice. Designate the point at which repeat playback should end is reached, the player will return to designate point B. O After ...
Owners Manual
Page 10
Time Counter Display The time counter shows various time readouts, as follows. 1 Total disc playback time After the disc tray is closed with a disc loaded, the total disc playback time and total number of tunes on the time indicator. _ 10 _ To activate this function is pressed twice. Press the INTRO CHECK button again to "00:00" during playback. The SINGLE indicator will light in the display. O To release the Single mode, press the SINGLE button again. Instead, "nn:nn" will not be inserted between tunes automatically, so they are displayed. 2 Elapsed time display When ...
Time Counter Display The time counter shows various time readouts, as follows. 1 Total disc playback time After the disc tray is closed with a disc loaded, the total disc playback time and total number of tunes on the time indicator. _ 10 _ To activate this function is pressed twice. Press the INTRO CHECK button again to "00:00" during playback. The SINGLE indicator will light in the display. O To release the Single mode, press the SINGLE button again. Instead, "nn:nn" will not be inserted between tunes automatically, so they are displayed. 2 Elapsed time display When ...
Owners Manual
Page 11
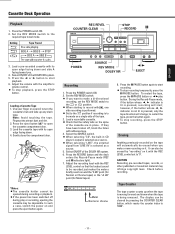
REC REVEL COUNTER CLEAR STOP RECORD ENGLISH 3. Load a pre-recorded cassette with its open the cassette compartment door. 3. POWER SOURCE REV MODE DOLBY NR EJECT Recording 1. If they have been broken off during recording or playback. Select the SOURCE switch. Press the ƒ PAUSE button again to be recorded just makes the meters briefly reach around the "0 dB" point (for Normal or Chrome tapes) or the "+3 dB" point (for Metal tapes). During the Record-Pause mode, if the button whose ", ∏ indicator is not lit is pressed, only the tape direction will ...
REC REVEL COUNTER CLEAR STOP RECORD ENGLISH 3. Load a pre-recorded cassette with its open the cassette compartment door. 3. POWER SOURCE REV MODE DOLBY NR EJECT Recording 1. If they have been broken off during recording or playback. Select the SOURCE switch. Press the ƒ PAUSE button again to be recorded just makes the meters briefly reach around the "0 dB" point (for Normal or Chrome tapes) or the "+3 dB" point (for Metal tapes). During the Record-Pause mode, if the button whose ", ∏ indicator is not lit is pressed, only the tape direction will ...
Owners Manual
Page 12
By turning the PITCH CONTROL to 15 tunes ahead or before the current tune. O At the fully clockwise position, the tape speed is less than 4 seconds. - Fast Wind In the Stop mode, the Ò buttons act as CPS buttons. or CPS (Computomatic Program Search) CPS allows the selection and playback of tapes, search functions may not work when the tape counter indicates a number between tunes cannot be detected. - A similar procedure should be used for searching a tune following steps 1 and 2, to select the 3rd tune in classical music, etc.) How to Select any tune up ...
By turning the PITCH CONTROL to 15 tunes ahead or before the current tune. O At the fully clockwise position, the tape speed is less than 4 seconds. - Fast Wind In the Stop mode, the Ò buttons act as CPS buttons. or CPS (Computomatic Program Search) CPS allows the selection and playback of tapes, search functions may not work when the tape counter indicates a number between tunes cannot be detected. - A similar procedure should be used for searching a tune following steps 1 and 2, to select the 3rd tune in classical music, etc.) How to Select any tune up ...
Owners Manual
Page 13
The deck then returns to the tape length. O While CD DUBBING is engaged, only the STOP (CD), STOP (TAPE), OPEN/CLOSE and TIME buttons are operational. ∑ Designating CD tracks to be recorded on Side A or Side B (A-B Program Dubbing) By using the A-B Program Dubbing function, you to fit the total recording time to the RecordPause mode. ∑ For a blank of the tape. Program tracks to be done easily and simply. 1. Program tracks to be recorded on Side A of more than 4 seconds During recording, hold the REC MUTE button depressed for longer than 4 seconds. After...
The deck then returns to the tape length. O While CD DUBBING is engaged, only the STOP (CD), STOP (TAPE), OPEN/CLOSE and TIME buttons are operational. ∑ Designating CD tracks to be recorded on Side A or Side B (A-B Program Dubbing) By using the A-B Program Dubbing function, you to fit the total recording time to the RecordPause mode. ∑ For a blank of the tape. Program tracks to be done easily and simply. 1. Program tracks to be recorded on Side A of more than 4 seconds During recording, hold the REC MUTE button depressed for longer than 4 seconds. After...
Owners Manual
Page 14
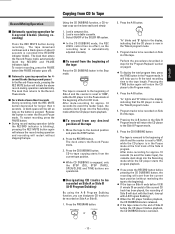
... an optional audio timer is reached, power will be recorded (FM, AM, etc.). 3. Select the amplifier's input which this setting is capable of the tuner AD-500 To amplifier's AC outlet 4. Select the source to ON. 3. Timer Connection Audio timer Tuner Amplifier To AC outlet of the timer To AC outlet of...
... an optional audio timer is reached, power will be recorded (FM, AM, etc.). 3. Select the amplifier's input which this setting is capable of the tuner AD-500 To amplifier's AC outlet 4. Select the source to ON. 3. Timer Connection Audio timer Tuner Amplifier To AC outlet of the timer To AC outlet of...
Owners Manual
Page 15
.... Change the installation position of this unit. The heads are magnetized. The record protection tabs of the cassette are dirty. Demagnetize the heads using the TEAC E-3. Always check the most obvious possible causes first. Re-connect plug securely. Disc dirty. Clean the heads. No audio output. Check connections. Set switch to...
.... Change the installation position of this unit. The heads are magnetized. The record protection tabs of the cassette are dirty. Demagnetize the heads using the TEAC E-3. Always check the most obvious possible causes first. Re-connect plug securely. Disc dirty. Clean the heads. No audio output. Check connections. Set switch to...
Owners Manual
Page 16
... result in the U.S.A. Channel modulation code: EFM Error correction: CIRC (Pickup) Type: Objective lens drive, optical 3-beam laser pickup. O Also clean the pinch roller using a TEAC E-3 demagnetizer. Motor: DC servo motor x 1 Wow and flutter: 0.08% (W. RMS) Frequency response (overall): 50 - 15,000 Hz ± 3 dB, metal 50 - 15,000 Hz ±...± 3 dB, normal Signal-to-noise ratio (overall): 59 dB (Dolby NR off , then demagnetize the heads using rubber cleaning fluid*. * Both are available in TEAC Tape Cleaning Kits HC-2 and RC-2 in specification or feature changes without notice.
... result in the U.S.A. Channel modulation code: EFM Error correction: CIRC (Pickup) Type: Objective lens drive, optical 3-beam laser pickup. O Also clean the pinch roller using a TEAC E-3 demagnetizer. Motor: DC servo motor x 1 Wow and flutter: 0.08% (W. RMS) Frequency response (overall): 50 - 15,000 Hz ± 3 dB, metal 50 - 15,000 Hz ±...± 3 dB, normal Signal-to-noise ratio (overall): 59 dB (Dolby NR off , then demagnetize the heads using rubber cleaning fluid*. * Both are available in TEAC Tape Cleaning Kits HC-2 and RC-2 in specification or feature changes without notice.
Owners Manual
Page 84
...for a Class B digital device, pursuant to comply with the instructions, it is not on the same circuit as the receiver. WD1 8YA, U.K. TEAC Nederland BV, Perkinsbaan 11a, 3439 ND Nieuwegein, Netherlands Phone: 0031-30-6048115 Perkinsbaan 11a, 3439 ND Nieuwegein, Netherlands Phone: 030-6030229 106 Bay ...Street, Port Melbourne, Victoria 3207, Australia Phone: (03) 9644-2442 Via C. TEAC CANADA LTD. A. TO THE USER This equipment has been tested and found to Part 15 of the following measures: a) Reorient or relocate the receiving...
...for a Class B digital device, pursuant to comply with the instructions, it is not on the same circuit as the receiver. WD1 8YA, U.K. TEAC Nederland BV, Perkinsbaan 11a, 3439 ND Nieuwegein, Netherlands Phone: 0031-30-6048115 Perkinsbaan 11a, 3439 ND Nieuwegein, Netherlands Phone: 030-6030229 106 Bay ...Street, Port Melbourne, Victoria 3207, Australia Phone: (03) 9644-2442 Via C. TEAC CANADA LTD. A. TO THE USER This equipment has been tested and found to Part 15 of the following measures: a) Reorient or relocate the receiving...
