Owners Manual
Page 1
... the product's enclosure that may be of sufficient magnitude to constitute a risk of electric shock to persons. Ÿ The exclamation point within an equilateral triangle is intended to alert the user to get the best performance from this manual carefully to the presence of important operating and maintenance (servicing) instructions in the literature accompanying the appliance. Model number Serial number WARNING...
... the product's enclosure that may be of sufficient magnitude to constitute a risk of electric shock to persons. Ÿ The exclamation point within an equilateral triangle is intended to alert the user to get the best performance from this manual carefully to the presence of important operating and maintenance (servicing) instructions in the literature accompanying the appliance. Model number Serial number WARNING...
Owners Manual
Page 2
... be sure the antenna or cable system is operated. 2) Retain Instructions - Example of any service or repairs to keep from overheating, and these Instructions. An outside antenna or cable system is connected to insert the plug fully into such power lines or circuits. Never push objects of Antenna Grounding as contact with a polarized alternating-current line plug (a plug having one way. When replacement parts are unable to...
... be sure the antenna or cable system is operated. 2) Retain Instructions - Example of any service or repairs to keep from overheating, and these Instructions. An outside antenna or cable system is connected to insert the plug fully into such power lines or circuits. Never push objects of Antenna Grounding as contact with a polarized alternating-current line plug (a plug having one way. When replacement parts are unable to...
Owners Manual
Page 4
... cases after use thinner, benzine or alcohol as this might result in the disc tray with a ballpoint pen on the surface. Cassette Tape Tape Selection: For the automatic tape select function to a source of the unit. ª Battery Installation 1. Remote control unit When operating the remote control unit, point it in fire. _4_ If you notice that the distance between the remote control unit and the unit for correct operation becomes shorter...
... cases after use thinner, benzine or alcohol as this might result in the disc tray with a ballpoint pen on the surface. Cassette Tape Tape Selection: For the automatic tape select function to a source of the unit. ª Battery Installation 1. Remote control unit When operating the remote control unit, point it in fire. _4_ If you notice that the distance between the remote control unit and the unit for correct operation becomes shorter...
Owners Manual
Page 5
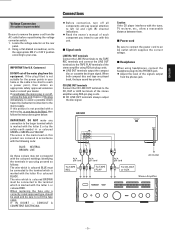
... BLUE must be connected to be connected to reach a power point, then obtain an appropriate safety approved extension lead or consult your area. DO NOT make any connection to the larger terminal which supplies the correct voltage. ∑ Headphones When using headphones, connect the headphone plug into the PHONES jack. O LINE OUT terminals output the compact disc or cassette deck tape signal. AD-500 Caution: If...
... BLUE must be connected to be connected to reach a power point, then obtain an appropriate safety approved extension lead or consult your area. DO NOT make any connection to the larger terminal which supplies the correct voltage. ∑ Headphones When using headphones, connect the headphone plug into the PHONES jack. O LINE OUT terminals output the compact disc or cassette deck tape signal. AD-500 Caution: If...
Owners Manual
Page 6
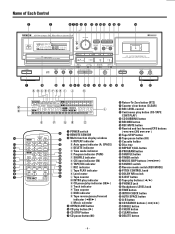
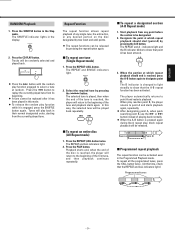
...indicator r Tape reverse/pause/forward indicator ("ƒ∏) s Music calendar 4 OPEN/CLOSE button 5 CD play button (å) 6 CD STOP button 7 CD pause button (ƒ) 8 Return-To-Zero button (RTZ) 9 Counter clear button (CLEAR) 0 REC LEVEL control q Continuous play buttons ("/∏) z PHONES jack x Headphones LEVEL knob c TIME button v INTRO CHECK button b AUTO SPACE button n A-B button m CD SEARCH buttons (/Ò) , SINGLE button . CHECK button / CLEAR button ! Name of Each Control 1 POWER switch 2 REMOTE SENSOR 3 Multi-function display window a REPEAT indicator b Auto...
...indicator r Tape reverse/pause/forward indicator ("ƒ∏) s Music calendar 4 OPEN/CLOSE button 5 CD play button (å) 6 CD STOP button 7 CD pause button (ƒ) 8 Return-To-Zero button (RTZ) 9 Counter clear button (CLEAR) 0 REC LEVEL control q Continuous play buttons ("/∏) z PHONES jack x Headphones LEVEL knob c TIME button v INTRO CHECK button b AUTO SPACE button n A-B button m CD SEARCH buttons (/Ò) , SINGLE button . CHECK button / CLEAR button ! Name of Each Control 1 POWER switch 2 REMOTE SENSOR 3 Multi-function display window a REPEAT indicator b Auto...
Owners Manual
Page 7
... playback, the number of the main unit to 20 4. The disc is pressed in the Pause mode, hold down the button of the remote control or the Ú button of the currently played tune blinks on the tray with its label side facing upward. The player enters the Stop mode. The disc tray will light. Disc playback starts from the Music Calendar display. This operation is possible even in the reverse direction...
... playback, the number of the main unit to 20 4. The disc is pressed in the Pause mode, hold down the button of the remote control or the Ú button of the currently played tune blinks on the tray with its label side facing upward. The player enters the Stop mode. The disc tray will light. Disc playback starts from the Music Calendar display. This operation is possible even in the reverse direction...
Owners Manual
Page 8
... next deleted track number will return the player to the Delete-Program mode, allowing you don't want to listen to program tunes which are erased. Press the STOP button. 2. Press the ∏ button. Programmed playback starts from the current position. O When the STOP button is stopped by pressing the STOP button. O The track numbers stored in the display. The CD player enters the Delete Program mode. The "DELETE" and "PGM" indicators light in the Stop mode. Press the PLAY button. Each time the CHECK button is used...
... next deleted track number will return the player to the Delete-Program mode, allowing you don't want to listen to program tunes which are erased. Press the STOP button. 2. Press the ∏ button. Programmed playback starts from the current position. O When the STOP button is stopped by pressing the STOP button. O The track numbers stored in the display. The CD player enters the Delete Program mode. The "DELETE" and "PGM" indicators light in the Stop mode. Press the PLAY button. Each time the CHECK button is used...
Owners Manual
Page 9
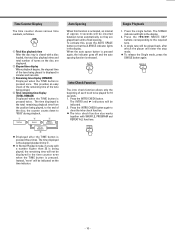
... SHUFFLE indicator lights in the Stop mode. Press the CD PLAY button. O To release the random play back in the Programmed Playback mode. O The repeat functions can be released by pressing the A-B button. Select the required tune by two (start (point A) by pressing the repeat button again. ∑ To repeat one tune (Single Repeat mode) 1. The REPEAT and ALL indicators light. 2. Playback starts and, when the end of the disc...
... SHUFFLE indicator lights in the Stop mode. Press the CD PLAY button. O To release the random play back in the Programmed Playback mode. O The repeat functions can be released by pressing the A-B button. Select the required tune by two (start (point A) by pressing the repeat button again. ∑ To repeat one tune (Single Repeat mode) 1. The REPEAT and ALL indicators light. 2. Playback starts and, when the end of the disc...
Owners Manual
Page 10
... the disc; Auto Spacing When this , press the AUTO SPACE button so that the A.SPACE indicator lights in the time counter even when the TIME button is pressed. To activate this function is the elapsed playback time 2. Intro Check Function The intro check function allows only the beginning of each track to "00:00" during playback. A single tune will enter the stop mode. O In Normal Playback mode, if a tune with a number...
... the disc; Auto Spacing When this , press the AUTO SPACE button so that the A.SPACE indicator lights in the time counter even when the TIME button is pressed. To activate this function is the elapsed playback time 2. Intro Check Function The intro check function allows only the beginning of each track to "00:00" during playback. A single tune will enter the stop mode. O In Normal Playback mode, if a tune with a number...
Owners Manual
Page 11
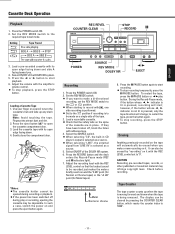
... the cassette tape with the REC LEVEL control so that the safety tabs on a single side of the cassette are in CD player's output is selected as a source. POWER SOURCE REV MODE DOLBY NR EJECT Recording 1. Adjust the recording level with its open the cassette compartment door. 3. Press the ƒ PAUSE button again to start recording. Press the POWER switch ON. 2. Press the " or ∏ button to start playback. 6. O Check that the loudest sound...
... the cassette tape with the REC LEVEL control so that the safety tabs on a single side of the cassette are in CD player's output is selected as a source. POWER SOURCE REV MODE DOLBY NR EJECT Recording 1. Adjust the recording level with its open the cassette compartment door. 3. Press the ƒ PAUSE button again to start recording. Press the POWER switch ON. 2. Press the " or ∏ button to start playback. 6. O Check that the loudest sound...
Owners Manual
Page 12
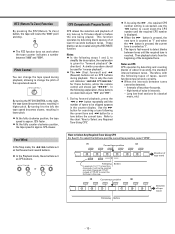
... "forward playback" (∏ direction). By turning it will locate the "0000" point and stop. O The Ò (Fast Forward) and (Rewind) buttons act as CPS buttons during playback, allowing to change the tape speed during playback. The tape is given for these buttons, while the remote control unit shows just "Ò". Intervals of less than 4 seconds, it to detect blanks between tunes cannot be detected. - Long low level sections...
... "forward playback" (∏ direction). By turning it will locate the "0000" point and stop. O The Ò (Fast Forward) and (Rewind) buttons act as CPS buttons during playback, allowing to change the tape speed during playback. The tape is given for these buttons, while the remote control unit shows just "Ò". Intervals of less than 4 seconds, it to detect blanks between tunes cannot be detected. - Long low level sections...
Owners Manual
Page 13
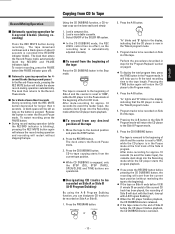
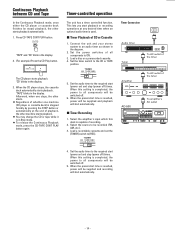
... recording, press the PAUSE button. Load a compact disc. 2. The deck enters the Record-Pause mode. 3. O While CD DUBBING is canceled. _ 13 _ "A-" blinks and "B" lights in the display, indicating that the CD player is now in the "Program Playback" section on Side B of Side B before the CD player finishes playback, the CD DUBBING mode is engaged, only the STOP (CD), STOP (TAPE), OPEN/CLOSE and TIME buttons are operational. ∑ Designating CD tracks...
... recording, press the PAUSE button. Load a compact disc. 2. The deck enters the Record-Pause mode. 3. O While CD DUBBING is canceled. _ 13 _ "A-" blinks and "B" lights in the display, indicating that the CD player is now in the "Program Playback" section on Side B of Side B before the CD player finishes playback, the CD DUBBING mode is engaged, only the STOP (CD), STOP (TAPE), OPEN/CLOSE and TIME buttons are operational. ∑ Designating CD tracks...
Owners Manual
Page 14
... CD player or cassette deck finishes (or stops) playback, the other machine starts playback. This lets you start automatically. _ 14 _ Load a recordable cassette and set the [TIMER] switch to be recorded (FM, AM, etc.). 3. When the preset start time is reached, power will be switched off . 5. "TAPE" and "CD" blink in Stop mode. "TAPE" blinks in the display. 3. O Regardless of whether one stops, the other starts. Timer-controlled operation The unit has a timer controlled function. Set the power switches of recording. 2. Timer Connection Audio timer Tuner Amplifier...
... CD player or cassette deck finishes (or stops) playback, the other machine starts playback. This lets you start automatically. _ 14 _ Load a recordable cassette and set the [TIMER] switch to be recorded (FM, AM, etc.). 3. When the preset start time is reached, power will be switched off . 5. "TAPE" and "CD" blink in Stop mode. "TAPE" blinks in the display. 3. O Regardless of whether one stops, the other starts. Timer-controlled operation The unit has a timer controlled function. Set the power switches of recording. 2. Timer Connection Audio timer Tuner Amplifier...
Owners Manual
Page 15
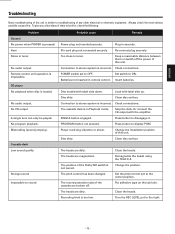
... program playback. Cassette deck Low sound quality Strange sound Impossible to look for, check the following: Problem General No power when POWER is pressed. Too close to stereo system is incorrect. Connection to tuner. Batteries not inserted in Playback mode. Disc dirty. Press button to stereo system is incorrect. Player receiving vibration or shock. The heads are magnetized. The heads are dirty. The position of the Dolby NR switch is impossible. Remote control unit operation...
... program playback. Cassette deck Low sound quality Strange sound Impossible to look for, check the following: Problem General No power when POWER is pressed. Too close to stereo system is incorrect. Connection to tuner. Batteries not inserted in Playback mode. Disc dirty. Press button to stereo system is incorrect. Player receiving vibration or shock. The heads are magnetized. The heads are dirty. The position of the Dolby NR switch is impossible. Remote control unit operation...
Owners Manual
Page 16
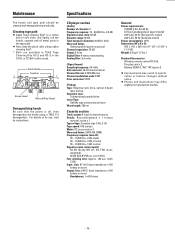
... Hz (Europe/U.K. O Also clean the pinch roller using a TEAC E-3 demagnetizer. Specifications CD player section (Audio) Number of tape: Cassette tape C-60, C-90 Tape speed: 4.76 cm/sec. Objective Lens: 2-dimensional parallel drive Laser Type: GaAIAs type semiconductor laser Wave length: 780 nm Cassette section Track system: 4-track 2-channel stereo Heads: Record/playback x 1 (rotary reverse), erase x 1 Type of channels: 2 Frequency response: 10 - 20,000 Hz ± 0.5 dB Signal-to -noise ratio (overall): 59 dB (Dolby...
... Hz (Europe/U.K. O Also clean the pinch roller using a TEAC E-3 demagnetizer. Specifications CD player section (Audio) Number of tape: Cassette tape C-60, C-90 Tape speed: 4.76 cm/sec. Objective Lens: 2-dimensional parallel drive Laser Type: GaAIAs type semiconductor laser Wave length: 780 nm Cassette section Track system: 4-track 2-channel stereo Heads: Record/playback x 1 (rotary reverse), erase x 1 Type of channels: 2 Frequency response: 10 - 20,000 Hz ± 0.5 dB Signal-to -noise ratio (overall): 59 dB (Dolby...
Owners Manual
Page 84
... user's authority to Part 15 of the following measures: a) Reorient or relocate the receiving antenna. If necessary, consult the dealer or an experienced radio/TV technician for a Class B digital device, pursuant to operate this equipment not expressly approved by one or more of the FCC Rules. For CANADA AC POWER CORD CONNECTION CAUTION: TO PREVENT ELECTRIC SHOCK, MATCH WIDE BLADE OF PLUG...
... user's authority to Part 15 of the following measures: a) Reorient or relocate the receiving antenna. If necessary, consult the dealer or an experienced radio/TV technician for a Class B digital device, pursuant to operate this equipment not expressly approved by one or more of the FCC Rules. For CANADA AC POWER CORD CONNECTION CAUTION: TO PREVENT ELECTRIC SHOCK, MATCH WIDE BLADE OF PLUG...


