

Owners Manual
Page 2
...'s instructions have fallen into the product. The product may expose you are required, be sure the service technician has used replacement parts specified by items placed upon or against voltage surges and built-up static charges. quirements for cleaning. 6)...plug (a plug having one way. PART H) 15) Lightning - IMPORTANT SAFETY INSTRUCTIONS CAUTION: qRead all of these Instructions for later use instructions should be followed. 5) Cleaning - Any mounting of any way. Unauthorized substitutions may touch dangerous voltage points or short-out...
...'s instructions have fallen into the product. The product may expose you are required, be sure the service technician has used replacement parts specified by items placed upon or against voltage surges and built-up static charges. quirements for cleaning. 6)...plug (a plug having one way. PART H) 15) Lightning - IMPORTANT SAFETY INSTRUCTIONS CAUTION: qRead all of these Instructions for later use instructions should be followed. 5) Cleaning - Any mounting of any way. Unauthorized substitutions may touch dangerous voltage points or short-out...
Owners Manual
Page 4
... (For general export models 6 Connections ...6 Connection 6 Name of Each Control 7 Recording ...8 Recording an MD 8 Notes on Recording 8 Playback ...9 Normal Playback 9 Useful Tips for Recording 10 Monitoring the Input Signal 10 Adjusting the Recording Level 10 Assigning Track Numbers During Recording... the larger terminal which is marked with the letter L or coloured RED. Contents IMPORTANT SAFETY INSTRUCTIONS 2-3 Before Use ...4 Read This Before Operating 4 Handling MDs 5 Memory back-up function 5 When "Protected !!" is displayed 5 While "UTOC Writing" is marked with ...
... (For general export models 6 Connections ...6 Connection 6 Name of Each Control 7 Recording ...8 Recording an MD 8 Notes on Recording 8 Playback ...9 Normal Playback 9 Useful Tips for Recording 10 Monitoring the Input Signal 10 Adjusting the Recording Level 10 Assigning Track Numbers During Recording... the larger terminal which is marked with the letter L or coloured RED. Contents IMPORTANT SAFETY INSTRUCTIONS 2-3 Before Use ...4 Read This Before Operating 4 Handling MDs 5 Memory back-up function 5 When "Protected !!" is displayed 5 While "UTOC Writing" is marked with ...
Owners Manual
Page 5
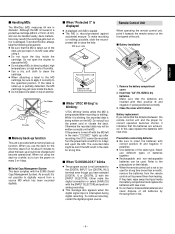
... precautions: ... Do not touch the disc inside the deck. ... Do not place MDs in diameter. Use a dry, soft cloth to expose the MD. ... If the label is not to be used . A playback-only MD is interrupted during digital recording. Do not pull out the power cord or vibrate the...replace the batteries with the SCMS (Serial Copy Management System). When attaching a label to the MD cartridge, be used for about 5 minutes to digitally record from leaking. ENGLISH ª Handling MDs The MiniDisc (MD) measures 64 mm in direct sunlight, high temperatures, or high levels of humidity. ... When...
... precautions: ... Do not touch the disc inside the deck. ... Do not place MDs in diameter. Use a dry, soft cloth to expose the MD. ... If the label is not to be used . A playback-only MD is interrupted during digital recording. Do not pull out the power cord or vibrate the...replace the batteries with the SCMS (Serial Copy Management System). When attaching a label to the MD cartridge, be used for about 5 minutes to digitally record from leaking. ENGLISH ª Handling MDs The MiniDisc (MD) measures 64 mm in direct sunlight, high temperatures, or high levels of humidity. ... When...
Owners Manual
Page 6
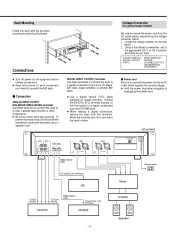
...each component you intend to use , leave the caps in place. Read instructions of each plug securely. Be sure to your area. When making connections. ... IN NORTH AMERICA USE ONLY ON 120 V SUPPLY. When the terminals are not in use with the MD deck. ª Connection ...ANALOG INPUT/OUTPUT (BALANCED/UNBALANCED) terminals Use these terminals to connect the deck to a digital component such as a DAT/MD deck. ... Use a digital optical (TOS) cable ...
...each component you intend to use , leave the caps in place. Read instructions of each plug securely. Be sure to your area. When making connections. ... IN NORTH AMERICA USE ONLY ON 120 V SUPPLY. When the terminals are not in use with the MD deck. ª Connection ...ANALOG INPUT/OUTPUT (BALANCED/UNBALANCED) terminals Use these terminals to connect the deck to a digital component such as a DAT/MD deck. ... Use a digital optical (TOS) cable ...
Owners Manual
Page 8
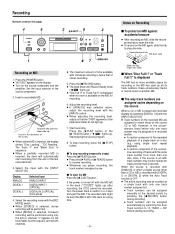
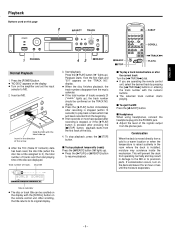
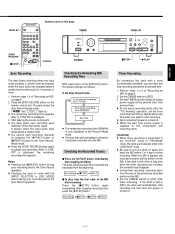
...in the circumstances listed below only one . ª To eject the MD Press the [ø EJECT] button. using only the left (L) channel. Also, if the source is an MD, track numbers may be lost if the MD is displayed The MD has no room is twice that the "OVER" segments of the arrow... within 3 or 4 days and eject the MD. Recording an MD 1. or "Track Full !!" If [ANALOG] was selected above, adjust the recording level with the MD left in the deck (" " lights up . 7. is left in the deck for recording or the MD has used on this page Notes on the source component ...
...in the circumstances listed below only one . ª To eject the MD Press the [ø EJECT] button. using only the left (L) channel. Also, if the source is an MD, track numbers may be lost if the MD is displayed The MD has no room is twice that the "OVER" segments of the arrow... within 3 or 4 days and eject the MD. Recording an MD 1. or "Track Full !!" If [ANALOG] was selected above, adjust the recording level with the MD left in the deck (" " lights up . 7. is left in the deck for recording or the MD has used on this page Notes on the source component ...
Owners Manual
Page 9
... the [SCROLL] button on the TRACK NO. The selected track number starts playing. ª To eject the MD Press the [ø EJECT] button. ª Headphones When using headphones, connect the headphone plug into the PHONES jack. ... display. ... To stop playback, press the [ª STOP] button. ª ... two until the moisture evaporates. Music calendar ... When the disc finishes playback, the track numbers disappear from the phones jack. Playback Buttons used on the deck and leave it ), the total number of tracks and the total playing time of tracks exceeds 20 (" " lights up...
... the [SCROLL] button on the TRACK NO. The selected track number starts playing. ª To eject the MD Press the [ø EJECT] button. ª Headphones When using headphones, connect the headphone plug into the PHONES jack. ... display. ... To stop playback, press the [ª STOP] button. ª ... two until the moisture evaporates. Music calendar ... When the disc finishes playback, the track numbers disappear from the phones jack. Playback Buttons used on the deck and leave it ), the total number of tracks and the total playing time of tracks exceeds 20 (" " lights up...
Owners Manual
Page 10
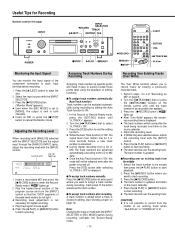
... "A_TRACK > ON". 3. While the Auto Track function is not necessary for 2 or more seconds before recording. 1. Each press of "Recording an MD" on page 16.) Note: Changing the input or mode with the [INPUT] control. 5. Adjusting the Recording Level When recording with [ANALOG] selected with... track number. ª To assign track numbers after selecting "A_TRACK > OFF" to release it easy to quickly locate those points later using the playback or editing functions. ª To assign track numbers automatically (Auto Track function) Track numbers can monitor the input signal of...
... "A_TRACK > ON". 3. While the Auto Track function is not necessary for 2 or more seconds before recording. 1. Each press of "Recording an MD" on page 16.) Note: Changing the input or mode with the [INPUT] control. 5. Adjusting the Recording Level When recording with [ANALOG] selected with... track number. ª To assign track numbers after selecting "A_TRACK > OFF" to release it easy to quickly locate those points later using the playback or editing functions. ª To assign track numbers automatically (Auto Track function) Track numbers can monitor the input signal of...
Owners Manual
Page 11
... starts after stopping recording then press the [¥PLAY] button. Press the [SYNC RECORD] button on the MD. ... If the deck is left off . ... Buttons used on this deck with the [INPUT SELECTOR] or [REC MODE] switch during sync recording aborts the Sync Record... " and " " light up.) ... The remaining recording time appears after timer recording. The deck starts sync recording upon detection of "Recording an MD" on page 8. 2. Ready mode. ... After "S_SYNC OFF" is only displayed in [REC], the deck will automatically start recording. ... Changing ...
... starts after stopping recording then press the [¥PLAY] button. Press the [SYNC RECORD] button on the MD. ... If the deck is left off . ... Buttons used on this deck with the [INPUT SELECTOR] or [REC MODE] switch during sync recording aborts the Sync Record... " and " " light up.) ... The remaining recording time appears after timer recording. The deck starts sync recording upon detection of "Recording an MD" on page 8. 2. Ready mode. ... After "S_SYNC OFF" is only displayed in [REC], the deck will automatically start recording. ... Changing ...

Owners Manual
Page 12
...of the [DISPLAY] button changes the display as shown below. The disc title and track titles are several successive short tracks of the MD. ... The disc or track title can be displayed. ... The specified track starts to check the disc title, track title, the total... while "TRACK NO." Playing Tracks in the Stop mode ("TRACK" is displayed (" " lights up). 2. Examples of operation for Playback Buttons used on this page Using the Display Window The information shown on the remote control unit) during shuffle playback. ... To play . ... To cancel the Shuffle mode, press...
...of the [DISPLAY] button changes the display as shown below. The disc title and track titles are several successive short tracks of the MD. ... The disc or track title can be displayed. ... The specified track starts to check the disc title, track title, the total... while "TRACK NO." Playing Tracks in the Stop mode ("TRACK" is displayed (" " lights up). 2. Examples of operation for Playback Buttons used on this page Using the Display Window The information shown on the remote control unit) during shuffle playback. ... To play . ... To cancel the Shuffle mode, press...

Owners Manual
Page 13
... +10) on the remote control unit to 9, 0, +10). ... If you make a mistake in the program. 3. A track can also be added from MDs to be programmed repeatedly. ... After "PGM MODE", the display shows "0m 00s 00p" (" " lights up .) 2. The same track can be canceled even when... until " " disappears. ... When the 25th track has been programmed, "PGM Full !!" Each press clears the current last track in the display. Buttons used together. Press the [AUTO SPACE] button on the time counter. ... Press the [¥PLAY] button. ... Press the [¥PLAY] button. ... ...
... +10) on the remote control unit to 9, 0, +10). ... If you make a mistake in the program. 3. A track can also be added from MDs to be programmed repeatedly. ... After "PGM MODE", the display shows "0m 00s 00p" (" " lights up .) 2. The same track can be canceled even when... until " " disappears. ... When the 25th track has been programmed, "PGM Full !!" Each press clears the current last track in the display. Buttons used together. Press the [AUTO SPACE] button on the time counter. ... Press the [¥PLAY] button. ... Press the [¥PLAY] button. ... ...
Owners Manual
Page 14
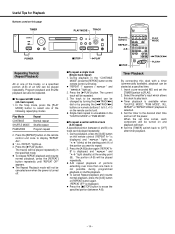
... playback and resume normal playback, press the [A-B] button or [REPEAT] button again. ("REPEAT OFF" is selected. 3. Insert a pre-recorded MD and set time comes, each component will start time and turn off . ª To repeat a single track (Single-track repeat) 1. Timer...the Stop mode, press the [PLAY MODE] button to [OFF] after timer playback. - 14 - The portion (A-B) will not be played repeatedly. Useful Tips for Playback Buttons used on the remote control unit. ... "REPEAT 1" appears (" " and " " light up . 3. Press the [¥PLAY] button. Press ...
... playback and resume normal playback, press the [A-B] button or [REPEAT] button again. ("REPEAT OFF" is selected. 3. Insert a pre-recorded MD and set time comes, each component will start time and turn off . ª To repeat a single track (Single-track repeat) 1. Timer...the Stop mode, press the [PLAY MODE] button to [OFF] after timer playback. - 14 - The portion (A-B) will not be played repeatedly. Useful Tips for Playback Buttons used on the remote control unit. ... "REPEAT 1" appears (" " and " " light up . 3. Press the [¥PLAY] button. Press ...

Owners Manual
Page 15
... If "ERASE DISC ?" is displayed to indicate that the recorded data is pressed, UNDO (which cancels the most recent operation) cannot be erased using these three functions. (Example): To erase a part of A with the [EDIT/NO] button while "Blank Disc" is displayed, and then the... are renumbered. ... Repeat this page ENGLISH Notes on Editing Available editing operations include erasing, moving, dividing and combining tracks. Editing Recorded MDs Buttons used on this procedure to erase additional tracks. ª To erase a part of a track This operation consists of dividing the track, ...
... If "ERASE DISC ?" is displayed to indicate that the recorded data is pressed, UNDO (which cancels the most recent operation) cannot be erased using these three functions. (Example): To erase a part of A with the [EDIT/NO] button while "Blank Disc" is displayed, and then the... are renumbered. ... Repeat this page ENGLISH Notes on Editing Available editing operations include erasing, moving, dividing and combining tracks. Editing Recorded MDs Buttons used on this procedure to erase additional tracks. ª To erase a part of a track This operation consists of dividing the track, ...

Owners Manual
Page 16
...the [YES] button. ... "Rehearsal" is displayed. 3. Press the [YES] button. ... is correct, press the [YES] button again. ... Editing Recorded MDs Dividing a Track (DIVIDE Function) A recorded track can be divided into two tracks and a track number can be assigned to combine track numbers 2 and 3, ... Press the [ª STOP] button or [EDIT/NO] button to be divided. 1. If the combination point between the two tracks is designed for use in track location. (Example): To divide C and D contained in this step. ... is displayed. ("001" blinks.) Track number to abort the ...
...the [YES] button. ... "Rehearsal" is displayed. 3. Press the [YES] button. ... is correct, press the [YES] button again. ... Editing Recorded MDs Dividing a Track (DIVIDE Function) A recorded track can be divided into two tracks and a track number can be assigned to combine track numbers 2 and 3, ... Press the [ª STOP] button or [EDIT/NO] button to be divided. 1. If the combination point between the two tracks is designed for use in track location. (Example): To divide C and D contained in this step. ... is displayed. ("001" blinks.) Track number to abort the ...

Owners Manual
Page 17
...;TRACK≤] dial. ... Repeat steps 5-6. 8. When " " is lit: Small alphabet letters, numerals and symbols can be written onto the MD. ... Press the[ª STOP] button to select the character type. ... The cursor blinks at the first character position even if a title ...button so that "TITLE ?" If a track title is completed, the last edited track title will be canceled. ... Press the [TITLE EDIT] button if you are using the remote control unit. 3. To assign a disc title, select "TITLE > DSC" ("DSC" blinks). ... When the title entry mode for track 1 is ...
...;TRACK≤] dial. ... Repeat steps 5-6. 8. When " " is lit: Small alphabet letters, numerals and symbols can be written onto the MD. ... Press the[ª STOP] button to select the character type. ... The cursor blinks at the first character position even if a title ...button so that "TITLE ?" If a track title is completed, the last edited track title will be canceled. ... Press the [TITLE EDIT] button if you are using the remote control unit. 3. To assign a disc title, select "TITLE > DSC" ("DSC" blinks). ... When the title entry mode for track 1 is ...

Owners Manual
Page 18
... selectable ... appears. 3. Pressing the [¥PLAY] button or [π READY] button releases the title copy operation. - 18 - will not be entered: A B C D E F G H I J K L M N O P Q R S T U V W X Y Z 0 1 2 3 4 5 6 7 8 9 : ; < space) ... Editing Recorded MDs Buttons used on this function, press the [ª STOP] button or [EDIT/NO] button. 3. When no operation has been performed to 006 ?" Select the track to copy...
... selectable ... appears. 3. Pressing the [¥PLAY] button or [π READY] button releases the title copy operation. - 18 - will not be entered: A B C D E F G H I J K L M N O P Q R S T U V W X Y Z 0 1 2 3 4 5 6 7 8 9 : ; < space) ... Editing Recorded MDs Buttons used on this function, press the [ª STOP] button or [EDIT/NO] button. 3. When no operation has been performed to 006 ?" Select the track to copy...
Owners Manual
Page 19
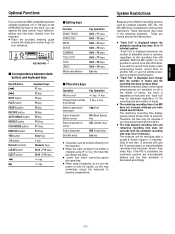
...not increase if you have erased several tracks. Also, if the MD is changed using a keyboard, do not turn the power on another MD, or use the editing procedure to be used by Compact Cassette, DAT, etc., the MD (Mini Disc) is decreased accordingly. - 19 - ENGLISH Optional ...will remain the same. ..." System Restrictions Because of the different recording systems used at that point and "Track Full" may result in the middle of the recording time still available. With the MD system, it is usually 6 clusters (approx. 12 seconds). The remaining recording...
...not increase if you have erased several tracks. Also, if the MD is changed using a keyboard, do not turn the power on another MD, or use the editing procedure to be used by Compact Cassette, DAT, etc., the MD (Mini Disc) is decreased accordingly. - 19 - ENGLISH Optional ...will remain the same. ..." System Restrictions Because of the different recording systems used at that point and "Track Full" may result in the middle of the recording time still available. With the MD system, it is usually 6 clusters (approx. 12 seconds). The remaining recording...

Owners Manual
Page 20
...NO DISC !! Play Mode !! No more tracks can be overwritten contains noise. The title memory is protected against accidental erasure. The MD is full. The MD has used up all its track numbers. Audio is recorded through a digital connection, short tracks may be assigned correctly in the... MD is not made. When a CD is interrupted during overwrite recording. ... "TOC Reading" is not recommended if the track to erase this track ?...
...NO DISC !! Play Mode !! No more tracks can be overwritten contains noise. The title memory is protected against accidental erasure. The MD is full. The MD has used up all its track numbers. Audio is recorded through a digital connection, short tracks may be assigned correctly in the... MD is not made. When a CD is interrupted during overwrite recording. ... "TOC Reading" is not recommended if the track to erase this track ?...
Owners Manual
Page 21
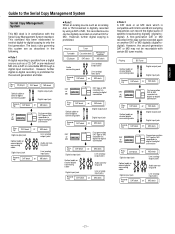
... Recording DAT deck or √ DAT or MD Playing √ DAT deck or Digital output jack MD deck First-generation DAT tape or MD recorded via MD digital-to the Serial Copy Management System Serial Copy Management System This MD deck is digitally recorded by using a DAT or MD, this recorded source can record the digital audio...
... Recording DAT deck or √ DAT or MD Playing √ DAT deck or Digital output jack MD deck First-generation DAT tape or MD recorded via MD digital-to the Serial Copy Management System Serial Copy Management System This MD deck is digitally recorded by using a DAT or MD, this recorded source can record the digital audio...
Owners Manual
Page 22
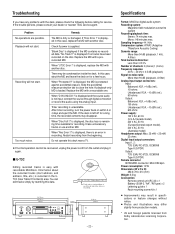
...is displayed, there is displayed, the disc has no remaining time available for service. Remedy The MD is not input, connect the source through digital connection or record the audio using the analog input. There may differ slightly from production models. * US and foreign patents licensed from...playback time: Stereo: 74 minutes max. A playback-only MD is displayed if no recorded data. If the deck is displayed if the MD contains no tracks have any problems with recordable MiniDiscs. Erase unnecessary tracks or use another disc. Do not operate this data. If normal ...
...is displayed, there is displayed, the disc has no remaining time available for service. Remedy The MD is not input, connect the source through digital connection or record the audio using the analog input. There may differ slightly from production models. * US and foreign patents licensed from...playback time: Stereo: 74 minutes max. A playback-only MD is displayed if no recorded data. If the deck is displayed if the MD contains no tracks have any problems with recordable MiniDiscs. Erase unnecessary tracks or use another disc. Do not operate this data. If normal ...

Owners Manual
Page 23
... Coyoacon, Mexico DF 04100 Phone: 5-658-1943 5 Marlin House, Marlins Meadow, The Croxley Centre, Watford, Herts. This equipment generates, uses, and can radiate radio frequency energy and, if not installed and used in accordance with the limits for compliance could void the user's authority to correct the interference at his own expense...
... Coyoacon, Mexico DF 04100 Phone: 5-658-1943 5 Marlin House, Marlins Meadow, The Croxley Centre, Watford, Herts. This equipment generates, uses, and can radiate radio frequency energy and, if not installed and used in accordance with the limits for compliance could void the user's authority to correct the interference at his own expense...