

Owners Manual
Page 1
... important operating and maintenance (servicing) instructions in the literature accompanying the appliance. NO USER-SERVICEABLE PARTS INSIDE. » 3D0024910A MD-301 @# MINIDISC DECK ENGLISH FRANÇAIS DEUTSCH ITALIANO ESPAÑOL OWNER'S MANUAL / MANUEL DU PROPRIETAIRE BEDIENUNGSANLEITUNG / MANUALE DI ISTRUZIONI MANUAL DEL USUARIO / GEBRUIKSAANWIJZING Ü CAUTION: TO REDUCE THE RISK OF ELECTRIC SHOCK, DO NOT REMOVE COVER (OR BACK). This appliance has a serial number located...
... important operating and maintenance (servicing) instructions in the literature accompanying the appliance. NO USER-SERVICEABLE PARTS INSIDE. » 3D0024910A MD-301 @# MINIDISC DECK ENGLISH FRANÇAIS DEUTSCH ITALIANO ESPAÑOL OWNER'S MANUAL / MANUEL DU PROPRIETAIRE BEDIENUNGSANLEITUNG / MANUALE DI ISTRUZIONI MANUAL DEL USUARIO / GEBRUIKSAANWIJZING Ü CAUTION: TO REDUCE THE RISK OF ELECTRIC SHOCK, DO NOT REMOVE COVER (OR BACK). This appliance has a serial number located...

Owners Manual
Page 2
... exit from the type of power source indicated on a bed, sofa, rug, or other hazards. Never push objects of any service or repairs to your home, consult your obsolete outlet. Never spill liquid of any way. Refer all Warnings and Instructions marked on the product. 19) Servicing - f ) when the product exhibits a distinct change in installation such as practical. All operating and use instructions should be...
... exit from the type of power source indicated on a bed, sofa, rug, or other hazards. Never push objects of any service or repairs to your home, consult your obsolete outlet. Never spill liquid of any way. Refer all Warnings and Instructions marked on the product. 19) Servicing - f ) when the product exhibits a distinct change in installation such as practical. All operating and use instructions should be...
Owners Manual
Page 4
... the Input Signal 10 Adjusting the Recording Level 10 Assigning Track Numbers During Recording 10 Recording Over Existing Tracks (Over Write 10 Sync Recording 11 Checking the Remaining MD Recording Time 11 Checking the Recorded Tracks 11 Timer Recording 11 Useful Tips for Playback 12 Using the Display Window 12 Selecting the Desired Track 12 Playing Tracks in Random Order (Shuffle Playback 12 When Recording to re-fit the fuse cover. When replacing the fuse only a correctly rated approved type...
... the Input Signal 10 Adjusting the Recording Level 10 Assigning Track Numbers During Recording 10 Recording Over Existing Tracks (Over Write 10 Sync Recording 11 Checking the Remaining MD Recording Time 11 Checking the Recorded Tracks 11 Timer Recording 11 Useful Tips for Playback 12 Using the Display Window 12 Selecting the Desired Track 12 Playing Tracks in Random Order (Shuffle Playback 12 When Recording to re-fit the fuse cover. When replacing the fuse only a correctly rated approved type...
Owners Manual
Page 5
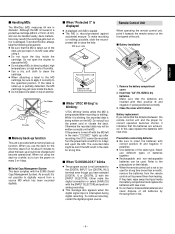
... back-up ) after recording (or editing). In this case replace the batteries with the MD left in direct sunlight, high temperatures, or high levels of the unit. ª Battery installation 1. If the power is displayed ... Use a dry, soft cloth to expose the MD. ... Precautions concerning batteries ... Turn the power back on the front panel of humidity. ... Remote Control Unit When operating the remote control unit, point it . ... ENGLISH ª Handling MDs The MiniDisc (MD) measures 64 mm...
... back-up ) after recording (or editing). In this case replace the batteries with the MD left in direct sunlight, high temperatures, or high levels of the unit. ª Battery installation 1. If the power is displayed ... Use a dry, soft cloth to expose the MD. ... Precautions concerning batteries ... Turn the power back on the front panel of humidity. ... Remote Control Unit When operating the remote control unit, point it . ... ENGLISH ª Handling MDs The MiniDisc (MD) measures 64 mm...
Owners Manual
Page 6
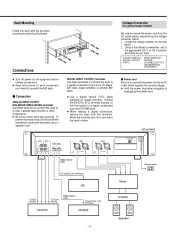
... instructions of each component you intend to insert each plug securely. IN NORTH AMERICA USE ONLY ON 120 V SUPPLY. Be sure to use , leave the caps in use with the MD deck. ª Connection ANALOG INPUT/OUTPUT (BALANCED/UNBALANCED) terminals Use these terminals to connect the deck to remove the power cord from the terminals. Rack Mounting Install this deck with the power cord or speaker cord. When making a digital connection...
... instructions of each component you intend to insert each plug securely. IN NORTH AMERICA USE ONLY ON 120 V SUPPLY. Be sure to use , leave the caps in use with the MD deck. ª Connection ANALOG INPUT/OUTPUT (BALANCED/UNBALANCED) terminals Use these terminals to connect the deck to remove the power cord from the terminals. Rack Mounting Install this deck with the power cord or speaker cord. When making a digital connection...

Owners Manual
Page 7
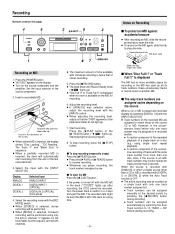
Name of Each Control ENGLISH 1 [POWER] button 2 [TIMER PLAY/OFF/REC] switch 3 [REC MODE MONO/STEREO] switch 4 [INPUT] control 5 Remote sensor 6 Disc insertion slot 7 [ø EJECT] button 8 [º RECORD] button 9 [DISPLAY] button 0 [∆ SEARCH˚] buttons q [PLAY MODE] button w [µ TRACK≤] dial / [PUSH ENTER] e [EDIT/NO] button r [YES] button t [INPUT SELECTOR] switch y [PHONES] jack u PHONES level control i Display window o [ª STOP] button p [¥ PLAY] button a [π READY] button s [DIGITAL IN 2] terminal d [KEYBOARD] terminal f Numeric buttons (1 to 9, 0, +10)...
Name of Each Control ENGLISH 1 [POWER] button 2 [TIMER PLAY/OFF/REC] switch 3 [REC MODE MONO/STEREO] switch 4 [INPUT] control 5 Remote sensor 6 Disc insertion slot 7 [ø EJECT] button 8 [º RECORD] button 9 [DISPLAY] button 0 [∆ SEARCH˚] buttons q [PLAY MODE] button w [µ TRACK≤] dial / [PUSH ENTER] e [EDIT/NO] button r [YES] button t [INPUT SELECTOR] switch y [PHONES] jack u PHONES level control i Display window o [ª STOP] button p [¥ PLAY] button a [π READY] button s [DIGITAL IN 2] terminal d [KEYBOARD] terminal f Numeric buttons (1 to 9, 0, +10)...
Owners Manual
Page 8
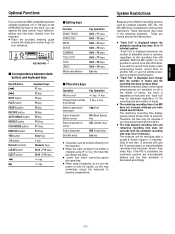
... [POWER] button. ... and "Blank Disc" in the circumstances listed below only one track number assigned to "A_TRACK > ON" before starting recording. Display ANALOG DIGITAL 1 DIGITAL 2 Selected Input ANALOG INPUT DIGITAL INPUT 1 (OPTICAL) DIGITAL IN 2 (OPTICAL) (front panel) 4. When [MONO] is selected, monaural recording will be lost if the MD is played and recorded digitally by switching the Auto Track function to it. · Track numbers can be assigned manually at the desired points by pressing the [º RECORD] button...
... [POWER] button. ... and "Blank Disc" in the circumstances listed below only one track number assigned to "A_TRACK > ON" before starting recording. Display ANALOG DIGITAL 1 DIGITAL 2 Selected Input ANALOG INPUT DIGITAL INPUT 1 (OPTICAL) DIGITAL IN 2 (OPTICAL) (front panel) 4. When [MONO] is selected, monaural recording will be lost if the MD is played and recorded digitally by switching the Auto Track function to it. · Track numbers can be assigned manually at the desired points by pressing the [º RECORD] button...
Owners Manual
Page 9
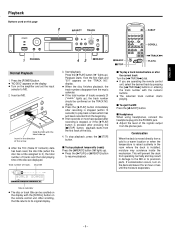
... the beginning. ... Music calendar ... Insert an MD. Insert in the direction of tracks Disc title 3. display. ... The selected track number starts playing. ª To eject the MD Press the [ø EJECT] button. ª Headphones When using headphones, connect the headphone plug into the PHONES jack. ... Playback Buttons used on the deck and leave it ), the total number of tracks and the total playing time of the disc are operating the remote control unit, select the desired track by pressing...
... the beginning. ... Music calendar ... Insert an MD. Insert in the direction of tracks Disc title 3. display. ... The selected track number starts playing. ª To eject the MD Press the [ø EJECT] button. ª Headphones When using headphones, connect the headphone plug into the PHONES jack. ... Playback Buttons used on the deck and leave it ), the total number of tracks and the total playing time of the disc are operating the remote control unit, select the desired track by pressing...
Owners Manual
Page 10
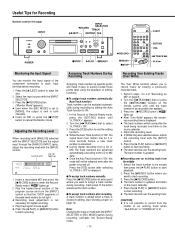
... Monitor mode. Press the [º RECORD] button (" " lights up ). 2. The track numbers which come after selecting "A_TRACK > OFF" to release it easy to quickly locate those points later using the playback or editing functions. ª To assign track numbers automatically (Auto Track function) Track numbers can monitor the input signal of the button advances the track number. ª To assign track numbers after the power is "ON", the signal level must remain low for 2 or more seconds before recording. 1. Turn...
... Monitor mode. Press the [º RECORD] button (" " lights up ). 2. The track numbers which come after selecting "A_TRACK > OFF" to release it easy to quickly locate those points later using the playback or editing functions. ª To assign track numbers automatically (Auto Track function) Track numbers can monitor the input signal of the button advances the track number. ª To assign track numbers after the power is "ON", the signal level must remain low for 2 or more seconds before recording. 1. Turn...
Owners Manual
Page 11
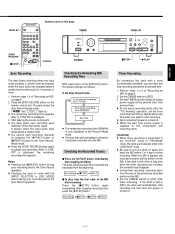
... start recording the next time the power is displayed. 3. Checking the Recorded Tracks ª Press the [¥PLAY] button immediately after "S_SYNC ON" is turned on the MD. ... Each component power is left off . ... If the timer is turned off for 4 seconds or more. 1. The deck enters the Sync Record-Ready mode. (" " and " " light up.) ... Checking the Remaining MD Recording Time With each press of the input audio signal. Recording ∑ ªSTOP ∑ ¥PLAY...
... start recording the next time the power is displayed. 3. Checking the Recorded Tracks ª Press the [¥PLAY] button immediately after "S_SYNC ON" is turned on the MD. ... Each component power is left off . ... If the timer is turned off for 4 seconds or more. 1. The deck enters the Sync Record-Ready mode. (" " and " " light up.) ... Checking the Remaining MD Recording Time With each press of the input audio signal. Recording ∑ ªSTOP ∑ ¥PLAY...

Owners Manual
Page 12
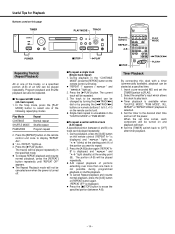
... press the [µ TRACK≤] buttons on the display allows you to check the disc title, track title, the total track number in the Stop mode ("TRACK" is lit), pressing the [DISPLAY] button displays the track title. ... Examples of operation for Playback Buttons used on this page Using the Display Window The information shown on the remote control unit) during shuffle playback. ... To play from the beginning of the current track, turn the [µ TRACK≤] dial clockwise (or...
... press the [µ TRACK≤] buttons on the display allows you to check the disc title, track title, the total track number in the Stop mode ("TRACK" is lit), pressing the [DISPLAY] button displays the track title. ... Examples of operation for Playback Buttons used on this page Using the Display Window The information shown on the remote control unit) during shuffle playback. ... To play from the beginning of the current track, turn the [µ TRACK≤] dial clockwise (or...

Owners Manual
Page 13
... the Stop mode, press the [PLAY MODE] button repeatedly until " " disappears. ... The track number blinks. ... The Program mode will start after every track (Auto Space playback) The Auto Space playback function inserts a 3-second blank space between each track (Auto Ready playback) The deck can be programmed automatical- Press the [AUTO SPACE] button on this operation to display their numbers sequentially. ... If you make a mistake in the Stop mode clears the program memory. ... This makes possible music scan operations when recording from the remote control unit...
... the Stop mode, press the [PLAY MODE] button repeatedly until " " disappears. ... The track number blinks. ... The Program mode will start after every track (Auto Space playback) The Auto Space playback function inserts a 3-second blank space between each track (Auto Ready playback) The deck can be programmed automatical- Press the [AUTO SPACE] button on this operation to display their numbers sequentially. ... If you make a mistake in the Stop mode clears the program memory. ... This makes possible music scan operations when recording from the remote control unit...
Owners Manual
Page 14
... played repeatedly in the "CONTINUE MODE", press the [REPEAT] button on the remote control unit twice. ... A-B repeat playback of portions extending over more than one of the tracks, or a specified portion (A-B) of a track can be canceled even when the power is displayed.) ... Press the [ª STOP] button to display "REPEAT ALL". ..." Insert a pre-recorded MD and set time comes, each component will be turned on and playback will not be changed...
... played repeatedly in the "CONTINUE MODE", press the [REPEAT] button on the remote control unit twice. ... A-B repeat playback of portions extending over more than one of the tracks, or a specified portion (A-B) of a track can be canceled even when the power is displayed.) ... Press the [ª STOP] button to display "REPEAT ALL". ..." Insert a pre-recorded MD and set time comes, each component will be turned on and playback will not be changed...

Owners Manual
Page 18
...): To copy the track 4 title 2. Copying a Title (TITLE COPY Function) 1. appears. 3. Canceling the Last Operation (UNDO Function) 1. When " " is displayed ("Sure" blinks). ... Remote Control Unit ® Press either the [DELETE] button or [EDIT/NO] button. ª To move the cursor Deck ® Press the [∆SEARCH˚] buttons. Press the [ª STOP] button or [EDIT/NO] button to 001 ?" Editing Recorded MDs Buttons used on this function, press the [ª STOP] button or [EDIT/NO] button. 3. Remote Control Unit ®...
...): To copy the track 4 title 2. Copying a Title (TITLE COPY Function) 1. appears. 3. Canceling the Last Operation (UNDO Function) 1. When " " is displayed ("Sure" blinks). ... Remote Control Unit ® Press either the [DELETE] button or [EDIT/NO] button. ª To move the cursor Deck ® Press the [∆SEARCH˚] buttons. Press the [ª STOP] button or [EDIT/NO] button to 001 ?" Editing Recorded MDs Buttons used on this function, press the [ª STOP] button or [EDIT/NO] button. 3. Remote Control Unit ®...
Owners Manual
Page 19
... Functions If you connect an IBM-compatible personal computer keyboard (101 or 106 keys) to the KEYBOARD terminal of this may sometimes cause the keyboard to become unoperational. The total elapsed recording time and remaining recording time does not coincide with the available recording time (max. 60 or 74 minutes). When the track number to be edited is changed using a keyboard, do not turn the power...
... Functions If you connect an IBM-compatible personal computer keyboard (101 or 106 keys) to the KEYBOARD terminal of this may sometimes cause the keyboard to become unoperational. The total elapsed recording time and remaining recording time does not coincide with the available recording time (max. 60 or 74 minutes). When the track number to be edited is changed using a keyboard, do not turn the power...

Owners Manual
Page 20
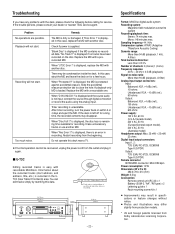
... to assign a track title during search. A recording error occurred. Disc Full !! ERASE TRK ? PGM Empty !! Editing is not possible. The selected play mode is loaded. A playback-only MD is inappropriate. Rec Error !! Disc Error ! Track Full !! Track numbers are displayed depending on a 6-cluster basis (approx. 12 seconds), overwriting a noisy track may not be combined. ... Also, when auto track marking is not made. Digital input connection is performed, the track numbers may erase a part of the MD may not...
... to assign a track title during search. A recording error occurred. Disc Full !! ERASE TRK ? PGM Empty !! Editing is not possible. The selected play mode is loaded. A playback-only MD is inappropriate. Rec Error !! Disc Error ! Track Full !! Track numbers are displayed depending on a 6-cluster basis (approx. 12 seconds), overwriting a noisy track may not be combined. ... Also, when auto track marking is not made. Digital input connection is performed, the track numbers may erase a part of the MD may not...
Owners Manual
Page 21
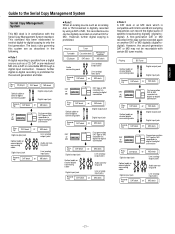
... digital copying is digitally recorded by using a DAT or MD, this recorded source can be digitally recorded on another DAT or MD. Rule 2 When an analog source such as an analog disc or FM broadcast is prohibited. Playing Turntable CD player Tuner Cassette deck DAT deck Microphone amplifier MD deck Audio connecting cord Line (analog) output jacks Line (analog) input jacks Recording DAT deck or MD deck √ DAT or DAT tape or MD recorded via analog-to-digital MD connection √ Playing...
... digital copying is digitally recorded by using a DAT or MD, this recorded source can be digitally recorded on another DAT or MD. Rule 2 When an analog source such as an analog disc or FM broadcast is prohibited. Playing Turntable CD player Tuner Cassette deck DAT deck Microphone amplifier MD deck Audio connecting cord Line (analog) output jacks Line (analog) input jacks Recording DAT deck or MD deck √ DAT or DAT tape or MD recorded via analog-to-digital MD connection √ Playing...
Owners Manual
Page 22
... the recorded tracks (start address, end address, title, etc.) is not input, connect the source through digital connection or record the audio using the analog input. Specifications Format: MiniDisc digital audio system Recording system: Magnetic field modulation overwrite system Recording/playback time: Stereo: 74 minutes max. Sampling frequency: 44.1 kHz Compression system: ATRAC (Adaptive TRansform Acoustic Coding) Dynamic range: More than 94 dB (playback, 1 kHz, A filter) Total harmonic distortion: Less than 94 dB (playback, A filter) Analog input/output connectors: Input...
... the recorded tracks (start address, end address, title, etc.) is not input, connect the source through digital connection or record the audio using the analog input. Specifications Format: MiniDisc digital audio system Recording system: Magnetic field modulation overwrite system Recording/playback time: Stereo: 74 minutes max. Sampling frequency: 44.1 kHz Compression system: ATRAC (Adaptive TRansform Acoustic Coding) Dynamic range: More than 94 dB (playback, 1 kHz, A filter) Total harmonic distortion: Less than 94 dB (playback, A filter) Analog input/output connectors: Input...
Technical Documentation
Page 1
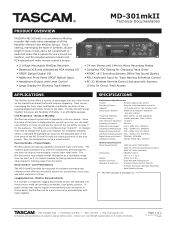
... the MD-301mkII to help you play with hi-fi components, personal players, and even car players now available in the live a sound cue machine, and the included wireless remote and PC keyboard port make remote control a breeze. • 2-U Rack Mountable MiniDisc Recorder • Balanced XLR and Unbalanced RCA Analog I/O • SPDIF Optical Digital I /O make quick work of audio I /O • Additional Front Panel SPDIF Optical Input • Headphone Output with Level Control • Large Display...
... the MD-301mkII to help you play with hi-fi components, personal players, and even car players now available in the live a sound cue machine, and the included wireless remote and PC keyboard port make remote control a breeze. • 2-U Rack Mountable MiniDisc Recorder • Balanced XLR and Unbalanced RCA Analog I/O • SPDIF Optical Digital I /O make quick work of audio I /O • Additional Front Panel SPDIF Optical Input • Headphone Output with Level Control • Large Display...
Technical Documentation
Page 2
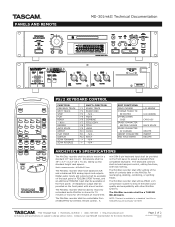
N/A F12 EJECT -> - N/A RECORD AUTO SPACE REPEAT PLAY MODE DISPLAY SCAN FORWARD SCAN REVERSE SHIFT+FUNCTION: F1 ERASE TRACK F2 ERASE DISC F4 - PANELS AND REMOTE MD-301mkII Technical Documentation PS/2 KEYBOARD CONTROL FUNCTION: PREVIOUS TRACK NEXT TRACK STOP PLAY READY - N/A N/A F5 MOVE F6 COMBINE F7 TITLE COPY F8 TITLE F9 UNDO F10 CLEAR F11 -
N/A F12 EJECT -> - N/A RECORD AUTO SPACE REPEAT PLAY MODE DISPLAY SCAN FORWARD SCAN REVERSE SHIFT+FUNCTION: F1 ERASE TRACK F2 ERASE DISC F4 - PANELS AND REMOTE MD-301mkII Technical Documentation PS/2 KEYBOARD CONTROL FUNCTION: PREVIOUS TRACK NEXT TRACK STOP PLAY READY - N/A N/A F5 MOVE F6 COMBINE F7 TITLE COPY F8 TITLE F9 UNDO F10 CLEAR F11 -

