Owner's Manual
Page 1
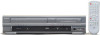
... to complete connections. Before you start Connections Getting started Recording Owner's Manual DVD Recorder with this unit , you need additional operating assistance after connections are completed. (You CANNOT record on any copyright protected DVD disc with Video Cassette Recorder SR90VE POWER REW F.FWD STOP/EJECT PLAY VCR RECORD OPEN/CLOSE CHANNEL DUBBING...
... to complete connections. Before you start Connections Getting started Recording Owner's Manual DVD Recorder with this unit , you need additional operating assistance after connections are completed. (You CANNOT record on any copyright protected DVD disc with Video Cassette Recorder SR90VE POWER REW F.FWD STOP/EJECT PLAY VCR RECORD OPEN/CLOSE CHANNEL DUBBING...
Owner's Manual
Page 2
... be thrown away or incinerated but disposed of the FCC Rules.These limits are designed to provide reasonable protection against harmful interference in the instruction manual.The user could lose the authority to Part 15 of in a particular installation. Make your local recycling regulations. Contact your local regulations concerning chemical wastes...
... be thrown away or incinerated but disposed of the FCC Rules.These limits are designed to provide reasonable protection against harmful interference in the instruction manual.The user could lose the authority to Part 15 of in a particular installation. Make your local recycling regulations. Contact your local regulations concerning chemical wastes...
Owner's Manual
Page 4
... use , or the usage of rental or worn tapes can see a clear picture. • Playback picture may need to DVD-RW in this owner's manual Many functions of this problem. Symbol DVD-V Video DVD-RW VR DVD-RW DVD-R CD MP3 VCR First: DVD (Press:) First: VCR (Press:) Description...GUIDE" in a horizontal and stable position. Avoid the Hazards of Electrical Shock and Fire • Do not handle the power cord with this Owner's Manual, the laser optical pickup unit may occur inside .Turn off, unplug the power plug, and please call our help line mentioned on this unit, unplug...
... use , or the usage of rental or worn tapes can see a clear picture. • Playback picture may need to DVD-RW in this owner's manual Many functions of this problem. Symbol DVD-V Video DVD-RW VR DVD-RW DVD-R CD MP3 VCR First: DVD (Press:) First: VCR (Press:) Description...GUIDE" in a horizontal and stable position. Avoid the Hazards of Electrical Shock and Fire • Do not handle the power cord with this Owner's Manual, the laser optical pickup unit may occur inside .Turn off, unplug the power plug, and please call our help line mentioned on this unit, unplug...
Owner's Manual
Page 5
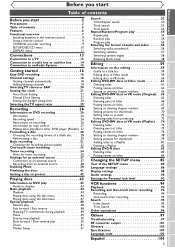
... Channel settings 18 Getting channels automatically 18 Adding/deleting channels 19 Selecting TV stereo or SAP 20 Setting the clock 21 Auto Clock Setting 21 Manual Clock Setting 22 Setting the daylight saving time 24 Selecting the TV aspect ratio 25 Recording 26 Information on DVD recording 26 Information 26 Recording...
... Channel settings 18 Getting channels automatically 18 Adding/deleting channels 19 Selecting TV stereo or SAP 20 Setting the clock 21 Auto Clock Setting 21 Manual Clock Setting 22 Setting the daylight saving time 24 Selecting the TV aspect ratio 25 Recording 26 Information on DVD recording 26 Information 26 Recording...
Owner's Manual
Page 11
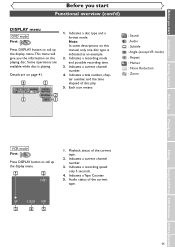
... 41. 4 1 1 5 1 00:00:00 DVD-RW Video mode 2 SP 1:25 Rem. Indicates a current channel number. 3. Audio status of disc play. 5. Some operations are on this manual, only one disc type is playing. Indicates a current channel number. 4. CH 1 3 1. Indicates a recording speed only 5 seconds. 4. Before you start Connections Getting started Recording Before you...
... 41. 4 1 1 5 1 00:00:00 DVD-RW Video mode 2 SP 1:25 Rem. Indicates a current channel number. 3. Audio status of disc play. 5. Some operations are on this manual, only one disc type is playing. Indicates a current channel number. 4. CH 1 3 1. Indicates a recording speed only 5 seconds. 4. Before you start Connections Getting started Recording Before you...
Owner's Manual
Page 15
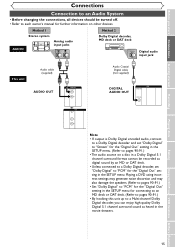
... Getting started Recording Connections Connection to an Audio System • Before changing the connections, all devices should be turned off. • Refer to each owner's manual for further information on a disc in a Dolby Digital 5.1 channel surround format cannot be recorded as heard in the SETUP menu. Before you can enjoy high...
... Getting started Recording Connections Connection to an Audio System • Before changing the connections, all devices should be turned off. • Refer to each owner's manual for further information on a disc in a Dolby Digital 5.1 channel surround format cannot be recorded as heard in the SETUP menu. Before you can enjoy high...
Owner's Manual
Page 17
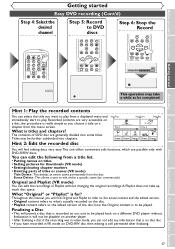
... 3 Chapter 1 Chapter 2 You will find editing discs very easy.This unit offers convenient edit functions, which are possible only with DVD-R/RW discs. Throughout this manual, you will find Original and Playlist to refer to the actual content and the edited version. • Original content refers to what's actually recorded on...
... 3 Chapter 1 Chapter 2 You will find editing discs very easy.This unit offers convenient edit functions, which are possible only with DVD-R/RW discs. Throughout this manual, you will find Original and Playlist to refer to the actual content and the edited version. • Original content refers to what's actually recorded on...
Owner's Manual
Page 18
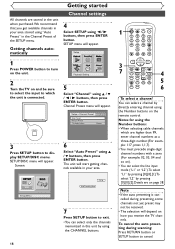
Setup > Channel Preset VCR DVD Auto Preset Manual Preset TV Audio Select Stereo 3 Press SETUP button to cancel. The unit will start getting channels available in your area stored using K / L / { / B buttons, then press ...
Setup > Channel Preset VCR DVD Auto Preset Manual Preset TV Audio Select Stereo 3 Press SETUP button to cancel. The unit will start getting channels available in your area stored using K / L / { / B buttons, then press ...

Owner's Manual
Page 19
...will appear. Playing discs Editing Changing the SETUP menu VCR functions Others Español 19 SETUP menu will appear. Manual Preset menu will appear. 4 Select "Manual Preset" using { / B buttons, then press ENTER button. Before you start Connections Getting started Recording Getting started ... settings (cont'd) Adding/deleting channels The channels you can continue adding or deleting channels. 7 Press SETUP button to exit. Setup > Channel Preset > Manual Preset CH2 Add Delete POWER REC SPEED AUDIO OPEN/CLOSE .@/: 1 GHI 4 PQRS 7 DISPLAY ABC 2 JKL 5 TUV 8 SPACE 0 VCR DEF ...
...will appear. Playing discs Editing Changing the SETUP menu VCR functions Others Español 19 SETUP menu will appear. Manual Preset menu will appear. 4 Select "Manual Preset" using { / B buttons, then press ENTER button. Before you start Connections Getting started Recording Getting started ... settings (cont'd) Adding/deleting channels The channels you can continue adding or deleting channels. 7 Press SETUP button to exit. Setup > Channel Preset > Manual Preset CH2 Add Delete POWER REC SPEED AUDIO OPEN/CLOSE .@/: 1 GHI 4 PQRS 7 DISPLAY ABC 2 JKL 5 TUV 8 SPACE 0 VCR DEF ...
Owner's Manual
Page 20
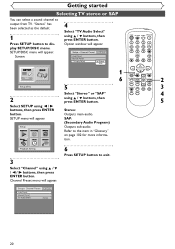
...6 STOP REC/OTR SETUP TIMER PROG. SETUP/DISC menu will appear. 6 Press SETUP button to output from TV. Setup > Channel Preset VCR DVD Auto Preset Manual Preset TV Audio Select SteSrteeoreo SAP POWER REC SPEED AUDIO OPEN/CLOSE .@/: 1 GHI 4 PQRS 7 DISPLAY ABC 2 JKL 5 TUV 8 SPACE 0 VCR DEF... ENTER button. Refer to display SETUP/DISC menu. Option window will appear. SETUP menu will appear. Setup > Channel Preset VCR DVD Auto Preset Manual Preset TV Audio Select Stereo 20 Setup 5 Select "Stereo" or "SAP" using K / L buttons, then press ENTER button. Getting started ...
...6 STOP REC/OTR SETUP TIMER PROG. SETUP/DISC menu will appear. 6 Press SETUP button to output from TV. Setup > Channel Preset VCR DVD Auto Preset Manual Preset TV Audio Select SteSrteeoreo SAP POWER REC SPEED AUDIO OPEN/CLOSE .@/: 1 GHI 4 PQRS 7 DISPLAY ABC 2 JKL 5 TUV 8 SPACE 0 VCR DEF... ENTER button. Refer to display SETUP/DISC menu. Option window will appear. SETUP menu will appear. Setup > Channel Preset VCR DVD Auto Preset Manual Preset TV Audio Select Stereo 20 Setup 5 Select "Stereo" or "SAP" using K / L buttons, then press ENTER button. Getting started ...
Owner's Manual
Page 21
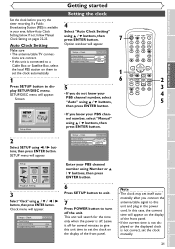
...POWER button to a Select "Auto Clock Setting" using K / L buttons, then press ENTER button. Leave it off . Setup Enter your PBS channel number, select "Manual" using K / L buttons, then press ENTER button. Playback Setting 3 Select "Clock" using { / B buttons, then press ENTER button. SETUP menu will search for... MENU RETURN 2 Press SETUP button to set the clock on pages 22-23. Note • The clock may set the clock manually. Option window will appear. Clock menu will appear. If not, follow Auto Clock Setting below. Setup > Clock Clock Setting Auto ...
...POWER button to a Select "Auto Clock Setting" using K / L buttons, then press ENTER button. Leave it off . Setup Enter your PBS channel number, select "Manual" using K / L buttons, then press ENTER button. Playback Setting 3 Select "Clock" using { / B buttons, then press ENTER button. SETUP menu will search for... MENU RETURN 2 Press SETUP button to set the clock on pages 22-23. Note • The clock may set the clock manually. Option window will appear. Clock menu will appear. If not, follow Auto Clock Setting below. Setup > Clock Clock Setting Auto ...
Owner's Manual
Page 22
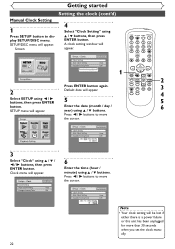
...STOP REC/OTR SETUP TIMER PROG. Setup Menu 2 Select SETUP using K / L / { / B buttons, then press ENTER button. Getting started Setting the clock (cont'd) Manual Clock Setting 1 Press SETUP button to move the cursor. SETUP/DISC menu will be lost if either there is a power failure or this unit has... been unplugged for more than 30 seconds when you set the clock manually. Press { / B buttons to move the cursor. Setup Press ENTER button again. REC MONITOR ENTER MENU/LIST TOP MENU RETURN CLEAR/C-RESET...
...STOP REC/OTR SETUP TIMER PROG. Setup Menu 2 Select SETUP using K / L / { / B buttons, then press ENTER button. Getting started Setting the clock (cont'd) Manual Clock Setting 1 Press SETUP button to move the cursor. SETUP/DISC menu will be lost if either there is a power failure or this unit has... been unplugged for more than 30 seconds when you set the clock manually. Press { / B buttons to move the cursor. Setup Press ENTER button again. REC MONITOR ENTER MENU/LIST TOP MENU RETURN CLEAR/C-RESET...

Owner's Manual
Page 23
Before you start Connections Getting started Recording Getting started Setting the clock (cont'd) 7 8 Press K / L buttons to (3) in "Manual Clock Setting". 4 Select "Auto Clock Setting" using K / L buttons, then press ENTER button. 6 Press SETUP button to exit. REC MONITOR ENTER MENU/LIST TOP ...MENU RETURN 7 CLEAR/C-RESET ZOOM SKIP SKIP SEARCH MODE CM SKIP When "Auto Clock Setting" is selected to "Auto" or "Manual", change it to "OFF" as follows: Repeat steps (1) to select AM or PM, then press ENTER button. Setup > Clock Clock Setting Auto Clock...
Before you start Connections Getting started Recording Getting started Setting the clock (cont'd) 7 8 Press K / L buttons to (3) in "Manual Clock Setting". 4 Select "Auto Clock Setting" using K / L buttons, then press ENTER button. 6 Press SETUP button to exit. REC MONITOR ENTER MENU/LIST TOP ...MENU RETURN 7 CLEAR/C-RESET ZOOM SKIP SKIP SEARCH MODE CM SKIP When "Auto Clock Setting" is selected to "Auto" or "Manual", change it to "OFF" as follows: Repeat steps (1) to select AM or PM, then press ENTER button. Setup > Clock Clock Setting Auto Clock...
Owner's Manual
Page 34
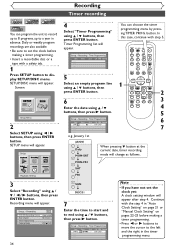
... a safety tab. 1 Press SETUP button to the left and the right in advance. e.g. Continue with the step 4 in "Auto Clock Setting" on page 21 or "Manual Clock Setting" on pages 22-23 before making a timer programming. • Press { or B buttons to move the cursor to display SETUP/DISC menu. January 1st...
... a safety tab. 1 Press SETUP button to the left and the right in advance. e.g. Continue with the step 4 in "Auto Clock Setting" on page 21 or "Manual Clock Setting" on pages 22-23 before making a timer programming. • Press { or B buttons to move the cursor to display SETUP/DISC menu. January 1st...
Owner's Manual
Page 94
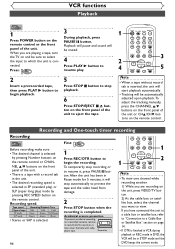
... want to resume it will stop recording or to view. Playback will pause and sound will be automatically adjusted upon playback.To adjust the tracking manually, press the CHANNEL K/L buttons on the front panel of the unit. Record tab 94 1 PQRS 7 DISPLAY TUV 8 SPACE 0 VCR WXYZ VIDEO/TV 9 SLOW DVD PAUSE...
... want to resume it will stop recording or to view. Playback will pause and sound will be automatically adjusted upon playback.To adjust the tracking manually, press the CHANNEL K/L buttons on the front panel of the unit. Record tab 94 1 PQRS 7 DISPLAY TUV 8 SPACE 0 VCR WXYZ VIDEO/TV 9 SLOW DVD PAUSE...
Owner's Manual
Page 97
... a TV program using the CH o / p buttons. • Press VIDEO/TV button if necessary. • Adjust TV antenna. • Adjust the picture (see the TV's instruction manual). • Place the unit and TV farther apart. • Place the TV and any TV program using RF connection. • Switch the input selector on...
... a TV program using the CH o / p buttons. • Press VIDEO/TV button if necessary. • Adjust TV antenna. • Adjust the picture (see the TV's instruction manual). • Place the unit and TV farther apart. • Place the TV and any TV program using RF connection. • Switch the input selector on...

Owner's Manual
Page 98
... REC/OTR button. The subtitle language cannot be changed or turned off. The angles cannot be changed . Nothing was activated (page 48). See the instruction manual supplied with another recorder, the unit cannot play the disc if it is upside down.
... REC/OTR button. The subtitle language cannot be changed or turned off. The angles cannot be changed . Nothing was activated (page 48). See the instruction manual supplied with another recorder, the unit cannot play the disc if it is upside down.