
Owner's Manual
Page 2
... communications. NO USER SERVICEABLE PARTS INSIDE. LASER SAFETY This unit employs a laser. CAUTION: USE OF CONTROLS OR ADJUSTMENTS OR PERFORMANCE OF PROCEDURES OTHER THAN THOSE SPECIFIED HEREIN MAY RESULT IN HAZARDOUS RADIATION EXPOSURE. RADIO-TV INTERFERENCE This equipment has been tested and found to Part 15 of important operating and maintenance (servicing) instructions in a residential installation. However, there is connected. 4) Consult the...
... communications. NO USER SERVICEABLE PARTS INSIDE. LASER SAFETY This unit employs a laser. CAUTION: USE OF CONTROLS OR ADJUSTMENTS OR PERFORMANCE OF PROCEDURES OTHER THAN THOSE SPECIFIED HEREIN MAY RESULT IN HAZARDOUS RADIATION EXPOSURE. RADIO-TV INTERFERENCE This equipment has been tested and found to Part 15 of important operating and maintenance (servicing) instructions in a residential installation. However, there is connected. 4) Consult the...
Owner's Manual
Page 3
... the safety and operating instructions should not be sure the service technician has used replacement parts specified by following conditions: a. Slots and openings in damage and will prevent damage to the video product due to an antenna discharge unit, size of grounding conductors, location of the polarized plug. 12. Do not defeat the safety purpose of antenna-discharge unit, connection to the...
... the safety and operating instructions should not be sure the service technician has used replacement parts specified by following conditions: a. Slots and openings in damage and will prevent damage to the video product due to an antenna discharge unit, size of grounding conductors, location of the polarized plug. 12. Do not defeat the safety purpose of antenna-discharge unit, connection to the...
Owner's Manual
Page 5
... 26 ON-SCREEN INFORMATION 26 TRACK SELECTION (MP3 26 RANDOM PLAYBACK (MP3 27 PROGRAM (MP3 27 AUDIO LANGUAGE 27 STEREO SOUND MODE 27 SUBTITLE LANGUAGE 27 CAMERA ANGLE 27 CHANGING THE ON-SCREEN DISPLAY 28 PARENTAL CONTROL 28 MARKER SETUP SCREEN 29 ■ DVD SETUP 29 AUDIO SETTING 29 BLACK LEVEL SETTING 30 VIRTUAL SURROUND 30 DISPLAY SETTING 30 LANGUAGE SETTING 31 ■ TROUBLESHOOTING GUIDE 32 ■ MAINTENANCE 33 ■ SPECIFICATIONS 34 INDICE ■ CONTROLES DEL FUNCIONAMIENTO...
... 26 ON-SCREEN INFORMATION 26 TRACK SELECTION (MP3 26 RANDOM PLAYBACK (MP3 27 PROGRAM (MP3 27 AUDIO LANGUAGE 27 STEREO SOUND MODE 27 SUBTITLE LANGUAGE 27 CAMERA ANGLE 27 CHANGING THE ON-SCREEN DISPLAY 28 PARENTAL CONTROL 28 MARKER SETUP SCREEN 29 ■ DVD SETUP 29 AUDIO SETTING 29 BLACK LEVEL SETTING 30 VIRTUAL SURROUND 30 DISPLAY SETTING 30 LANGUAGE SETTING 31 ■ TROUBLESHOOTING GUIDE 32 ■ MAINTENANCE 33 ■ SPECIFICATIONS 34 INDICE ■ CONTROLES DEL FUNCIONAMIENTO...
Owner's Manual
Page 6
... sound mode ¡Parental lock ¡Automatic detection of discs This player automatically detects if the loaded disc is spilled on disc. ¡Playing an audio CD with MP3 files ¡Direct Search ¡On-screen display Information about the current operation can control the range of sound volume. ¡Black Level Setting VCR Mode Hardware specifications ¡Auto Head Cleaner ¡Trilingual on the power cord when disconnecting it is dry. -6- er tuner...
... sound mode ¡Parental lock ¡Automatic detection of discs This player automatically detects if the loaded disc is spilled on disc. ¡Playing an audio CD with MP3 files ¡Direct Search ¡On-screen display Information about the current operation can control the range of sound volume. ¡Black Level Setting VCR Mode Hardware specifications ¡Auto Head Cleaner ¡Trilingual on the power cord when disconnecting it is dry. -6- er tuner...
Owner's Manual
Page 8
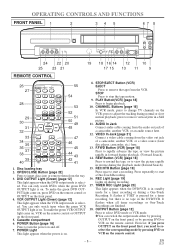
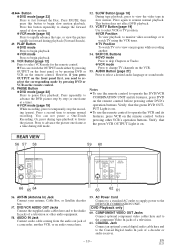
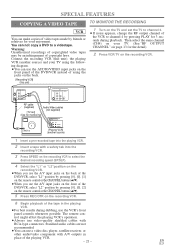
... 37 38 39 40 POWER SPEED AUDIO 1 2 4 5 7 8 0 DISPLAY DVD 3 6 9 +10 VCR SKIP/CH. VCR OUTPUT Light (Green) [page 12] This light appears when the VCR output mode is selected. To make the green DVD OUTPUT light come on, VCR on the remote control or OUTPUT on the front panel. 5. Disc loading tray 2. AUDIO In Jack Connect audio cable coming from the audio out jack of a camcorder, another VCR, or an audio source here. 12. REC Light [page 19] Lights up during a One...
... 37 38 39 40 POWER SPEED AUDIO 1 2 4 5 7 8 0 DISPLAY DVD 3 6 9 +10 VCR SKIP/CH. VCR OUTPUT Light (Green) [page 12] This light appears when the VCR output mode is selected. To make the green DVD OUTPUT light come on, VCR on the remote control or OUTPUT on the front panel. 5. Disc loading tray 2. AUDIO In Jack Connect audio cable coming from the audio out jack of a camcorder, another VCR, or an audio source here. 12. REC Light [page 19] Lights up during a One...
Owner's Manual
Page 9
... to reset the setting. ● VCR mode [page 18] Press to put the VCR into standby mode for a timer recording. 40. RETURN Button [page 30] ● DVD mode Returns to correct digits when setting program (For example: setting clock or timer program). Press to access or remove the VCR's on the remote control. Press to the previous operation in the DVD Player. 21. Press to add or delete channel numbers during DVD or Audio CD playback. ● VCR mode [page...
... to reset the setting. ● VCR mode [page 18] Press to put the VCR into standby mode for a timer recording. 40. RETURN Button [page 30] ● DVD mode Returns to correct digits when setting program (For example: setting clock or timer program). Press to access or remove the VCR's on the remote control. Press to the previous operation in the DVD Player. 21. Press to add or delete channel numbers during DVD or Audio CD playback. ● VCR mode [page...
Owner's Manual
Page 10
... to supply power to select a desired audio language or sound mode. Notes ¡To use the remote control to advance the picture one frame at a time during playback (Forward Search). 49. AUDIO IN Jack Connect audio cable coming from the audio out jack of a television or other DVD's operation buttons. 48.g Button ● DVD mode [page 23] Press to the component Video In jacks of a decoder or audio receiver. - 10 - Press PAUSE, then press this button repeatedly to view one program while...
... to supply power to select a desired audio language or sound mode. Notes ¡To use the remote control to advance the picture one frame at a time during playback (Forward Search). 49. AUDIO IN Jack Connect audio cable coming from the audio out jack of a television or other DVD's operation buttons. 48.g Button ● DVD mode [page 23] Press to the component Video In jacks of a decoder or audio receiver. - 10 - Press PAUSE, then press this button repeatedly to view one program while...

Owner's Manual
Page 13
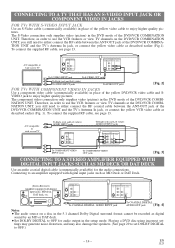
... a power failure or the DVD/VCR COMBINATION UNIT is unplugged for more than 30 seconds, the RF output channel setting will return to the ANT-IN jack of the DVD/VCR COMBINATION UNIT. 4. CONNECTING TO A TV WITH A/V TERMINALS Antenna/Cable signal DVD/VCR AUDIO OUT VCR ANT-IN L A/V-compatible or wide screen TV To ANT. If the A/V cables are watching television programs. CONNECTING TO A TV WITHOUT A/V TERMINALS 1. Press PLAY. ¡If noise appears, change the...
... a power failure or the DVD/VCR COMBINATION UNIT is unplugged for more than 30 seconds, the RF output channel setting will return to the ANT-IN jack of the DVD/VCR COMBINATION UNIT. 4. CONNECTING TO A TV WITH A/V TERMINALS Antenna/Cable signal DVD/VCR AUDIO OUT VCR ANT-IN L A/V-compatible or wide screen TV To ANT. If the A/V cables are watching television programs. CONNECTING TO A TV WITHOUT A/V TERMINALS 1. Press PLAY. ¡If noise appears, change the...
Owner's Manual
Page 14
... S-Video connection only supplies video (picture) in the DVD mode of the yellow DVD/VCR video cable and SVIDEO jack to OFF for the audio connections. tings may generate noise distortion, and may also damage the speakers. (See page 29 to set - A/V-compatible or wide screen TV DVD/VCR AUDIO OUT VCR ANT-IN L R ANT-OUT VIDEO OUT AUDIO IN VIDEO IN DVD S-VIDEO COMPONENT AUDIO OUT VIDEO OUT OUT Y DIGITAL AUDIO OUT Cb L COAXIAL Cr R To S-VIDEO INPUT jack To S-VIDEO OUT jack To Right (red) and...
... S-Video connection only supplies video (picture) in the DVD mode of the yellow DVD/VCR video cable and SVIDEO jack to OFF for the audio connections. tings may generate noise distortion, and may also damage the speakers. (See page 29 to set - A/V-compatible or wide screen TV DVD/VCR AUDIO OUT VCR ANT-IN L R ANT-OUT VIDEO OUT AUDIO IN VIDEO IN DVD S-VIDEO COMPONENT AUDIO OUT VIDEO OUT OUT Y DIGITAL AUDIO OUT Cb L COAXIAL Cr R To S-VIDEO INPUT jack To S-VIDEO OUT jack To Right (red) and...
Owner's Manual
Page 15
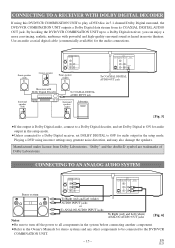
... the speakers. EN 1L25 CONNECTING TO AN ANALOG AUDIO SYSTEM DVD/VCR AUDIO OUT ANT-IN L VCR DVD S-VIDEO COMPONENT AUDIO OUT VIDEO OUT OUT Y DIGITAL AUDIO OUT R ANT-OUT VIDEO OUT AUDIO IN VIDEO IN Cb L COAXIAL Cr R Stereo system To Right (red) and Left (white) AUDIO INPUT jacks or To ANALOG AUDIO INPUT jacks Notes To Right (red) and Left (white) ANALOG AUDIO OUT jacks [Fig. 6] ¡Be sure to turn off the power to play a DVD disc in 5.1 channel Dolby Digital surround, the DVD/VCR...
... the speakers. EN 1L25 CONNECTING TO AN ANALOG AUDIO SYSTEM DVD/VCR AUDIO OUT ANT-IN L VCR DVD S-VIDEO COMPONENT AUDIO OUT VIDEO OUT OUT Y DIGITAL AUDIO OUT R ANT-OUT VIDEO OUT AUDIO IN VIDEO IN Cb L COAXIAL Cr R Stereo system To Right (red) and Left (white) AUDIO INPUT jacks or To ANALOG AUDIO INPUT jacks Notes To Right (red) and Left (white) ANALOG AUDIO OUT jacks [Fig. 6] ¡Be sure to turn off the power to play a DVD disc in 5.1 channel Dolby Digital surround, the DVD/VCR...
Owner's Manual
Page 16
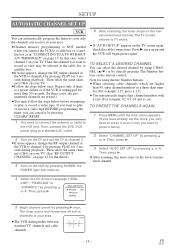
... CHANNELS AGAIN 1 Press MENU until the main menu appears. (If you have already set the TV to channel 3. ¡If noise appears, change the RF output channel of the VCR to TV mode. ¡If "AUTO SET UP" appears on the remote control. EN 1L25 Repeat only if there is a power failure or if the VCR is NOT needed when you connect the VCR to a cable box or a satellite box as a three-digit number...
... CHANNELS AGAIN 1 Press MENU until the main menu appears. (If you have already set the TV to channel 3. ¡If noise appears, change the RF output channel of the VCR to TV mode. ¡If "AUTO SET UP" appears on the remote control. EN 1L25 Repeat only if there is a power failure or if the VCR is NOT needed when you connect the VCR to a cable box or a satellite box as a three-digit number...

Owner's Manual
Page 17
... and need English: Press MENU and choose SELEC. MENU TIMER PROGRAMMING AUTO REPEAT [OFF] CHANNEL SET UP CLOCK SET LANGUAGE SELECT have to press it twice). 2 Select "CHANNEL SET UP" by pressing K or L. Then, press B. 4 Enter the desired channel number by pressing K or L. TO ADD/DELETE CHANNELS When scanning, some channels may be skipped due to the VCR memory manually. 1 Press MENU until the main menu appears. (If you have already set , the CLOCK SET menu...
... and need English: Press MENU and choose SELEC. MENU TIMER PROGRAMMING AUTO REPEAT [OFF] CHANNEL SET UP CLOCK SET LANGUAGE SELECT have to press it twice). 2 Select "CHANNEL SET UP" by pressing K or L. Then, press B. 4 Enter the desired channel number by pressing K or L. TO ADD/DELETE CHANNELS When scanning, some channels may be skipped due to the VCR memory manually. 1 Press MENU until the main menu appears. (If you have already set , the CLOCK SET menu...
Owner's Manual
Page 18
... a specific point on the TV and set the TV to channel 3. ¡If noise appears, change the RF output channel of a still picture. You may skip to vibrate vertically during the Still mode. ¡You cannot manually adjust the tracking of the VCR to go in the LP/SLP modes only). EN 1L25 Please insert a tape. SEARCH FUNCTIONS VCR PICTURE SEARCH If you to play...
... a specific point on the TV and set the TV to channel 3. ¡If noise appears, change the RF output channel of a still picture. You may skip to vibrate vertically during the Still mode. ¡You cannot manually adjust the tracking of the VCR to go in the LP/SLP modes only). EN 1L25 Please insert a tape. SEARCH FUNCTIONS VCR PICTURE SEARCH If you to play...
Owner's Manual
Page 19
... the remote control. The set up flashes. START TIME END TIME CHANNEL REC SPEED 1) Set the program number (1-8) Program number which is selected in the VCR. ¡The desired recording speed is not set up screen is selected by pressing REC/OTR on the VCR. 1 Press REC/OTR to the DVD mode automatically as in "CONNECTING TO A TV WITHOUT A/V TERMINALS" on page 13, select channel 3 on your TV, and select the specific INPUT channel assigned by your cable box...
... the remote control. The set up flashes. START TIME END TIME CHANNEL REC SPEED 1) Set the program number (1-8) Program number which is selected in the VCR. ¡The desired recording speed is not set up screen is selected by pressing REC/OTR on the VCR. 1 Press REC/OTR to the DVD mode automatically as in "CONNECTING TO A TV WITHOUT A/V TERMINALS" on page 13, select channel 3 on your TV, and select the specific INPUT channel assigned by your cable box...
Owner's Manual
Page 20
... "DVD/VCR TO TV CONNECTION" on the remote control to channel 3 or 4 the same channel as in this manual. ¡When timer recordings are finished, the TIMER REC light will not operate. Select either VCR or DVD mode, then continue with the other features as described in this manual. For weekly: Press K or L to point to turn on the VCR. 2 Select main menu by mode. - 20 - ONE TIME PROGRAM PROGRAM NUMBER 4 DATE - - / - - REC SPEED - - 4) Set the start time...
... "DVD/VCR TO TV CONNECTION" on the remote control to channel 3 or 4 the same channel as in this manual. ¡When timer recordings are finished, the TIMER REC light will not operate. Select either VCR or DVD mode, then continue with the other features as described in this manual. For weekly: Press K or L to point to turn on the VCR. 2 Select main menu by mode. - 20 - ONE TIME PROGRAM PROGRAM NUMBER 4 DATE - - / - - REC SPEED - - 4) Set the start time...
Owner's Manual
Page 21
... CHANNEL buttons (o/p). ¡When you use the A/V input jacks on the front of the DVD/VCR, select "L2" position by pressing [0], [0], [2] on the remote control or the CHANNEL buttons (o/p). 5 Press REC/OTR on the TV and set the TV to channel 3. ¡If noise appears, change the RF output channel of the VCR to a videotape. trol might affect the playing VCR's operation. ¡Always use video-quality shielded cables with A/V outputs in the playing VCR. ¡For best...
... CHANNEL buttons (o/p). ¡When you use the A/V input jacks on the front of the DVD/VCR, select "L2" position by pressing [0], [0], [2] on the remote control or the CHANNEL buttons (o/p). 5 Press REC/OTR on the TV and set the TV to channel 3. ¡If noise appears, change the RF output channel of the VCR to a videotape. trol might affect the playing VCR's operation. ¡Always use video-quality shielded cables with A/V outputs in the playing VCR. ¡For best...

Owner's Manual
Page 22
... or playback time in the DVD main menu and press ENTER to the correct channel. ¡Select DVD mode by pressing DVD on the remote control or OUTPUT on the TV screen during operation, warning that a prohibited operation has been encountered by the DVD or the disc. ¡With DVDs that use titles for playback program signals, playback may appear at the top-right on the front panel. If the...
... or playback time in the DVD main menu and press ENTER to the correct channel. ¡Select DVD mode by pressing DVD on the remote control or OUTPUT on the TV screen during operation, warning that a prohibited operation has been encountered by the DVD or the disc. ¡With DVDs that use titles for playback program signals, playback may appear at the top-right on the front panel. If the...
Owner's Manual
Page 23
... using the FWD or REV button on the front panel, press the button in PAUSE mode, and hold it for more than 1.5 seconds to normal playback, press PLAY. 2 The disc goes forward by one more time. 2 Press PLAY, playback will resume from the point at ×8. symbol 3 Press Arrow (L/K/s/B) to select an item, and ENTER to call up the DVD menu...
... using the FWD or REV button on the front panel, press the button in PAUSE mode, and hold it for more than 1.5 seconds to normal playback, press PLAY. 2 The disc goes forward by one more time. 2 Press PLAY, playback will resume from the point at ×8. symbol 3 Press Arrow (L/K/s/B) to select an item, and ENTER to call up the DVD menu...
Owner's Manual
Page 32
... VCR mode. Then, set up . • Cancel the parental lock or change the control level. Video or color fades in this Owner's Manual, check the player consulting the following checklist. You are not a sign of the audio component on. • Correct the audio output settings. • Correct the input settings on the DVD. If not, press VCR on the remote control to put it to the TV. • There are some cases where pictures...
... VCR mode. Then, set up . • Cancel the parental lock or change the control level. Video or color fades in this Owner's Manual, check the player consulting the following checklist. You are not a sign of the audio component on. • Correct the audio output settings. • Correct the input settings on the DVD. If not, press VCR on the remote control to put it to the TV. • There are some cases where pictures...
Owner's Manual
Page 33
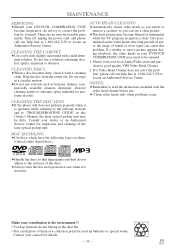
... insert or remove a cassette, so you can cause this Owner's Manual, the laser optical pickup unit may be cleaned. 1. Do not wipe in your DVD/VCR COMBINATION UNIT may become inoperative, do not belong in this problem. NOTES: ¡Remember to locate an Authorized Service Center. DISC HANDLING ¡Use discs which have the following logos on the video heads...
... insert or remove a cassette, so you can cause this Owner's Manual, the laser optical pickup unit may be cleaned. 1. Do not wipe in your DVD/VCR COMBINATION UNIT may become inoperative, do not belong in this problem. NOTES: ¡Remember to locate an Authorized Service Center. DISC HANDLING ¡Use discs which have the following logos on the video heads...


