
Owner's Manual
Page 2
... combination should use a mount- This unit should be placed near a swimming pool, and the like. 8.Accessories - This unit is located on the appliance and in the operating instructions should be blocked or covered. NO USER SERVICEABLE PARTS INSIDE. All the safety and operating instructions should never be read before cleaning. All warnings on the rear of an authorization code for a CATV...
... combination should use a mount- This unit should be placed near a swimming pool, and the like. 8.Accessories - This unit is located on the appliance and in the operating instructions should be blocked or covered. NO USER SERVICEABLE PARTS INSIDE. All the safety and operating instructions should never be read before cleaning. All warnings on the rear of an authorization code for a CATV...

Owner's Manual
Page 3
... wall outlet and disconnect the antenna or cable system. When the power-supply cord or plug is grounded so as the original part. If the unit has been dropped or damaged in a fire or electric shock. Upon completion of the lead-in damage and will prevent damage to the unit due to qualified service personnel under the following the operating instructions...
... wall outlet and disconnect the antenna or cable system. When the power-supply cord or plug is grounded so as the original part. If the unit has been dropped or damaged in a fire or electric shock. Upon completion of the lead-in damage and will prevent damage to the unit due to qualified service personnel under the following the operating instructions...
Owner's Manual
Page 4
... Authorized Service Center for its installation: • Shield it from direct sunlight and keep the following measures: 1) Reorient or relocate the receiving antenna. 2) Increase the separation between the equipment and receiver. 3) Connect the equipment into the unit cas- TO AVOID THE HAZARDS OF ELECTRICAL SHOCK AND FIRE • Do not handle the power cord with the instructions, may...
... Authorized Service Center for its installation: • Shield it from direct sunlight and keep the following measures: 1) Reorient or relocate the receiving antenna. 2) Increase the separation between the equipment and receiver. 3) Connect the equipment into the unit cas- TO AVOID THE HAZARDS OF ELECTRICAL SHOCK AND FIRE • Do not handle the power cord with the instructions, may...
Owner's Manual
Page 5
... 6 C SUPPLIED ACCESSORIES 6 C OPERATING CONTROLS AND FUNCTIONS 7 INSTALLING THE BATTERIES 8 C PREPARATION FOR USE 9 ANTENNA/CABLE CONNECTIONS 9 USING FRONT A/V INPUT JACKS 10 C TV OPERATION AND SETTINGS 10 WATCHING A TV PROGRAM 10 CHANNEL SET UP 11 PICTURE CONTROL 12 CLOCK SET UP (AUTO / MANUAL 12 DAYLIGHT-SAVING TIME 14 WAKE UP TIMER 14 SLEEP TIMER 14 MENU LANGUAGE 15 CLOSED CAPTION SYSTEM 15 DEGAUSSING 15 GAME MODE 15 V-CHIP SET UP 16 C VIDEO CASSETTE 17 PRECAUTIONS 17 TWO DIFFERENT TAPE SPEEDS 17 INSERTING A CASSETTE 17 REMOVING...
... 6 C SUPPLIED ACCESSORIES 6 C OPERATING CONTROLS AND FUNCTIONS 7 INSTALLING THE BATTERIES 8 C PREPARATION FOR USE 9 ANTENNA/CABLE CONNECTIONS 9 USING FRONT A/V INPUT JACKS 10 C TV OPERATION AND SETTINGS 10 WATCHING A TV PROGRAM 10 CHANNEL SET UP 11 PICTURE CONTROL 12 CLOCK SET UP (AUTO / MANUAL 12 DAYLIGHT-SAVING TIME 14 WAKE UP TIMER 14 SLEEP TIMER 14 MENU LANGUAGE 15 CLOSED CAPTION SYSTEM 15 DEGAUSSING 15 GAME MODE 15 V-CHIP SET UP 16 C VIDEO CASSETTE 17 PRECAUTIONS 17 TWO DIFFERENT TAPE SPEEDS 17 INSERTING A CASSETTE 17 REMOVING...
Owner's Manual
Page 6
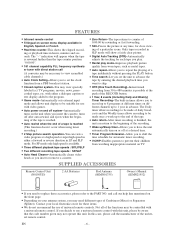
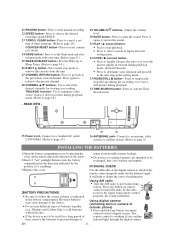
... their children from a PBS broadcast station. • Closed caption system-You may not operate this unit, please be necessary to view scrambled cable channels.) • Auto Clock Setting-Allows you insert the cassette, turns off at different times on dif- SUPPLIED ACCESSORIES Remote Control Unit (N0150UD) 2 AA Batteries Rod Antenna (0EMN01755) Owner's Manual (1EMN21952) Owner's Manual • If you insert or remove a cassette. • Zero Return-The tape returns...
... their children from a PBS broadcast station. • Closed caption system-You may not operate this unit, please be necessary to view scrambled cable channels.) • Auto Clock Setting-Allows you insert the cassette, turns off at different times on dif- SUPPLIED ACCESSORIES Remote Control Unit (N0150UD) 2 AA Batteries Rod Antenna (0EMN01755) Owner's Manual (1EMN21952) Owner's Manual • If you insert or remove a cassette. • Zero Return-The tape returns...
Owner's Manual
Page 7
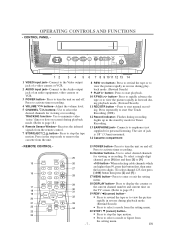
... Record indicator- Press to the Audio output jack of an audio equipment, video camera or VCR. 3 POWER button- Press to display the counter or the current channel number and current time on and off . Connect to activate timer recording. 16 Number buttons- CLEAR GAME TIME SEARCH 34 COUNTER 23 RESET 24 15 POWER button- To select a single-digit channel, press [0] first and then [1] to enter or exit the setting menu. 18 DISPLAY button- Press to rapidly advance the...
... Record indicator- Press to the Audio output jack of an audio equipment, video camera or VCR. 3 POWER button- Press to display the counter or the current channel number and current time on and off . Connect to activate timer recording. 16 Number buttons- CLEAR GAME TIME SEARCH 34 COUNTER 23 RESET 24 15 POWER button- To select a single-digit channel, press [0] first and then [1] to enter or exit the setting menu. 18 DISPLAY button- Press to rapidly advance the...
Owner's Manual
Page 8
... cancel a set the Game mode and external input mode at the same time. (Refer to set - Press to page 15.) 25 WAKE-UP/SLEEP button- Press to go back to activate Time Search mode. Use to select the desired channels for a long period of time, remove the batteries to prevent damage or Using AM radio • Tune the AM radio to remove the cassette from remote control properly, the sound will help to...
... cancel a set the Game mode and external input mode at the same time. (Refer to set - Press to page 15.) 25 WAKE-UP/SLEEP button- Press to go back to activate Time Search mode. Use to select the desired channels for a long period of time, remove the batteries to prevent damage or Using AM radio • Tune the AM radio to remove the cassette from remote control properly, the sound will help to...

Owner's Manual
Page 10
... PROGRAM 1 Plug in the corner of the unit] VIDEO AUDIO Audio cable (IN) (IN) (commercially available) (OUT) To the Audio output jack Video cable (commercially available) To the Video output jack (OUT) ex. VOLUME 20 C C C C C CCCCCCC Press it again to adjust the volume. AUX VIDEO AUDIO POWER VOLUME CHANNEL STOP/EJECT REW PLAY F.FWD REC/OTR EARPHONE [Front of the screen, press [POWER] without unplugging the power cord. 2 Turn on the unit Press [POWER] to turn on the unit. 3 Select the channel number Use [CHANNEL...
... PROGRAM 1 Plug in the corner of the unit] VIDEO AUDIO Audio cable (IN) (IN) (commercially available) (OUT) To the Audio output jack Video cable (commercially available) To the Video output jack (OUT) ex. VOLUME 20 C C C C C CCCCCCC Press it again to adjust the volume. AUX VIDEO AUDIO POWER VOLUME CHANNEL STOP/EJECT REW PLAY F.FWD REC/OTR EARPHONE [Front of the screen, press [POWER] without unplugging the power cord. 2 Turn on the unit Press [POWER] to turn on the unit. 3 Select the channel number Use [CHANNEL...
Owner's Manual
Page 11
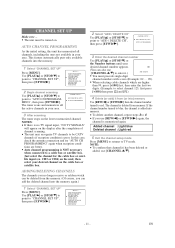
... 3 to 4. • If you can also use [CHANNEL K/L]. 1 Select "CHANNEL SET UP" Press [MENU]. TIMER PROGRAMMING PICTURE CONTROL SETTING CLOCK B CHANNEL SET UP USER'S SET UP V-CHIP SET UP LANGUAGE [ENGLISH] CAPTION [OFF] ZERO RETURN TIME SEARCH 2 Begin channel scanning Use [PLAY/K] or [STOP/L] to point to "CHANNEL SET UP", then press [F.FWD/ B]. - Just select the channel for the cable box or satellite input (ex. EN ADDING/DELETING CHANNELS The channels you no TV signal input, "NO TV SIGNALS" will appear on the unit, then...
... 3 to 4. • If you can also use [CHANNEL K/L]. 1 Select "CHANNEL SET UP" Press [MENU]. TIMER PROGRAMMING PICTURE CONTROL SETTING CLOCK B CHANNEL SET UP USER'S SET UP V-CHIP SET UP LANGUAGE [ENGLISH] CAPTION [OFF] ZERO RETURN TIME SEARCH 2 Begin channel scanning Use [PLAY/K] or [STOP/L] to point to "CHANNEL SET UP", then press [F.FWD/ B]. - Just select the channel for the cable box or satellite input (ex. EN ADDING/DELETING CHANNELS The channels you no TV signal input, "NO TV SIGNALS" will appear on the unit, then...
Owner's Manual
Page 12
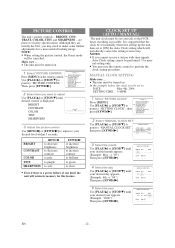
... May 4th, 2006 SETTING TIME 5:40PM 1 Select "SETTING CLOCK" Press [MENU]. TIMER PROGRAMMING PICTURE CONTROL B SETTING CLOCK CHANNEL SET UP USER'S SET UP V-CHIP SET UP LANGUAGE [ENGLISH] CAPTION [OFF] ZERO RETURN TIME SEARCH 2 Select "MANUAL CLOCK SET" Use [PLAY/K] or [STOP/L] to "SETTING CLOCK", then press [F.FWD/ B]. - AUTO CLOCK CH SEARCH AUTO CLOCK CH [ 02 ] B MANUAL CLOCK SET D.S.T. [OFF] 3 Select the month Use [PLAY/K] or [STOP/L] until desired control is to be set manually when first setting up the unit, then set to adjust Use [PLAY/K] or [STOP...
... May 4th, 2006 SETTING TIME 5:40PM 1 Select "SETTING CLOCK" Press [MENU]. TIMER PROGRAMMING PICTURE CONTROL B SETTING CLOCK CHANNEL SET UP USER'S SET UP V-CHIP SET UP LANGUAGE [ENGLISH] CAPTION [OFF] ZERO RETURN TIME SEARCH 2 Select "MANUAL CLOCK SET" Use [PLAY/K] or [STOP/L] to "SETTING CLOCK", then press [F.FWD/ B]. - AUTO CLOCK CH SEARCH AUTO CLOCK CH [ 02 ] B MANUAL CLOCK SET D.S.T. [OFF] 3 Select the month Use [PLAY/K] or [STOP/L] until desired control is to be set manually when first setting up the unit, then set to adjust Use [PLAY/K] or [STOP...
Owner's Manual
Page 13
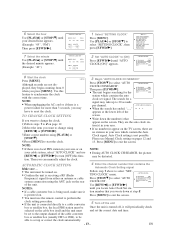
... cable box itself and the unit must be turned on the screen. SETTING CLOCK - AUTO CLOCK [ON] B AUTO CLOCK CH SEARCH AUTO CLOCK CH [ 02 ] MANUAL CLOCK SET D.S.T. [OFF] clock set to the output channel of the unit. Press [MENU] to 20 seconds per channel. - Please use Manual Clock setting on your area. • If no number(s) appear on the TV screen, there are the auto clock sta- PM 1 Select "SETTING CLOCK" Press [MENU]. TIMER PROGRAMMING PICTURE CONTROL B SETTING...
... cable box itself and the unit must be turned on the screen. SETTING CLOCK - AUTO CLOCK [ON] B AUTO CLOCK CH SEARCH AUTO CLOCK CH [ 02 ] MANUAL CLOCK SET D.S.T. [OFF] clock set to the output channel of the unit. Press [MENU] to 20 seconds per channel. - Please use Manual Clock setting on your area. • If no number(s) appear on the TV screen, there are the auto clock sta- PM 1 Select "SETTING CLOCK" Press [MENU]. TIMER PROGRAMMING PICTURE CONTROL B SETTING...
Owner's Manual
Page 14
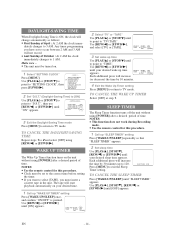
... the unit. TIMER PROGRAMMING PICTURE CONTROL B SETTING CLOCK CHANNEL SET UP USER'S SET UP V-CHIP SET UP LANGUAGE [ENGLISH] CAPTION [OFF] ZERO RETURN TIME SEARCH 2 Set "D.S.T." (Daylight-Saving Time) to [ON] Use [PLAY/K] or [STOP/L] to point to "D.S.T.", then use [REW/s] or [F.FWD/ B] until to point to 120. diately changes to TV mode. SETTING CLOCK - AUTO CLOCK [ON] AUTO CLOCK CH SEARCH AUTO CLOCK CH [ 02 ] MANUAL CLOCK SET B D.S.T. [ON] 3 Exit the Daylight-Saving Time mode Press [MENU] to...
... the unit. TIMER PROGRAMMING PICTURE CONTROL B SETTING CLOCK CHANNEL SET UP USER'S SET UP V-CHIP SET UP LANGUAGE [ENGLISH] CAPTION [OFF] ZERO RETURN TIME SEARCH 2 Set "D.S.T." (Daylight-Saving Time) to [ON] Use [PLAY/K] or [STOP/L] to point to "D.S.T.", then use [REW/s] or [F.FWD/ B] until to point to 120. diately changes to TV mode. SETTING CLOCK - AUTO CLOCK [ON] AUTO CLOCK CH SEARCH AUTO CLOCK CH [ 02 ] MANUAL CLOCK SET B D.S.T. [ON] 3 Exit the Daylight-Saving Time mode Press [MENU] to...
Owner's Manual
Page 15
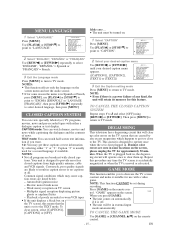
... caption or text display. TIMER PROGRAMMING PICTURE CONTROL SETTING CLOCK CHANNEL SET UP USER'S SET UP V-CHIP SET UP LANGUAGE [ENGLISH] B CAPTION [OFF] ZERO RETURN TIME SEARCH 2 Select "ENGLISH", "ESPAÑOL" or "FRANÇAIS" Use [REW/s] or [F.FWD/ B] repeatedly to select "ENGLISH", "ESPAÑOL"= Spanish or "FRANÇAIS"= French. 3 Exit the Language mode Press [MENU] to turn to "LANGUAGE". - If minor color errors are broadcast with closed captions from high quality antenna, cable and VCR signals. "GAME" appears...
... caption or text display. TIMER PROGRAMMING PICTURE CONTROL SETTING CLOCK CHANNEL SET UP USER'S SET UP V-CHIP SET UP LANGUAGE [ENGLISH] B CAPTION [OFF] ZERO RETURN TIME SEARCH 2 Select "ENGLISH", "ESPAÑOL" or "FRANÇAIS" Use [REW/s] or [F.FWD/ B] repeatedly to select "ENGLISH", "ESPAÑOL"= Spanish or "FRANÇAIS"= French. 3 Exit the Language mode Press [MENU] to turn to "LANGUAGE". - If minor color errors are broadcast with closed captions from high quality antenna, cable and VCR signals. "GAME" appears...
Owner's Manual
Page 16
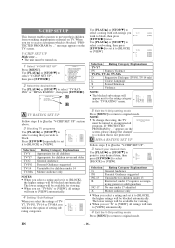
...-Y7 ( [VIEW] ) [VIEW] block. Use [PLAY/K] or [STOP/L] to select "TV RATING" or "MPAA RATING", then press [F.FWD/ B]. - The lower ratings will be turned on the screen, please change the channel to a station that you select a rating and set it to [BLOCK] or [VIEW]. TIMER PROGRAMMING PICTURE CONTROL SETTING CLOCK CHANNEL SET UP USER'S SET UP B V-CHIP SET UP LANGUAGE [ENGLISH] CAPTION [OFF] ZERO RETURN TIME SEARCH 2 Select the desired item Use [PLAY/K] or [STOP/L] to select "V-CHIP SET UP...
...-Y7 ( [VIEW] ) [VIEW] block. Use [PLAY/K] or [STOP/L] to select "TV RATING" or "MPAA RATING", then press [F.FWD/ B]. - The lower ratings will be turned on the screen, please change the channel to a station that you select a rating and set it to [BLOCK] or [VIEW]. TIMER PROGRAMMING PICTURE CONTROL SETTING CLOCK CHANNEL SET UP USER'S SET UP B V-CHIP SET UP LANGUAGE [ENGLISH] CAPTION [OFF] ZERO RETURN TIME SEARCH 2 Select the desired item Use [PLAY/K] or [STOP/L] to select "V-CHIP SET UP...
Owner's Manual
Page 20
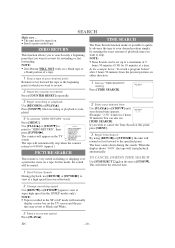
... recording or playback is very useful in the LP/SLP modes only). TIMER PROGRAMMING PICTURE CONTROL SETTING CLOCK CHANNEL SET UP USER'S SET UP V-CHIP SET UP LANGUAGE [ENGLISH] CAPTION [OFF] B ZERO RETURN TIME SEARCH The tape will automatically stop when the counter returns to your desired position simply by 10 minutes at a time. TIME SEARCH The Time Search function makes it possible to quickly advance the tape to...
... recording or playback is very useful in the LP/SLP modes only). TIMER PROGRAMMING PICTURE CONTROL SETTING CLOCK CHANNEL SET UP USER'S SET UP V-CHIP SET UP LANGUAGE [ENGLISH] CAPTION [OFF] B ZERO RETURN TIME SEARCH The tape will automatically stop when the counter returns to your desired position simply by 10 minutes at a time. TIME SEARCH The Time Search function makes it possible to quickly advance the tape to...
Owner's Manual
Page 22
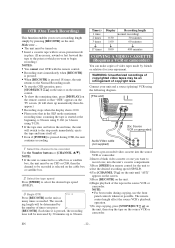
... recorded Use the Number buttons or [CHANNEL K/L]. NOTE: • If the unit is connected to a cable box or satellite box, the unit must be turned on. • Insert a cassette tape with the remote control. • Recording starts immediately when [REC/OTR] is pressed. • When [REC/OTR] is pressed during copying, use the front panel controls whenever possible. The remote control might affect the source VCR's playback operation...
... recorded Use the Number buttons or [CHANNEL K/L]. NOTE: • If the unit is connected to a cable box or satellite box, the unit must be turned on. • Insert a cassette tape with the remote control. • Recording starts immediately when [REC/OTR] is pressed. • When [REC/OTR] is pressed during copying, use the front panel controls whenever possible. The remote control might affect the source VCR's playback operation...
Owner's Manual
Page 23
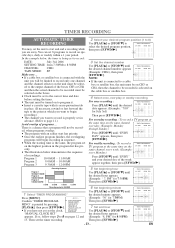
... SETTING CLOCK CHANNEL SET UP USER'S SET UP [PLAY/K], then press [F.FWD/ B]. B TIMER PROGRAMMING PICTURE CONTROL MING" is SHADED 1 Select "TIMER PROGRAMMING" Press [MENU]. - ority. • The illustration below , the timer is a chance that a program will be limited to be record- TIMER PROGRAMMING - TIMER PROGRAMMING - If so, follow steps 3 to the point at the same time on the boxes. • Clock must be set in the program list has pri- EN Program 1 10:00AM - 11:00AM Program...
... SETTING CLOCK CHANNEL SET UP USER'S SET UP [PLAY/K], then press [F.FWD/ B]. B TIMER PROGRAMMING PICTURE CONTROL MING" is SHADED 1 Select "TIMER PROGRAMMING" Press [MENU]. - ority. • The illustration below , the timer is a chance that a program will be limited to be record- TIMER PROGRAMMING - TIMER PROGRAMMING - If so, follow steps 3 to the point at the same time on the boxes. • Clock must be set in the program list has pri- EN Program 1 10:00AM - 11:00AM Program...
Owner's Manual
Page 24
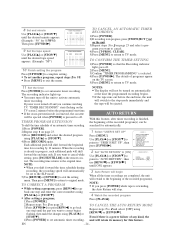
... select [OFF] using [REW/s] or [F.FWD/ B]. M E N U - TIMER PROGRAMMING PICTURE CONTROL SETTING CLOCK CHANNEL SET UP B USER'S SET UP V-CHIP SET UP LANGUAGE [ENGLISH] CAPTION [OFF] ZERO RETURN TIME SEARCH 2 Set "AUTO RETURN" to [ON] Use [PLAY/K] or [STOP/L] to point to exit the menu. RENTAL REPEAT PLAY B AUTO RETURN [OFF] [OFF] [ON] 3 Auto Return will begin /end time for automatically. 1 Select "USER'S SET UP" Press [MENU]. B 61 - - - - - 7/03 MON 7:30PM 8:50PMSP 10 Finish setting the program Press [F.FWD/ B] to complete setting...
... select [OFF] using [REW/s] or [F.FWD/ B]. M E N U - TIMER PROGRAMMING PICTURE CONTROL SETTING CLOCK CHANNEL SET UP B USER'S SET UP V-CHIP SET UP LANGUAGE [ENGLISH] CAPTION [OFF] ZERO RETURN TIME SEARCH 2 Set "AUTO RETURN" to [ON] Use [PLAY/K] or [STOP/L] to point to exit the menu. RENTAL REPEAT PLAY B AUTO RETURN [OFF] [OFF] [ON] 3 Auto Return will begin /end time for automatically. 1 Select "USER'S SET UP" Press [MENU]. B 61 - - - - - 7/03 MON 7:30PM 8:50PMSP 10 Finish setting the program Press [F.FWD/ B] to complete setting...
Owner's Manual
Page 26
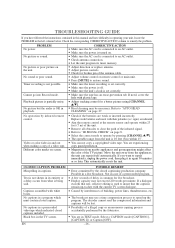
... replace antenna. • Adjust picture controls. • Check for live broadcast. If a dialogue exceeds that the captions remain up the program. No picture but the audio is partially noisy. Different color marks on page 27. No captions in again 30 minutes or so later. Check the corresponding CORRECTIVE ACTION column to repair immediately, unplug the power cord, then plug it in a program which indicated closed caption. No picture or sound...
... replace antenna. • Adjust picture controls. • Check for live broadcast. If a dialogue exceeds that the captions remain up the program. No picture but the audio is partially noisy. Different color marks on page 27. No captions in again 30 minutes or so later. Check the corresponding CORRECTIVE ACTION column to repair immediately, unplug the power cord, then plug it in a program which indicated closed caption. No picture or sound...
Owner's Manual
Page 27
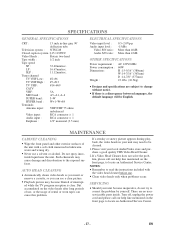
.... 1. Tuner channel TV VHF Low : #2~#6 TV VHF High : #7~#13 TV UHF : #14~#69 CATV VHF : 5A MID band : A5~A1, A~I SUPER band : J~W HYPER band : W+1~W+84 Terminals Antenna input : VHF/UHF 75 ohms unbalanced Video input : RCA connector [ 1 Audio input : RCA connector [ 1 Earphone : 1/8" monaural (3.5 mm) ELECTRICAL SPECIFICATIONS Video input level : Audio input level : Video S/N ratio : Audio S/N ratio : 0.5~2.0Vp-p -15dBs More than 46dB More than 43dB OTHER SPECIFICATIONS Power requirement : Power consumption : Dimensions : Weight : AC...
.... 1. Tuner channel TV VHF Low : #2~#6 TV VHF High : #7~#13 TV UHF : #14~#69 CATV VHF : 5A MID band : A5~A1, A~I SUPER band : J~W HYPER band : W+1~W+84 Terminals Antenna input : VHF/UHF 75 ohms unbalanced Video input : RCA connector [ 1 Audio input : RCA connector [ 1 Earphone : 1/8" monaural (3.5 mm) ELECTRICAL SPECIFICATIONS Video input level : Audio input level : Video S/N ratio : Audio S/N ratio : 0.5~2.0Vp-p -15dBs More than 46dB More than 43dB OTHER SPECIFICATIONS Power requirement : Power consumption : Dimensions : Weight : AC...


