

Owner's Manual
Page 2
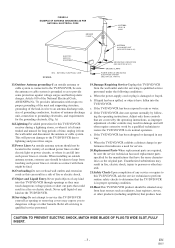
... NOT REMOVE COVER (OR BACK). Do not use a mounting accessory recommended by placing the TV/DVD/VCR on the rear of an authorization code for some specific reason, such as the possibility of the loss of the cabinet. EXCEPTION: A product that is meant for uninterrupted service and, that they are provided for ventilation and to ensure reliable operation of power supply to...
... NOT REMOVE COVER (OR BACK). Do not use a mounting accessory recommended by placing the TV/DVD/VCR on the rear of an authorization code for some specific reason, such as the possibility of the loss of the cabinet. EXCEPTION: A product that is meant for uninterrupted service and, that they are provided for ventilation and to ensure reliable operation of power supply to...
Owner's Manual
Page 3
... outside antenna or cable system is connected to the TV/DVD/VCR, be sure the antenna or cable system is left unattended and unused for service. 20.Replacement Parts-When replacement parts are covered by a qualified technician to restore the TV/DVD/VCR to persons or other products (including amplifiers) that could result in any service or repairs to qualified service personnel under the following the operating instructions. If...
... outside antenna or cable system is connected to the TV/DVD/VCR, be sure the antenna or cable system is left unattended and unused for service. 20.Replacement Parts-When replacement parts are covered by a qualified technician to restore the TV/DVD/VCR to persons or other products (including amplifiers) that could result in any service or repairs to qualified service personnel under the following the operating instructions. If...

Owner's Manual
Page 6
... 7 C OPERATING CONTROLS AND FUNCTIONS 9, 10 C PREPARATION FOR USE 11 ANTENNA/CABLE CONNECTION 11 CONNECTING TO EXTERNAL INPUT JACKS 12 INSTALLING THE BATTERIES . . .12 EXTERNAL INPUT MODE . . . . . .12 CONNECTING TO A STEREO AMPLIFIER EQUIPPED WITH DIGITAL INPUT JACKS SUCH AS MD DECK OR DAT DECK (for DVD 13 CONNECTING TO A DOLBY DIGITAL DECODER OR DTS DECODER (for DVD) . . .14 TV/VCR SECTION C SET UP FOR USE 15 CHANNEL SET UP FOR THE FIRST TIME 15 DELETING (OR ADDING) CHANNEL 15 CHANNEL SET UP...
... 7 C OPERATING CONTROLS AND FUNCTIONS 9, 10 C PREPARATION FOR USE 11 ANTENNA/CABLE CONNECTION 11 CONNECTING TO EXTERNAL INPUT JACKS 12 INSTALLING THE BATTERIES . . .12 EXTERNAL INPUT MODE . . . . . .12 CONNECTING TO A STEREO AMPLIFIER EQUIPPED WITH DIGITAL INPUT JACKS SUCH AS MD DECK OR DAT DECK (for DVD 13 CONNECTING TO A DOLBY DIGITAL DECODER OR DTS DECODER (for DVD) . . .14 TV/VCR SECTION C SET UP FOR USE 15 CHANNEL SET UP FOR THE FIRST TIME 15 DELETING (OR ADDING) CHANNEL 15 CHANNEL SET UP...

Owner's Manual
Page 7
... view scrambled cable channels.) • Auto Clock Setting-Allows you to set the TV/DVD/VCR to advance the tape by rewinding or fast forwarding. • Still-"Freeze" the picture at any time, for close viewing of a particular scene. • Digital Auto Tracking (DTR)-Automatically adjusts the tracking for automatic timer recording. • V-CHIP-Enables parents to prevent their children from watching inappropriate material on screen TV/VCR setup display selectable in English...
... view scrambled cable channels.) • Auto Clock Setting-Allows you to set the TV/DVD/VCR to advance the tape by rewinding or fast forwarding. • Still-"Freeze" the picture at any time, for close viewing of a particular scene. • Digital Auto Tracking (DTR)-Automatically adjusts the tracking for automatic timer recording. • V-CHIP-Enables parents to prevent their children from watching inappropriate material on screen TV/VCR setup display selectable in English...
Owner's Manual
Page 8
... of the functions may not operate this TV/DVD/VCR. EN 1C29 DVD Mode ¡Dolby Digital sound This player can handle Dolby Digital surround sound having 5.1 channels when connected to a Dolby Digital decoder. ¡Still/fast/slow/step playback Various playback modes are available on a disc. ¡Parental lock You can set the control level to limit playback of discs which the play was stopped. ¡Virtual Surround...
... of the functions may not operate this TV/DVD/VCR. EN 1C29 DVD Mode ¡Dolby Digital sound This player can handle Dolby Digital surround sound having 5.1 channels when connected to a Dolby Digital decoder. ¡Still/fast/slow/step playback Various playback modes are available on a disc. ¡Parental lock You can set the control level to limit playback of discs which the play was stopped. ¡Virtual Surround...
Owner's Manual
Page 9
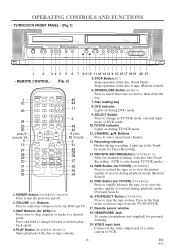
.../VCR mode.) 14. VIDEO input Jack Connect to change to stop the tape motion. EN 1C29 PLAY Button [TV/VCR P.26 / DVD P.37] Starts playback of the disc or tape. (Remote control) 1 22 23 24 25 26 (DVD) 3 (TV/VCR) 14 4 13 27 28 29 30 31 32 33 POWER PICTURE SLEEP SELECT 123 CH. 456 789 PAUSE 0 +100 +10 SPEED C.RESET ZOOM VOL. HEADPHONE Jack To connect headphone (not supplied) for Timer Recording. 13. DVD Indicator Lights...
.../VCR mode.) 14. VIDEO input Jack Connect to change to stop the tape motion. EN 1C29 PLAY Button [TV/VCR P.26 / DVD P.37] Starts playback of the disc or tape. (Remote control) 1 22 23 24 25 26 (DVD) 3 (TV/VCR) 14 4 13 27 28 29 30 31 32 33 POWER PICTURE SLEEP SELECT 123 CH. 456 789 PAUSE 0 +100 +10 SPEED C.RESET ZOOM VOL. HEADPHONE Jack To connect headphone (not supplied) for Timer Recording. 13. DVD Indicator Lights...

Owner's Manual
Page 10
... played back from the menu on the TV screen. COAXIAL 46 47 48 20. DVD Mode: Use when making settings while watching the display on the front panel indicator. - 10 - Number Buttons TV Mode:[P.15] Press two digits to select a setting mode from a different angle. 37. Arrow Buttons TV/VCR Mode: Press to directly access the desired channel. AUDIO L/R input Jacks Connect to the previous operation in the TV/VCR setup mode and in the DVD. 42. RETURN Button Returns to the audio output jacks...
... played back from the menu on the TV screen. COAXIAL 46 47 48 20. DVD Mode: Use when making settings while watching the display on the front panel indicator. - 10 - Number Buttons TV Mode:[P.15] Press two digits to select a setting mode from a different angle. 37. Arrow Buttons TV/VCR Mode: Press to directly access the desired channel. AUDIO L/R input Jacks Connect to the previous operation in the TV/VCR setup mode and in the DVD. 42. RETURN Button Returns to the audio output jacks...
Owner's Manual
Page 11
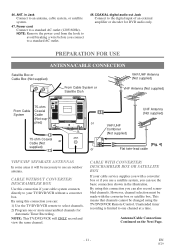
... SEPARATE ANTENNAS In some areas it will ONLY record and view the same channel. By using this connection if your cable system connects directly to the digital input of an external amplifier or decoder for Automatic Timer Recording. Unattended timer recording is limited to select channels. 2) Program one channel at a time. ANT. in the illustration. NOTE: Remove the power cord from the hook to avoid breaking a wire before you can : 1) Use the TV/DVD/VCR remote...
... SEPARATE ANTENNAS In some areas it will ONLY record and view the same channel. By using this connection if your cable system connects directly to the digital input of an external amplifier or decoder for Automatic Timer Recording. Unattended timer recording is limited to select channels. 2) Program one channel at a time. ANT. in the illustration. NOTE: Remove the power cord from the hook to avoid breaking a wire before you can : 1) Use the TV/DVD/VCR remote...
Owner's Manual
Page 15
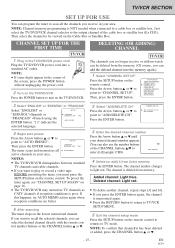
.../VCR 1 Plug in your area. SET UP - If you want to scan all B AUTO PRESET active channels in the corner of the cable box or satellite box (Ex CH3). Press the ENTER button. - The channel number changes to "ADD/DELETE CH". TIMER PROGRAMMING SETTING CLOCK B CHANNEL SET UP USER'S SET UP V-CHIP SET UP LANGUAGE [ENGLISH] CAPTION [OFF] ZERO RETURN TIME SEARCH INDEX SEARCH 3 Select "ENGLISH" or "ESPAÑOL" or "FRANÇAIS" Select "ENGLISH" or - Deleted channel: Light red...
.../VCR 1 Plug in your area. SET UP - If you want to scan all B AUTO PRESET active channels in the corner of the cable box or satellite box (Ex CH3). Press the ENTER button. - The channel number changes to "ADD/DELETE CH". TIMER PROGRAMMING SETTING CLOCK B CHANNEL SET UP USER'S SET UP V-CHIP SET UP LANGUAGE [ENGLISH] CAPTION [OFF] ZERO RETURN TIME SEARCH INDEX SEARCH 3 Select "ENGLISH" or "ESPAÑOL" or "FRANÇAIS" Select "ENGLISH" or - Deleted channel: Light red...
Owner's Manual
Page 18
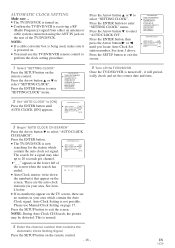
... locate Auto Clock Set station number. Please use the TV/DVD/VCR remote control to 20 seconds per channel. •"_ _" appears at the lower left of the TV/DVD/VCR. EN 1C29 Press the ENTER button, then press the Arrow button B or s until AUTO CLOCK [ON] appears. - TV/VCR SETUP - This is receiving a RF (Radio Frequency) signal from either an antenna or cable system connection using the ANT IN jack on the rear...
... locate Auto Clock Set station number. Please use the TV/DVD/VCR remote control to 20 seconds per channel. •"_ _" appears at the lower left of the TV/DVD/VCR. EN 1C29 Press the ENTER button, then press the Arrow button B or s until AUTO CLOCK [ON] appears. - TV/VCR SETUP - This is receiving a RF (Radio Frequency) signal from either an antenna or cable system connection using the ANT IN jack on the rear...

Owner's Manual
Page 19
... usually the best, you can change the TV channels. PPPPPPPCPPPPPPP+ 3 Adjust the picture control Press the Arrow button B or s to adjust to your desired channel number or press the number on the remote control. VOLUME 20 C C C C C CCCCCCC NOTES: • If you press the CHANNEL button o or pin the DVD mode, you may need to make some further adjustments for using the Number button on the remote control: ¡When selecting cable channels which are preset to factory specifications. EN 1C29...
... usually the best, you can change the TV channels. PPPPPPPCPPPPPPP+ 3 Adjust the picture control Press the Arrow button B or s to adjust to your desired channel number or press the number on the remote control. VOLUME 20 C C C C C CCCCCCC NOTES: • If you press the CHANNEL button o or pin the DVD mode, you may need to make some further adjustments for using the Number button on the remote control: ¡When selecting cable channels which are preset to factory specifications. EN 1C29...

Owner's Manual
Page 26
... panel in finding or skipping over a particular scene on the playback picture. NOTE: If it is very useful in the DVD mode, the VCR forward or reverse will be set automatically. If this mode, the sound will start playback automatically. 2 To begin playback PLAY B Press the PLAY button. 3 To stop it, twice to the Stop mode. Please press the STOP/EJECT button once to Black...
... panel in finding or skipping over a particular scene on the playback picture. NOTE: If it is very useful in the DVD mode, the VCR forward or reverse will be set automatically. If this mode, the sound will start playback automatically. 2 To begin playback PLAY B Press the PLAY button. 3 To stop it, twice to the Stop mode. Please press the STOP/EJECT button once to Black...

Owner's Manual
Page 31
... diagram. [The TV/DVD/VCR] [Fig.8] W PLAY F.FWD STOP/EJECT HEADPHONE VIDEO L AUDIO R To VIDEO INPUT jack (yellow) Audio/Video adapter cable (not supplied) To Right (red) and Left (white) AUDIO INPUT jacks To Right (red) and Left (white) AUDIO OUT jacks AUDIO L OUT IN R VIDEO To VIDEO OUT jack (yellow) OUT IN [Ex: Source (playing) VCR or camcorder] 1)Insert a pre-recorded video cassette into the TV/DVD/VCR's cassette compartment. 3)Press the SPEED button on remote control for your TV/DVD/VCR and a Source (Playing) VCR using...
... diagram. [The TV/DVD/VCR] [Fig.8] W PLAY F.FWD STOP/EJECT HEADPHONE VIDEO L AUDIO R To VIDEO INPUT jack (yellow) Audio/Video adapter cable (not supplied) To Right (red) and Left (white) AUDIO INPUT jacks To Right (red) and Left (white) AUDIO OUT jacks AUDIO L OUT IN R VIDEO To VIDEO OUT jack (yellow) OUT IN [Ex: Source (playing) VCR or camcorder] 1)Insert a pre-recorded video cassette into the TV/DVD/VCR's cassette compartment. 3)Press the SPEED button on remote control for your TV/DVD/VCR and a Source (Playing) VCR using...

Owner's Manual
Page 33
.../VCR To shift the time schedule of an automatic timer recording. 1)Press the POWER button. 2)Repeat step [1] on page 32. 3)Press the RECORD button and select the desired program using the Arrow button K or L. • After setting a program; 1)Press the POWER button. 2)Repeat steps [1] - [2] on the remote control. Each additional push will automatically be set automatic timer recording. NOTE: When you want to correct begins flashing, then make the changes...
.../VCR To shift the time schedule of an automatic timer recording. 1)Press the POWER button. 2)Repeat step [1] on page 32. 3)Press the RECORD button and select the desired program using the Arrow button K or L. • After setting a program; 1)Press the POWER button. 2)Repeat steps [1] - [2] on the remote control. Each additional push will automatically be set automatic timer recording. NOTE: When you want to correct begins flashing, then make the changes...

Owner's Manual
Page 37
... up the title menu. Then, operate the DVD functions. ¡Unless stated, all operations described are based on the TV screen during operation, warning that use titles for playback program signals, playback may appear on the remote control. Similarly, when the POWER button is pressed to open disc loading tray. DVD-V 1 Press the TITLE button. ¡The title menu will then start automatically, press the PLAY button. ¡When...
... up the title menu. Then, operate the DVD functions. ¡Unless stated, all operations described are based on the TV screen during operation, warning that use titles for playback program signals, playback may appear on the remote control. Similarly, when the POWER button is pressed to open disc loading tray. DVD-V 1 Press the TITLE button. ¡The title menu will then start automatically, press the PLAY button. ¡When...

Owner's Manual
Page 42
... audio language setting on your desired subtitle language. ¡The subtitle language will be displayed on some DVDs with multiple audio languages (e.g. BLACK LEVEL SETTING DVD-V Adjust the Black Level Settings to make the black parts of the screen. 2 Press the ANGLE button repeatedly to exit. You can not be fixed to select your desired angle. ON AUDIO LANGUAGE DVD-V The TV/DVD/VCR allows you change the Subtitle language setting. ON: Makes the dark parts brighter. play...
... audio language setting on your desired subtitle language. ¡The subtitle language will be displayed on some DVDs with multiple audio languages (e.g. BLACK LEVEL SETTING DVD-V Adjust the Black Level Settings to make the black parts of the screen. 2 Press the ANGLE button repeatedly to exit. You can not be fixed to select your desired angle. ON AUDIO LANGUAGE DVD-V The TV/DVD/VCR allows you change the Subtitle language setting. ON: Makes the dark parts brighter. play...

Owner's Manual
Page 45
... ENTER buttons. DISPLAY TV MODE 4:3 LETTER BOX ANGLE ICON ON AUTO POWER OFF ON 4 Press the Arrow buttons (K/L) to select DIS- DOLBY DIGITAL: QUICK Set to ON when the unit is connected to a Dolby Digital Decoder. (ON: Output a Dolby Digital signal) (OFF: Convert the Dolby Digital to loud sound. ¡The default setting is ON. DRC (Dynamic Range Control): ¡To compress the range of soft to PCM (2 channel stereo)) ¡The default setting...
... ENTER buttons. DISPLAY TV MODE 4:3 LETTER BOX ANGLE ICON ON AUTO POWER OFF ON 4 Press the Arrow buttons (K/L) to select DIS- DOLBY DIGITAL: QUICK Set to ON when the unit is connected to a Dolby Digital Decoder. (ON: Output a Dolby Digital signal) (OFF: Convert the Dolby Digital to loud sound. ¡The default setting is ON. DRC (Dynamic Range Control): ¡To compress the range of soft to PCM (2 channel stereo)) ¡The default setting...
Owner's Manual
Page 47
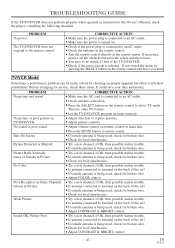
... being used , check for broken wire. • Adjust CONTRAST & BRIGHT control. • Try a new channel, if OK, then possible station trouble. • Is antenna connected to an AC outlet. • Check antenna connection. • Press the SELECT button on the remote control,whichever you need. No sound or poor sound. Then try other TV feature. • Let the TV/DVD/VCR program its tuner memory. • Adjust direction or replace antenna. • Adjust picture controls. • Adjust volume control on remote control...
... being used , check for broken wire. • Adjust CONTRAST & BRIGHT control. • Try a new channel, if OK, then possible station trouble. • Is antenna connected to an AC outlet. • Check antenna connection. • Press the SELECT button on the remote control,whichever you need. No sound or poor sound. Then try other TV feature. • Let the TV/DVD/VCR program its tuner memory. • Adjust direction or replace antenna. • Adjust picture controls. • Adjust volume control on remote control...

Owner's Manual
Page 49
... the audio output settings. • Correct the input settings on the screen, prohibiting an operation CD sound dropout No CD reproduction DVD picture dropout DVD picture freeze DVD picture in specific modes, but this is not a malfunction. • The selected language is not a malfunction • The DVD does not contain audio source or subtitles in this TV/DVD/VCR. • Press the SELECT button on the remote control to select DVD mode. No DTS audio is prohibited by the player or...
... the audio output settings. • Correct the input settings on the screen, prohibiting an operation CD sound dropout No CD reproduction DVD picture dropout DVD picture freeze DVD picture in specific modes, but this is not a malfunction. • The selected language is not a malfunction • The DVD does not contain audio source or subtitles in this TV/DVD/VCR. • Press the SELECT button on the remote control to select DVD mode. No DTS audio is prohibited by the player or...

Owner's Manual
Page 50
ticide liquid near the TV/DVD/VCR. SERVICING • Should your TV/DVD/VCR may be cleaned. 1. AUTO HEAD CLEANING • Automatically cleans video heads as you insert or remove a cassette, so you can cause this problem. There are no user-serviceable parts inside. Turn off , use a soft cloth. • Do not use a hard cloth since this Owner's Manual, the laser optical pickup unit may need to be dirty. DISC...
ticide liquid near the TV/DVD/VCR. SERVICING • Should your TV/DVD/VCR may be cleaned. 1. AUTO HEAD CLEANING • Automatically cleans video heads as you insert or remove a cassette, so you can cause this problem. There are no user-serviceable parts inside. Turn off , use a soft cloth. • Do not use a hard cloth since this Owner's Manual, the laser optical pickup unit may need to be dirty. DISC...


