

Owner's Manual
Page 2
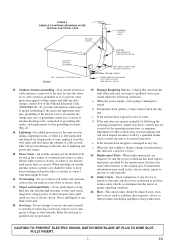
... the outlet, try reversing the plug. Follow Instructions - EXCEPTION: A product that is meant for a CATV converter, is equipped with a cart, stand, tripod, bracket, or table recommended by placing the unit on the marking label. PORTABLE CART WARNING turer's instructions and should use instructions should be placed near a swimming pool, and the like. 8. Power-supply cords should not be unplugged by...
... the outlet, try reversing the plug. Follow Instructions - EXCEPTION: A product that is meant for a CATV converter, is equipped with a cart, stand, tripod, bracket, or table recommended by placing the unit on the marking label. PORTABLE CART WARNING turer's instructions and should use instructions should be placed near a swimming pool, and the like. 8. Power-supply cords should not be unplugged by...
Owner's Manual
Page 3
... Antenna grounding - EN d. If the unit has been dropped or damaged in a fire or electric shock. Replacement Parts - This will often require extensive work by the manufacturer that could result in any kind into this can fall into the unit. If the unit has been exposed to qualified service personnel. 19. Lightning - When the power-supply cord or plug...
... Antenna grounding - EN d. If the unit has been dropped or damaged in a fire or electric shock. Replacement Parts - This will often require extensive work by the manufacturer that could result in any kind into this can fall into the unit. If the unit has been exposed to qualified service personnel. 19. Lightning - When the power-supply cord or plug...
Owner's Manual
Page 4
... its installation: • Shield it from direct sunlight and keep the following measures: 1) Reorient or relocate the receiving antenna. 2) Increase the separation between the equipment and receiver. 3) Connect the equipment into an outlet on your unit, unplug the power cord immediately and take the unit to our Authorized Service Center for the unit to dry out. The serial number...
... its installation: • Shield it from direct sunlight and keep the following measures: 1) Reorient or relocate the receiving antenna. 2) Increase the separation between the equipment and receiver. 3) Connect the equipment into an outlet on your unit, unplug the power cord immediately and take the unit to our Authorized Service Center for the unit to dry out. The serial number...
Owner's Manual
Page 5
... FIRE 4 WARNING 4 C TABLE OF CONTENTS 5 C FEATURES 6 C SUPPLIED ACCESSORIES 6 C OPERATING CONTROLS AND FUNCTIONS 7 INSTALLING THE BATTERIES 8 C PREPARATION FOR USE 9 ANTENNA/CABLE CONNECTIONS 9 USING FRONT A/V INPUT JACKS 10 C TV OPERATION AND SETTINGS 10 WATCHING A TV PROGRAM 10 PICTURE CONTROL 11 GAME MODE 11 DEGAUSSING 11 WAKE UP TIMER 11 SLEEP TIMER 12 CLOSED CAPTION SYSTEM 12 CHANNEL SET UP 12 CLOCK SET UP (AUTO / MANUAL 13 DAYLIGHT-SAVING TIME 15 MENU LANGUAGE 15 V-CHIP SET UP 16 C VIDEO CASSETTE 17 CPLAYBACK 18 NORMAL PLAYBACK...
... FIRE 4 WARNING 4 C TABLE OF CONTENTS 5 C FEATURES 6 C SUPPLIED ACCESSORIES 6 C OPERATING CONTROLS AND FUNCTIONS 7 INSTALLING THE BATTERIES 8 C PREPARATION FOR USE 9 ANTENNA/CABLE CONNECTIONS 9 USING FRONT A/V INPUT JACKS 10 C TV OPERATION AND SETTINGS 10 WATCHING A TV PROGRAM 10 PICTURE CONTROL 11 GAME MODE 11 DEGAUSSING 11 WAKE UP TIMER 11 SLEEP TIMER 12 CLOSED CAPTION SYSTEM 12 CHANNEL SET UP 12 CLOCK SET UP (AUTO / MANUAL 13 DAYLIGHT-SAVING TIME 15 MENU LANGUAGE 15 V-CHIP SET UP 16 C VIDEO CASSETTE 17 CPLAYBACK 18 NORMAL PLAYBACK...
Owner's Manual
Page 6
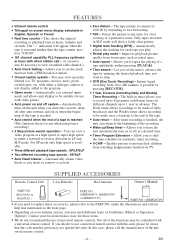
... tape counter posi- Automatically adjusts the tracking for these items. • We do not recommend the use a universal remote control with direct station call our help line mentioned on the front page. • Depending on screen menu display selectable in either a dialogue caption or text display added to skip. • OTR (One Touch Recording) - SUPPLIED ACCESSORIES Remote Control Unit 2 AA Batteries Rod Antenna Owner's Manual Owner's Manual PART NO. If you may...
... tape counter posi- Automatically adjusts the tracking for these items. • We do not recommend the use a universal remote control with direct station call our help line mentioned on the front page. • Depending on screen menu display selectable in either a dialogue caption or text display added to skip. • OTR (One Touch Recording) - SUPPLIED ACCESSORIES Remote Control Unit 2 AA Batteries Rod Antenna Owner's Manual Owner's Manual PART NO. If you may...
Owner's Manual
Page 7
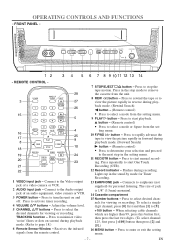
... selection and proceed to select desired channels for Timer Recording. 13 EARPHONE jack - Connects to the Audio output jack of a video camera or VCR. 2 AUDIO input jack - To select a singledigit channel, press [0] first and then [1] to enter or exit the setting menu. -7- Press to minimize video 'noise' (lines or dots on screen) during playback mode. (Rewind Search) s button - (Remote control) • Press to remove the cassette from the remote control. 7 STOP/EJECT P N button - OPERATING CONTROLS AND FUNCTIONS - VIDEO AUDIO POWER VOLUME CHANNEL STOP/EJECT REW PLAY...
... selection and proceed to select desired channels for Timer Recording. 13 EARPHONE jack - Connects to the Audio output jack of a video camera or VCR. 2 AUDIO input jack - To select a singledigit channel, press [0] first and then [1] to enter or exit the setting menu. -7- Press to minimize video 'noise' (lines or dots on screen) during playback mode. (Rewind Search) s button - (Remote control) • Press to remove the cassette from the remote control. 7 STOP/EJECT P N button - OPERATING CONTROLS AND FUNCTIONS - VIDEO AUDIO POWER VOLUME CHANNEL STOP/EJECT REW PLAY...
Owner's Manual
Page 8
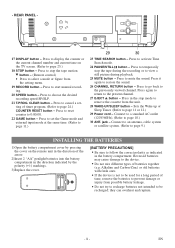
... reset counter to page 11 or 12.) 29 Power cord - Reversed batteries may cause damage to start manual recording. 20 SPEED button - they can overheat and rupture. -8- Press to the device. • Do not mix different types of time, remove the batteries to prevent damage or injury from the setting menu. 19 RECORD button - Press to set the Game mode and external input mode at the same time...
... reset counter to page 11 or 12.) 29 Power cord - Reversed batteries may cause damage to start manual recording. 20 SPEED button - they can overheat and rupture. -8- Press to the device. • Do not mix different types of time, remove the batteries to prevent damage or injury from the setting menu. 19 RECORD button - Press to set the Game mode and external input mode at the same time...

Owner's Manual
Page 10
... a cable box or satellite box, press [CHANNEL K/L] to select CH3 or CH4 according to the output channel setting of the screen, press [POWER] without unplugging the power cord. 2 Turn on the unit Press [POWER] to turn on the screen. TO WATCH CABLE OR SATELLITE CHANNEL • If the unit is connected to the front AUDIO/VIDEO input jacks, press [CHANNEL K/L] repeatedly until "AUX" appears on the unit. 3 Select the channel number Press [CHANNEL K/L] or the Number buttons to adjust the volume. Connect the Audio/Video output jacks...
... a cable box or satellite box, press [CHANNEL K/L] to select CH3 or CH4 according to the output channel setting of the screen, press [POWER] without unplugging the power cord. 2 Turn on the unit Press [POWER] to turn on the screen. TO WATCH CABLE OR SATELLITE CHANNEL • If the unit is connected to the front AUDIO/VIDEO input jacks, press [CHANNEL K/L] repeatedly until "AUX" appears on the unit. 3 Select the channel number Press [CHANNEL K/L] or the Number buttons to adjust the volume. Connect the Audio/Video output jacks...
Owner's Manual
Page 11
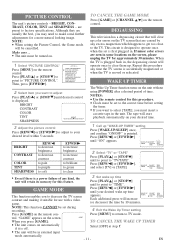
.../TAPE". "GAME" appears on the remote control. TIMER PROGRAMMING B PICTURE CONTROL SETTING CLOCK CHANNEL SET UP USER'S SET UP V-CHIP SET UP LANGUAGE [ENGLISH] CAPTION [OFF] ZERO RETURN TIME SEARCH 2 Select item you want to adjust Press [PLAY/K] or [STOP/L] until desired control is plugged back in, the degaussing circuit will be set is moved or relocated. When the TV is displayed. WAKE UP B ON/OFF [ON] TIMER TV/TAPE [TV] TIME [12:00AM] 2 Select "TV...
.../TAPE". "GAME" appears on the remote control. TIMER PROGRAMMING B PICTURE CONTROL SETTING CLOCK CHANNEL SET UP USER'S SET UP V-CHIP SET UP LANGUAGE [ENGLISH] CAPTION [OFF] ZERO RETURN TIME SEARCH 2 Select item you want to adjust Press [PLAY/K] or [STOP/L] until desired control is plugged back in, the degaussing circuit will be set is moved or relocated. When the TV is displayed. WAKE UP B ON/OFF [ON] TIMER TV/TAPE [TV] TIME [12:00AM] 2 Select "TV...

Owner's Manual
Page 12
... USER'S SET UP V-CHIP SET UP LANGUAGE [ENGLISH] B CAPTION [CAPTION1] ZERO RETURN TIME SEARCH 3 Exit the caption setting mode Press [MENU] to return to "AUTO CH PROGRAMMING", then press [F.FWD/ B]. CHANNEL SET UP Make sure ... • The unit must be turned on TV screen • Multiplex signal reception displaying picture ghosts or airplane flutter. • Playback of time. ADD / DELETE CH (CATV) B AUTO CH PROGRAMMING - 12 - SLEEP TIMER The Sleep Timer function turns off the unit without using...
... USER'S SET UP V-CHIP SET UP LANGUAGE [ENGLISH] B CAPTION [CAPTION1] ZERO RETURN TIME SEARCH 3 Exit the caption setting mode Press [MENU] to return to "AUTO CH PROGRAMMING", then press [F.FWD/ B]. CHANNEL SET UP Make sure ... • The unit must be turned on TV screen • Multiplex signal reception displaying picture ghosts or airplane flutter. • Playback of time. ADD / DELETE CH (CATV) B AUTO CH PROGRAMMING - 12 - SLEEP TIMER The Sleep Timer function turns off the unit without using...
Owner's Manual
Page 13
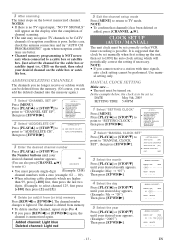
... must precede single-digit (Example: CH8) channel numbers with time signals, auto clock setting cannot be deleted from (or into the memory again.) 1 Select "CHANNEL SET UP" Press [MENU]. CH3) on the cable box or satellite box. TIMER PROGRAMMING PICTURE CONTROL SETTING CLOCK B CHANNEL SET UP USER'S SET UP V-CHIP SET UP LANGUAGE [ENGLISH] CAPTION [OFF] ZERO RETURN TIME SEARCH - NOTE: • To confirm that the clock be set correctly so that VCR timer recording is memorized again. Use manual setting only. MONTH...
... must precede single-digit (Example: CH8) channel numbers with time signals, auto clock setting cannot be deleted from (or into the memory again.) 1 Select "CHANNEL SET UP" Press [MENU]. CH3) on the cable box or satellite box. TIMER PROGRAMMING PICTURE CONTROL SETTING CLOCK B CHANNEL SET UP USER'S SET UP V-CHIP SET UP LANGUAGE [ENGLISH] CAPTION [OFF] ZERO RETURN TIME SEARCH - NOTE: • To confirm that the clock be set correctly so that VCR timer recording is memorized again. Use manual setting only. MONTH...
Owner's Manual
Page 14
... cable box itself and the unit must be turned on . • You must use Manual Clock Setting on page 13. 2)Select the item you want to change using [REW/s] or [F.FWD/ B]. 3)Enter correct numbers using the ANT. NOTES: Follow step 1 above to turn [OFF] this feature to start the clock. MANUAL CLOCK SET - AUTO CLOCK CH SEARCH - press [REW/s] or [F.FWD/ B] to select "SETTING CLOCK" menu. M E N U - TIMER PROGRAMMING PICTURE CONTROL B SETTING CLOCK CHANNEL SET UP USER'S SET...
... cable box itself and the unit must be turned on . • You must use Manual Clock Setting on page 13. 2)Select the item you want to change using [REW/s] or [F.FWD/ B]. 3)Enter correct numbers using the ANT. NOTES: Follow step 1 above to turn [OFF] this feature to start the clock. MANUAL CLOCK SET - AUTO CLOCK CH SEARCH - press [REW/s] or [F.FWD/ B] to select "SETTING CLOCK" menu. M E N U - TIMER PROGRAMMING PICTURE CONTROL B SETTING CLOCK CHANNEL SET UP USER'S SET...
Owner's Manual
Page 15
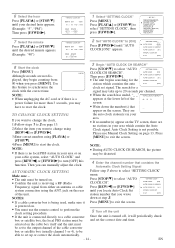
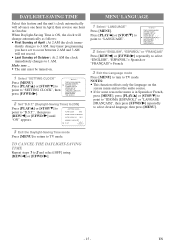
...- Press [PLAY/K] or [STOP/L] to point to - M E N U - TIMER PROGRAMMING PICTURE CONTROL B SETTING CLOCK CHANNEL SET UP USER'S SET UP V-CHIP SET UP LANGUAGE [ENGLISH] CAPTION [OFF] ZERO RETURN TIME SEARCH 2 Set "D.S.T." (Daylight-Saving Time) to [ON] Press [PLAY/K] or [STOP/L] to "SETTING CLOCK", then press [F.FWD/ B]. - point to 2 and select [OFF] using [REW/s] or [F.FWD/ B]. - 15 - AUTO CLOCK [ON] AUTO CLOCK CH SEARCH AUTO CLOCK CH [ 02 ] MANUAL CLOCK SET B D.S.T. [ON] MENU LANGUAGE 1 Select "LANGUAGE" Press [MENU]. NOTES...
...- Press [PLAY/K] or [STOP/L] to point to - M E N U - TIMER PROGRAMMING PICTURE CONTROL B SETTING CLOCK CHANNEL SET UP USER'S SET UP V-CHIP SET UP LANGUAGE [ENGLISH] CAPTION [OFF] ZERO RETURN TIME SEARCH 2 Set "D.S.T." (Daylight-Saving Time) to [ON] Press [PLAY/K] or [STOP/L] to "SETTING CLOCK", then press [F.FWD/ B]. - point to 2 and select [OFF] using [REW/s] or [F.FWD/ B]. - 15 - AUTO CLOCK [ON] AUTO CLOCK CH SEARCH AUTO CLOCK CH [ 02 ] MANUAL CLOCK SET B D.S.T. [ON] MENU LANGUAGE 1 Select "LANGUAGE" Press [MENU]. NOTES...

Owner's Manual
Page 16
...; To change the channel to a station that you select a rating and set TV-14 ( TV-MA ( ) [VIEW] ) [VIEW] it to [BLOCK] or [VIEW]. V-CHIP SET UP This feature enables parents to prevent their children from watching inappropriate material on the TV screen. message appears on TV. M E N U - TIMER PROGRAMMING PICTURE CONTROL SETTING CLOCK CHANNEL SET UP USER'S SET UP B V-CHIP SET UP LANGUAGE [ENGLISH] CAPTION [OFF] ZERO RETURN TIME SEARCH 2 Select the desired item Press [PLAY...
...; To change the channel to a station that you select a rating and set TV-14 ( TV-MA ( ) [VIEW] ) [VIEW] it to [BLOCK] or [VIEW]. V-CHIP SET UP This feature enables parents to prevent their children from watching inappropriate material on the TV screen. message appears on TV. M E N U - TIMER PROGRAMMING PICTURE CONTROL SETTING CLOCK CHANNEL SET UP USER'S SET UP B V-CHIP SET UP LANGUAGE [ENGLISH] CAPTION [OFF] ZERO RETURN TIME SEARCH 2 Select the desired item Press [PLAY...

Owner's Manual
Page 20
.... 3 Return to "ZERO RETURN", then press [F.FWD/ B]. Press [STOP/L] when recording or playback is very useful in forward/reverse). 2 Change searching speed Press [REW/s] or [F.FWD/ B] again to the specified point. TO CANCEL DURING TIME SEARCH Press [STOP/EJECT P N] on the TV TIMER PROGRAMMING PICTURE CONTROL SETTING CLOCK CHANNEL SET UP USER'S SET UP V-CHIP SET UP LANGUAGE [ENGLISH] CAPTION [OFF] B ZERO RETURN TIME SEARCH screen. EN
.... 3 Return to "ZERO RETURN", then press [F.FWD/ B]. Press [STOP/L] when recording or playback is very useful in forward/reverse). 2 Change searching speed Press [REW/s] or [F.FWD/ B] again to the specified point. TO CANCEL DURING TIME SEARCH Press [STOP/EJECT P N] on the TV TIMER PROGRAMMING PICTURE CONTROL SETTING CLOCK CHANNEL SET UP USER'S SET UP V-CHIP SET UP LANGUAGE [ENGLISH] CAPTION [OFF] B ZERO RETURN TIME SEARCH screen. EN
Owner's Manual
Page 22
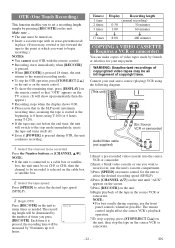
... the unit until "AUX" appears on the screen. 5)Press [REC/OTR] on remote control for your enjoyment. Each time it is connected to a cable box or satellite box, the unit must be recorded Press the Number buttons or [CHANNEL K/L]. NOTE: • For best results during OTR, the unit continues recording. 1 Select the channel to be turned on. • Insert a cassette tape with its erase-prevention...
... the unit until "AUX" appears on the screen. 5)Press [REC/OTR] on remote control for your enjoyment. Each time it is connected to a cable box or satellite box, the unit must be recorded Press the Number buttons or [CHANNEL K/L]. NOTE: • For best results during OTR, the unit continues recording. 1 Select the channel to be turned on. • Insert a cassette tape with its erase-prevention...
Owner's Manual
Page 23
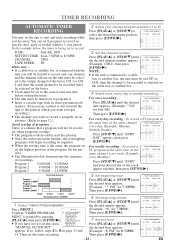
... channel to be recorded must be selected on the boxes. • Clock must be set to the correct time and date before setting the timer. • The unit must be recorded is selected on the cable box or satellite box. 4 Select once, every day or weekly recording For once recording : - TIMER PROGRAMMING - B TIMER PROGRAMMING PICTURE CONTROL MING" is SHADED 1 Select "TIMER PROGRAMMING" Press [MENU]. - TIMER PROGRAMMING - You can set in the program list has pri- select the desired program...
... channel to be recorded must be selected on the boxes. • Clock must be set to the correct time and date before setting the timer. • The unit must be recorded is selected on the cable box or satellite box. 4 Select once, every day or weekly recording For once recording : - TIMER PROGRAMMING - B TIMER PROGRAMMING PICTURE CONTROL MING" is SHADED 1 Select "TIMER PROGRAMMING" Press [MENU]. - TIMER PROGRAMMING - You can set in the program list has pri- select the desired program...

Owner's Manual
Page 24
...] appears. - TIMER PROGRAMMING PICTURE CONTROL SETTING CLOCK CHANNEL SET UP B USER'S SET UP V-CHIP SET UP LANGUAGE [ENGLISH] CAPTION [OFF] ZERO RETURN TIME SEARCH forward the end time only. TO CORRECT A PROGRAM • While setting a program; 8 Set end minute Press [PLAY/K] or [STOP/L] until the desired minute appears. (Example: "50" for automatically. 2)Repeat step 1 on page 23. 3)Press [RECORD] and select the desired program using [PLAY/K] or [STOP/L]. 4)Press [RECORD] again. TIMER PROGRAMMING - gram you...
...] appears. - TIMER PROGRAMMING PICTURE CONTROL SETTING CLOCK CHANNEL SET UP B USER'S SET UP V-CHIP SET UP LANGUAGE [ENGLISH] CAPTION [OFF] ZERO RETURN TIME SEARCH forward the end time only. TO CORRECT A PROGRAM • While setting a program; 8 Set end minute Press [PLAY/K] or [STOP/L] until the desired minute appears. (Example: "50" for automatically. 2)Repeat step 1 on page 23. 3)Press [RECORD] and select the desired program using [PLAY/K] or [STOP/L]. 4)Press [RECORD] again. TIMER PROGRAMMING - gram you...
Owner's Manual
Page 26
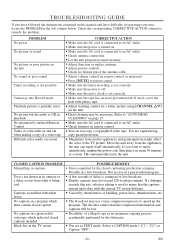
... a video tape Different color marks on screen CORRECTIVE ACTION • Make sure the AC cord is connected to an AC outlet. • Make sure the power is turned on remote control or main unit. • Press [MUTE] to restore sound. • Make sure the timer recording is set correctly. • Make sure the tape has an erase-prevention tab. CLOSED CAPTION PROBLEM Misspelling in captions Text...
... a video tape Different color marks on screen CORRECTIVE ACTION • Make sure the AC cord is connected to an AC outlet. • Make sure the power is turned on remote control or main unit. • Press [MUTE] to restore sound. • Make sure the timer recording is set correctly. • Make sure the tape has an erase-prevention tab. CLOSED CAPTION PROBLEM Misspelling in captions Text...

Owner's Manual
Page 27
.... Tuner channel TV VHF Low : #2~#6 TV VHF High : #7~#13 TV UHF : #14~#69 CATV VHF : 5A MID band : A5~A1, A~I SUPER band : J~W HYPER band : W+1~W+84 Terminals Antenna input : VHF/UHF 75 ohms unbalanced Video input : RCA connector [ 1 Audio input : RCA connector [ 1 Earphone : 1/8" monaural (3.5 mm) ELECTRICAL SPECIFICATIONS Video input level : Audio input level : Video S/N ratio : Audio S/N ratio : 0.5~2.0Vp-p -15dBs More than 46dB More than 43dB OTHER SPECIFICATIONS Power requirement : Power consumption : Dimensions : Weight : AC...
.... Tuner channel TV VHF Low : #2~#6 TV VHF High : #7~#13 TV UHF : #14~#69 CATV VHF : 5A MID band : A5~A1, A~I SUPER band : J~W HYPER band : W+1~W+84 Terminals Antenna input : VHF/UHF 75 ohms unbalanced Video input : RCA connector [ 1 Audio input : RCA connector [ 1 Earphone : 1/8" monaural (3.5 mm) ELECTRICAL SPECIFICATIONS Video input level : Audio input level : Video S/N ratio : Audio S/N ratio : 0.5~2.0Vp-p -15dBs More than 46dB More than 43dB OTHER SPECIFICATIONS Power requirement : Power consumption : Dimensions : Weight : AC...


