Caution: accessory position
Page 1
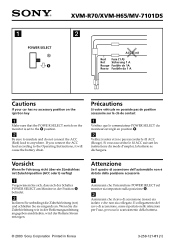
Il collegamento del cavo di accensione, come riportato nelle istruzioni per l'uso, provoca lo scaricamento della batteria. © 2003 Sony Corporation Printed in der Position B befindet. 2 Isolieren Sie unbedingt die Zubehörleitung (rot) und schließen Sie sie nirgends... sich, dass sich der Schalter POWER SELECT am Monitor in Korea 3-258-121-01 (1) If you connect the ACC lead according to anywhere. Si vous raccordez le fil ACC suivant les instructions du mode d'emploi, la batterie se déchargera. 1 POWER SELECT A B XVM-R70/XVM-H65/MV-7101DS 2 ACC (5 m) Red Fuse...
Il collegamento del cavo di accensione, come riportato nelle istruzioni per l'uso, provoca lo scaricamento della batteria. © 2003 Sony Corporation Printed in der Position B befindet. 2 Isolieren Sie unbedingt die Zubehörleitung (rot) und schließen Sie sie nirgends... sich, dass sich der Schalter POWER SELECT am Monitor in Korea 3-258-121-01 (1) If you connect the ACC lead according to anywhere. Si vous raccordez le fil ACC suivant les instructions du mode d'emploi, la batterie se déchargera. 1 POWER SELECT A B XVM-R70/XVM-H65/MV-7101DS 2 ACC (5 m) Red Fuse...

Operating Instructions (primary manual)
Page 1
Model No. XVM-R70 Serial No. XVM-R70 2003 Sony Corporation Refer to these numbers whenever you call upon your Sony dealer regarding this product. Record the serial number in the space provided below. 3-254-962-11 (1) Overhead Monitor Operating Instructions US Mode d'emploi FR Owner's Record The model and serial numbers are located on the top of the unit.
Model No. XVM-R70 Serial No. XVM-R70 2003 Sony Corporation Refer to these numbers whenever you call upon your Sony dealer regarding this product. Record the serial number in the space provided below. 3-254-962-11 (1) Overhead Monitor Operating Instructions US Mode d'emploi FR Owner's Record The model and serial numbers are located on the top of the unit.
Operating Instructions (primary manual)
Page 3
Table of contents Welcome! ...4 Precautions ...5 Location of controls ...7 Operation Opening the display monitor 9 Selecting the input source 10 Setting the screen mode 11 Changing the display settings 12 Adjusting the volume ...14 Connections Installation diagram ...15 Connection diagram ...16 Additional Information Maintenance ...18 Specifications ...20 Troubleshooting ...21 3
Table of contents Welcome! ...4 Precautions ...5 Location of controls ...7 Operation Opening the display monitor 9 Selecting the input source 10 Setting the screen mode 11 Changing the display settings 12 Adjusting the volume ...14 Connections Installation diagram ...15 Connection diagram ...16 Additional Information Maintenance ...18 Specifications ...20 Troubleshooting ...21 3

Operating Instructions (primary manual)
Page 4
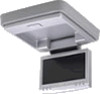
Thank you for purchasing the Sony Overhead Monitor. • Reversible picture • PAL or NTSC color system compatible • Full, Zoom, and Widezoom screen modes available, in addition to the normal screen mode &#... image, free from reversed or blurred colors. • 3 Audio/Video inputs and 1 Audio/Video output are provided for connecting a video player, video game, and additional monitor. • 7.5 V DC output is provided for connecting PS one™. • Built-in infrared transmitter for cordless headphones (optional) • 2 headphone jacks are provided for...
Thank you for purchasing the Sony Overhead Monitor. • Reversible picture • PAL or NTSC color system compatible • Full, Zoom, and Widezoom screen modes available, in addition to the normal screen mode &#... image, free from reversed or blurred colors. • 3 Audio/Video inputs and 1 Audio/Video output are provided for connecting a video player, video game, and additional monitor. • 7.5 V DC output is provided for connecting PS one™. • Built-in infrared transmitter for cordless headphones (optional) • 2 headphone jacks are provided for...

Operating Instructions (primary manual)
Page 5
... technician or service personnel. • If you drill a hole in a safe place when the driver watch or operate the monitor. Precautions To avoid the risk of children. Do not hang onto the monitor. - Do not insert your head against the unit when getting tangled or crimped in the event of a sudden movement... not to the OFF position or take the key out. On installation • Installing this operating manual. The driver must not watch and operate the monitor, or use headphones. • After installing - Take care not to next page t 5
... technician or service personnel. • If you drill a hole in a safe place when the driver watch or operate the monitor. Precautions To avoid the risk of children. Do not hang onto the monitor. - Do not insert your head against the unit when getting tangled or crimped in the event of a sudden movement... not to the OFF position or take the key out. On installation • Installing this operating manual. The driver must not watch and operate the monitor, or use headphones. • After installing - Take care not to next page t 5
Operating Instructions (primary manual)
Page 6
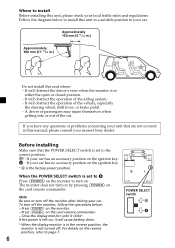
... to install this unit, please check your car has an accessory position on the reverse position, refer to the correct position. Close the display monitor until it will obstruct the operation of the car. When the POWER SELECT switch is set to page 7. 6 POWER SELECT switch A B...Press (POWER) on the monitor to install Before installing this unit in a suitable position in this unit where: - Before installing Make sure that are not covered in your car has no accessory position on . The monitor does not turn off the monitor after driving your nearest Sony dealer. To turn on...
... to install this unit, please check your car has an accessory position on the reverse position, refer to the correct position. Close the display monitor until it will obstruct the operation of the car. When the POWER SELECT switch is set to page 7. 6 POWER SELECT switch A B...Press (POWER) on the monitor to install Before installing this unit in a suitable position in this unit where: - Before installing Make sure that are not covered in your car has no accessory position on . The monitor does not turn off the monitor after driving your nearest Sony dealer. To turn on...

Operating Instructions (primary manual)
Page 7
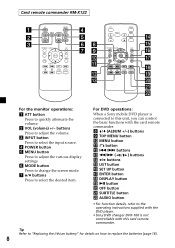
... turned and facing the enclosure (you press (REVERSE) on the monitor, the reverse screen mode switches between on the monitor. Each time you will hear a click). Location of controls Monitor 1 OPEN button Press to open the monitor. 2 Receptor for the card remote commander/Transmitter for the cordless headphones 3 UP... to switch images upside down. 6 INPUT button Press to select the input source. 7 POWER button * The reverse position of the display monitor You can close with the LCD surface out after turning around 180 degrees, and images on the screen can be turned upside down by pressing...
... turned and facing the enclosure (you press (REVERSE) on the monitor, the reverse screen mode switches between on the monitor. Each time you will hear a click). Location of controls Monitor 1 OPEN button Press to open the monitor. 2 Receptor for the card remote commander/Transmitter for the cordless headphones 3 UP... to switch images upside down. 6 INPUT button Press to select the input source. 7 POWER button * The reverse position of the display monitor You can close with the LCD surface out after turning around 180 degrees, and images on the screen can be turned upside down by pressing...
Operating Instructions (primary manual)
Page 8
... Tip Refer to "Replacing the lithium battery" for details on how to quickly attenuate the volume. 2 VOL (volume) +/- For DVD operations: When a Sony mobile DVD player is not controllable with the card remote commander. 8 V/v (ALBUM +/-) buttons 9 TOP MENU button 0 MENU button qa O button qs ./>...buttons qf B/b buttons qg LIST button qh SET UP button qj ENTER button qk DISPLAY button ql u button w; OFF AUDIO SUBTITLE For the monitor operations: 1 ATT button Press to replace the batteries (page 18). 8 OFF button wa SUBTITLE button ws AUDIO button • For function ...
... Tip Refer to "Replacing the lithium battery" for details on how to quickly attenuate the volume. 2 VOL (volume) +/- For DVD operations: When a Sony mobile DVD player is not controllable with the card remote commander. 8 V/v (ALBUM +/-) buttons 9 TOP MENU button 0 MENU button qa O button qs ./>...buttons qf B/b buttons qg LIST button qh SET UP button qj ENTER button qk DISPLAY button ql u button w; OFF AUDIO SUBTITLE For the monitor operations: 1 ATT button Press to replace the batteries (page 18). 8 OFF button wa SUBTITLE button ws AUDIO button • For function ...
Operating Instructions (primary manual)
Page 9
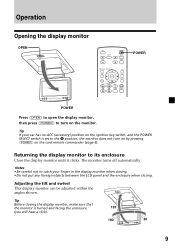
...between the LCD panel and the enclosure when closing the display monitor, make sure that the monitor is set to the B position, the monitor does not turn on the card remote commander (page 6). The monitor turns off automatically. Operation Opening the display monitor OPEN ATT INPUT VOL POWER MENU MODE TOP MENU ALBUM+ LIST... is turned and facing the enclosure (you will hear a click). 120˚ 180˚ 30˚ 9 Adjusting the tilt and swivel This display monitor can be adjusted within the angles shown. OFF AUDIO SUBTITLE POWER POWER Press (OPEN) to open the display...
...between the LCD panel and the enclosure when closing the display monitor, make sure that the monitor is set to the B position, the monitor does not turn on the card remote commander (page 6). The monitor turns off automatically. Operation Opening the display monitor OPEN ATT INPUT VOL POWER MENU MODE TOP MENU ALBUM+ LIST... is turned and facing the enclosure (you will hear a click). 120˚ 180˚ 30˚ 9 Adjusting the tilt and swivel This display monitor can be adjusted within the angles shown. OFF AUDIO SUBTITLE POWER POWER Press (OPEN) to open the display...

Operating Instructions (primary manual)
Page 10
OFF AUDIO SUBTITLE POWER INPUT POWER 1 Press (POWER). The power is set to the B position, the monitor does not turn on by pressing (POWER) on . Tip If your car has no ACC (accessory) position on the ignition key switch, and the POWER ...
OFF AUDIO SUBTITLE POWER INPUT POWER 1 Press (POWER). The power is set to the B position, the monitor does not turn on by pressing (POWER) on . Tip If your car has no ACC (accessory) position on the ignition key switch, and the POWER ...

Operating Instructions (primary manual)
Page 15
... an unstable or uneven surface. - on a dashboard, or in a place subject to direct sunlight. - Note All equipment other than one Overhead Monitor and one ™: - in a place subject to excessive vibration. - in a place near magnetic source such as magnets, speakers and a TV...730;F) or above 35˚C (95˚F)). in poorly ventilated or humid place. - Overhead Monitor Front Left speaker Tweeter Left Head unit Tweeter Right Front Right speaker Rear Left speaker Sony mobile DVD player DVX-11A Subwoofer Rear Right speaker Be sure to securely fasten all equipment to the...
... an unstable or uneven surface. - on a dashboard, or in a place subject to direct sunlight. - Note All equipment other than one Overhead Monitor and one ™: - in a place subject to excessive vibration. - in a place near magnetic source such as magnets, speakers and a TV...730;F) or above 35˚C (95˚F)). in poorly ventilated or humid place. - Overhead Monitor Front Left speaker Tweeter Left Head unit Tweeter Right Front Right speaker Rear Left speaker Sony mobile DVD player DVX-11A Subwoofer Rear Right speaker Be sure to securely fasten all equipment to the...
Operating Instructions (primary manual)
Page 16
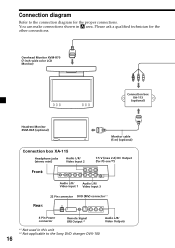
Overhead Monitor XVM-R70 (7-inch wide color LCD Monitor) Connection box XA-113 (optional) Headrest Monitor XVM-H65 (optional) Monitor cable (5 m) (optional) Connection box XA-115 Headphone jacks (stereo mini) Audio L/R/ Video Input 2 Front: 7.5 V (max 2 A) DC Output (for PS one™) Audio L/R/ Audio L/R/ Video Input 1 ... in A area. You can make connections shown in this unit *2 Not applicable to the connection diagram for the other connections. Connection diagram Refer to the Sony DVD changer DVX-100 16 Please ask a qualified technician for the proper connections.
Overhead Monitor XVM-R70 (7-inch wide color LCD Monitor) Connection box XA-113 (optional) Headrest Monitor XVM-H65 (optional) Monitor cable (5 m) (optional) Connection box XA-115 Headphone jacks (stereo mini) Audio L/R/ Video Input 2 Front: 7.5 V (max 2 A) DC Output (for PS one™) Audio L/R/ Audio L/R/ Video Input 1 ... in A area. You can make connections shown in this unit *2 Not applicable to the connection diagram for the other connections. Connection diagram Refer to the Sony DVD changer DVX-100 16 Please ask a qualified technician for the proper connections.
Operating Instructions (primary manual)
Page 17
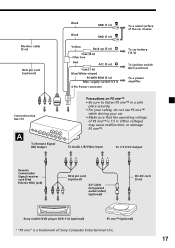
... receiver cord (5m) (Stereo Mini jack) RCA pin cord (optional) AV Cable (integrated audio/video) (optional) DC-DC cord (3 m) Sony mobile DVD player DVX-11A (optional) PS one™ (optional) * "PS one ™. Monitor cable (5 m) RCA pin cord (optional) Connection box XA-115 Black GND (1 m) Black GND (1 m) Yellow Back-up (5 m) Fuse (8 A) Filter... safety, do not use PS one™ while driving your car. • Make sure that the operating voltage of PS one™ is a trademark of Sony Computer Entertainment Inc. 17
... receiver cord (5m) (Stereo Mini jack) RCA pin cord (optional) AV Cable (integrated audio/video) (optional) DC-DC cord (3 m) Sony mobile DVD player DVX-11A (optional) PS one™ (optional) * "PS one ™. Monitor cable (5 m) RCA pin cord (optional) Connection box XA-115 Black GND (1 m) Black GND (1 m) Yellow Back-up (5 m) Fuse (8 A) Filter... safety, do not use PS one™ while driving your car. • Make sure that the operating voltage of PS one™ is a trademark of Sony Computer Entertainment Inc. 17
Operating Instructions (primary manual)
Page 19
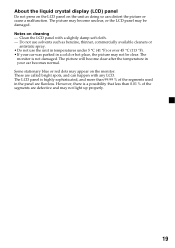
...;C (113 °F). • If your car becomes normal. The picture will become unclear, or the LCD panel may appear on cleaning - Notes on the monitor. The monitor is highly sophisticated, and more than 0.01 % of the segments used in a cold or hot place, the picture may not be damaged. The LCD panel...
...;C (113 °F). • If your car becomes normal. The picture will become unclear, or the LCD panel may appear on cleaning - Notes on the monitor. The monitor is highly sophisticated, and more than 0.01 % of the segments used in a cold or hot place, the picture may not be damaged. The LCD panel...
Operating Instructions (primary manual)
Page 20
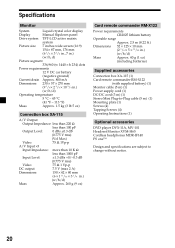
Specifications Monitor System Liquid crystal color display Display Manual flipdown panel Drive system TFT-LCD active matrix system Picture size 7 inches wide screen (16:9) 154 &#... 1/8 × 5 × 13/32 in.) (w/h/d) Mass Approx. 40 g (1 oz) (including batteries) Supplied accessories Connection box XA-115 (1) Card remote commander RM-X122 (with supplied battery) (1) Monitor cable (5 m) (1) Power supply cord (1) DC-DC cord (3 m) (1) Stereo Mini Plug-to-Plug cable (5 m) (1) Mounting plate (1) Screws (4) Tapping Screws (4) Operating Instructions (1) Optional accessories DVD player...
Specifications Monitor System Liquid crystal color display Display Manual flipdown panel Drive system TFT-LCD active matrix system Picture size 7 inches wide screen (16:9) 154 &#... 1/8 × 5 × 13/32 in.) (w/h/d) Mass Approx. 40 g (1 oz) (including batteries) Supplied accessories Connection box XA-115 (1) Card remote commander RM-X122 (with supplied battery) (1) Monitor cable (5 m) (1) Power supply cord (1) DC-DC cord (3 m) (1) Stereo Mini Plug-to-Plug cable (5 m) (1) Mounting plate (1) Screws (4) Tapping Screws (4) Operating Instructions (1) Optional accessories DVD player...

