
Operating Instructions
Page 1
2-645-712-11 (1) Mobile Monitor Operating Instructions US Mode d'emploi FR Owner's Record The model and serial numbers are located on the bottom of the unit. Refer to these numbers whenever you call upon your Sony dealer regarding this product. XVM-F65WL Serial No. XVM-F65WL 2005 Sony Corporation Model No. En ce qui concerne l'installation et les connexions, consulter le manuel d'Installation/ Connexions fourni. Record the serial number in the space provided below. For installation and connections, see the supplied Installation/Connections manual.
2-645-712-11 (1) Mobile Monitor Operating Instructions US Mode d'emploi FR Owner's Record The model and serial numbers are located on the bottom of the unit. Refer to these numbers whenever you call upon your Sony dealer regarding this product. XVM-F65WL Serial No. XVM-F65WL 2005 Sony Corporation Model No. En ce qui concerne l'installation et les connexions, consulter le manuel d'Installation/ Connexions fourni. Record the serial number in the space provided below. For installation and connections, see the supplied Installation/Connections manual.

Operating Instructions
Page 2
... not cause interference. This equipment generates, uses, and can be used in order to meet FCC emission limits. Thank you for purchasing the Sony Mobile Monitor. • Built-in 2.4 GHz Wireless AV receiver. • PAL or NTSC color system compatible. • Full, Wide and Zoom ... San Diego, CA 92127 USA Properly shielded and grounded cables Telephone Number: 858-942-2230 and connectors must accept any Model No.: XVM-F65WL interference, including interference that to which can radiate radio frequency energy and, if not installed and used in accordance with the instructions, ...
... not cause interference. This equipment generates, uses, and can be used in order to meet FCC emission limits. Thank you for purchasing the Sony Mobile Monitor. • Built-in 2.4 GHz Wireless AV receiver. • PAL or NTSC color system compatible. • Full, Wide and Zoom ... San Diego, CA 92127 USA Properly shielded and grounded cables Telephone Number: 858-942-2230 and connectors must accept any Model No.: XVM-F65WL interference, including interference that to which can radiate radio frequency energy and, if not installed and used in accordance with the instructions, ...
Operating Instructions
Page 4
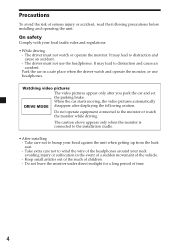
...installation cradle. • After installing - Do not operate equipment connected to distraction and cause an accident. It may lead to the monitor or watch the monitor while driving. Take care not to wind the wire of the headphones around your head against the unit when getting up from the..., the video pictures automatically DRIVE MODE disappear after you park the car and set the parking brake. The caution above appears only when the monitor is connected to distraction and cause an accident. - Keep small articles out of the reach of time. 4 Watching video pictures The video ...
...installation cradle. • After installing - Do not operate equipment connected to distraction and cause an accident. It may lead to the monitor or watch the monitor while driving. Take care not to wind the wire of the headphones around your head against the unit when getting up from the..., the video pictures automatically DRIVE MODE disappear after you park the car and set the parking brake. The caution above appears only when the monitor is connected to distraction and cause an accident. - Keep small articles out of the reach of time. 4 Watching video pictures The video ...

Operating Instructions
Page 6
... display darkens.) 5 POWER (on/off) button Press to turn on/off . (When it is 25.) or to switch the dimmer on/off the monitor. 6 VOLUME +/- Location of controls Monitor 1 5 2 7 8 34 6 1 INPUT button Press to select the input source. 2 Receptor for the card remote commander/Transmitter for the cordless headphones* 3 MENU button .... 4 DIMMER button Press to select the item during menu operation. 7 RESET button 8 Monaural speaker * If interference occurs while using several cordless headphones If several monitors are installed and used simultaneously, interference may occur. 6
... display darkens.) 5 POWER (on/off) button Press to turn on/off . (When it is 25.) or to switch the dimmer on/off the monitor. 6 VOLUME +/- Location of controls Monitor 1 5 2 7 8 34 6 1 INPUT button Press to select the input source. 2 Receptor for the card remote commander/Transmitter for the cordless headphones* 3 MENU button .... 4 DIMMER button Press to select the item during menu operation. 7 RESET button 8 Monaural speaker * If interference occurs while using several cordless headphones If several monitors are installed and used simultaneously, interference may occur. 6

Operating Instructions
Page 7
Tip Refer to "Replacing the lithium battery" for details on how to adjust the volume of the monitor. buttons Press to replace the batteries (page 19). 7 To restore the previous volume level, press (ATT) again or (VOL) +/-. 2 INPUT button Press to select the ...
Tip Refer to "Replacing the lithium battery" for details on how to adjust the volume of the monitor. buttons Press to replace the batteries (page 19). 7 To restore the previous volume level, press (ATT) again or (VOL) +/-. 2 INPUT button Press to select the ...

Operating Instructions
Page 9
...indication changes in the following sequence: VIDEO 1 VIDEO 2 RECEIVER* Note If you use with the rechargeable battery (MV-100BAT) (optional), the monitor automatically enters into the receiver mode when turned on. On the card remote commander, press {/1 . The power is turned on wireless transmission (...Receiver mode) Simultaneous use the monitor with other 2.4 GHz equipment may cause image interference or audio noise. Operation Selecting the input source You can select the input source....
...indication changes in the following sequence: VIDEO 1 VIDEO 2 RECEIVER* Note If you use with the rechargeable battery (MV-100BAT) (optional), the monitor automatically enters into the receiver mode when turned on. On the card remote commander, press {/1 . The power is turned on wireless transmission (...Receiver mode) Simultaneous use the monitor with other 2.4 GHz equipment may cause image interference or audio noise. Operation Selecting the input source You can select the input source....

Operating Instructions
Page 11
... setting. or MENU. Changing the menu settings You can adjust the display settings manually if the display is selected. 2 Press M or m ((VOLUME) (+) or (-) on the monitor) to adjust to see from the position where you press (MENU), the setting screen changes in this area. See the next page for the setting...
... setting. or MENU. Changing the menu settings You can adjust the display settings manually if the display is selected. 2 Press M or m ((VOLUME) (+) or (-) on the monitor) to adjust to see from the position where you press (MENU), the setting screen changes in this area. See the next page for the setting...

Operating Instructions
Page 12
... edges of the screen, with only the left and right edges of the screen (regular image). Wide: An image with an aspect ratio of the monitor. CH1, CH2, OFF Turning on the backside of 4 to fill the screen. On, Off Turning on and off the speaker on and off to 63...
... edges of the screen, with only the left and right edges of the screen (regular image). Wide: An image with an aspect ratio of the monitor. CH1, CH2, OFF Turning on the backside of 4 to fill the screen. On, Off Turning on and off the speaker on and off to 63...
Operating Instructions
Page 13
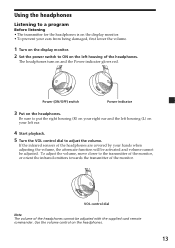
... • The transmitter for the headphones is on the display monitor. • To prevent your ears from being damaged, first lower the volume. 1 Turn on the display monitor. 2 Set the power switch to ON on the left housing of the monitor. To adjust the volume, move closer to the transmitter of ...the monitor, or orient the infrared emitters towards the transmitter of the headphones. If the ...
... • The transmitter for the headphones is on the display monitor. • To prevent your ears from being damaged, first lower the volume. 1 Turn on the display monitor. 2 Set the power switch to ON on the left housing of the monitor. To adjust the volume, move closer to the transmitter of ...the monitor, or orient the infrared emitters towards the transmitter of the headphones. If the ...

Operating Instructions
Page 14
... automatically restored when you to hear outside sounds and to be considerate to the monitor's menu setting of any questions or problems concerning the headphones that are not covered in your nearest Sony dealer. 14 After listening to the program Take off the headphones, and then turn... off the monitor before taking off the headphones). Caring for a long period of the infrared sensors may...
... automatically restored when you to hear outside sounds and to be considerate to the monitor's menu setting of any questions or problems concerning the headphones that are not covered in your nearest Sony dealer. 14 After listening to the program Take off the headphones, and then turn... off the monitor before taking off the headphones). Caring for a long period of the infrared sensors may...

Operating Instructions
Page 15
Notes when using the rechargeable battery • When the rechargeable battery is attached, the monitor automatically enters into the receiver mode. (INPUT) will be charged before use . You can use the optional rechargeable battery for the remote use . To detach ...
Notes when using the rechargeable battery • When the rechargeable battery is attached, the monitor automatically enters into the receiver mode. (INPUT) will be charged before use . You can use the optional rechargeable battery for the remote use . To detach ...

Operating Instructions
Page 16
... The lamp of the rechargeable battery indicates the charging conditions. To the cigar lighter socket and parking brake switch cord Battery rechargeable cable (supplied) MONITOR (XVM) DC OUT 9V MAX 1A POWER DC 12V 3A INPUT VIDEO 1 VIDEO 2 V L R OUTPUT LOCATION V L R REAR/FRONT Be ...sure to press (POWER) (or {/1 on the card remote commander) to complete charging. If the monitor is made. Charging the rechargeable battery (in a car only) To charge the rechargeable battery, use the supplied Connection box and Battery rechargeable cable...
... The lamp of the rechargeable battery indicates the charging conditions. To the cigar lighter socket and parking brake switch cord Battery rechargeable cable (supplied) MONITOR (XVM) DC OUT 9V MAX 1A POWER DC 12V 3A INPUT VIDEO 1 VIDEO 2 V L R OUTPUT LOCATION V L R REAR/FRONT Be ...sure to press (POWER) (or {/1 on the card remote commander) to complete charging. If the monitor is made. Charging the rechargeable battery (in a car only) To charge the rechargeable battery, use the supplied Connection box and Battery rechargeable cable...

Operating Instructions
Page 17
... battery may become hot during the charging procedure; Battery duration Approximately 210 minutes* (fully charged, DIMMER On) * When used for 30 seconds even after the monitor is completed, unplug the power supply from the rechargeable battery. Notes on charging • Be sure to light in green again. • While charging, the...
... battery may become hot during the charging procedure; Battery duration Approximately 210 minutes* (fully charged, DIMMER On) * When used for 30 seconds even after the monitor is completed, unplug the power supply from the rechargeable battery. Notes on charging • Be sure to light in green again. • While charging, the...

Operating Instructions
Page 21
...or worn out, replace them as illustrated below. Do not use solvents such as doing so can order replacements at your car becomes normal. The monitor is not commercially available. The LCD panel is a possibility that less than 99.99 % of the segments are called bright spots, and can ...replaceable. Clean the LCD panel with any LCD. However, there is highly sophisticated, and more than 0.01 % of the segments used in your nearest Sony dealer. 1 Remove the old ear pad by pulling it off. Replacing the ear pads The ear pads are flawless. Some stationary blue or red ...
...or worn out, replace them as illustrated below. Do not use solvents such as doing so can order replacements at your car becomes normal. The monitor is not commercially available. The LCD panel is a possibility that less than 99.99 % of the segments are called bright spots, and can ...replaceable. Clean the LCD panel with any LCD. However, there is highly sophisticated, and more than 0.01 % of the segments used in your nearest Sony dealer. 1 Remove the old ear pad by pulling it off. Replacing the ear pads The ear pads are flawless. Some stationary blue or red ...

Operating Instructions
Page 22
... (0.3 m) (1) Operating Instructions (1 set) Optional accessories Multi Disc Player MEX-R5 Rechargeable Battery MV-100BAT Design and specifications are subject to change without notice. 22 Specifications Monitor System Liquid crystal color display Drive system TFT-LCD active matrix system Picture size 6.5 inches wide screen (16:9) 143.4 × 79.3 mm, 165.1 mm (w/h, d) Picture...
... (0.3 m) (1) Operating Instructions (1 set) Optional accessories Multi Disc Player MEX-R5 Rechargeable Battery MV-100BAT Design and specifications are subject to change without notice. 22 Specifications Monitor System Liquid crystal color display Drive system TFT-LCD active matrix system Picture size 6.5 inches wide screen (16:9) 143.4 × 79.3 mm, 165.1 mm (w/h, d) Picture...

Operating Instructions
Page 23
... cord has been disconnected. •The fuse has blown. If you use the monitor on the headrest of the monitor with your unit. The operation buttons on the monitor do not function. / The monitor does not turn on the card remote commander. Troubleshooting The following checklist will help ...RECEIVER mode. •Simultaneous use only NAVI as an input source while driving. If there is no sound Press (VOL)(+) ((VOLUME)(+) on the monitor) or (ATT) on when using the other 2.4 GHz equipment may temporarily occur during driving as a car engine or motorcycle. Image interference or...
... cord has been disconnected. •The fuse has blown. If you use the monitor on the headrest of the monitor with your unit. The operation buttons on the monitor do not function. / The monitor does not turn on the card remote commander. Troubleshooting The following checklist will help ...RECEIVER mode. •Simultaneous use only NAVI as an input source while driving. If there is no sound Press (VOL)(+) ((VOLUME)(+) on the monitor) or (ATT) on when using the other 2.4 GHz equipment may temporarily occur during driving as a car engine or motorcycle. Image interference or...

Operating Instructions
Page 24
... by unplugging the Cigar lighter adaptor. 24 Although this will not cause any object between the transmitter and the headphones. •Check that the display monitor is turned on. •The attenuate function is activated. , Check if there is any problem, you move away from the transmitter, more noise is... off . , Replace the batteries with new ones If you turn the ignition switch to the OFF position while the Cigar lighter adaptor of the monitor is plugged, the power of car audio equipments may stay on for a few seconds. This is inherent in infrared ray transmission and does not ...
... by unplugging the Cigar lighter adaptor. 24 Although this will not cause any object between the transmitter and the headphones. •Check that the display monitor is turned on. •The attenuate function is activated. , Check if there is any problem, you move away from the transmitter, more noise is... off . , Replace the batteries with new ones If you turn the ignition switch to the OFF position while the Cigar lighter adaptor of the monitor is plugged, the power of car audio equipments may stay on for a few seconds. This is inherent in infrared ray transmission and does not ...

Marketing Specifications
Page 1
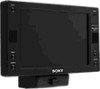
... Power Requirements: 12 VDC Inputs and Outputs Video In (BNC): 2 Dimensions Weight: 14.1 oz (400 g) Measurements: 7 7/11 x 3 x 1 1/15" (194 x 101 x 27.1mm) UPC Code: 027242667440 XVM-F65WL A/V Monitor
... Power Requirements: 12 VDC Inputs and Outputs Video In (BNC): 2 Dimensions Weight: 14.1 oz (400 g) Measurements: 7 7/11 x 3 x 1 1/15" (194 x 101 x 27.1mm) UPC Code: 027242667440 XVM-F65WL A/V Monitor

Marketing Specifications
Page 2
Sony is prohibited. Reproduction in whole or in part without notice. XVM-F65WL A/V Monitor Please visit the Dealer Network for more information at www.sony.com/dn ©2006 Sony Electronics Inc. Features and specifications are subject to change without written permission is a trademark of their respective owners. All other trademarks are approximate Sony Electronics Inc. • 16530 Via Esprillo • San Diego, CA 92127 • 1-800-222-7669 • www.sony.com Last Updated: 02/10/2007 Non-metric weights and measures are property of Sony.
Sony is prohibited. Reproduction in whole or in part without notice. XVM-F65WL A/V Monitor Please visit the Dealer Network for more information at www.sony.com/dn ©2006 Sony Electronics Inc. Features and specifications are subject to change without written permission is a trademark of their respective owners. All other trademarks are approximate Sony Electronics Inc. • 16530 Via Esprillo • San Diego, CA 92127 • 1-800-222-7669 • www.sony.com Last Updated: 02/10/2007 Non-metric weights and measures are property of Sony.

