
Limited Warranty (U.S. Only)
Page 1
... is invalid if the factory-applied serial number has been altered or removed from state to the End User License Agreements included with the Product. This Limited Warranty gives you specific legal rights and you may not apply to the Sony authorized service facility specified. 3-272-643-01 ® Car Audio LIMITED WARRANTY (U.S. For purposes of protection to you must...
... is invalid if the factory-applied serial number has been altered or removed from state to the End User License Agreements included with the Product. This Limited Warranty gives you specific legal rights and you may not apply to the Sony authorized service facility specified. 3-272-643-01 ® Car Audio LIMITED WARRANTY (U.S. For purposes of protection to you must...
Primary User Manual
Page 1
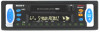
Record the serial number in the space provided below. For installation and connections, see the supplied installation/connections manual. Refer to these numbers whenever you call upon your Sony dealer regarding this product. Model No. XR-CA300/CA305 Serial No. 3-225-231-11 (2) FM/AM Cassette Car Stereo Operating Instructions US Owner's Record The model and serial numbers are located on the bottom of the unit. XR-CA300 XR-CA305 2001 Sony Corporation
Record the serial number in the space provided below. For installation and connections, see the supplied installation/connections manual. Refer to these numbers whenever you call upon your Sony dealer regarding this product. Model No. XR-CA300/CA305 Serial No. 3-225-231-11 (2) FM/AM Cassette Car Stereo Operating Instructions US Owner's Record The model and serial numbers are located on the bottom of the unit. XR-CA300 XR-CA305 2001 Sony Corporation
Primary User Manual
Page 2
... appear in the display when you operate this Sony Cassette Player. When you play a CD TEXT disc*2. *1 You can radiate radio frequency energy and, if not installed and used in accordance with the instructions, may cause harmful interference to operate this equipment does cause harmful interference to radio or television reception, which the receiver is recorded on , the user is an audio CD that any changes or modifications...
... appear in the display when you operate this Sony Cassette Player. When you play a CD TEXT disc*2. *1 You can radiate radio frequency energy and, if not installed and used in accordance with the instructions, may cause harmful interference to operate this equipment does cause harmful interference to radio or television reception, which the receiver is recorded on , the user is an audio CD that any changes or modifications...
Primary User Manual
Page 3
... prevent sound reproduction altogether. The cassette player head should be caught in the machine. The tape used for long continuous play. If everything is in order, check the fuse. •If no power is being supplied to stretch easily. However, this manual, please consult your audio equipment, be careful not to splash juice or other soft drinks onto the car audio. To...
... prevent sound reproduction altogether. The cassette player head should be caught in the machine. The tape used for long continuous play. If everything is in order, check the fuse. •If no power is being supplied to stretch easily. However, this manual, please consult your audio equipment, be careful not to splash juice or other soft drinks onto the car audio. To...
Primary User Manual
Page 4
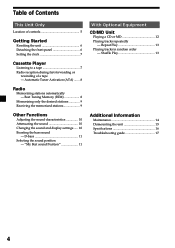
... CD/MD Unit Playing a CD or MD 12 Playing tracks repeatedly - Automatic Tuner Activation (ATA) ....... 8 Radio Memorizing stations automatically - Shuffle Play 13 Additional Information Maintenance 14 Dismounting the unit 15 Specifications 16 Troubleshooting guide 17 4 Repeat Play 13 Playing tracks in random order - Best Tuning Memory (BTM 8 Memorizing only the desired stations 9 Receiving the memorized stations 9 Other Functions Adjusting the sound characteristics 10 Attenuating the sound 10 Changing the sound and display settings ..... 10 Boosting the bass sound -
... CD/MD Unit Playing a CD or MD 12 Playing tracks repeatedly - Automatic Tuner Activation (ATA) ....... 8 Radio Memorizing stations automatically - Shuffle Play 13 Additional Information Maintenance 14 Dismounting the unit 15 Specifications 16 Troubleshooting guide 17 4 Repeat Play 13 Playing tracks in random order - Best Tuning Memory (BTM 8 Memorizing only the desired stations 9 Receiving the memorized stations 9 Other Functions Adjusting the sound characteristics 10 Attenuating the sound 10 Changing the sound and display settings ..... 10 Boosting the bass sound -
Primary User Manual
Page 5
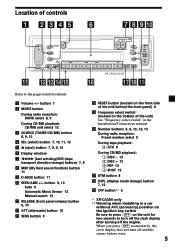
... unit behind the front panel) 6 qg Frequency select switch* (located on the unit for two seconds to the pages listed for details. 1 Volume +/- qh Number buttons 8, 9, 10, 12, 13 During radio reception: Preset number select 9 During tape playback: (6) ATA 8 During CD/MD playback: (1) DISC - 13 (2) DISC + 13 (3) REP 13 (4) SHUF 13 qj BTM button 8 qk DSPL (display mode change ) buttons 7, 8 8 MBP (My Best sound Position) button 11 9 D-BASS button 11 q; Location of controls RELEASE SOURCE SRC MODE SEL ATT SENS DISC...
... unit behind the front panel) 6 qg Frequency select switch* (located on the unit for two seconds to the pages listed for details. 1 Volume +/- qh Number buttons 8, 9, 10, 12, 13 During radio reception: Preset number select 9 During tape playback: (6) ATA 8 During CD/MD playback: (1) DISC - 13 (2) DISC + 13 (3) REP 13 (4) SHUF 13 qj BTM button 8 qk DSPL (display mode change ) buttons 7, 8 8 MBP (My Best sound Position) button 11 9 D-BASS button 11 q; Location of controls RELEASE SOURCE SRC MODE SEL ATT SENS DISC...
Primary User Manual
Page 6
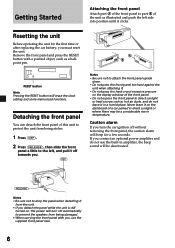
.... Never leave it on the display window of the unit as a ballpoint pen. Resetting the unit Before operating the unit for the first time or after replacing the car battery, you turn off without removing the front panel, the caution alarm will be a considerable rise in a humid place. Remove the front panel and press the RESET button with you, use the built-in direct sunlight or where there may...
.... Never leave it on the display window of the unit as a ballpoint pen. Resetting the unit Before operating the unit for the first time or after replacing the car battery, you turn off without removing the front panel, the caution alarm will be a considerable rise in a humid place. Remove the front panel and press the RESET button with you, use the built-in direct sunlight or where there may...
Primary User Manual
Page 7
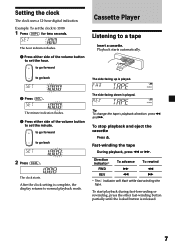
... clock The clock uses a 12-hour digital indication. The side facing down is played. 2 Press (SEL). The minute indication flashes. 3 Press either side of the volume button to set the minute. To stop playback and eject the cassette Press Z. The hour indication flashes. 1 Press either side of the volume button to go back The side facing up is played. to set the clock to a tape Insert a cassette. After the clock setting...
... clock The clock uses a 12-hour digital indication. The side facing down is played. 2 Press (SEL). The minute indication flashes. 3 Press either side of the volume button to set the minute. To stop playback and eject the cassette Press Z. The hour indication flashes. 1 Press either side of the volume button to go back The side facing up is played. to set the clock to a tape Insert a cassette. After the clock setting...
Primary User Manual
Page 8
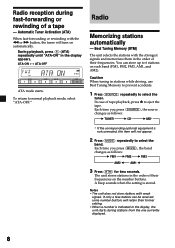
You can be received, some number buttons will not appear. 2 Press (MODE) repeatedly to select the band. Caution When tuning in stations while driving, use Best Tuning Memory to prevent accidents. 1 Press (SOURCE) repeatedly to 6 stations on each band (FM1, FM2, FM3, AM1, and AM2). Each time you press (MODE), the band changes as follows: B TUNER B CD* B MD* * If the corresponding optional equipment is not connected, this item will...
You can be received, some number buttons will not appear. 2 Press (MODE) repeatedly to select the band. Caution When tuning in stations while driving, use Best Tuning Memory to prevent accidents. 1 Press (SOURCE) repeatedly to 6 stations on each band (FM1, FM2, FM3, AM1, and AM2). Each time you press (MODE), the band changes as follows: B TUNER B CD* B MD* * If the corresponding optional equipment is not connected, this item will...
Primary User Manual
Page 9
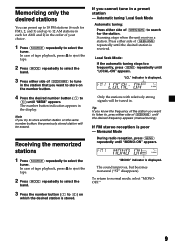
... eject the tape. 2 Press (MODE) repeatedly to select the band. 3 Press the number button ((1) to (6)) on the number button. 4 Press the desired number button ((1) to (6)) until the desired frequency appears (manual tuning). "LCL" indicator is poor - If FM stereo reception is displayed. In case of tape playback, press Z to eject the tape. 2 Press (MODE) repeatedly to select the band. 3 Press either side of (SEEK/AMS) to tune in the station...
... eject the tape. 2 Press (MODE) repeatedly to select the band. 3 Press the number button ((1) to (6)) on the number button. 4 Press the desired number button ((1) to (6)) until the desired frequency appears (manual tuning). "LCL" indicator is poor - If FM stereo reception is displayed. In case of tape playback, press Z to eject the tape. 2 Press (MODE) repeatedly to select the band. 3 Press either side of (SEEK/AMS) to tune in the station...
Primary User Manual
Page 10
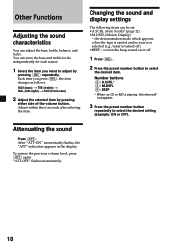
... restore the previous volume level, press (ATT) again. "ATT-OFF" flashes momentarily. 10 Changing the sound and display settings The following items can adjust the bass, treble, balance, and fader. After "ATT-ON" momentarily flashes, the "ATT" indication appears in the display. the demonstration mode which appears when the tape is ejected and no CD or MD is turned off . 1 Press (SEL). 2 Press the preset number button to turn the beep sound on or off...
... restore the previous volume level, press (ATT) again. "ATT-OFF" flashes momentarily. 10 Changing the sound and display settings The following items can adjust the bass, treble, balance, and fader. After "ATT-ON" momentarily flashes, the "ATT" indication appears in the display. the demonstration mode which appears when the tape is ejected and no CD or MD is turned off . 1 Press (SEL). 2 Press the preset number button to turn the beep sound on or off...
Primary User Manual
Page 11
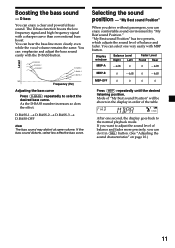
... display goes back to select the desired bass curve. Level D.BASS-3 D.BASS-2 D.BASS-1 D.BASS-3 D.BASS-2 D.BASS-1 0dB Frequency (Hz) Adjusting the bass curve Press (D-BASS) repeatedly to the normal playback mode. If the bass sound distorts, select less effective bass curve. Selecting the sound position - "My Best sound Position" has two presets, which adjusts the sound level of the table. D-bass You can emphasize and adjust the bass sound easily with the D-BASS button. You can do it in order of balance and...
... display goes back to select the desired bass curve. Level D.BASS-3 D.BASS-2 D.BASS-1 D.BASS-3 D.BASS-2 D.BASS-1 0dB Frequency (Hz) Adjusting the bass curve Press (D-BASS) repeatedly to the normal playback mode. If the bass sound distorts, select less effective bass curve. Selecting the sound position - "My Best sound Position" has two presets, which adjusts the sound level of the table. D-bass You can emphasize and adjust the bass sound easily with the D-BASS button. You can do it in order of balance and...
Primary User Manual
Page 12
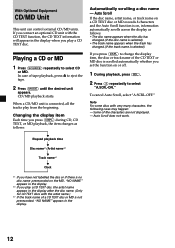
... track has changed (if the track name is selected). To cancel Auto Scroll, select "A.SCRL-OFF." With Optional Equipment CD/MD Unit This unit can control external CD/MD units. If you have not labelled the disc or if there is on, information automatically scrolls across the display as follows: V Elapsed playback time V Disc name*1/Artist name*2 V Track name*3 V Clock Automatically scrolling a disc name...
... track has changed (if the track name is selected). To cancel Auto Scroll, select "A.SCRL-OFF." With Optional Equipment CD/MD Unit This unit can control external CD/MD units. If you have not labelled the disc or if there is on, information automatically scrolls across the display as follows: V Elapsed playback time V Disc name*1/Artist name*2 V Track name*3 V Clock Automatically scrolling a disc name...
Primary User Manual
Page 13
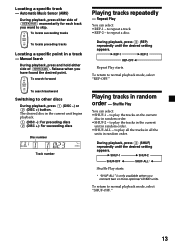
... units in the current unit begins playback. (1) (DISC -): For preceding discs (2) (DISC +): For succeeding discs Disc number Track number Playing tracks repeatedly - to repeat a track. • REP-2 - During playback, press (4) (SHUF) repeatedly until the desired setting appears. Locating a specific track - to other discs During playback, press (1) (DISC -) or (2) (DISC +) button. Shuffle Play You can select: • REP-1 - To search forward SEEK AMS To search backward Switching to repeat a disc. The desired disc...
... units in the current unit begins playback. (1) (DISC -): For preceding discs (2) (DISC +): For succeeding discs Disc number Track number Playing tracks repeatedly - to repeat a track. • REP-2 - During playback, press (4) (SHUF) repeatedly until the desired setting appears. Locating a specific track - to other discs During playback, press (1) (DISC -) or (2) (DISC +) button. Shuffle Play You can select: • REP-1 - To search forward SEEK AMS To search backward Switching to repeat a disc. The desired disc...
Primary User Manual
Page 14
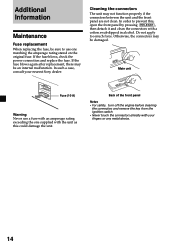
... power connection and replace the fuse. In order to use a fuse with an amperage rating exceeding the one matching the amperage rating stated on the original fuse. In such a case, consult your fingers or any metal device. 14 Back of the front panel Notes • For safety, turn off the engine before cleaning the connectors and remove the key from the ignition switch...
... power connection and replace the fuse. In order to use a fuse with an amperage rating exceeding the one matching the amperage rating stated on the original fuse. In such a case, consult your fingers or any metal device. 14 Back of the front panel Notes • For safety, turn off the engine before cleaning the connectors and remove the key from the ignition switch...

Primary User Manual
Page 15
Dismounting the unit 1 Release key (supplied) 2 3 4 15
Dismounting the unit 1 Release key (supplied) 2 3 4 15
Primary User Manual
Page 17
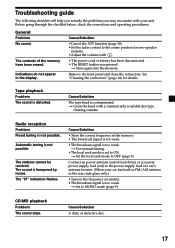
...-speaker systems. •Adjust the volume with a commercially available dry-type cleaning cassette. t Clean the head with (+). • The power cord or battery has been disconnected. • The RESET button was pressed. Cause/Solution A dirty or defective disc. 17 Troubleshooting guide The following checklist will help you remedy the problems you may encounter with your car has built-in FM/AM antenna in the rear/side glass only.) •Tune...
...-speaker systems. •Adjust the volume with a commercially available dry-type cleaning cassette. t Clean the head with (+). • The power cord or battery has been disconnected. • The RESET button was pressed. Cause/Solution A dirty or defective disc. 17 Troubleshooting guide The following checklist will help you remedy the problems you may encounter with your car has built-in FM/AM antenna in the rear/side glass only.) •Tune...
Primary User Manual
Page 18
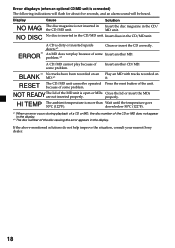
...Play an MD with tracks recorded on MD.*2 it. properly. Insert discs in the CD/ the CD/MD unit. Error displays (when an optional CD/MD unit is connected) The following indications will flash for about five seconds, and an alarm sound will be operated Press the reset button of the disc causing the error appears in the display. No disc... disc number of the CD or MD does not appear in the CD/MD unit. If the above-mentioned solutions do not help improve the situation, consult your nearest Sony dealer. 18 A CD/MD cannot play because of the MD unit is not inserted in Insert the disc ...
...Play an MD with tracks recorded on MD.*2 it. properly. Insert discs in the CD/ the CD/MD unit. Error displays (when an optional CD/MD unit is connected) The following indications will flash for about five seconds, and an alarm sound will be operated Press the reset button of the disc causing the error appears in the display. No disc... disc number of the CD or MD does not appear in the CD/MD unit. If the above-mentioned solutions do not help improve the situation, consult your nearest Sony dealer. 18 A CD/MD cannot play because of the MD unit is not inserted in Insert the disc ...

Primary User Manual
Page 20
Sony Corporation Printed in Malaysia
Sony Corporation Printed in Malaysia


