

Primary User Manual
Page 1
Model No. For installation and connections, see the supplied installation/connections manual. XR-C2300X XR-C2200 2000 Sony Corporation XR-C2300X Serial No. Record the serial number in the space provided below. Model No. 3-868-290-11 (1) FM/AM Cassette Car Stereo Operating Instructions US Owner's Record The model and serial numbers are located on the bottom of the unit. Refer to these numbers whenever you call upon your Sony dealer regarding this product. XR-C2200 Serial No.
Model No. For installation and connections, see the supplied installation/connections manual. XR-C2300X XR-C2200 2000 Sony Corporation XR-C2300X Serial No. Record the serial number in the space provided below. Model No. 3-868-290-11 (1) FM/AM Cassette Car Stereo Operating Instructions US Owner's Record The model and serial numbers are located on the bottom of the unit. Refer to these numbers whenever you call upon your Sony dealer regarding this product. XR-C2200 Serial No.
Primary User Manual
Page 2
... display when you operate this Sony Cassette Player. When you play a CD TEXT disc *2. *1 You can expand your authority to radio communications. Warning This equipment has been tested and found to comply with the limits for a Class B digital device, pursuant to Part 15 of the following measures: - These limits are cautioned that any changes or modifications not expressly approved in a residential installation...
... display when you operate this Sony Cassette Player. When you play a CD TEXT disc *2. *1 You can expand your authority to radio communications. Warning This equipment has been tested and found to comply with the limits for a Class B digital device, pursuant to Part 15 of the following measures: - These limits are cautioned that any changes or modifications not expressly approved in a residential installation...
Primary User Manual
Page 3
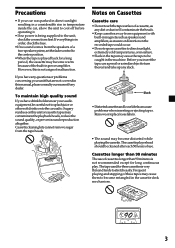
... power amplifier. Remove or replace loose labels. • The sound may contaminate the playback heads, reduce the sound quality, or prevent sound reproduction altogether. Precautions • If your car was parked in direct sunlight resulting in a considerable rise in temperature inside the car, allow the unit to cool off before operating it. • If no sound comes from the speakers of a two-speaker system, set the fader control...
... power amplifier. Remove or replace loose labels. • The sound may contaminate the playback heads, reduce the sound quality, or prevent sound reproduction altogether. Precautions • If your car was parked in direct sunlight resulting in a considerable rise in temperature inside the car, allow the unit to cool off before operating it. • If no sound comes from the speakers of a two-speaker system, set the fader control...

Primary User Manual
Page 4
... 16 Troubleshooting guide 17 4 Repeat Play 14 Playing tracks in random order - ATA (Automatic Tuner Activation) ........ 9 Radio Memorizing stations automatically - Best Tuning Memory (BTM 9 Memorizing only the desired stations 10 Receiving the memorized stations 10 Other Functions Adjusting the sound characteristics 11 Changing the sound and display settings ...... 11 Boosting the bass sound - Table of Contents This Unit Only Location of controls 5 Getting Started Resetting the unit 6 Detaching the front panel 6 How to use the menu 7 Setting the clock 7 Cassette Player...
... 16 Troubleshooting guide 17 4 Repeat Play 14 Playing tracks in random order - ATA (Automatic Tuner Activation) ........ 9 Radio Memorizing stations automatically - Best Tuning Memory (BTM 9 Memorizing only the desired stations 10 Receiving the memorized stations 10 Other Functions Adjusting the sound characteristics 11 Changing the sound and display settings ...... 11 Boosting the bass sound - Table of Contents This Unit Only Location of controls 5 Getting Started Resetting the unit 6 Detaching the front panel 6 How to use the menu 7 Setting the clock 7 Cassette Player...

Primary User Manual
Page 5
... clock display does not turn off the clock display after turning off and this causes battery wear. 5 D ISC - REP SHUF OFF 1 2 3 4 5 6 XR-C2200/XR-C2300X Refer to the pages listed for details. 1 MENU button 7, 9, 10, 11, 13 2 Volume control dial 3 SOURCE (TUNER/CD/MD) button 9, 10, 12 4 PRST/DISC +/- (cursor up/down) buttons 7, 9, 10, 11, 13 During radio reception: Preset stations select 10 During CD/MD playback: Disc change 13 5 DSPL (display mode change) button 8, 12, 13 6 MODE button During radio reception...
... clock display does not turn off the clock display after turning off and this causes battery wear. 5 D ISC - REP SHUF OFF 1 2 3 4 5 6 XR-C2200/XR-C2300X Refer to the pages listed for details. 1 MENU button 7, 9, 10, 11, 13 2 Volume control dial 3 SOURCE (TUNER/CD/MD) button 9, 10, 12 4 PRST/DISC +/- (cursor up/down) buttons 7, 9, 10, 11, 13 During radio reception: Preset stations select 10 During CD/MD playback: Disc change 13 5 DSPL (display mode change) button 8, 12, 13 6 MODE button During radio reception...
Primary User Manual
Page 6
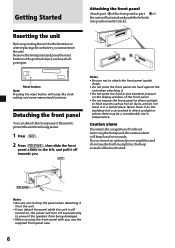
... the display window of the unit as a ballpoint pen. A B Reset button Note Pressing the reset button will erase the clock setting and some memorized functions. Getting Started Resetting the unit Before operating the unit for the first time or after replacing the car battery, you turn off without removing the front panel, the caution alarm will beep for a few seconds. Remove the front panel and press the reset button with you connect an optional power amplifier and...
... the display window of the unit as a ballpoint pen. A B Reset button Note Pressing the reset button will erase the clock setting and some memorized functions. Getting Started Resetting the unit Before operating the unit for the first time or after replacing the car battery, you turn off without removing the front panel, the caution alarm will beep for a few seconds. Remove the front panel and press the reset button with you connect an optional power amplifier and...

Primary User Manual
Page 7
... (PRST/DISC) repeatedly until "CLOCK" appears. 1 Press (ENTER). of (PRST/DISC)), or choose left/right (-/+ of (SEEK/AMS)). (PRST/DISC) (+) : To select upwards SOURCE (-) : To select downwards (SEEK/AMS) 4 Press either side of (PRST/DISC) to normal playback mode. (-) : To select leftwards SOURCE (+) : To select rightwards Setting the clock The clock uses a 12-hour digital indication. How to use the menu This unit is complete, the display returns to set the...
... (PRST/DISC) repeatedly until "CLOCK" appears. 1 Press (ENTER). of (PRST/DISC)), or choose left/right (-/+ of (SEEK/AMS)). (PRST/DISC) (+) : To select upwards SOURCE (-) : To select downwards (SEEK/AMS) 4 Press either side of (PRST/DISC) to normal playback mode. (-) : To select leftwards SOURCE (+) : To select rightwards Setting the clock The clock uses a 12-hour digital indication. How to use the menu This unit is complete, the display returns to set the...
Primary User Manual
Page 8
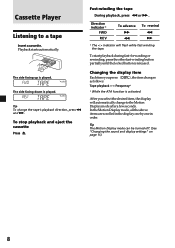
... follows: Tape playback y Frequency* * While the ATA function is played. Tip The Motion Display mode can be turned off. (See "Changing the sound and display settings" on page 11). 8 To start playback during fast-forwarding or rewinding, press the other fast-winding button partially until the locked button is played. Changing the display item Each time you select the desired item, the display will flash while fast-winding the...
... follows: Tape playback y Frequency* * While the ATA function is played. Tip The Motion Display mode can be turned off. (See "Changing the sound and display settings" on page 11). 8 To start playback during fast-forwarding or rewinding, press the other fast-winding button partially until the locked button is played. Changing the display item Each time you select the desired item, the display will flash while fast-winding the...
Primary User Manual
Page 9
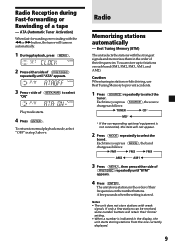
... their former setting. • When a number is stored. Play mode starts. 4 Press (ENTER). Each time you press (SOURCE), the source changes as follows: B FM1 B FM2 B FM3 AM2 b AM1 b 3 Press (MENU), then press either side of (SEEK/AMS) to select the band. Radio Memorizing stations automatically - Notes • The unit does not store stations with the strongest signals and memorizes them in stations while driving, use Best Tuning Memory to...
... their former setting. • When a number is stored. Play mode starts. 4 Press (ENTER). Each time you press (SOURCE), the source changes as follows: B FM1 B FM2 B FM3 AM2 b AM1 b 3 Press (MENU), then press either side of (SEEK/AMS) to select the band. Radio Memorizing stations automatically - Notes • The unit does not store stations with the strongest signals and memorizes them in stations while driving, use Best Tuning Memory to...
Primary User Manual
Page 10
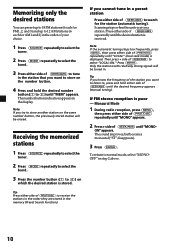
... know the frequency of the station you want to store on the number button. 4 Press and hold either side of (SEEK/AMS) until the desired frequency appears (manual tuning). Monaural Mode 1 During radio reception, press (MENU), then press either side of (PRST/DISC) repeatedly until "MONO" appears. 2 Press + side of (SEEK/AMS) until the desired station is displayed. To return to normal mode, select "MONOOFF...
... know the frequency of the station you want to store on the number button. 4 Press and hold either side of (SEEK/AMS) until the desired frequency appears (manual tuning). Monaural Mode 1 During radio reception, press (MENU), then press either side of (PRST/DISC) repeatedly until "MONO" appears. 2 Press + side of (SEEK/AMS) until the desired station is displayed. To return to normal mode, select "MONOOFF...
Primary User Manual
Page 11
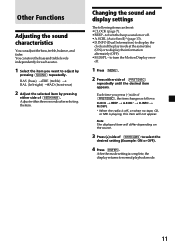
... display returns to turn the beep sound on the source. 3 Press (+) side of (PRST/DISC) repeatedly until the desired item appears. After the mode setting is playing, this item will differ depending on or off . 1 Press (MENU). 2 Press either side of (SEEK/AMS). Other Functions Adjusting the sound characteristics You can adjust the bass, treble, balance, and fader. Adjust within three seconds after selecting the item. BAS (bass) tTRE (treble...
... display returns to turn the beep sound on the source. 3 Press (+) side of (PRST/DISC) repeatedly until the desired item appears. After the mode setting is playing, this item will differ depending on or off . 1 Press (MENU). 2 Press either side of (SEEK/AMS). Other Functions Adjusting the sound characteristics You can adjust the bass, treble, balance, and fader. Adjust within three seconds after selecting the item. BAS (bass) tTRE (treble...
Primary User Manual
Page 12
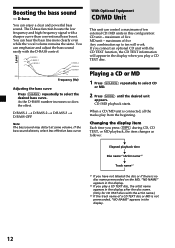
... configuration: CD unit - Playing a CD or MD 1 Press (SOURCE) repeatedly to select the desired bass curve. The D-bass function boosts the low frequency and high frequency signal with the D-BASS control. maximum of ten external CD/MD units in the display. 12 Changing the display item Each time you press (DSPL) during CD, CD TEXT, or MD playback, the item changes as follows: V Elapsed playback time V Disc name*1/Artist...
... configuration: CD unit - Playing a CD or MD 1 Press (SOURCE) repeatedly to select the desired bass curve. The D-bass function boosts the low frequency and high frequency signal with the D-BASS control. maximum of ten external CD/MD units in the display. 12 Changing the display item Each time you press (DSPL) during CD, CD TEXT, or MD playback, the item changes as follows: V Elapsed playback time V Disc name*1/Artist...

Primary User Manual
Page 13
...) to the Motion Display mode after a few seconds. For succeeding discs SOURCE For preceding discs Disc number Note For some discs with very many characters, the following cases may happen: - Track number 13 Locating a specific track - Locating a specific point in the current unit begins playback. 3 Press + side of (SEEK/AMS) momentarily for each track you set the function on or off . (See "Changing the sound and display settings" on , information...
...) to the Motion Display mode after a few seconds. For succeeding discs SOURCE For preceding discs Disc number Note For some discs with very many characters, the following cases may happen: - Track number 13 Locating a specific track - Locating a specific point in the current unit begins playback. 3 Press + side of (SEEK/AMS) momentarily for each track you set the function on or off . (See "Changing the sound and display settings" on , information...
Primary User Manual
Page 14
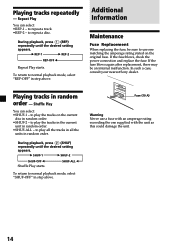
Repeat Play You can select: •SHUF-1 - to normal playback mode, select "SHUF-OFF" in random order. During playback, press (1) (REP) repeatedly until the desired setting appears. If the fuse blows, check the power connection and replace the fuse. Fuse (10 A) Warning Never use one supplied with the unit as this could damage the unit. 14 If the fuse blows again after replacement, there may be sure...
Repeat Play You can select: •SHUF-1 - to normal playback mode, select "SHUF-OFF" in random order. During playback, press (1) (REP) repeatedly until the desired setting appears. If the fuse blows, check the power connection and replace the fuse. Fuse (10 A) Warning Never use one supplied with the unit as this could damage the unit. 14 If the fuse blows again after replacement, there may be sure...

Primary User Manual
Page 15
... connectors and remove the key from the ignition switch. • Never touch the connectors directly with your fingers or with a cotton swab dipped in alcohol. Do not apply too much force. In order to prevent this, open the front panel by pressing (RELEASE), then detach it and clean the connectors with any metal device. 15 Cleaning the Connectors The unit...
... connectors and remove the key from the ignition switch. • Never touch the connectors directly with your fingers or with a cotton swab dipped in alcohol. Do not apply too much force. In order to prevent this, open the front panel by pressing (RELEASE), then detach it and clean the connectors with any metal device. 15 Cleaning the Connectors The unit...
Primary User Manual
Page 16
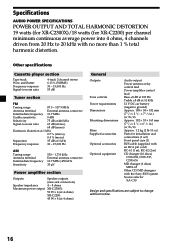
...) Parts for XR-C2200) per channel minimum continuous average power into 4 ohms, 4 channels driven from 20 Hz to change without notice. 16 Specifications AUDIO POWER SPECIFICATIONS POWER OUTPUT AND TOTAL HARMONIC DISTORTION 19 watts (for XR-C2300X)/18 watts (for installation and connections (1 set) Front panel case (1) BUS cable (supplied with an RCA pin cord) RC-61 (1 m), RC-62 (2 m) CD changer (10 discs) CDX-838, CDX-737, CDX-636 MD changer (6 discs) MDX-65 Other CD/MD changers with the Sony-BUS...
...) Parts for XR-C2200) per channel minimum continuous average power into 4 ohms, 4 channels driven from 20 Hz to change without notice. 16 Specifications AUDIO POWER SPECIFICATIONS POWER OUTPUT AND TOTAL HARMONIC DISTORTION 19 watts (for XR-C2300X)/18 watts (for installation and connections (1 set) Front panel case (1) BUS cable (supplied with an RCA pin cord) RC-61 (1 m), RC-62 (2 m) CD changer (10 discs) CDX-838, CDX-737, CDX-636 MD changer (6 discs) MDX-65 Other CD/MD changers with the Sony-BUS...

Primary User Manual
Page 17
...). t Set to the power supply lead of the memory have been erased. • The power cord or battery has been disconnected. • The reset button was pressed. Before going through the checklist below, check the connections and operating procedures. The stations cannot be received. Cause/Solution A dirty or defective disc. 17 The contents of a car's antenna booster. (When your unit. t Cleantheheadwithacommerciallyavailabledry-type cleaning cassette. The "ST" indication flashes...
...). t Set to the power supply lead of the memory have been erased. • The power cord or battery has been disconnected. • The reset button was pressed. Before going through the checklist below, check the connections and operating procedures. The stations cannot be received. Cause/Solution A dirty or defective disc. 17 The contents of a car's antenna booster. (When your unit. t Cleantheheadwithacommerciallyavailabledry-type cleaning cassette. The "ST" indication flashes...
Primary User Manual
Page 18
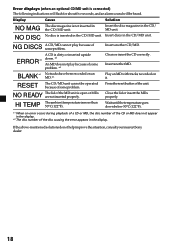
... unit. Play an MD with tracks recorded on it. Error displays (when an optional CD/MD unit is connected) The following indications will flash for about five seconds, and an alarm sound will be operated because of some problem. Insert another CD/MD. Press the reset button of some problem. NO READY The lid of the disc causing the error appears in the CD/MD unit...
... unit. Play an MD with tracks recorded on it. Error displays (when an optional CD/MD unit is connected) The following indications will flash for about five seconds, and an alarm sound will be operated because of some problem. Insert another CD/MD. Press the reset button of some problem. NO READY The lid of the disc causing the error appears in the CD/MD unit...

Primary User Manual
Page 20
Sony Corporation Printed in Malaysia
Sony Corporation Printed in Malaysia


