Operating Instructions
Page 4
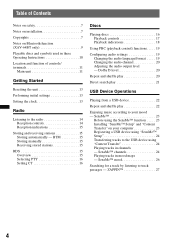
... the USB device using the SensMe™ function . . . . . 23 Installing "SensMe™ Setup" and "Content Transfer" on Bluetooth function (XAV-64BT only 9 Playable discs and symbols used in mood maps - SensMe 23 Before using "Content Transfer 24 Playing tracks in channels - SensMe™ channels 24...; mood 26 Searching for a track by listening to track passages - Table of controls/ terminals 11 Main unit 11 Getting Started Resetting the unit 13 Performing initial settings 13 Setting the clock 13 Radio Listening to the radio 14 Reception controls 14 Reception indications 15...
... the USB device using the SensMe™ function . . . . . 23 Installing "SensMe™ Setup" and "Content Transfer" on Bluetooth function (XAV-64BT only 9 Playable discs and symbols used in mood maps - SensMe 23 Before using "Content Transfer 24 Playing tracks in channels - SensMe™ channels 24...; mood 26 Searching for a track by listening to track passages - Table of controls/ terminals 11 Main unit 11 Getting Started Resetting the unit 13 Performing initial settings 13 Setting the clock 13 Radio Listening to the radio 14 Reception controls 14 Reception indications 15...
Operating Instructions
Page 11
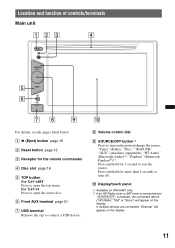
... a USB device. F Front AUX terminal page 51 G USB terminal Remove the cap to open the top menu. J Display/touch panel *1 Available on XAV-64BT only. *2 If an HD Radio tuner or SAT tuner is connected and (SOURCE/OFF) is pressed, the connected device ("HD Radio," "XM," or ..."Pandora" (Bluetooth Pandora®)*1. A Z (Eject) button page 16 B Reset button page 13 C Receptor for more than 2 seconds to open the source list. Press and hold for the remote commander D Disc slot page 16 E TOP button For XAV-64BT Press to turn on the display. Location and function of controls/terminals...
... a USB device. F Front AUX terminal page 51 G USB terminal Remove the cap to open the top menu. J Display/touch panel *1 Available on XAV-64BT only. *2 If an HD Radio tuner or SAT tuner is connected and (SOURCE/OFF) is pressed, the connected device ("HD Radio," "XM," or ..."Pandora" (Bluetooth Pandora®)*1. A Z (Eject) button page 16 B Reset button page 13 C Receptor for more than 2 seconds to open the source list. Press and hold for the remote commander D Disc slot page 16 E TOP button For XAV-64BT Press to turn on the display. Location and function of controls/terminals...

Operating Instructions
Page 13
...such as a ballpoint pen. Touch repeatedly until the desired language (English/Spanish/Russian) appears. 4 Touch "OK." Performing initial settings After resetting, the display for the first time, or after replacing the car battery or changing the connections, you can then be further configured in...the clock The clock uses a 12-hour indication. 1 Touch "Source List," then . If a power amplifier is complete. Note Pressing the reset button will erase the clock setting and some stored contents. The setting is connected, select "Rear." Initial Setting Rear/Sub Out Listening Position ...
...such as a ballpoint pen. Touch repeatedly until the desired language (English/Spanish/Russian) appears. 4 Touch "OK." Performing initial settings After resetting, the display for the first time, or after replacing the car battery or changing the connections, you can then be further configured in...the clock The clock uses a 12-hour indication. 1 Touch "Source List," then . If a power amplifier is complete. Note Pressing the reset button will erase the clock setting and some stored contents. The setting is connected, select "Rear." Initial Setting Rear/Sub Out Listening Position ...

Operating Instructions
Page 39
... sound setting menu appears. 3 Touch "EQ7." The options appear. 4 Touch the desired equalizer curve. The setting is set equalizer curve, touch "Reset." 5 Touch "OK." To cancel the equalizer curve, select "OFF." You can also adjust the volume level of the subwoofer. The level is ... return to the previous display, touch "Back." Customizing the equalizer curve - Back ATT Top EQ7 Tune : Custom 0 63 Hz 0 160 Hz 0 400 Hz Reset 0 0 1 kHz 2.5 kHz OK 0 0 6.3 kHz 16 kHz Tip Other equalizer types are also adjustable. The sound setting menu appears. 3 Touch "Balance/...
... sound setting menu appears. 3 Touch "EQ7." The options appear. 4 Touch the desired equalizer curve. The setting is set equalizer curve, touch "Reset." 5 Touch "OK." To cancel the equalizer curve, select "OFF." You can also adjust the volume level of the subwoofer. The level is ... return to the previous display, touch "Back." Customizing the equalizer curve - Back ATT Top EQ7 Tune : Custom 0 63 Hz 0 160 Hz 0 400 Hz Reset 0 0 1 kHz 2.5 kHz OK 0 0 6.3 kHz 16 kHz Tip Other equalizer types are also adjustable. The sound setting menu appears. 3 Touch "Balance/...

Operating Instructions
Page 40
... select "OFF." To return to the previous display, touch "Back." Back ATT Top Position Tune 100 100 100 100 100 (cm) Reset OK Note The subwoofer appears and the subwoofer custom setting keys are indicated below. The distance is set 132 4 You can change the ... in ) steps, between your listening position from each speaker so that the sound delay reaches the listener more correctly. To restore the default setting, touch "Reset." 5 Touch "OK." The setting is touched. the listening position is complete. Touch "Front L," "Front R," "Front," "All," or "Custom." 6 Set the...
... select "OFF." To return to the previous display, touch "Back." Back ATT Top Position Tune 100 100 100 100 100 (cm) Reset OK Note The subwoofer appears and the subwoofer custom setting keys are indicated below. The distance is set 132 4 You can change the ... in ) steps, between your listening position from each speaker so that the sound delay reaches the listener more correctly. To restore the default setting, touch "Reset." 5 Touch "OK." The setting is touched. the listening position is complete. Touch "Front L," "Front R," "Front," "All," or "Custom." 6 Set the...

Operating Instructions
Page 41
... Repeat this step to have 5 speakers (front left/right, rear left/right, center) and 1 subwoofer. To restore the default setting, touch "Reset." Speaker configuration and volume setup Creating a virtual center speaker - The sound setting menu appears. 3 Touch v/V to the previous display, touch "Back."...speaker. To return to scroll, then touch "RBE." Back Top 4.1ch Speaker Level Front L Front R Surround L Surround R Subwoofer 0 Reset 4 Touch the speaker, then +/- Rear Bass Enhancer Rear Bass Enhancer enhances the bass sound by applying the low pass filter setting (page...
... Repeat this step to have 5 speakers (front left/right, rear left/right, center) and 1 subwoofer. To restore the default setting, touch "Reset." Speaker configuration and volume setup Creating a virtual center speaker - The sound setting menu appears. 3 Touch v/V to the previous display, touch "Back."...speaker. To return to scroll, then touch "RBE." Back Top 4.1ch Speaker Level Front L Front R Surround L Surround R Subwoofer 0 Reset 4 Touch the speaker, then +/- Rear Bass Enhancer Rear Bass Enhancer enhances the bass sound by applying the low pass filter setting (page...

Operating Instructions
Page 53
... you can display the picture from a rear view camera by deactivating the camera input (page 45). If not, touch "General." 2 Touch v/V to edit. Reset 2 Select the line to scroll, then touch "Rear View Camera Setting." To adjust the position, touch V or v. Touch "Marker" again to edit. ...," or "3 Edit" corresponding to the line to hide the marker lines. To increase the length, touch B b. To restore the default setting, touch "Reset." To return to assist operation. Reversing the picture Touch "Mirror." The picture from a rear view camera does not appear in the rear monitor. Do not...
... you can display the picture from a rear view camera by deactivating the camera input (page 45). If not, touch "General." 2 Touch v/V to edit. Reset 2 Select the line to scroll, then touch "Rear View Camera Setting." To adjust the position, touch V or v. Touch "Marker" again to edit. ...," or "3 Edit" corresponding to the line to hide the marker lines. To increase the length, touch B b. To restore the default setting, touch "Reset." To return to assist operation. Reversing the picture Touch "Mirror." The picture from a rear view camera does not appear in the rear monitor. Do not...

Operating Instructions
Page 59
... and operating procedures. If the problem is not possible. t Turn on the back cover. The power antenna (aerial) does not have been erased. • The reset button has been pressed. t Store again into the memory. • The power supply lead or battery has been disconnected or it cannot be played. The...
... and operating procedures. If the problem is not possible. t Turn on the back cover. The power antenna (aerial) does not have been erased. • The reset button has been pressed. t Store again into the memory. • The power supply lead or battery has been disconnected or it cannot be played. The...
Operating Instructions
Page 61
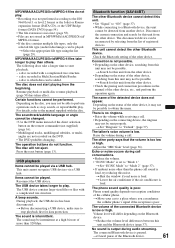
... Adjust the "MIC Gain" level (page 36). t Shut the window if road noise is poor. Volume level will not eject. Bluetooth function (XAV-64BT) The other Bluetooth device cannot detect this unit. • Set "Signal" to "ON" (page 37). • While connecting to a Bluetooth... cannot be played. The soundtrack/subtitle language or angle cannot be sent properly. During playback, the USB device has been disconnected. Press the reset button (page 13). A beep sounds. The sound is loud. t Search for data protection. Phone sound quality depends on the Bluetooth device...
... Adjust the "MIC Gain" level (page 36). t Shut the window if road noise is poor. Volume level will not eject. Bluetooth function (XAV-64BT) The other Bluetooth device cannot detect this unit. • Set "Signal" to "ON" (page 37). • While connecting to a Bluetooth... cannot be played. The soundtrack/subtitle language or angle cannot be sent properly. During playback, the USB device has been disconnected. Press the reset button (page 13). A beep sounds. The sound is loud. t Search for data protection. Phone sound quality depends on the Bluetooth device...

Operating Instructions
Page 63
.... The data for the current content. Check number on your Pandora® account. t Create a station on mobile device. t Press the reset button (page 13). The SensMe™ data is not connected. USB device is corrupted. A USB device or a USB cable has been disconnected...® source again. t Launch Pandora® on the list. t Try Thumbs Up/Down again. When not driving please see your nearest Sony dealer. t Select a source other than "Pandora," then select the Pandora® source again. If these solutions do not help improve the ...
.... The data for the current content. Check number on your Pandora® account. t Create a station on mobile device. t Press the reset button (page 13). The SensMe™ data is not connected. USB device is corrupted. A USB device or a USB cable has been disconnected...® source again. t Launch Pandora® on the list. t Try Thumbs Up/Down again. When not driving please see your nearest Sony dealer. t Select a source other than "Pandora," then select the Pandora® source again. If these solutions do not help improve the ...

Operating Instructions
Page 200
... cualquier duda u obtener la información más reciente sobre el soporte técnico de este producto, visite el siguiente sitio Web: http://esupport.sony.com http://www.sony.com/caraudio If you have any questions/problems regarding this product, try the following: 1 Read Troubleshooting in Thailand only); Call 1-800-222-7669 URL...
... cualquier duda u obtener la información más reciente sobre el soporte técnico de este producto, visite el siguiente sitio Web: http://esupport.sony.com http://www.sony.com/caraudio If you have any questions/problems regarding this product, try the following: 1 Read Troubleshooting in Thailand only); Call 1-800-222-7669 URL...


