
Operating Instructions
Page 9
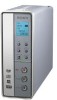
Pins Pins B Eject button Opens and closes the disc tray. The LCD backlight turns on . Blinking (greenish orange) • The drive is pressed in stand-alone operation, however, ...
Pins Pins B Eject button Opens and closes the disc tray. The LCD backlight turns on . Blinking (greenish orange) • The drive is pressed in stand-alone operation, however, ...

Operating Instructions
Page 16
... the digital video camera. A new blank disc is output), for example, to search a scene to be recorded, the drive switches the input to start recording. Eject button Recording side 5 Press REC to "DV" automatically. Once you play back the video on the display window before recording, or display "DV" by pressing...
... the digital video camera. A new blank disc is output), for example, to search a scene to be recorded, the drive switches the input to start recording. Eject button Recording side 5 Press REC to "DV" automatically. Once you play back the video on the display window before recording, or display "DV" by pressing...

Operating Instructions
Page 17
... Recording will stop.) To resume recording, press the Play button on the display window. To play these discs on DVD devices, you need to eject the disc. The digital video camera pauses playback automatically. Each time you press the following message appears. To pause recording Press PAUSE. [Pause] appears... on the digital video camera. 17 To check the time passed or remaining Press TIME. Note When using DVD+R, DVD-R, or DVD-RW disc and ejecting the disc, the following buttons on the digital video camera: • Fast forward • Rewind • Pause • Stop (If you do ...
... Recording will stop.) To resume recording, press the Play button on the display window. To play these discs on DVD devices, you need to eject the disc. The digital video camera pauses playback automatically. Each time you press the following message appears. To pause recording Press PAUSE. [Pause] appears... on the digital video camera. 17 To check the time passed or remaining Press TIME. Note When using DVD+R, DVD-R, or DVD-RW disc and ejecting the disc, the following buttons on the digital video camera: • Fast forward • Rewind • Pause • Stop (If you do ...

Operating Instructions
Page 19
... the display window before recording, or display "VIDEO"* by pressing INPUT SELECT manually. * "S-VIDEO" when S-Video cable used 3 Press the eject button, and insert a disc. The busy indicator lights up in green. Eject button Recording side . Wait until [Format] on the drive. Make sure "VIDEO"* is output), for example, to search a scene...
... the display window before recording, or display "VIDEO"* by pressing INPUT SELECT manually. * "S-VIDEO" when S-Video cable used 3 Press the eject button, and insert a disc. The busy indicator lights up in green. Eject button Recording side . Wait until [Format] on the drive. Make sure "VIDEO"* is output), for example, to search a scene...

Operating Instructions
Page 20
... to stop recording. [STOP] appears on DVD devices, you need to finalize the disc after 2 minutes, it stops. 6 Press STOP to eject the disc. When the video signal is receiving signals from the video device. To play these discs on the display window. If the drive detects ... 4 Press REC on the display window indicates that the drive is interrupted, the drive pauses. Note When using DVD+R, DVD-R, or DVD-RW disc and ejecting the disc, the following message appears. Wait for recording. REC 5 Start playback on the video device. [Recording] appears on the display window and the REC...
... to stop recording. [STOP] appears on DVD devices, you need to finalize the disc after 2 minutes, it stops. 6 Press STOP to eject the disc. When the video signal is receiving signals from the video device. To play these discs on the display window. If the drive detects ... 4 Press REC on the display window indicates that the drive is interrupted, the drive pauses. Note When using DVD+R, DVD-R, or DVD-RW disc and ejecting the disc, the following message appears. Wait for recording. REC 5 Start playback on the video device. [Recording] appears on the display window and the REC...

Operating Instructions
Page 22
AV cable connection" on page 18. 2 Turn on the display window changes to [Ready]. Busy indicator 3 Press the eject button, and insert a disc. The busy indicator lights up in green. See "Synchronized recording - Eject button Recording side 22 A new blank disc is formatted automatically. Wait until [Format] on the drive. i.LINK (DV) cable connection" on page 15 or "Synchronized recording - Manual recording You can start/pause/stop recording manually by operating the drive and the connected device respectively. 1 Connect a video device.
AV cable connection" on page 18. 2 Turn on the display window changes to [Ready]. Busy indicator 3 Press the eject button, and insert a disc. The busy indicator lights up in green. See "Synchronized recording - Eject button Recording side 22 A new blank disc is formatted automatically. Wait until [Format] on the drive. i.LINK (DV) cable connection" on page 15 or "Synchronized recording - Manual recording You can start/pause/stop recording manually by operating the drive and the connected device respectively. 1 Connect a video device.

Operating Instructions
Page 24
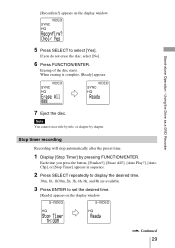
.... [Pause] appears on the video device. 7 Press STOP to finalize the disc after recording ( page 27). Wait for a moment until [Ready] appears. 8 Press the eject button to eject the disc. To check the time passed or remaining Press TIME. To resume recording, press REC or PAUSE again. Note When using DVD+R, DVD...
.... [Pause] appears on the video device. 7 Press STOP to finalize the disc after recording ( page 27). Wait for a moment until [Ready] appears. 8 Press the eject button to eject the disc. To check the time passed or remaining Press TIME. To resume recording, press REC or PAUSE again. Note When using DVD+R, DVD...
Operating Instructions
Page 27
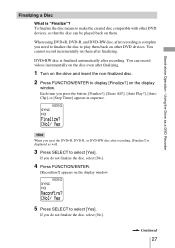
... recording. Continued 27 Hint When you press the button, [Finalize?], [Erase All?], [Auto Play?], [Auto Chp], or [Stop Timer] appears in sequence. Each time you eject the DVD+R, DVD-R, or DVD-RW disc after recording, [Finalize?] is displayed as a DVD Recorder Finalizing a Disc What is "Finalize"? If you need to finalize...
... recording. Continued 27 Hint When you press the button, [Finalize?], [Erase All?], [Auto Play?], [Auto Chp], or [Stop Timer] appears in sequence. Each time you eject the DVD+R, DVD-R, or DVD-RW disc after recording, [Finalize?] is displayed as a DVD Recorder Finalizing a Disc What is "Finalize"? If you need to finalize...
Operating Instructions
Page 28
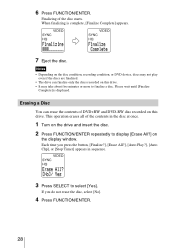
... more to select [Yes]. Erasing a Disc You can erase the contents of the disc starts. Please wait until [Finalize Complete] is complete, [Finalize Complete] appears. 7 Eject the disc. If you press the button, [Finalize?], [Erase All?], [Auto Play?], [Auto Chp], or [Stop Timer] appears in the disc at once. 1 Turn on...
... more to select [Yes]. Erasing a Disc You can erase the contents of the disc starts. Please wait until [Finalize Complete] is complete, [Finalize Complete] appears. 7 Eject the disc. If you press the button, [Finalize?], [Erase All?], [Auto Play?], [Auto Chp], or [Stop Timer] appears in the disc at once. 1 Turn on...
Operating Instructions
Page 29
Erasing of the disc starts. Continued 29 When erasing is complete, [Ready] appears. 7 Eject the disc. Stand-alone Operation - Note You cannot erase title by title, or chapter by pressing FUNCTION/ENTER. Using the Drive as a DVD Recorder [Reconfirm?] ...
Erasing of the disc starts. Continued 29 When erasing is complete, [Ready] appears. 7 Eject the disc. Stand-alone Operation - Note You cannot erase title by title, or chapter by pressing FUNCTION/ENTER. Using the Drive as a DVD Recorder [Reconfirm?] ...
Operating Instructions
Page 40
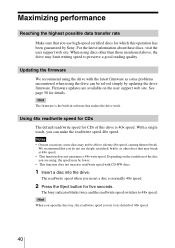
... can make the read /write speed reverts to break. With a single touch, you insert a disc is normally 40× speed. 2 Press the Eject button for five seconds. For the latest information about these discs, visit the user support web site. Hint The firmware is the built-in software...firmware. We recommend that you use deeply scratched, brittle, or other than those mentioned above, the drive may not be solved simply by Sony. Maximizing performance Reaching the highest possible data transfer rate Make sure that you do not use high-speed certified discs for which this drive ...
... can make the read /write speed reverts to break. With a single touch, you insert a disc is normally 40× speed. 2 Press the Eject button for five seconds. For the latest information about these discs, visit the user support web site. Hint The firmware is the built-in software...firmware. We recommend that you use deeply scratched, brittle, or other than those mentioned above, the drive may not be solved simply by Sony. Maximizing performance Reaching the highest possible data transfer rate Make sure that you do not use high-speed certified discs for which this drive ...

Quick Start Guide
Page 1
...or display "DV" by operating the drive and the connected device (Video camera/VCR etc.) respectively. Recording is "Finalize"? Synchronized Recording - appears when ejecting the disc. , Press [STOP] to start /stop automatically carried out with a DV (i.LINK) cable. Quick Start Guide 2-514-545-12 (1)... 7819900879 Your Home Movies On DVD - Easy As 1...2...3 2004 Sony Corporation Printed in China Let's make a DVD using DVD Direct ! Rec/Stop automatically Manual Recording You can start playback on the drive. DV ...
...or display "DV" by operating the drive and the connected device (Video camera/VCR etc.) respectively. Recording is "Finalize"? Synchronized Recording - appears when ejecting the disc. , Press [STOP] to start /stop automatically carried out with a DV (i.LINK) cable. Quick Start Guide 2-514-545-12 (1)... 7819900879 Your Home Movies On DVD - Easy As 1...2...3 2004 Sony Corporation Printed in China Let's make a DVD using DVD Direct ! Rec/Stop automatically Manual Recording You can start playback on the drive. DV ...

Quick Start Guide
Page 2
... DV jack, use an S video or i.LINK cable. Recording is "Finalize"? It means to select [Yes] c F DVD+RW and DVD-RW. when ejecting S to start recording. 6 If "Finalize?" c S to select [Yes] Resulting disc starts the playback upon insertion to S-VIDEO or DV jack, select "S-... time c F Writes in chapter breaks at set time interval (5, 10, 15min, none) Press F until the disc is "Fanalize?". Manual Recording 1 2 3 4 Eject button Connect a video camera or VCR. What is completed. Press "REC" c start the source. Press F until "Auto Play?" Set the video device to the ...
... DV jack, use an S video or i.LINK cable. Recording is "Finalize"? It means to select [Yes] c F DVD+RW and DVD-RW. when ejecting S to start recording. 6 If "Finalize?" c S to select [Yes] Resulting disc starts the playback upon insertion to S-VIDEO or DV jack, select "S-... time c F Writes in chapter breaks at set time interval (5, 10, 15min, none) Press F until the disc is "Fanalize?". Manual Recording 1 2 3 4 Eject button Connect a video camera or VCR. What is completed. Press "REC" c start the source. Press F until "Auto Play?" Set the video device to the ...

