Operating Instructions
Page 2
...more of the FCC Rules. This equipment has been tested and found to comply with Part 15 of Conformity Trade Name: SONY Model No.: VPL-HW10 Responsible Party: Sony Electronics Inc. Reorient or relocate the receiving antenna. - Connect the equipment into an outlet on , the user is ... radio frequency energy and, if not installed and used to connect peripherals must accept any changes or modifications not expressly approved in this manual could void your authority to Subpart B of Part 15 of important operating and maintenance (servicing) instructions in accordance with the limits for...
...more of the FCC Rules. This equipment has been tested and found to comply with Part 15 of Conformity Trade Name: SONY Model No.: VPL-HW10 Responsible Party: Sony Electronics Inc. Reorient or relocate the receiving antenna. - Connect the equipment into an outlet on , the user is ... radio frequency energy and, if not installed and used to connect peripherals must accept any changes or modifications not expressly approved in this manual could void your authority to Subpart B of Part 15 of important operating and maintenance (servicing) instructions in accordance with the limits for...

Operating Instructions
Page 11
...place subject to make sure it . • Do not place the remote in the illustration. Inserting them forcibly or with care. Remove this manual) Inserting the batteries into the remote control Push and slide to project the picture, etc. Do not drop or step on it, or spill...and Size AA (R6) batteries (2) • AC power cord (1) • Lens cap (1) When you use the projector. • Operating Instructions (this lens cap when you have purchased the projector, the lens cap is put onto the lens. Caution about handling the remote control • Handle the remote control with...
...place subject to make sure it . • Do not place the remote in the illustration. Inserting them forcibly or with care. Remove this manual) Inserting the batteries into the remote control Push and slide to project the picture, etc. Do not drop or step on it, or spill...and Size AA (R6) batteries (2) • AC power cord (1) • Lens cap (1) When you use the projector. • Operating Instructions (this lens cap when you have purchased the projector, the lens cap is put onto the lens. Caution about handling the remote control • Handle the remote control with...
Operating Instructions
Page 42
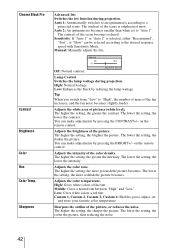
... "Auto 1". The contrast of the picture. The lower the setting, the lower the contrast. on the remote control. Adjusts the intensity of pictures (white level). Manual: Manually adjusts the Iris. Lamp Control Switches the lamp wattage during projection. Adjusts the white area of the color density. The lower the setting, the darker...
... "Auto 1". The contrast of the picture. The lower the setting, the lower the contrast. on the remote control. Adjusts the intensity of pictures (white level). Manual: Manually adjusts the Iris. Lamp Control Switches the lamp wattage during projection. Adjusts the white area of the color density. The lower the setting, the darker...
Operating Instructions
Page 48
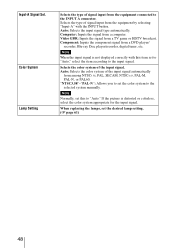
... is distorted or colorless, select the color system appropriate for the input signal. When replacing the lamps, set the color system to the selected system manually. If the picture is not displayed correctly with the INPUT button. Color System Lamp Setting Selects the type of the input signal automatically from the...
... is distorted or colorless, select the color system appropriate for the input signal. When replacing the lamps, set the color system to the selected system manually. If the picture is not displayed correctly with the INPUT button. Color System Lamp Setting Selects the type of the input signal automatically from the...
Operating Instructions
Page 49
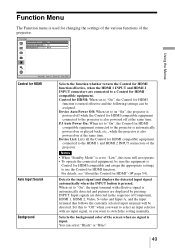
... Function menu is pressed. Device Auto Power Off: When set to the projector is input. For details, see "About the Control for HDMI Auto Input Search Background Selects the function whether to switch the setting manually. Control for HDMI: When set to "On", the Control for HDMI ...compatible equipment connected to the projector is automatically powered on or played back, etc., while the projector is also powered on "On", the projector is powered off at the same time....
... Function menu is pressed. Device Auto Power Off: When set to the projector is input. For details, see "About the Control for HDMI Auto Input Search Background Selects the function whether to switch the setting manually. Control for HDMI: When set to "On", the Control for HDMI ...compatible equipment connected to the projector is automatically powered on or played back, etc., while the projector is also powered on "On", the projector is powered off at the same time....

Operating Instructions
Page 64
..., 1 lens, projection system LCD panel 0.61-inch (15.4 mm) SXRD panel 6,220,800 pixels (2,073,600 pixels × 3) Lens 1.6 times zoom lens (manual) f=18.5 mm to 29.6 mm F2.50 to F3.40 Lamp 200 W Ultra High Pressure Lamp Projection picture size 40 inches to 300 inches ...(1,016 mm to 7,620 mm) (measured diagonally) Color system NTSC3.58/PAL/SECAM/ NTSC4.43/PAL-M/PAL-N/PAL60 system, switched automatically/ manually (PAL60 system not switched manually) Acceptable video signals 15 kHz RGB/component 50/60 Hz, Progressive component 50/60 Hz, 480/60i, 576/50i, 480/60p, 576/...
..., 1 lens, projection system LCD panel 0.61-inch (15.4 mm) SXRD panel 6,220,800 pixels (2,073,600 pixels × 3) Lens 1.6 times zoom lens (manual) f=18.5 mm to 29.6 mm F2.50 to F3.40 Lamp 200 W Ultra High Pressure Lamp Projection picture size 40 inches to 300 inches ...(1,016 mm to 7,620 mm) (measured diagonally) Color system NTSC3.58/PAL/SECAM/ NTSC4.43/PAL-M/PAL-N/PAL60 system, switched automatically/ manually (PAL60 system not switched manually) Acceptable video signals 15 kHz RGB/component 50/60 Hz, Progressive component 50/60 Hz, 480/60i, 576/50i, 480/60p, 576/...
Operating Instructions
Page 73
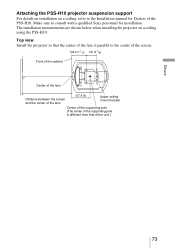
Make sure to consult with a qualified Sony personnel for Dealers of the unit.) Others 73 The installation measurements are shown below when installing the projector on a ceiling, refer to the center of the screen. 182.8 (7 1/4) 130 (5 1/8) Front of the cabinet Center of the lens Distance ... of the supporting pole is different from that of the PSS-H10. Top view Install the projector so that the center of the lens is parallel to the Installation manual for installation. Attaching the PSS-H10 projector suspension support For details on installation on a ceiling using the PSS-H10.
Make sure to consult with a qualified Sony personnel for Dealers of the unit.) Others 73 The installation measurements are shown below when installing the projector on a ceiling, refer to the center of the screen. 182.8 (7 1/4) 130 (5 1/8) Front of the cabinet Center of the lens Distance ... of the supporting pole is different from that of the PSS-H10. Top view Install the projector so that the center of the lens is parallel to the Installation manual for installation. Attaching the PSS-H10 projector suspension support For details on installation on a ceiling using the PSS-H10.

