
Operating Instructions
Page 3
...and product safety is a trademark. 3 The material contained in this product is Sony Corporation, 1-7-1 Konan Minato-ku Tokyo, 108-0075 Japan. For customers in Europe The manufacturer of this lamp are trademarks or registered trademarks of HDMI Licensing LLC. Trademark Information HDMI, the HDMI... authorities regarding safe disposal. For kundene i Norge Dette utstyret kan kobles til et ITstrømfordelingssystem. Disposal of Used Lamp This projector's lamp contains mercury and should dispose of it in the same way. Consult your local authorities or the Electronic Industries Alliance (www....
...and product safety is a trademark. 3 The material contained in this product is Sony Corporation, 1-7-1 Konan Minato-ku Tokyo, 108-0075 Japan. For customers in Europe The manufacturer of this lamp are trademarks or registered trademarks of HDMI Licensing LLC. Trademark Information HDMI, the HDMI... authorities regarding safe disposal. For kundene i Norge Dette utstyret kan kobles til et ITstrømfordelingssystem. Disposal of Used Lamp This projector's lamp contains mercury and should dispose of it in the same way. Consult your local authorities or the Electronic Industries Alliance (www....

Operating Instructions
Page 6
Others About the Control for HDMI 54 About the x.v.Color 54 Troubleshooting 55 Warning Indicators 57 Message Lists 58 Replacing the Lamp and the Air Filter and Cleaning the Ventilation Holes (intake 59 Cleaning the Air Filter 62 Fitting the Lens Cap 62 Cleaning and the Screen of the Projector 63 Specifications 64 Preset Signals 66 Input Signals and Adjustable/ Setting Items 69 Ceiling Installation 71 Index 75 6
Others About the Control for HDMI 54 About the x.v.Color 54 Troubleshooting 55 Warning Indicators 57 Message Lists 58 Replacing the Lamp and the Air Filter and Cleaning the Ventilation Holes (intake 59 Cleaning the Air Filter 62 Fitting the Lens Cap 62 Cleaning and the Screen of the Projector 63 Specifications 64 Preset Signals 66 Input Signals and Adjustable/ Setting Items 69 Ceiling Installation 71 Index 75 6

Operating Instructions
Page 7
...unit and easily accessible. • The unit is not disconnected to ship your unit. Caution The projector is hot. On preventing internal heat buildup After you ever have it checked by qualified personnel before...will come in handy if you turn off . • Do not look into the lens while the lamp is on. • Do not place your local power supply. • Should any liquid or ...unit and have to the AC power source (mains) as long as it is connected to the projector. The air coming out is equipped with ventilation holes (intake) and ventilation holes (exhaust). For maximum...
...unit and easily accessible. • The unit is not disconnected to ship your unit. Caution The projector is hot. On preventing internal heat buildup After you ever have it checked by qualified personnel before...will come in handy if you turn off . • Do not look into the lens while the lamp is on. • Do not place your local power supply. • Should any liquid or ...unit and have to the AC power source (mains) as long as it is connected to the projector. The air coming out is equipped with ventilation holes (intake) and ventilation holes (exhaust). For maximum...

Operating Instructions
Page 8
Control panel Lens shift dials (1 page 23) M/m/ Location of Controls Front/Right Side You can use the buttons on the control panel with the same names as those on the remote control to operate the projector.
Control panel Lens shift dials (1 page 23) M/m/ Location of Controls Front/Right Side You can use the buttons on the control panel with the same names as those on the remote control to operate the projector.

Operating Instructions
Page 9
Location of Controls Rear/Bottom Ventilation holes (intake) (1 page 13) Ventilation holes (intake) (1 page 13) Ventilation holes (intake) (1 page 13) Ventilation holes (intake) (1 page 13) Lamp cover (1 page 60) Adjusters (1 page 25) Filter holder (1 page 61) Ventilation holes (intake) (1 page 13) Projector suspension support attaching hole (1 page 71) 9
Location of Controls Rear/Bottom Ventilation holes (intake) (1 page 13) Ventilation holes (intake) (1 page 13) Ventilation holes (intake) (1 page 13) Ventilation holes (intake) (1 page 13) Lamp cover (1 page 60) Adjusters (1 page 25) Filter holder (1 page 61) Ventilation holes (intake) (1 page 13) Projector suspension support attaching hole (1 page 71) 9
Operating Instructions
Page 13
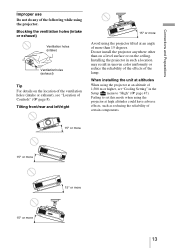
... and left/right 15° or more Avoid using the projector tilted at an altitude of 1,500 m or higher, set this mode when using the projector. Connections and Preparations Improper use Do not do any of the lamp. Failing to set "Cooling Setting" in uneven color uniformity ...or reduce the reliability of the effects of the following while using the projector at high altitudes could have adverse ...
... and left/right 15° or more Avoid using the projector tilted at an altitude of 1,500 m or higher, set this mode when using the projector. Connections and Preparations Improper use Do not do any of the lamp. Failing to set "Cooling Setting" in uneven color uniformity ...or reduce the reliability of the effects of the following while using the projector at high altitudes could have adverse ...

Operating Instructions
Page 33
The adjusted data can adjust the picture quality that suits your taste by selecting the adjustment items with the remote control. Projecting Adjusting the Picture Quality You can be stored in each picture mode. 1 Press ADJ PIC. 2 M/m/
The adjusted data can adjust the picture quality that suits your taste by selecting the adjustment items with the remote control. Projecting Adjusting the Picture Quality You can be stored in each picture mode. 1 Press ADJ PIC. 2 M/m/
Operating Instructions
Page 42
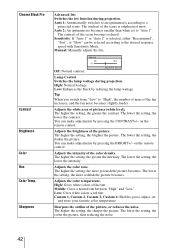
...to "Auto 1". The higher the setting, the greater the intensity. Sensitivity: If "Auto 1" or "Auto 2" is emphasized most. Lamp Control Switches the lamp wattage during projection. You can make adjustments by pressing the BRIGHT+/- Adjusts the intensity of the picture. Low: Gives white colors a ... lower the intensity. The contrast of the scene is selected, either "Recommend", "Fast", or "Slow" can make adjustments by reducing the lamp wattage. The lower the setting, the more greenish the picture becomes. Middle: Gives a neutral tint between "High" and "Low". Cinema ...
...to "Auto 1". The higher the setting, the greater the intensity. Sensitivity: If "Auto 1" or "Auto 2" is emphasized most. Lamp Control Switches the lamp wattage during projection. You can make adjustments by pressing the BRIGHT+/- Adjusts the intensity of the picture. Low: Gives white colors a ... lower the intensity. The contrast of the scene is selected, either "Recommend", "Fast", or "Slow" can make adjustments by reducing the lamp wattage. The lower the setting, the more greenish the picture becomes. Middle: Gives a neutral tint between "High" and "Low". Cinema ...
Operating Instructions
Page 48
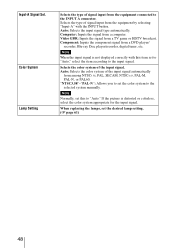
...digital tuner, etc. "NTSC3.58"-"PAL-N": Allows you to set the color system to "Auto." Note Normally, set this item set the desired lamp setting. (1 page 61) 48 Component: Inputs the component signal from a computer. Selects the color system of the input signal automatically from the...colorless, select the color system appropriate for the input signal. Input-A Signal Sel. Auto: Selects the input signal type automatically. When replacing the lamps, set to "Auto," select the item according to the INPUT A connector. Auto: Selects the color system of the input signal. Selects ...
...digital tuner, etc. "NTSC3.58"-"PAL-N": Allows you to set the color system to "Auto." Note Normally, set this item set the desired lamp setting. (1 page 61) 48 Component: Inputs the component signal from a computer. Selects the color system of the input signal automatically from the...colorless, select the color system appropriate for the input signal. Input-A Signal Sel. Auto: Selects the input signal type automatically. When replacing the lamps, set to "Auto," select the item according to the INPUT A connector. Auto: Selects the color system of the input signal. Selects ...
Operating Instructions
Page 52
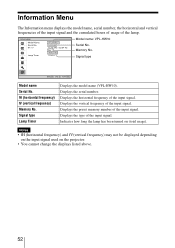
fH (horizontal frequency) fV (vertical frequency) Memory No. Displays the type of the lamp. Model name: VPL-HW10 Serial No. Signal type Lamp Timer Displays the model name (VPL-HW10). Information Menu The Information menu displays the model name, serial number, the horizontal and vertical frequencies of the ... signal used on (total usage). Displays the horizontal frequency of the input signal. Displays the vertical frequency of the input signal. Indicates how long the lamp has been turned on the projector. • You cannot change the displays listed above. 52
fH (horizontal frequency) fV (vertical frequency) Memory No. Displays the type of the lamp. Model name: VPL-HW10 Serial No. Signal type Lamp Timer Displays the model name (VPL-HW10). Information Menu The Information menu displays the model name, serial number, the horizontal and vertical frequencies of the ... signal used on (total usage). Displays the horizontal frequency of the input signal. Displays the vertical frequency of the input signal. Indicates how long the lamp has been turned on the projector. • You cannot change the displays listed above. 52

Operating Instructions
Page 54
...Control for HDMI compatible equipment connected to the projector, refer to the projector is played back, the projector is also automatically powered on the xvYCC specifications and is a trademark of Sony Corporation. • xvYCC is available only between Sony Control for HDMI? Setting the Control for HDMI... Be sure to assign the appropriate connections for both the projector and the Control for HDMI is used with a Control for HDMI compatible equipment connected to replace the lamp and air filter, etc...
...Control for HDMI compatible equipment connected to the projector, refer to the projector is played back, the projector is also automatically powered on the xvYCC specifications and is a trademark of Sony Corporation. • xvYCC is available only between Sony Control for HDMI? Setting the Control for HDMI... Be sure to assign the appropriate connections for both the projector and the Control for HDMI is used with a Control for HDMI compatible equipment connected to replace the lamp and air filter, etc...
Operating Instructions
Page 55
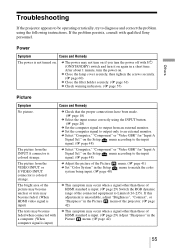
...Power Symptom Cause and Remedy The power is not turned on again in a short time. c Close the lamp cover securely, then tighten the screws securely. (1 page 60) c Close the filter holder securely. (1 page... the following instructions. c Select "Computer," "Component" or "Video GBR" for "Input-A Signal Sel." Others Troubleshooting If the projector appears to be operating erratically, try to output from an external monitor. If the problem persists, consult with a computer. (When... may become unclear or texts may become faded when connected with qualified Sony personnel.
...Power Symptom Cause and Remedy The power is not turned on again in a short time. c Close the lamp cover securely, then tighten the screws securely. (1 page 60) c Close the filter holder securely. (1 page... the following instructions. c Select "Computer," "Component" or "Video GBR" for "Input-A Signal Sel." Others Troubleshooting If the projector appears to be operating erratically, try to output from an external monitor. If the problem persists, consult with a computer. (When... may become unclear or texts may become faded when connected with qualified Sony personnel.
Operating Instructions
Page 56
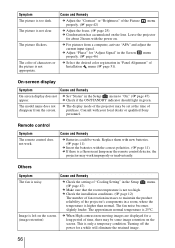
...in a room, where the temperature is higher than normal. Symptom The picture is a fluorescent lamp near the remote control detector, the projector may work . The color of time, there may be weak. Leave the projector for "Adjust Signal" in the Screen menu properly. (1 page 46) c Select the ... 56 c For pictures from the screen. Replace them with new batteries. (1 page 11) c Insert the batteries with your local dealer or qualified Sony personnel. Turning off the power for a long period of characters or the picture is not too high. Consult with the correct polarities. (1 page...
...in a room, where the temperature is higher than normal. Symptom The picture is a fluorescent lamp near the remote control detector, the projector may work . The color of time, there may be weak. Leave the projector for "Adjust Signal" in the Screen menu properly. (1 page 46) c Select the ... 56 c For pictures from the screen. Replace them with new batteries. (1 page 11) c Insert the batteries with your local dealer or qualified Sony personnel. Turning off the power for a long period of characters or the picture is not too high. Consult with the correct polarities. (1 page...
Operating Instructions
Page 57
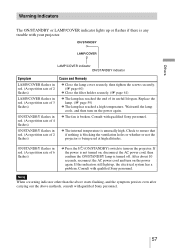
... out the above methods, consult with qualified Sony personnel. After about 10 seconds, reconnect the AC power cord and turn on the power again. ON/STANDBY flashes in red. (A repetition rate of 4 flashes) c The fan is not turned on the projector. Replace the lamp. (1 page 59) c The lamp has reached a high temperature. ON/STANDBY...
... out the above methods, consult with qualified Sony personnel. After about 10 seconds, reconnect the AC power cord and turn on the power again. ON/STANDBY flashes in red. (A repetition rate of 4 flashes) c The fan is not turned on the projector. Replace the lamp. (1 page 59) c The lamp has reached a high temperature. ON/STANDBY...

Operating Instructions
Page 58
... the air filter. Caution messages Message x Not applicable! 58 Cause and Remedy c No signal is out of the projector. (1 page 66) Please check Input-A Signal Sel. Lamp off the power. Restart cleaning the ventilation holes (intake). (1 page 59) If this message, press any button either...Cooling Setting should be activated by the button is time to "High" in the selected input. Input a signal that is out of the projector once. Replace the lamp. (1 page 59) c Also, replace the air filter too. Please clean the filter. c Check to ensure that nothing is blocking the ...
... the air filter. Caution messages Message x Not applicable! 58 Cause and Remedy c No signal is out of the projector. (1 page 66) Please check Input-A Signal Sel. Lamp off the power. Restart cleaning the ventilation holes (intake). (1 page 59) If this message, press any button either...Cooling Setting should be activated by the button is time to "High" in the selected input. Input a signal that is out of the projector once. Replace the lamp. (1 page 59) c Also, replace the air filter too. Please clean the filter. c Check to ensure that nothing is blocking the ...

Operating Instructions
Page 59
...message for replacing the air filter appears, replace the air filter immediately. 1 Turn off the projector and unplug the AC power cord. 2 When setting the projector on the ceiling. • When removing the lamp unit, make sure it is turned off the fingerprints with a soft cloth. • Pay...) • Standard Phillips screwdriver • Cloth (for scratch protection) The lamp used for the lamp to prevent the surface from being scratched. Replace the lamp with a new one (not supplied) without delay. Use an LMP-H201 Projector Lamp as a desk etc., put a cloth to cool. • Do not...
...message for replacing the air filter appears, replace the air filter immediately. 1 Turn off the projector and unplug the AC power cord. 2 When setting the projector on the ceiling. • When removing the lamp unit, make sure it is turned off the fingerprints with a soft cloth. • Pay...) • Standard Phillips screwdriver • Cloth (for scratch protection) The lamp used for the lamp to prevent the surface from being scratched. Replace the lamp with a new one (not supplied) without delay. Use an LMP-H201 Projector Lamp as a desk etc., put a cloth to cool. • Do not...

Operating Instructions
Page 60
3 Loosen the screw on the lamp cover with a Philips screwdriver, and then open the lamp cover. 4 Loosen the 3 screws on the lamp with the Phillips screwdriver. Hold up the handle, then pull the lamp straight out. Note Be careful not to touch the optical block inside the unit. 6 Close the lamp cover, then tighten the screws. 5 Hold the handle of the new lamp and push it in securely until it reaches the end, and then tighten the 3 screws. 60
3 Loosen the screw on the lamp cover with a Philips screwdriver, and then open the lamp cover. 4 Loosen the 3 screws on the lamp with the Phillips screwdriver. Hold up the handle, then pull the lamp straight out. Note Be careful not to touch the optical block inside the unit. 6 Close the lamp cover, then tighten the screws. 5 Hold the handle of the new lamp and push it in securely until it reaches the end, and then tighten the 3 screws. 60

Operating Instructions
Page 61
... holder. The menu screen below will not turn on unless the filter holder is set deep inside the projector. 10 Attach the filter holder. Notes • Be sure to avoid electrical shock or fire. Note ... on its original position. 13 Turn on the projector, then select the desired setting item on the filter holder. Caution Do not put your hands into the lamp replacement slot, and do not touch the fan ...Yes". Others 8 Remove the air filter. If you use an LMP-H201 Projector Lamp for replacement. 7 Remove the filter holder. Also, do not allow any liquid or other than the LMP-H201,...
... holder. The menu screen below will not turn on unless the filter holder is set deep inside the projector. 10 Attach the filter holder. Notes • Be sure to avoid electrical shock or fire. Note ... on its original position. 13 Turn on the projector, then select the desired setting item on the filter holder. Caution Do not put your hands into the lamp replacement slot, and do not touch the fan ...Yes". Others 8 Remove the air filter. If you use an LMP-H201 Projector Lamp for replacement. 7 Remove the filter holder. Also, do not allow any liquid or other than the LMP-H201,...

Operating Instructions
Page 62
.... Notes • When you clean the air filter, make sure you should be careful not to let any dust fall into the projector. • Cleaning the air filter is crucial to it . Note The lamp contains mercury. appears on how to attach and remove the air filter, see "Replacing the... to maintain the good performance of the lens cap will not turn on unless the lamp is used fluorescent tubes depend on the environment or how the projector is securely installed in place. • The projector will fit the zoom lever, as shown in the illustration. This value varies depending ...
.... Notes • When you clean the air filter, make sure you should be careful not to let any dust fall into the projector. • Cleaning the air filter is crucial to it . Note The lamp contains mercury. appears on how to attach and remove the air filter, see "Replacing the... to maintain the good performance of the lens cap will not turn on unless the lamp is used fluorescent tubes depend on the environment or how the projector is securely installed in place. • The projector will fit the zoom lever, as shown in the illustration. This value varies depending ...

Operating Instructions
Page 64
..., 1 lens, projection system LCD panel 0.61-inch (15.4 mm) SXRD panel 6,220,800 pixels (2,073,600 pixels × 3) Lens 1.6 times zoom lens (manual) f=18.5 mm to 29.6 mm F2.50 to F3.40 Lamp 200 W Ultra High Pressure Lamp Projection picture size 40 inches to 300 inches (1,016 mm to 7,620 mm) (measured...
..., 1 lens, projection system LCD panel 0.61-inch (15.4 mm) SXRD panel 6,220,800 pixels (2,073,600 pixels × 3) Lens 1.6 times zoom lens (manual) f=18.5 mm to 29.6 mm F2.50 to F3.40 Lamp 200 W Ultra High Pressure Lamp Projection picture size 40 inches to 300 inches (1,016 mm to 7,620 mm) (measured...


