
Operating Instructions
Page 1
4-191-106-13 (1) Data Projector Operating Instructions Before operating the unit, please read this manual and supplied Quick Reference Manual thoroughly and retain it for future reference. Please check with your local Sony Authorized Dealer. © 2010 Sony Corporation VPL-FH500L VPL-FX500L Not all models are available in all countries and area.
4-191-106-13 (1) Data Projector Operating Instructions Before operating the unit, please read this manual and supplied Quick Reference Manual thoroughly and retain it for future reference. Please check with your local Sony Authorized Dealer. © 2010 Sony Corporation VPL-FH500L VPL-FX500L Not all models are available in all countries and area.
Operating Instructions
Page 5
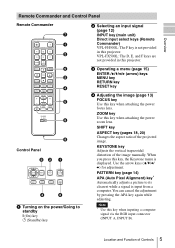
... this key when attaching the power zoom lens. Location and Function of the projected image. KEYSTONE key Adjusts the vertical trapezoidal distortion of the image manually. Use the arrow keys (V/v/B/ b) for adjustment. You can cancel the adjustment by pressing the APA key again while adjusting. Overview Remote Commander and Control Panel...
... this key when attaching the power zoom lens. Location and Function of the projected image. KEYSTONE key Adjusts the vertical trapezoidal distortion of the image manually. Use the arrow keys (V/v/B/ b) for adjustment. You can cancel the adjustment by pressing the APA key again while adjusting. Overview Remote Commander and Control Panel...

Operating Instructions
Page 8
... Insert the cable plugs firmly; Loose connections may reduce performance of the equipment you set the resolution of your computer to the instruction manuals of picture signals or cause a malfunction. INPUT A For connection when there is recommended that you are connecting. When pulling out a... sure to grip it by the plug, not the cable itself. • For more information, refer also to 1920 × 1200 pixels (VPLFH500L) or 1024 × 768 pixels (VPL-FX500L) for the external monitor. 8 Connecting the Projector Connecting a Computer Connection with an RGB output ...
... Insert the cable plugs firmly; Loose connections may reduce performance of the equipment you set the resolution of your computer to the instruction manuals of picture signals or cause a malfunction. INPUT A For connection when there is recommended that you are connecting. When pulling out a... sure to grip it by the plug, not the cable itself. • For more information, refer also to 1920 × 1200 pixels (VPLFH500L) or 1024 × 768 pixels (VPL-FX500L) for the external monitor. 8 Connecting the Projector Connecting a Computer Connection with an RGB output ...

Operating Instructions
Page 13
When attaching the Manual focus lens Turn the Focus Ring to adjust the size. When attaching the Electric zoom lens Press the ZOOM key on the projector or the ... position. Press the SHIFT key on the projector or the Remote Commander then press the B/ bkey (or V/v key) to adjust the size. When attaching the Manual zoom lens Turn the Zoom Ring to adjust the focus. To return the lens to the center position of the Projected image Focus Size (Zoom...
When attaching the Manual focus lens Turn the Focus Ring to adjust the size. When attaching the Electric zoom lens Press the ZOOM key on the projector or the ... position. Press the SHIFT key on the projector or the Remote Commander then press the B/ bkey (or V/v key) to adjust the size. When attaching the Manual zoom lens Turn the Zoom Ring to adjust the focus. To return the lens to the center position of the Projected image Focus Size (Zoom...

Operating Instructions
Page 19
... screen and also optimum image cannot be obtained, depending on the type of input signal. In this case, adjust the "Phase," "Pitch," and "Shift" items manually. *6: Available when a computer signal is input from the RGB input connector (INPUT A, INPUT B) or a video signal is input from the YPBPR input connector (INPUT A). This...
... screen and also optimum image cannot be obtained, depending on the type of input signal. In this case, adjust the "Phase," "Pitch," and "Shift" items manually. *6: Available when a computer signal is input from the RGB input connector (INPUT A, INPUT B) or a video signal is input from the YPBPR input connector (INPUT A). This...

Operating Instructions
Page 25
...image may unplug the AC power cord without going to Standby mode if no signal is input for 10 minutes. In such a case, adjust it manually to suit to the connected equipment. *2: When "Standby Mode" is set to "Low," lowers power consumption in Standby mode. Adjustments and Settings ...Sel. The entered settings will be registered. Auto/Computer/Video GBR/Component: When set to "Auto," selects the type of input signal. When "Manual" is selected for the connections and power. The Connection/Power Menu The Connection/Power menu is used for setting for "IP Address Setup," select ...
...image may unplug the AC power cord without going to Standby mode if no signal is input for 10 minutes. In such a case, adjust it manually to suit to the connected equipment. *2: When "Standby Mode" is set to "Low," lowers power consumption in Standby mode. Adjustments and Settings ...Sel. The entered settings will be registered. Auto/Computer/Video GBR/Component: When set to "Auto," selects the type of input signal. When "Manual" is selected for the connections and power. The Connection/Power Menu The Connection/Power menu is used for setting for "IP Address Setup," select ...
Operating Instructions
Page 27
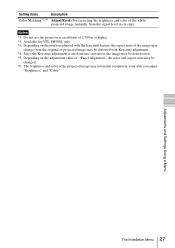
... Settings Using a Menu The Installation Menu 27 Setting items Description Color Matching*2 *6 Adjust/Reset: For correcting the brightness and color of the whole projected image manually from the original or projected image may be distorted with the lens shift feature, the aspect ratio of the projected image may not match completely...
... Settings Using a Menu The Installation Menu 27 Setting items Description Color Matching*2 *6 Adjust/Reset: For correcting the brightness and color of the whole projected image manually from the original or projected image may be distorted with the lens shift feature, the aspect ratio of the projected image may not match completely...

Operating Instructions
Page 34
.... The image is displayed smaller /a portion of the image. Check if the connecting cable is burnt out. Check if the connecting cable is set "Aspect" manually. Troubleshooting Before asking to have the projector repaired, try to external - In such a case, you can correct the trapezoidal distortion, using the ?/1 key on 23...
.... The image is displayed smaller /a portion of the image. Check if the connecting cable is burnt out. Check if the connecting cable is set "Aspect" manually. Troubleshooting Before asking to have the projector repaired, try to external - In such a case, you can correct the trapezoidal distortion, using the ?/1 key on 23...
Operating Instructions
Page 48
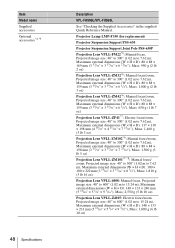
... H × D): 88 × 88 × 159 mm (3 15/32" × 3 15/32" × 6 1/4"), Mass: 1,000 g (2 lb 3 oz) Projection Lens VPLL-ZM42*6: Manual focus/zoom, Projected image size: 40" to 300" (1.02 m to 7.62 m), Maximum external dimensions (W × H × D): 88 × 88 × 159 mm (3 15/32" &#...; D): 88 × 88 × 198 mm (3 15/32" × 3 15/32" × 7 25/32"), Mass: 1,500 g (3 lb 5 oz) Projection Lens VPLL-ZM101*7 *8: Manual focus/ zoom, Projected image size: 40" to 300" (1.02 m to 7.62 m), Maximum external dimensions (W × H × D): 100 × 100 × 222 mm (3 15/16"...
... H × D): 88 × 88 × 159 mm (3 15/32" × 3 15/32" × 6 1/4"), Mass: 1,000 g (2 lb 3 oz) Projection Lens VPLL-ZM42*6: Manual focus/zoom, Projected image size: 40" to 300" (1.02 m to 7.62 m), Maximum external dimensions (W × H × D): 88 × 88 × 159 mm (3 15/32" &#...; D): 88 × 88 × 198 mm (3 15/32" × 3 15/32" × 7 25/32"), Mass: 1,500 g (3 lb 5 oz) Projection Lens VPLL-ZM101*7 *8: Manual focus/ zoom, Projected image size: 40" to 300" (1.02 m to 7.62 m), Maximum external dimensions (W × H × D): 100 × 100 × 222 mm (3 15/16"...
Operating Instructions
Page 49
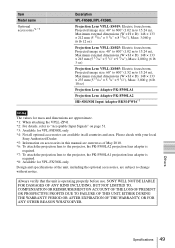
SONY WILL NOT BE LIABLE FOR DAMAGES OF ANY KIND INCLUDING, BUT NOT LIMITED TO, COMPENSATION OR REIMBURSEMENT ON ACCOUNT OF THE LOSS OF PRESENT OR ... AFTER EXPIRATION OF THE WARRANTY, OR FOR ANY OTHER REASON WHATSOEVER. Please check with your local Sony Authorized Dealer. *5: Information on page 51. *3: Available for VPL-FH500L only *4: Not all optional accessories are available in this manual are subject to change without notice. Always verify that the unit is required. *8: Available for...
SONY WILL NOT BE LIABLE FOR DAMAGES OF ANY KIND INCLUDING, BUT NOT LIMITED TO, COMPENSATION OR REIMBURSEMENT ON ACCOUNT OF THE LOSS OF PRESENT OR ... AFTER EXPIRATION OF THE WARRANTY, OR FOR ANY OTHER REASON WHATSOEVER. Please check with your local Sony Authorized Dealer. *5: Information on page 51. *3: Available for VPL-FH500L only *4: Not all optional accessories are available in this manual are subject to change without notice. Always verify that the unit is required. *8: Available for...

Operating Instructions
Page 62
... trademarks of Microsoft Corporation in the United States and other countries. • All other trademarks and registered trademarks are not specified. 62 Dimensions In this manual, ™ and ® marks are trademarks or registered trademarks of HDMI Licensing LLC in the United States and/or other countries. • PJLink is a registered...
... trademarks of Microsoft Corporation in the United States and other countries. • All other trademarks and registered trademarks are not specified. 62 Dimensions In this manual, ™ and ® marks are trademarks or registered trademarks of HDMI Licensing LLC in the United States and/or other countries. • PJLink is a registered...

