
Limited Warranty (US Only)
Page 1
... the LCD Projector Lamp the period will , at its original specifications. This Limited Warranty only covers product issues caused by this Limited Warranty for a period of one (1) year from the original date of purchase of the product. This Limited Warranty is invalid if the factory-applied serial number has been altered or removed from state to its option, repair or replace...
... the LCD Projector Lamp the period will , at its original specifications. This Limited Warranty only covers product issues caused by this Limited Warranty for a period of one (1) year from the original date of purchase of the product. This Limited Warranty is invalid if the factory-applied serial number has been altered or removed from state to its option, repair or replace...

Marketing Brochure
Page 3
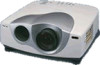
... Y/C separation/digital noise reduction and through mode, help to life. bringing beautiful large-screen images to provide a truly rewarding visual experience. As indicated by improving its model name, the VPL-VW11HT is proud to increase your home theater system. The stylish and brilliant way to bring breathtaking visuals into your home Sony is designed specifically for home theater use and offers many features to introduce the new VPL-VW11HT LCD Video Projector...
... Y/C separation/digital noise reduction and through mode, help to life. bringing beautiful large-screen images to provide a truly rewarding visual experience. As indicated by improving its model name, the VPL-VW11HT is proud to increase your home theater system. The stylish and brilliant way to bring breathtaking visuals into your home Sony is designed specifically for home theater use and offers many features to introduce the new VPL-VW11HT LCD Video Projector...
Marketing Brochure
Page 5
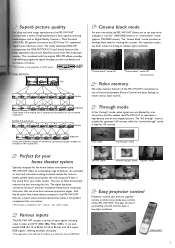
... your audio system. And like all other Sony home theater projectors, the VPL-VW11HT features a stylish white colored cabinet that can arise from film-originated sources. RM-PJVW10 5 "Full" mode "Full through " mode, video signals are combined, producing irregular images not included in low-light conditions. The digital keystone correction function* provides installation flexibility by scan conversion and this enables the VPL-VW11HT to reproduce a high-density, one-to-one mapped picture...
... your audio system. And like all other Sony home theater projectors, the VPL-VW11HT features a stylish white colored cabinet that can arise from film-originated sources. RM-PJVW10 5 "Full" mode "Full through " mode, video signals are combined, producing irregular images not included in low-light conditions. The digital keystone correction function* provides installation flexibility by scan conversion and this enables the VPL-VW11HT to reproduce a high-density, one-to-one mapped picture...
Marketing Brochure
Page 6
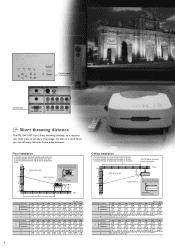
...) 6 Ceiling installation a: Distance between the screen and the center of the lens b: Distance between the ceiling and the center of the lens x: Distance between the ceiling and the center of the screen a PSS-610 Projector Suspension Support (not supplied) Ceiling b Center of the screen x Center of the lens Distance from the front of the cabinet and center of the lens Standard lens: Wall 10 mm ( 13/32 inches) 16:9 Screen size (inches...
...) 6 Ceiling installation a: Distance between the screen and the center of the lens b: Distance between the ceiling and the center of the lens x: Distance between the ceiling and the center of the screen a PSS-610 Projector Suspension Support (not supplied) Ceiling b Center of the screen x Center of the lens Distance from the front of the cabinet and center of the lens Standard lens: Wall 10 mm ( 13/32 inches) 16:9 Screen size (inches...
Marketing Brochure
Page 7
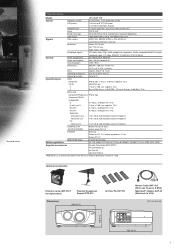
... (EMC), C-Tick, CCIB, VCCI, JEITA Supplied accessories Remote Commander RM-PJVW10 AA size Battery (2) Air Filter (3) Operation Manual *ANSI lumens is a measuring method of the American National Standards Institute IT 7.228. Simulated picture Specifications Model VPL-VW11HT Optical Projection system 3 LCD panels, 1 lens projection system LCD panels 1.35-inch p-Si TFT LCD panel 3,147,264 (1,049,088 x 3) pixels Projection lens 1.2 times zoom lens, F2.2 to 2.5, f44.6 to 53.6 mm Lamp 200 W UHP Screen coverage 40 to 300 inches (16...
... (EMC), C-Tick, CCIB, VCCI, JEITA Supplied accessories Remote Commander RM-PJVW10 AA size Battery (2) Air Filter (3) Operation Manual *ANSI lumens is a measuring method of the American National Standards Institute IT 7.228. Simulated picture Specifications Model VPL-VW11HT Optical Projection system 3 LCD panels, 1 lens projection system LCD panels 1.35-inch p-Si TFT LCD panel 3,147,264 (1,049,088 x 3) pixels Projection lens 1.2 times zoom lens, F2.2 to 2.5, f44.6 to 53.6 mm Lamp 200 W UHP Screen coverage 40 to 300 inches (16...
Operating Instructions
Page 7
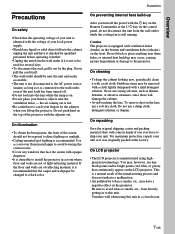
... local power supply. • Should any windows that face the screen with opaque draperies. • It is desirable to install the projector in a room where floor and walls are of the projector with a soft cloth. Use a cover over fluorescent lamps to avoid lowering the contrast ratio. • Cover any liquid or solid object fall into the lens while the lamp is on the control panel...
... local power supply. • Should any windows that face the screen with opaque draperies. • It is desirable to install the projector in a room where floor and walls are of the projector with a soft cloth. Use a cover over fluorescent lamps to avoid lowering the contrast ratio. • Cover any liquid or solid object fall into the lens while the lamp is on the control panel...
Operating Instructions
Page 8
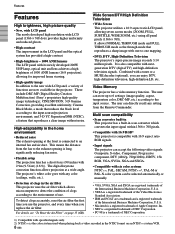
... the input source. In addition to -one -to the new wide LCD panel, a variety of functions are now available in scan converter which allows microcomputer to detect the condition of the Video Electronics Standard Association. The user can store up to 6 settings (image quality, aspect, temperature color, DRC-MF, etc.) according to the environment of clogs in the air filter This projector uses the air filter which High-adaptability...
... the input source. In addition to -one -to the new wide LCD panel, a variety of functions are now available in scan converter which allows microcomputer to detect the condition of the Video Electronics Standard Association. The user can store up to 6 settings (image quality, aspect, temperature color, DRC-MF, etc.) according to the environment of clogs in the air filter This projector uses the air filter which High-adaptability...

Operating Instructions
Page 9
... heat build-up. qf Adjuster buttons 9 (GB) You should also reset the air filter when you replace the air filter. • Replace and reset the air filter when a warning message is projected on the out of the picture. 2 Focus ring Adjusts the picture focus. 3 Ventilation holes (exhaust) 4 Lens Remove the lens cap before projection. 5 Front remote control detector (SIRCS receiver) 6 Adjusters When a picture is displayed on the screen to use the projector for the first time. Location and Function of Controls Front/Left Side 3 21...
... heat build-up. qf Adjuster buttons 9 (GB) You should also reset the air filter when you replace the air filter. • Replace and reset the air filter when a warning message is projected on the out of the picture. 2 Focus ring Adjusts the picture focus. 3 Ventilation holes (exhaust) 4 Lens Remove the lens cap before projection. 5 Front remote control detector (SIRCS receiver) 6 Adjusters When a picture is displayed on the screen to use the projector for the first time. Location and Function of Controls Front/Left Side 3 21...
Operating Instructions
Page 11
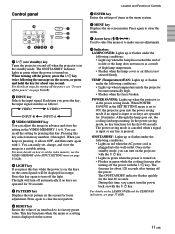
... the test pattern. 6 RESET key Resets the value of items in orange. When you press the key, the input signal switches as follows: B VIDEO B S-VIDEO INPUT-B b INPUT-A b 3 VIDEO MEMORY key You can adjust the image in advance and store the setting in the standby mode. Press again to its factory preset value. Control panel 0 LAMP/ COVER TEMP/ FAN POWER SAVING ON/ STANDBY MENU PATTERN ENTER RESET LIGHT INPUT VIDEO MEMORY 1 2 3 9 8765 4 1 I / 1 key twice following the message on the screen. Press again to...
... the test pattern. 6 RESET key Resets the value of items in orange. When you press the key, the input signal switches as follows: B VIDEO B S-VIDEO INPUT-B b INPUT-A b 3 VIDEO MEMORY key You can adjust the image in advance and store the setting in the standby mode. Press again to its factory preset value. Control panel 0 LAMP/ COVER TEMP/ FAN POWER SAVING ON/ STANDBY MENU PATTERN ENTER RESET LIGHT INPUT VIDEO MEMORY 1 2 3 9 8765 4 1 I / 1 key twice following the message on the screen. Press again to...

Operating Instructions
Page 13
Location and Function of Controls 4 VIDEO MEMORY keys You can store an image setting to one of equipment connected to the projector's VIDEO connector. For more details on how to set the video memory, see "Connecting with a Computer" on page 25 (GB). 5 MENU key 6 ENTER key 7 RESET key 8 Arrow keys (M/m/ S VIDEO: Selects the signal of the VIDEO MEMORY keys (1 - 6), and you can control a connected computer using the Remote Commander. Remote Commander The keys which...
Location and Function of Controls 4 VIDEO MEMORY keys You can store an image setting to one of equipment connected to the projector's VIDEO connector. For more details on how to set the video memory, see "Connecting with a Computer" on page 25 (GB). 5 MENU key 6 ENTER key 7 RESET key 8 Arrow keys (M/m/ S VIDEO: Selects the signal of the VIDEO MEMORY keys (1 - 6), and you can control a connected computer using the Remote Commander. Remote Commander The keys which...

Operating Instructions
Page 14
... change the Remote Commander as a guide. Setting up and projecting Location and Function of batteries. • If you will not use the Remote Commander for installing the projector. If batteries have leaked, remove them, wipe the battery compartment dry and replace the batteries with qualified Sony personnel. Notes on Remote Commander operation • Make sure that there is nothing to obstruct the infrared beam between the lens and the screen...
... change the Remote Commander as a guide. Setting up and projecting Location and Function of batteries. • If you will not use the Remote Commander for installing the projector. If batteries have leaked, remove them, wipe the battery compartment dry and replace the batteries with qualified Sony personnel. Notes on Remote Commander operation • Make sure that there is nothing to obstruct the infrared beam between the lens and the screen...

Operating Instructions
Page 15
... to the input signal. The connection method is the same as above. 15 (GB) Also refer to the instruction manuals of the cables properly; For details on setting, see page 27 (GB). • You can connect a high definition equipment. Setting up and projecting Connecting When making connections, be sure to: • turn off all equipment before making any connections. • use the proper cables for each connection. •...
... to the input signal. The connection method is the same as above. 15 (GB) Also refer to the instruction manuals of the cables properly; For details on setting, see page 27 (GB). • You can connect a high definition equipment. Setting up and projecting Connecting When making connections, be sure to: • turn off all equipment before making any connections. • use the proper cables for each connection. •...

Operating Instructions
Page 17
.... 4, 5, 6 3 LAMP/ COVER TEMP/ FAN POWER SAVING ON/ STANDBY MENU PATTERN ENTER RESET LIGHT INPUT VIDEO MEMORY 2 1 1 Plug the AC power cord into the selected language . The menu display appears. PICTURE CTRL CONTRAST: 80 BRIGHT: 50 RGB ENHANCER: 30 COLOR TEMP: HIGH INPUT-A Selecting the Menu Language 5 Select LANGUAGE with the M or m key, then press the < or ENTER key. SET SETTING INPUT-A STATUS: ON INPUT-A: COMPONENT INPUT-B: COMPONENT LANGUAGE: ENGLISH POWER SAVING: OFF SIRCS RECEIVER: FRONT&REAR CINE MOTION: AUTO...
.... 4, 5, 6 3 LAMP/ COVER TEMP/ FAN POWER SAVING ON/ STANDBY MENU PATTERN ENTER RESET LIGHT INPUT VIDEO MEMORY 2 1 1 Plug the AC power cord into the selected language . The menu display appears. PICTURE CTRL CONTRAST: 80 BRIGHT: 50 RGB ENHANCER: 30 COLOR TEMP: HIGH INPUT-A Selecting the Menu Language 5 Select LANGUAGE with the M or m key, then press the < or ENTER key. SET SETTING INPUT-A STATUS: ON INPUT-A: COMPONENT INPUT-B: COMPONENT LANGUAGE: ENGLISH POWER SAVING: OFF SIRCS RECEIVER: FRONT&REAR CINE MOTION: AUTO...

Operating Instructions
Page 18
...to adjust the focus. The ON/STANDBY indicator lights in green. 3 Turn on the Remote Commander. To restore the picture, press the MUTING PIC key again. 1 After all equipment is completely connected, plug the AC power cord into the standby mode. 2 Press the I / 1 key on the control panel or the I key on equipment connected to select the input source. Projecting Projecting 5 LAMP/ COVER TEMP/ FAN POWER SAVING ON/ STANDBY MENU PATTERN ENTER RESET 5,6 LIGHT INPUT VIDEO MEMORY 2 4 1 MUTING PIC INPUT SELECT VIDEO A B S VIDEO VIDEO MEMORY 1 2 3 4 5 6 OFF MENU RESET...
...to adjust the focus. The ON/STANDBY indicator lights in green. 3 Turn on the Remote Commander. To restore the picture, press the MUTING PIC key again. 1 After all equipment is completely connected, plug the AC power cord into the standby mode. 2 Press the I / 1 key on the control panel or the I key on equipment connected to select the input source. Projecting Projecting 5 LAMP/ COVER TEMP/ FAN POWER SAVING ON/ STANDBY MENU PATTERN ENTER RESET 5,6 LIGHT INPUT VIDEO MEMORY 2 4 1 MUTING PIC INPUT SELECT VIDEO A B S VIDEO VIDEO MEMORY 1 2 3 4 5 6 OFF MENU RESET...

Operating Instructions
Page 34
... lamp becomes darker, replace the lamp promptly with qualified Sony personnel. • Pull out the lamp unit by loosening one after about 1500 hours for the OFF setting, or about 3000 hours for the ON setting in place. Tighten the screws. Note When replacing the lamp, be displayed. When replacing the lamp after turning off the projector, then unplug the power cord. Note The lamp becomes a high temperature after using the projector Turn off the projector...
... lamp becomes darker, replace the lamp promptly with qualified Sony personnel. • Pull out the lamp unit by loosening one after about 1500 hours for the OFF setting, or about 3000 hours for the ON setting in place. Tighten the screws. Note When replacing the lamp, be displayed. When replacing the lamp after turning off the projector, then unplug the power cord. Note The lamp becomes a high temperature after using the projector Turn off the projector...
Operating Instructions
Page 35
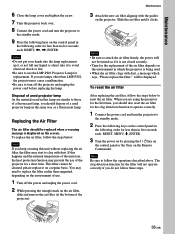
Maintenance 6 Close the lamp cover and tighten the screw. 7 Turn the projector back over. 8 Connect the power cord and turn the projector to the standby mode. 9 Press the following keys on the control panel in the following order for less than in five seconds each: RESET,
Maintenance 6 Close the lamp cover and tighten the screw. 7 Turn the projector back over. 8 Connect the power cord and turn the projector to the standby mode. 9 Press the following keys on the control panel in the following order for less than in five seconds each: RESET,
Operating Instructions
Page 36
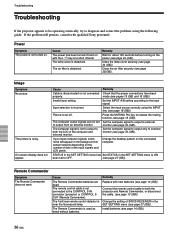
...)). Troubleshooting Troubleshooting If the projector appears to be operating erratically, try to the input signal. Remedy Wait for about 120 seconds before turning on the power (see page 18 (GB)). The picture is disconnected or not connected Check that the proper connections have been properly. Invalid input setting. Set the computer signal to output only to both the LCD of dots in the SET SETTING menu (see page 34 (GB)). Remote Commander Symptom...
...)). Troubleshooting Troubleshooting If the projector appears to be operating erratically, try to the input signal. Remedy Wait for about 120 seconds before turning on the power (see page 18 (GB)). The picture is disconnected or not connected Check that the proper connections have been properly. Invalid input setting. Set the computer signal to output only to both the LCD of dots in the SET SETTING menu (see page 34 (GB)). Remote Commander Symptom...

Operating Instructions
Page 37
... INPUT-B in the SET SETTING menu is set to see if the air filter has been used over 500 hours. Caution messages Use the list below to cool down the lamp and turn on the screen. Message NO INPUT Not applicable! Wait for 120 seconds to check the meaning of its life. The resolution setting of the output signal of the projector. Please replace the lamp. The lamp becomes a high temperature. TEMP/FAN indicators light up . Remedy Attach the lamp cover or the air filter...
... INPUT-B in the SET SETTING menu is set to see if the air filter has been used over 500 hours. Caution messages Use the list below to cool down the lamp and turn on the screen. Message NO INPUT Not applicable! Wait for 120 seconds to check the meaning of its life. The resolution setting of the output signal of the projector. Please replace the lamp. The lamp becomes a high temperature. TEMP/FAN indicators light up . Remedy Attach the lamp cover or the air filter...
Operating Instructions
Page 39
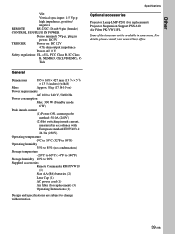
...) Storage temperature -20°C to 60°C (-4°F to 140°F) Storage humidity 10% to change without notice. 39 (GB) For details, please consult your nearest Sony office. Tick Specifications Optional accessories Projector Lamp LMP-P201 (for replacement) (3) Operating Instructions (1) Design and specifications are subject to 90% Supplied accessories Remote Commander RM-PJVW10 (1) Size AA (R6) batteries (2) Lens Cap (1) AC power cord (1) Air filter (for replacement) Projector Suspension Support PSS-610 Air Filter PK...
...) Storage temperature -20°C to 60°C (-4°F to 140°F) Storage humidity 10% to change without notice. 39 (GB) For details, please consult your nearest Sony office. Tick Specifications Optional accessories Projector Lamp LMP-P201 (for replacement) (3) Operating Instructions (1) Design and specifications are subject to 90% Supplied accessories Remote Commander RM-PJVW10 (1) Size AA (R6) batteries (2) Lens Cap (1) AC power cord (1) Air filter (for replacement) Projector Suspension Support PSS-610 Air Filter PK...
Operating Instructions
Page 42
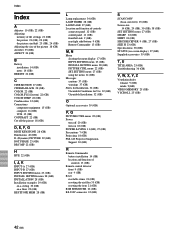
...) KEYSTONE MEM 28 (GB) Index L Lamp replacement 34 (GB) LAMP TIMER 28 (GB) LANGUAGE 27 (GB) Location and function of controls connector panel 12 (GB) control panel 11 (GB) front/left side 9 (GB) rear/right side/bottom 9 (GB) Remote Commander 13 (GB) M, N Menu clearing the menu display 17 (GB) INPUT SETTING menu 23 (GB) INSTALL SETTING menu 28 (GB) PICTURE CTRL menu 22 (GB) SET SETTING menu 27 (GB) using the menu 21 (GB) Messages cautions 37 (GB) warnings 37...
...) KEYSTONE MEM 28 (GB) Index L Lamp replacement 34 (GB) LAMP TIMER 28 (GB) LANGUAGE 27 (GB) Location and function of controls connector panel 12 (GB) control panel 11 (GB) front/left side 9 (GB) rear/right side/bottom 9 (GB) Remote Commander 13 (GB) M, N Menu clearing the menu display 17 (GB) INPUT SETTING menu 23 (GB) INSTALL SETTING menu 28 (GB) PICTURE CTRL menu 22 (GB) SET SETTING menu 27 (GB) using the menu 21 (GB) Messages cautions 37 (GB) warnings 37...


