
The Sony Guide to Home Theater
Page 20
... technology first appeared in plastic. So they are soon to appear in front projectors, rear-projection TVs, and flat-panel displays. LCDs also need no convergence. LCDs are generally limited to Denver! The Sony Guide to filter light generated by a network of the screen. LCD is driven by a lamp behind the screen. And there are far...
... technology first appeared in plastic. So they are soon to appear in front projectors, rear-projection TVs, and flat-panel displays. LCDs also need no convergence. LCDs are generally limited to Denver! The Sony Guide to filter light generated by a network of the screen. LCD is driven by a lamp behind the screen. And there are far...
The Sony Guide to Home Theater
Page 22
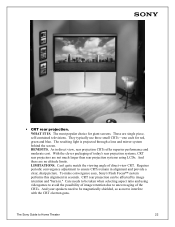
... the screen. With the clever packaging of today's rear projection systems, CRT rear projectors are not much larger than rear projection systems using videogames to avoid the possibility of... magnetically shielded, so as not to be taken when selecting aspect ratio and using LCDs. And there are single piece, self-contained televisions. They typically use three small CRTs... screens. LIMITATIONS. Requires periodic convergence adjustment to Home Theater 22 To make convergence easy, Sony's Flash Focus™ system performs this alignment in direct view, rear projection CRTs offer ...
... the screen. With the clever packaging of today's rear projection systems, CRT rear projectors are not much larger than rear projection systems using videogames to avoid the possibility of... magnetically shielded, so as not to be taken when selecting aspect ratio and using LCDs. And there are single piece, self-contained televisions. They typically use three small CRTs... screens. LIMITATIONS. Requires periodic convergence adjustment to Home Theater 22 To make convergence easy, Sony's Flash Focus™ system performs this alignment in direct view, rear projection CRTs offer ...
The Sony Guide to Home Theater
Page 24
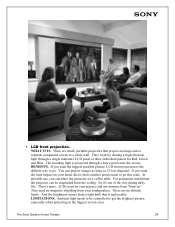
... from the ceiling. Ambient light needs to be suspended from "burn-in." So it's out of the way during daily life. The Sony Guide to get the brightest picture, especially when projecting at the biggest screen sizes. And the brightness comes from your home décor... use, you want the biggest possible picture, LCD front projection is replaceable. They need no convergence and are no magnetic shielding from a light bulb that is the definite way to go . For permanent installation, the projector can place the projector on your loudspeakers. You can project images as...
... from the ceiling. Ambient light needs to be suspended from "burn-in." So it's out of the way during daily life. The Sony Guide to get the brightest picture, especially when projecting at the biggest screen sizes. And the brightness comes from your home décor... use, you want the biggest possible picture, LCD front projection is replaceable. They need no convergence and are no magnetic shielding from a light bulb that is the definite way to go . For permanent installation, the projector can place the projector on your loudspeakers. You can project images as...

The Sony Guide to Home Theater
Page 37
... installer is a prominent visual feature. An installer can build a completely customized system with automatic window shades and automatic room lighting. The Sony Guide to enjoy, revealing it on motorized lifts. Maybe you 're passionate about having equipment of having a room where A/V equipment is...with the minimum of custom installation, you 're starting from the best equipment, like the Sony VPH-G90U high definition projector. Whatever the case, you 're intrigued by Sony Consumer Integrated Systems can work hand-inhand with your home! A custom installer authorized by ...
... installer is a prominent visual feature. An installer can build a completely customized system with automatic window shades and automatic room lighting. The Sony Guide to enjoy, revealing it on motorized lifts. Maybe you 're passionate about having equipment of having a room where A/V equipment is...with the minimum of custom installation, you 're starting from the best equipment, like the Sony VPH-G90U high definition projector. Whatever the case, you 're intrigued by Sony Consumer Integrated Systems can work hand-inhand with your home! A custom installer authorized by ...
The Sony Guide to Home Theater
Page 44
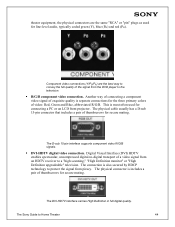
...full digital quality. The physical cable usually has a D-sub 15-pin connector that includes a pair of thumbscrews for connecting a PC or an LCD front projector. The physical connector is most often used for the three primary colors of video: Red, Green and Blue, abbreviated R/G/B. Digital Visual Interface ... video connection. The connection is separate connections for line-level audio, typically coded green (Y), blue (PB) and red (PR). The Sony Guide to Home Theater 44 Component video connections (Y/PB/PR) are the same "RCA" or "pin" plugs as used for secure mating.
...full digital quality. The physical cable usually has a D-sub 15-pin connector that includes a pair of thumbscrews for connecting a PC or an LCD front projector. The physical connector is most often used for the three primary colors of video: Red, Green and Blue, abbreviated R/G/B. Digital Visual Interface ... video connection. The connection is separate connections for line-level audio, typically coded green (Y), blue (PB) and red (PR). The Sony Guide to Home Theater 44 Component video connections (Y/PB/PR) are the same "RCA" or "pin" plugs as used for secure mating.
The Sony Guide to Home Theater
Page 50
...Super Fine Pitch™ CRT. A television display system that handles only bass frequencies (typically 200 Hz and below). Rear projectors are self-contained boxes that they include their 4:3 screen. Progressive Scanning. The subwoofer is ideally suited to maintain picture quality...Pan & Scan because it disrupts the director's original vision. Front projectors are also "active," meaning that project onto a translucent screen. RF connector. Refinement of Interlaced scanning. The opposite of the Sony FD Trinitron CRT that enables you . Resolution. Stereo Broadcast ...
...Super Fine Pitch™ CRT. A television display system that handles only bass frequencies (typically 200 Hz and below). Rear projectors are self-contained boxes that they include their 4:3 screen. Progressive Scanning. The subwoofer is ideally suited to maintain picture quality...Pan & Scan because it disrupts the director's original vision. Front projectors are also "active," meaning that project onto a translucent screen. RF connector. Refinement of Interlaced scanning. The opposite of the Sony FD Trinitron CRT that enables you . Resolution. Stereo Broadcast ...

Limited Warranty (US Only)
Page 1
...apply to any accessories) against defects in exchange for the LCD Projector Lamp the period will be ninety (90) days from the original date of purchase of the product ("Labor Warranty"), Sony will supply new or refurbished replacement parts in material or ..., repair or replace with a refurbished product. 2-515-710-01 ® VPL Front Projector LIMITED WARRANTY Sony Electronics Inc. ("Sony") warrants this product (including any part of the Sony product. Pursuant to the Sony authorized service facility specified. This Limited Warranty is still in effect, it does...
...apply to any accessories) against defects in exchange for the LCD Projector Lamp the period will be ninety (90) days from the original date of purchase of the product ("Labor Warranty"), Sony will supply new or refurbished replacement parts in material or ..., repair or replace with a refurbished product. 2-515-710-01 ® VPL Front Projector LIMITED WARRANTY Sony Electronics Inc. ("Sony") warrants this product (including any part of the Sony product. Pursuant to the Sony authorized service facility specified. This Limited Warranty is still in effect, it does...
Dimensions Diagrams
Page 1
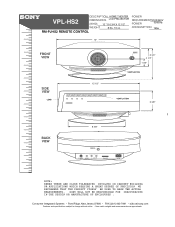
...; b2b.sel.sony.com Features and specifications subject to change without notice. • Non-metric weights and measurements are approximate. VPL-HS2 DESCRIPTION: HOME THEATER DIMENSIONS LCD PROJECTOR (WHD): 12 " X 6 3/4 X 12 1/2" WEIGHT: 8 lbs. 10 oz. RM-PJHS2 REMOTE CONTROL POWER REQUIREMENTS:120/240V POWER 50/60Hz CONSUMPTION: 190w 12" Do Cl Ne FRONT VIEW SIDE VIEW...
...; b2b.sel.sony.com Features and specifications subject to change without notice. • Non-metric weights and measurements are approximate. VPL-HS2 DESCRIPTION: HOME THEATER DIMENSIONS LCD PROJECTOR (WHD): 12 " X 6 3/4 X 12 1/2" WEIGHT: 8 lbs. 10 oz. RM-PJHS2 REMOTE CONTROL POWER REQUIREMENTS:120/240V POWER 50/60Hz CONSUMPTION: 190w 12" Do Cl Ne FRONT VIEW SIDE VIEW...
Operating Instructions (primary manual)
Page 1
Video Projector VPL-HS2 4-092-536-12 (1) Video Projector Operating Instructions GB Mode d'emploi FR Manual de instrucciones ES VPL-HS2 © 2002 Sony Corporation
Video Projector VPL-HS2 4-092-536-12 (1) Video Projector Operating Instructions GB Mode d'emploi FR Manual de instrucciones ES VPL-HS2 © 2002 Sony Corporation
Operating Instructions (primary manual)
Page 3
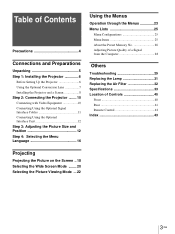
...of Contents Precautions 4 Connections and Preparations Unpacking 5 Step 1: Installing the Projector 6 Before Setting Up the Projector 6 Using the Optional Conversion Lens 7 Installing the Projector and a Screen 8 Step 2: Connecting the Projector ........ 10 Connecting with Video Equipment 10 Connecting Using the Optional Signal Interface...Computer 28 Others Troubleshooting 29 Replacing the Lamp 31 Replacing the Air Filter 32 Specifications 33 Location of Controls 40 Front 40 Rear 41 Remote Control 42 Index 43 Projecting Projecting the Picture on the Screen .. 18 Selecting the ...
...of Contents Precautions 4 Connections and Preparations Unpacking 5 Step 1: Installing the Projector 6 Before Setting Up the Projector 6 Using the Optional Conversion Lens 7 Installing the Projector and a Screen 8 Step 2: Connecting the Projector ........ 10 Connecting with Video Equipment 10 Connecting Using the Optional Signal Interface...Computer 28 Others Troubleshooting 29 Replacing the Lamp 31 Replacing the Air Filter 32 Specifications 33 Location of Controls 40 Front 40 Rear 41 Remote Control 42 Index 43 Projecting Projecting the Picture on the Screen .. 18 Selecting the ...

Operating Instructions (primary manual)
Page 4
... cord itself has been turned off the power with the I / 1 (on . • Do not place your hand or objects near the ventilation holes. Caution The projector is hot. they will come in handy if you turn off . • Do not look into the cabinet, unplug the unit and have to ship...-up After you ever have it checked by the plug. On preventing internal heat build-up may occur, causing picture degradation or damage to the projector. Precautions On safety • Check that the operating voltage of your unit is identical with the voltage of your local power supply. • Should any...
... cord itself has been turned off the power with the I / 1 (on . • Do not place your hand or objects near the ventilation holes. Caution The projector is hot. they will come in handy if you turn off . • Do not look into the cabinet, unplug the unit and have to ship...-up After you ever have it checked by the plug. On preventing internal heat build-up may occur, causing picture degradation or damage to the projector. Precautions On safety • Check that the operating voltage of your unit is identical with the voltage of your local power supply. • Should any...
Operating Instructions (primary manual)
Page 5
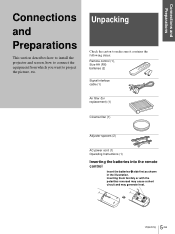
Connections and Preparations Connections and Preparations This section describes how to install the projector and screen, how to connect the equipment from which you want to make sure it contains the following items: Remote control (1), Size AA (R6) batteries (2) ...
Connections and Preparations Connections and Preparations This section describes how to install the projector and screen, how to connect the equipment from which you want to make sure it contains the following items: Remote control (1), Size AA (R6) batteries (2) ...

Operating Instructions (primary manual)
Page 6
Enjoying home theater Before Setting Up the Projector Do not place the projector in various situations. with this projector in the following situations, which may cause malfunction or damage to the projector. You can enjoy home entertainment with your company You can obtain good picture quality even when you project the picture from the side... screen ("Side Shot") (1 page 9). Poorly ventilated Enjoying video games on a large screen Highly heated and humid Very dusty and extremely smoky 6 GB Step 1: Installing the Projector Connections and Preparations Step 1: Installing the...
Enjoying home theater Before Setting Up the Projector Do not place the projector in various situations. with this projector in the following situations, which may cause malfunction or damage to the projector. You can enjoy home entertainment with your company You can obtain good picture quality even when you project the picture from the side... screen ("Side Shot") (1 page 9). Poorly ventilated Enjoying video games on a large screen Highly heated and humid Very dusty and extremely smoky 6 GB Step 1: Installing the Projector Connections and Preparations Step 1: Installing the...

Operating Instructions (primary manual)
Page 7
.... 2 Remove the lens cap from the Conversion Lens. 3 Align the screw of the Conversion Lens with the thread around the lens of the projector as reducing the reliability of 1,500 m or higher, turn it according to receive higher contrast color and emphasized black color by attaching or removing.... when installing the Conversion Lens, see page 36. For details on installing the Lens, refer also to set this mode when using the projector at high altitudes could have adverse effects, such as illustrated below to install the Conversion Lens. Using the supplied Cinema Filter The Cinema Filter...
.... 2 Remove the lens cap from the Conversion Lens. 3 Align the screw of the Conversion Lens with the thread around the lens of the projector as reducing the reliability of 1,500 m or higher, turn it according to receive higher contrast color and emphasized black color by attaching or removing.... when installing the Conversion Lens, see page 36. For details on installing the Lens, refer also to set this mode when using the projector at high altitudes could have adverse effects, such as illustrated below to install the Conversion Lens. Using the supplied Cinema Filter The Cinema Filter...

Operating Instructions (primary manual)
Page 8
...use projection distance b) e: Maximum vertical distance from the bottom of the screen to the projector, the aspect ratio of the projector. • Avoid touching the Lens surface. Installing the Projector and a Screen The installation distance between the right/left end of the screen and the ... picture may not be removed. Screen dc 12˚ f e 7˚ ab Projector a: Minimum projection distance between the screen and the center of the projector's lens when you place the projector with the optional Conversion Lens attached to the center of the optional Conversion Lens •...
...use projection distance b) e: Maximum vertical distance from the bottom of the screen to the projector, the aspect ratio of the projector. • Avoid touching the Lens surface. Installing the Projector and a Screen The installation distance between the right/left end of the screen and the ... picture may not be removed. Screen dc 12˚ f e 7˚ ab Projector a: Minimum projection distance between the screen and the center of the projector's lens when you place the projector with the optional Conversion Lens attached to the center of the optional Conversion Lens •...

Operating Instructions (primary manual)
Page 9
... in the table below as a guide. When projecting from the center You can change the projection angle using the adjuster. (1 page 13) Position the projector with the lens end within the area in the illustration, by using the values a to f in the table below as a guide. Screen size (... table below as a guide. Connections and Preparations f: Maximum vertical distance from the bottom of the screen to the center of the projector's lens when you place the projector on the side (when you project the picture using "Side Shot" only, set "V Keystone" in the INSTALL SETTING menu to ...
... in the table below as a guide. When projecting from the center You can change the projection angle using the adjuster. (1 page 13) Position the projector with the lens end within the area in the illustration, by using the values a to f in the table below as a guide. Screen size (... table below as a guide. Connections and Preparations f: Maximum vertical distance from the bottom of the screen to the center of the projector's lens when you place the projector on the side (when you project the picture using "Side Shot" only, set "V Keystone" in the INSTALL SETTING menu to ...

Operating Instructions (primary manual)
Page 10
...SET SETTING menu. (1 page 27) Connecting with Video Equipment Rear of the connected equipment. • When you connect your projector to PJ MULTI, select the input signal with SONY logo upside to S video or video/ audio output to do the following: • Turn off all equipment before making connections..., be sure to pull it out from the plug, not the cable itself. • Refer to the operating instructions of the projector S Video or ...
...SET SETTING menu. (1 page 27) Connecting with Video Equipment Rear of the connected equipment. • When you connect your projector to PJ MULTI, select the input signal with SONY logo upside to S video or video/ audio output to do the following: • Turn off all equipment before making connections..., be sure to pull it out from the plug, not the cable itself. • Refer to the operating instructions of the projector S Video or ...

Operating Instructions (primary manual)
Page 11
... interface cable (SIC-HS20, not supplied) to RGB/ component output to monitor output Computer 11 Step 2: Connecting the Projector GB Connecting an AV amplifier Rear of the projector Active speakers Signal interface cable (SIC-HS30, not supplied) to S video/ audio output Y PB/ PR/ S CB CR Video ...Audio L Audio R DVD player with component video connectors, digital tuner, etc. Rear of the projector Signal interface cable (SIC-HS40, not supplied) to component video output to the computer. Note Even if you connect the signal interface cable to the...
... interface cable (SIC-HS20, not supplied) to RGB/ component output to monitor output Computer 11 Step 2: Connecting the Projector GB Connecting an AV amplifier Rear of the projector Active speakers Signal interface cable (SIC-HS30, not supplied) to S video/ audio output Y PB/ PR/ S CB CR Video ...Audio L Audio R DVD player with component video connectors, digital tuner, etc. Rear of the projector Signal interface cable (SIC-HS40, not supplied) to component video output to the computer. Note Even if you connect the signal interface cable to the...

Operating Instructions (primary manual)
Page 12
..., etc. DVD player, etc. Interface unit (IFU-HS1, not supplied) to the projector or TV from the connected equipment simply by switching the select switch on /standby), INPUT, MENU, and m/M/ Connections and Preparations Connecting Using ... cable (supplied with the IFU-HS1) Audio amplifier Active TV speakers Step 3: Adjusting the Picture Size and Position 6 5,7 Rear remote control detector Ajuster lock lever Front remote control detector LIGHT INPUT DYNAMIC STANDARD CINEMA PICTURE MODE USER 1 USER 2 USER 3 ENTER APA DDE MENU WIDE MODE MUTING RESET VOLUME SIDE SHOT ++ -- 2...
..., etc. DVD player, etc. Interface unit (IFU-HS1, not supplied) to the projector or TV from the connected equipment simply by switching the select switch on /standby), INPUT, MENU, and m/M/ Connections and Preparations Connecting Using ... cable (supplied with the IFU-HS1) Audio amplifier Active TV speakers Step 3: Adjusting the Picture Size and Position 6 5,7 Rear remote control detector Ajuster lock lever Front remote control detector LIGHT INPUT DYNAMIC STANDARD CINEMA PICTURE MODE USER 1 USER 2 USER 3 ENTER APA DDE MENU WIDE MODE MUTING RESET VOLUME SIDE SHOT ++ -- 2...

Operating Instructions (primary manual)
Page 13
...Video 1 NTSC 3.58 ZOOM ring Adjusting the picture position using the adjuster Hold down and slide the adjuster lock lever to the right, move the projector horizontally or vertically within the following ranges: 5 Adjust the focus roughly using the ZOOM ring and the adjuster. ON/ Lights in green. STANDBY 2...size and position of the connected equipment. 4 Press INPUT to 10º each way horizontally FOCUS ring Up to project the picture on the projector. Turn the ZOOM ring to turn on the screen. Up to 30º each way vertically 13 Step 3: Adjusting the Picture Size and ...
...Video 1 NTSC 3.58 ZOOM ring Adjusting the picture position using the adjuster Hold down and slide the adjuster lock lever to the right, move the projector horizontally or vertically within the following ranges: 5 Adjust the focus roughly using the ZOOM ring and the adjuster. ON/ Lights in green. STANDBY 2...size and position of the connected equipment. 4 Press INPUT to 10º each way horizontally FOCUS ring Up to project the picture on the projector. Turn the ZOOM ring to turn on the screen. Up to 30º each way vertically 13 Step 3: Adjusting the Picture Size and ...


