The Sony Guide to Home Theater
Page 24
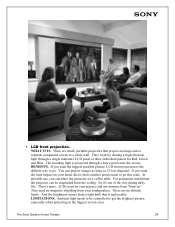
... go . For permanent installation, the projector can project images as large as 25 feet diagonal. The Sony Guide to go this route. There's more. They need no convergence and are no magnetic shielding from a light bulb that is projected through a single miniature LCD panel or three individual panels for Red, Green and Blue. There are immune from the ceiling. LIMITATIONS. The resulting light is replaceable. BENEFITS. You can...
... go . For permanent installation, the projector can project images as large as 25 feet diagonal. The Sony Guide to go this route. There's more. They need no convergence and are no magnetic shielding from a light bulb that is projected through a single miniature LCD panel or three individual panels for Red, Green and Blue. There are immune from the ceiling. LIMITATIONS. The resulting light is replaceable. BENEFITS. You can...
The Sony Guide to Home Theater
Page 50
... the Sony FD Trinitron CRT that makes channel programming and timer setting easy. Enables you to rediscover your A/V receiver at high signal quality. S-Video keeps the black-and-white signal (luminance) apart from the color signal (chrominance) to Home Theater 50 The opposite of view left or right, "panning" the frame. Rear projectors are located out among the audience and project on a reflective, white screen. A measure of video signal detail...
... the Sony FD Trinitron CRT that makes channel programming and timer setting easy. Enables you to rediscover your A/V receiver at high signal quality. S-Video keeps the black-and-white signal (luminance) apart from the color signal (chrominance) to Home Theater 50 The opposite of view left or right, "panning" the frame. Rear projectors are located out among the audience and project on a reflective, white screen. A measure of video signal detail...
The Sony Guide to Home Theater
Page 51
... and video systems that helps deliver the superlative performance of New America Publications, Inc. TV Guide is a registered trademark of DIRECTV Inc., a unit of Texas Instruments, Inc. * Playback on a Memory Stick media are approximate. A Final Word Home theater is a trademark of Hughes Electronics Corporation. Sony, CineAlta, Cyber-shot, Digital Cinema Sound, Digital Reality Creation, Direct Stream Digital, DRC, DVD Dream, Flash Focus...
... and video systems that helps deliver the superlative performance of New America Publications, Inc. TV Guide is a registered trademark of DIRECTV Inc., a unit of Texas Instruments, Inc. * Playback on a Memory Stick media are approximate. A Final Word Home theater is a trademark of Hughes Electronics Corporation. Sony, CineAlta, Cyber-shot, Digital Cinema Sound, Digital Reality Creation, Direct Stream Digital, DRC, DVD Dream, Flash Focus...

Limited Warranty (US Only)
Page 1
..., Sony will supply new or refurbished replacement parts in exchange for parts determined to obtain warranty service for your authorized dealer, call the Sony Customer Information Service Center [1-800-222-SONY] For an accessory or part not available from the original date of purchase of product ("Parts Warranty"), Sony will , at its option, repair or replace with a refurbished product. This Limited Warranty does not cover Sony products...
..., Sony will supply new or refurbished replacement parts in exchange for parts determined to obtain warranty service for your authorized dealer, call the Sony Customer Information Service Center [1-800-222-SONY] For an accessory or part not available from the original date of purchase of product ("Parts Warranty"), Sony will , at its option, repair or replace with a refurbished product. This Limited Warranty does not cover Sony products...
Operating Instructions (primary manual)
Page 2
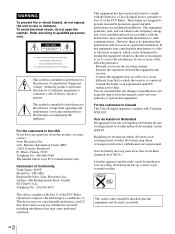
... installation. The socket-outlet should be installed near the equipment and be of sufficient magnitude to constitute a risk of Conformity Trade Name: SONY Model No.: VPL-HS2 Responsible Party: Sony Electronics Inc. Connect the equipment into an outlet on , the user is encouraged to try to radio communications. Myers, Florida 33913 Telephone No.: 800-686-7669 The number below is for help...
... installation. The socket-outlet should be installed near the equipment and be of sufficient magnitude to constitute a risk of Conformity Trade Name: SONY Model No.: VPL-HS2 Responsible Party: Sony Electronics Inc. Connect the equipment into an outlet on , the user is encouraged to try to radio communications. Myers, Florida 33913 Telephone No.: 800-686-7669 The number below is for help...

Operating Instructions (primary manual)
Page 13
... vertically 13 Step 3: Adjusting the Picture Size and Position GB The ON/STANDBY indicator lights in red and the projector goes into a wall outlet. Each time you press the button, the input indication changes. (1 page 19) INPUT Video 1 NTSC 3.58 ZOOM ring Adjusting the picture position using the adjuster Hold down and slide the adjuster lock lever to fit the screen using the FOCUS ring. STANDBY 3 Turn on the screen. Refer to the operating instructions of the picture to the right...
... vertically 13 Step 3: Adjusting the Picture Size and Position GB The ON/STANDBY indicator lights in red and the projector goes into a wall outlet. Each time you press the button, the input indication changes. (1 page 19) INPUT Video 1 NTSC 3.58 ZOOM ring Adjusting the picture position using the adjuster Hold down and slide the adjuster lock lever to fit the screen using the FOCUS ring. STANDBY 3 Turn on the screen. Refer to the operating instructions of the picture to the right...

Operating Instructions (primary manual)
Page 15
... the screen. button. If you set "V Keystone" in the INSTALL SETTING menu to fit the screen using the ZOOM ring. If you position the projector on the right side, adjust so that the left side of the picture fits the left or right side of the picture fits that both "Side Shot" and "V Keystone" adjustments." Connections and Preparations When projecting using "Side Shot" adjustment only 1 Set "V Keystone" in the INSTALL SETTING to "Manual," and set the...
... the screen. button. If you set "V Keystone" in the INSTALL SETTING menu to fit the screen using the ZOOM ring. If you position the projector on the right side, adjust so that the left side of the picture fits the left or right side of the picture fits that both "Side Shot" and "V Keystone" adjustments." Connections and Preparations When projecting using "Side Shot" adjustment only 1 Set "V Keystone" in the INSTALL SETTING to "Manual," and set the...

Operating Instructions (primary manual)
Page 16
... as a yellow button. Vo l u m e : 30 Input A Tip You can select one of nine languages for displaying the menu and other on the side panel of the projector instead of the M/m/ Connections and Preparations Step 4: Selecting the Menu Language You can operate the menu using the joystick on -screen displays. STANDBY 2 Press the [/1 (on/standby) switch to turn on the projector. The menu presently selected is English. 1 Plug the AC power cord into standby mode.
... as a yellow button. Vo l u m e : 30 Input A Tip You can select one of nine languages for displaying the menu and other on the side panel of the projector instead of the M/m/ Connections and Preparations Step 4: Selecting the Menu Language You can operate the menu using the joystick on -screen displays. STANDBY 2 Press the [/1 (on/standby) switch to turn on the projector. The menu presently selected is English. 1 Plug the AC power cord into standby mode.

Operating Instructions (primary manual)
Page 23
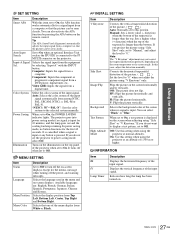
Operation through the Menus GB If you select an item name followed by dots (...), a sub menu with an on-screen menu for making various adjustments and settings. To change the tone of the menu display and the menu language displayed in the MENU SETTING menu. For Video/S Video input: Shows "Auto" or the "Color System" setting in a sub menu. x is displayed when no signal is equipped with setting items appear. Display items Input signal indicator Video 1 NTSC 3.58 Input signal setting indicator Picture adjustment menu Contrast: Min Input signal indicator Shows...
Operation through the Menus GB If you select an item name followed by dots (...), a sub menu with an on-screen menu for making various adjustments and settings. To change the tone of the menu display and the menu language displayed in the MENU SETTING menu. For Video/S Video input: Shows "Auto" or the "Color System" setting in a sub menu. x is displayed when no signal is equipped with setting items appear. Display items Input signal indicator Video 1 NTSC 3.58 Input signal setting indicator Picture adjustment menu Contrast: Min Input signal indicator Shows...

Operating Instructions (primary manual)
Page 25
... adjusting the picture. Contrast The higher the setting, the greater the contrast. The lower the setting, the more greenish the picture becomes. Using the Menus Menu Lists Menu Configurations The projector is used to adjust the input signal. SET SETTING menu The SET SETTING menu is used to change the onscreen language, display position of the lamp. Cinema: Select for changing the settings of the projector. items other than "Volume," and "Wide Mode" setting Tip You can also adjust...
... adjusting the picture. Contrast The higher the setting, the greater the contrast. The lower the setting, the more greenish the picture becomes. Using the Menus Menu Lists Menu Configurations The projector is used to adjust the input signal. SET SETTING menu The SET SETTING menu is used to change the onscreen language, display position of the lamp. Cinema: Select for changing the settings of the projector. items other than "Volume," and "Wide Mode" setting Tip You can also adjust...

Operating Instructions (primary manual)
Page 26
...) or progressive video (50p) signal is displayed to the input signal source. As the setting increases, the picture moves up . Adjusts the subtitle area. As the setting decreases, the subtitle area moves down . Set according to fill the vertical screen size. Cinema Black Switches the lamp wattage during projection. Normal: The picture with normal 4:3 aspect ratio is input, the picture may not be a 4:3 picture. Zoom: The normal 4:3 aspect ratio picture is done...
...) or progressive video (50p) signal is displayed to the input signal source. As the setting increases, the picture moves up . Adjusts the subtitle area. As the setting decreases, the subtitle area moves down . Set according to fill the vertical screen size. Cinema Black Switches the lamp wattage during projection. Normal: The picture with normal 4:3 aspect ratio is input, the picture may not be a 4:3 picture. Zoom: The normal 4:3 aspect ratio picture is done...
Operating Instructions (primary manual)
Page 27
... to display a test pattern, set to Off. V: Flips the picture vertically. On: Use this postion. Indicates how long the lamp has been turned on -screen displays. You can be seen clearly. Video GBR: Inputs the signal from a DVD player, digital tuner, etc. "NTSC3. 58"-"PAL-N": Sets the color system to On, the POWER SAVING indicator lights. Power Saving When set to "Manual," and adjust the level to power saving mode, select Off. If you project the picture using...
... to display a test pattern, set to Off. V: Flips the picture vertically. On: Use this postion. Indicates how long the lamp has been turned on -screen displays. You can be seen clearly. Video GBR: Inputs the signal from a DVD player, digital tuner, etc. "NTSC3. 58"-"PAL-N": Sets the color system to On, the POWER SAVING indicator lights. Power Saving When set to "Manual," and adjust the level to power saving mode, select Off. If you project the picture using...

Operating Instructions (primary manual)
Page 28
... user memories are displayed in the INPUT SETTING menu when you can automatically adjust to the projector. Signal Super Mac-2 SGI-1 Macintosh 19" Memory No. 23 23 25 H size 1312 1320 1328 Note When the aspect ratio of input signal does not match the screen size, a part of a Signal from the preset memory about the following signals, you adjust the picture manually. (1 page 26) 28 GB Menu Lists Adjusting Picture Quality of the screen...
... user memories are displayed in the INPUT SETTING menu when you can automatically adjust to the projector. Signal Super Mac-2 SGI-1 Macintosh 19" Memory No. 23 23 25 H size 1312 1320 1328 Note When the aspect ratio of input signal does not match the screen size, a part of a Signal from the preset memory about the following signals, you adjust the picture manually. (1 page 26) 28 GB Menu Lists Adjusting Picture Quality of the screen...
Operating Instructions (primary manual)
Page 29
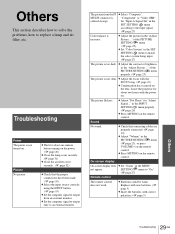
... work. of the PICTURE SETTING menu (1 page 25). c Adjust "Dot Phase" for about two hours with the power on the remote control. SETTING menu to an external monitor. Replace with new batteries. (1 page 5) c Insert the batteries with the FOCUS ring. (1 page 19) c Condensation has occurred on the remote control. c Set "Color System" in the SET SETTING menu to replace a lamp and air filter, etc. c Check that the proper connections have been made. (1 page 10) c Select the input source correctly using the INPUT button...
... work. of the PICTURE SETTING menu (1 page 25). c Adjust "Dot Phase" for about two hours with the power on the remote control. SETTING menu to an external monitor. Replace with new batteries. (1 page 5) c Insert the batteries with the FOCUS ring. (1 page 19) c Condensation has occurred on the remote control. c Set "Color System" in the SET SETTING menu to replace a lamp and air filter, etc. c Check that the proper connections have been made. (1 page 10) c Select the input source correctly using the INPUT button...
Operating Instructions (primary manual)
Page 30
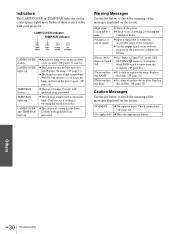
...blocking the ventilation holes. TEMP/FAN lights up. Check to replace the air filter. Please check Input-A Signal Sel. Replace the LAMP. c Check to replace the lamp. Check connections. (1 page 10) Not applicable! LAMP/COVER Indicator TEMP/FAN Indicator LAMP/ COVER TEMP/ FAN POWER SAVING ON/ STANDBY LAMP/COVER flashes. Consult with qualified Sony personnel. Consult with qualified Sony personnel. c Turn off in the SET SETTING menu to check the meaning of the frequency. c Set the output signal on the screen. c The internal temperature is time to see if nothing...
...blocking the ventilation holes. TEMP/FAN lights up. Check to replace the air filter. Please check Input-A Signal Sel. Replace the LAMP. c Check to replace the lamp. Check connections. (1 page 10) Not applicable! LAMP/COVER Indicator TEMP/FAN Indicator LAMP/ COVER TEMP/ FAN POWER SAVING ON/ STANDBY LAMP/COVER flashes. Consult with qualified Sony personnel. Consult with qualified Sony personnel. c Turn off in the SET SETTING menu to check the meaning of the frequency. c Set the output signal on the screen. c The internal temperature is time to see if nothing...
Operating Instructions (primary manual)
Page 31
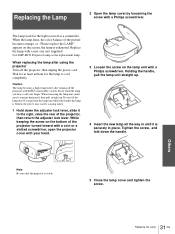
... screwdriver, open the projector cover with a Philips screwdriver. Replacing the Lamp 2 Open the lamp cover by loosening the screw with a new one (not supplied). The lamp used for the lamp to the right, raise the rear of the picture becomes strange, or "Please replace the LAMP." When the lamp dims, the color balance of the projector, then return the adjuster lock lever. Use LMP-H150 Projector Lamp as the replacement lamp. While keeping the screw on /standby) switch. When removing the lamp unit...
... screwdriver, open the projector cover with a Philips screwdriver. Replacing the Lamp 2 Open the lamp cover by loosening the screw with a new one (not supplied). The lamp used for the lamp to the right, raise the rear of the picture becomes strange, or "Please replace the LAMP." When the lamp dims, the color balance of the projector, then return the adjuster lock lever. Use LMP-H150 Projector Lamp as the replacement lamp. While keeping the screw on /standby) switch. When removing the lamp unit...
Operating Instructions (primary manual)
Page 32
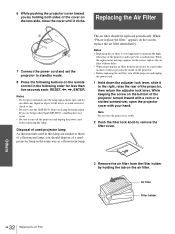
6 While pushing the projector cover toward you by holding both sides of the cover on the remote control in the following buttons on the lens side, close the cover until it clicks. Replacing the Air Filter 2 1 7 Connect the power cord and set the projector to standby mode. 8 Press the following order for less than five seconds each: RESET,
6 While pushing the projector cover toward you by holding both sides of the cover on the remote control in the following buttons on the lens side, close the cover until it clicks. Replacing the Air Filter 2 1 7 Connect the power cord and set the projector to standby mode. 8 Press the following order for less than five seconds each: RESET,
Operating Instructions (primary manual)
Page 34
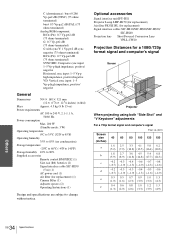
...;F) Operating humidity 35% to 85% (no condensation) Storage temperature -20ºC to 60ºC (-4ºF to 140ºF) Storage humidity 10% to 90% Supplied accessories Remote control RM-PJHS2 (1) Size AA (R6) batteries (2) Signal interface cable SIC-HS50 (5 m) (1) AC power cord (1) Air filter (for a 1080i/720p format signal and computer's signal Screen dc 12˚ f e 7˚ ab Projector When projecting using both "Side Shot" and "V Keystone" adjustments For a 720p format signal...
...;F) Operating humidity 35% to 85% (no condensation) Storage temperature -20ºC to 60ºC (-4ºF to 140ºF) Storage humidity 10% to 90% Supplied accessories Remote control RM-PJHS2 (1) Size AA (R6) batteries (2) Signal interface cable SIC-HS50 (5 m) (1) AC power cord (1) Air filter (for a 1080i/720p format signal and computer's signal Screen dc 12˚ f e 7˚ ab Projector When projecting using both "Side Shot" and "V Keystone" adjustments For a 720p format signal...
Operating Instructions (primary manual)
Page 43
.../COVER 30 TEMP/FAN 30 INFORMATION menu 27 INPUT SETTING menu 26 Input-A Signal Sel 27 INSTALL SETTING menu 27 Installing the Projector and a Screen 8 L Lamp replacement 31 Lamp Timer 27 Language 27 Location of controls front 40 rear 41 remote control 42 M Menu clearing the menu display......... 24 operation 23 reset 24 Menu Color 27 Menu Position 27 MENU SETTING menu 27 Message caution 30 warning 30 O Optional accesories 34 P Picture Mode 25 Cinema 25 Dynamic 25 Standard 25 User 1, 2 and 3 25 PICTURE SETTING menu 25 Power Saving 27 Preset memory 28, 39 Projection...
.../COVER 30 TEMP/FAN 30 INFORMATION menu 27 INPUT SETTING menu 26 Input-A Signal Sel 27 INSTALL SETTING menu 27 Installing the Projector and a Screen 8 L Lamp replacement 31 Lamp Timer 27 Language 27 Location of controls front 40 rear 41 remote control 42 M Menu clearing the menu display......... 24 operation 23 reset 24 Menu Color 27 Menu Position 27 MENU SETTING menu 27 Message caution 30 warning 30 O Optional accesories 34 P Picture Mode 25 Cinema 25 Dynamic 25 Standard 25 User 1, 2 and 3 25 PICTURE SETTING menu 25 Power Saving 27 Preset memory 28, 39 Projection...
Marketing Specifications & Features
Page 2
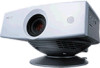
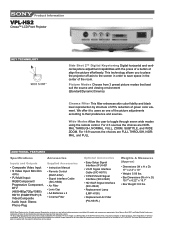
... (with third party software not supplied with the press of the picture adjustments according to toggle through seven wide modes using the remote control. We offer it to users as one of a button ot align the picture effortlessly. Reproduction in whole or in the center of green color element. Product Information VPL-HS2 Cineza™ LCD Front Projector KEY TECHNOLOGY Side Shot 2™ Digital Keystoning Digital horizontal and vertical keystone adjustment capabilities with the...
... (with third party software not supplied with the press of the picture adjustments according to toggle through seven wide modes using the remote control. We offer it to users as one of a button ot align the picture effortlessly. Reproduction in whole or in the center of green color element. Product Information VPL-HS2 Cineza™ LCD Front Projector KEY TECHNOLOGY Side Shot 2™ Digital Keystoning Digital horizontal and vertical keystone adjustment capabilities with the...


