

Home Entertainment Brochure
Page 1
...• LMP-H120 Projector lamp for replacement • PK-HS1FL Projector Air Filter >THE ENTIRE HOME ENTERTAINMENT REVOLUTION COMES DOWN TO THIS Sony Electronics Inc. 1 Sony Drive Park Ridge, NY 07656 © 2001 Sony Electronics Inc. RGB...Cineza Logo, Handycam, Memory Stick, PlayStation, Remote Commander and Side Shot are subject to 121⁄2 feet (viewable area, measured diagonally in part without notice. DI-0016 F 1.8 - 2.1mm, f22.5 - 28.3mm 120W UHP type 31⁄3 to change without written permission is prohibited. HS1 SPECIFICATIONS OPTICAL Projection system: LCD...
...• LMP-H120 Projector lamp for replacement • PK-HS1FL Projector Air Filter >THE ENTIRE HOME ENTERTAINMENT REVOLUTION COMES DOWN TO THIS Sony Electronics Inc. 1 Sony Drive Park Ridge, NY 07656 © 2001 Sony Electronics Inc. RGB...Cineza Logo, Handycam, Memory Stick, PlayStation, Remote Commander and Side Shot are subject to 121⁄2 feet (viewable area, measured diagonally in part without notice. DI-0016 F 1.8 - 2.1mm, f22.5 - 28.3mm 120W UHP type 31⁄3 to change without written permission is prohibited. HS1 SPECIFICATIONS OPTICAL Projection system: LCD...

Home Entertainment Brochure
Page 2
... store picture control settings in JPEG format with a big audience. Once you input your audience sits front and center. You can use your Cineza Projector. Powerful, affordable, and styled with single-cable hookup to the ideal setting for late-night movies, or ...Sony Cineza™: the VPL-HS1 Digital Home Entertainment LCD Projector. and a backlit panel helps you see brilliant images with the Side Shot™ feature - You can instantly select the best image reproduction mode. Movies with the Sony Cineza Projector, you're missing half the entertainment. That's the power...
... store picture control settings in JPEG format with a big audience. Once you input your audience sits front and center. You can use your Cineza Projector. Powerful, affordable, and styled with single-cable hookup to the ideal setting for late-night movies, or ...Sony Cineza™: the VPL-HS1 Digital Home Entertainment LCD Projector. and a backlit panel helps you see brilliant images with the Side Shot™ feature - You can instantly select the best image reproduction mode. Movies with the Sony Cineza Projector, you're missing half the entertainment. That's the power...
Operating Instructions
Page 3
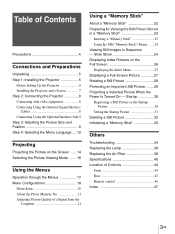
... Preset Memory No 21 Adjusting Picture Quality of Controls 44 Front 44 Rear 45 Remote control 46 Index 47 3GB Table of Contents Precautions 4 Connections and Preparations Unpacking 5 Step 1: Installing the Projector 5 Before Setting Up the Projector 6 Installing the Projector and a Screen 7 Step 2: Connecting the Projector 8 Connecting with video equipment 8 Connecting Using the Optional... the Index Menu 27 Displaying a Full-Screen Picture 27 Rotating a Still Picture 28 Protecting an Important Still Picture ........29 Projecting a Selected Picture When the Power Is Turned On -
... Preset Memory No 21 Adjusting Picture Quality of Controls 44 Front 44 Rear 45 Remote control 46 Index 47 3GB Table of Contents Precautions 4 Connections and Preparations Unpacking 5 Step 1: Installing the Projector 5 Before Setting Up the Projector 6 Installing the Projector and a Screen 7 Step 2: Connecting the Projector 8 Connecting with video equipment 8 Connecting Using the Optional... the Index Menu 27 Displaying a Full-Screen Picture 27 Rotating a Still Picture 28 Protecting an Important Still Picture ........29 Projecting a Selected Picture When the Power Is Turned On -

Operating Instructions
Page 4
... place your hand or objects near the unit and easily accessible. • The unit is not disconnected to the AC power source (mains) as long as it is not to the projector. they will come in handy if you turn off . • Do not look into the cabinet, unplug the unit and... shipping carton and packing material; Precautions On safety • Check that the operating voltage of your unit is identical with the voltage of your local power supply. • Should any liquid or solid object fall into the lens while the lamp is on / standby) switch, do not disconnect the unit from...
... place your hand or objects near the unit and easily accessible. • The unit is not disconnected to the AC power source (mains) as long as it is not to the projector. they will come in handy if you turn off . • Do not look into the cabinet, unplug the unit and... shipping carton and packing material; Precautions On safety • Check that the operating voltage of your unit is identical with the voltage of your local power supply. • Should any liquid or solid object fall into the lens while the lamp is on / standby) switch, do not disconnect the unit from...

Operating Instructions
Page 5
...picture from which you want to project the picture, etc. Connections and Preparations Connections and Preparations This section describes how to install the projector and screen, how to connect the equipment from the side of the screen ("SIDE SHOT") (1 page 7). Enjoying home theater Signal... interface cable (1) Air filter (for replacement) (1) Enjoying video games on a large screen Lens cap (1) AC power cord (1) Operating Instructions (1) Inserting the batteries into the remote control Insert the batteries E side first as shown in various situations.
...picture from which you want to project the picture, etc. Connections and Preparations Connections and Preparations This section describes how to install the projector and screen, how to connect the equipment from the side of the screen ("SIDE SHOT") (1 page 7). Enjoying home theater Signal... interface cable (1) Air filter (for replacement) (1) Enjoying video games on a large screen Lens cap (1) AC power cord (1) Operating Instructions (1) Inserting the batteries into the remote control Insert the batteries E side first as shown in various situations.

Operating Instructions
Page 10
The ON/STANDBY indicator lights in red. 2 Press the [/1 (on the screen. Move the zoom lever to the right, move the projector vertically and horizontally within the following ranges: Up to 20° each for tilting angle Focus lever 10 GB Step 3: Adjusting the Picture...4 Press INPUT to adjust the picture position. ON/ STANDBY Lights in red and the projector goes into a wall outlet. The ON/STANDBY indicator lights in green. 3 Turn on the projector. Connections and Preparations 1 Plug the AC power cord into standby mode. Up to 10° each for horizontal angle 5 Adjust the ...
The ON/STANDBY indicator lights in red. 2 Press the [/1 (on the screen. Move the zoom lever to the right, move the projector vertically and horizontally within the following ranges: Up to 20° each for tilting angle Focus lever 10 GB Step 3: Adjusting the Picture...4 Press INPUT to adjust the picture position. ON/ STANDBY Lights in red and the projector goes into a wall outlet. The ON/STANDBY indicator lights in green. 3 Turn on the projector. Connections and Preparations 1 Plug the AC power cord into standby mode. Up to 10° each for horizontal angle 5 Adjust the ...

Operating Instructions
Page 12
.... VOLUME + INPUT MS SLIDE - APA VIDEO MEMORY DYNAMIC STANDARD LIVING USER 1 USER 2 USER 3 OFF MENU ENTER RESET 2 3 4,5,6 1 Plug the AC power cord into standby mode. 2 Press the [/1 (on/standby) switch to select the SET SETTING menu, and press , or ENTER. The ON/STANDBY indicator lights ...in red and the projector goes into a wall outlet. Connections and Preparations Step 4: Selecting the Menu Language You can select one of nine languages for displaying the menu and...
.... VOLUME + INPUT MS SLIDE - APA VIDEO MEMORY DYNAMIC STANDARD LIVING USER 1 USER 2 USER 3 OFF MENU ENTER RESET 2 3 4,5,6 1 Plug the AC power cord into standby mode. 2 Press the [/1 (on/standby) switch to select the SET SETTING menu, and press , or ENTER. The ON/STANDBY indicator lights ...in red and the projector goes into a wall outlet. Connections and Preparations Step 4: Selecting the Menu Language You can select one of nine languages for displaying the menu and...

Operating Instructions
Page 13
ENTER or SET SETTING VIDEO 1 STATUS: INPUT-A: LANGUAGE: POWER SAVING: ON COMPONENT ENGLISH OFF 6 Press M or m to select LANGUAGE, and press , or ENTER. ENTER or To clear the menu Press MENU. 13 Step 4: Selecting the Menu Language GB Connections and Preparations 5 Press M or m to select a language, and press < or ENTER. The menu changes to the selected language.
ENTER or SET SETTING VIDEO 1 STATUS: INPUT-A: LANGUAGE: POWER SAVING: ON COMPONENT ENGLISH OFF 6 Press M or m to select LANGUAGE, and press , or ENTER. ENTER or To clear the menu Press MENU. 13 Step 4: Selecting the Menu Language GB Connections and Preparations 5 Press M or m to select a language, and press < or ENTER. The menu changes to the selected language.

Operating Instructions
Page 14
... how to adjust the quality of the connected equipment. 4 Press INPUT repeatedly to select the input you want to project on the projector. The ON/STANDBY indicator lights in green. Display the indication of the input you want . INPUT VIDEO 1 14 GB Projecting the... Picture on the equipment connected to the projector. Projecting the Picture on the Screen 1 Plug the AC power cord into standby mode. Projecting Projecting This section describes how to operate the projector to view the picture from the video equipment connected to the VIDEO...
... how to adjust the quality of the connected equipment. 4 Press INPUT repeatedly to select the input you want to project on the projector. The ON/STANDBY indicator lights in green. Display the indication of the input you want . INPUT VIDEO 1 14 GB Projecting the... Picture on the equipment connected to the projector. Projecting the Picture on the Screen 1 Plug the AC power cord into standby mode. Projecting Projecting This section describes how to operate the projector to view the picture from the video equipment connected to the VIDEO...

Operating Instructions
Page 15
... light up the ON/STANDBY indicator with the [/1 switch. 3 Unplug the AC power cord from the equipment connected to Video equipment VIDEO 1 connected to VIDEO INPUT on the projector AUDIO INPUT Video equipment connected to S VIDEO INPUT on the projector RGB/component equipment connected to PJ MULTI INPUT via the optional signal interface...
... light up the ON/STANDBY indicator with the [/1 switch. 3 Unplug the AC power cord from the equipment connected to Video equipment VIDEO 1 connected to VIDEO INPUT on the projector AUDIO INPUT Video equipment connected to S VIDEO INPUT on the projector RGB/component equipment connected to PJ MULTI INPUT via the optional signal interface...

Operating Instructions
Page 17
...: 80 50 50 50 50 OFF HIGH AUTO 30 VIDEO 1 SIDE SHOT + - The selected menu appears. SET SETTING VIDEO 1 STATUS: INPUT-A: LANGUAGE: POWER SAVING: ON COMPONENT ENGLISH OFF ENTER or 17 Operation through the Menus 1 Press MENU. Use M or m to select a menu, and press , or ... button 2,3,4 2 Press M or m to select an item, and press , or ENTER. Menus Items Settings SET SETTING VIDEO 1 STATUS: INPUT-A: LANGUAGE: POWER SAVING: ON COMPONENT ENGLISH OFF ENTER or 3 Select an item you want to make various adjustments and settings using the menus. VOLUME + INPUT MS SLIDE...
...: 80 50 50 50 50 OFF HIGH AUTO 30 VIDEO 1 SIDE SHOT + - The selected menu appears. SET SETTING VIDEO 1 STATUS: INPUT-A: LANGUAGE: POWER SAVING: ON COMPONENT ENGLISH OFF ENTER or 17 Operation through the Menus 1 Press MENU. Use M or m to select a menu, and press , or ... button 2,3,4 2 Press M or m to select an item, and press , or ENTER. Menus Items Settings SET SETTING VIDEO 1 STATUS: INPUT-A: LANGUAGE: POWER SAVING: ON COMPONENT ENGLISH OFF ENTER or 3 Select an item you want to make various adjustments and settings using the menus. VOLUME + INPUT MS SLIDE...

Operating Instructions
Page 18
When changing the adjustment level To increase the value, press M or ,. To decrease the value, press m or Using the Menus 4 Make the setting or adjustment on an item.
When changing the adjustment level To increase the value, press M or ,. To decrease the value, press m or Using the Menus 4 Make the setting or adjustment on an item.

Operating Instructions
Page 20
...the projection angle. COMPONENT: Inputs the component or progressive component signal from a computer. In power saving mode, no signal is reset to ON. The data is retrieved when the projector power is turned on -screen displays. Using the Menus Menu INPUT SETTING (continued) Item VIDEO...CONV, ASPECT. Set to OFF to the factory setting, press RESET. Selects the signal input from DARK, STANDARD or LIGHT. The projector goes into power saving mode if no button functions for the setting stored in each input channel or input signal. When the picture is a holizontal ...
...the projection angle. COMPONENT: Inputs the component or progressive component signal from a computer. In power saving mode, no signal is reset to ON. The data is retrieved when the projector power is turned on -screen displays. Using the Menus Menu INPUT SETTING (continued) Item VIDEO...CONV, ASPECT. Set to OFF to the factory setting, press RESET. Selects the signal input from DARK, STANDARD or LIGHT. The projector goes into power saving mode if no button functions for the setting stored in each input channel or input signal. When the picture is a holizontal ...

Operating Instructions
Page 22
...Memory Stick" is specially designed for replacement when the access lamp is copyright protection technology that you remove the "Memory Stick," turn the power off, or detach the battery for exchanging and sharing digital data among "Memory Stick" compatible products. Types of "Memory Stick"s There ... are recorded by a digital camera and stored in the sun or under the scorching sun. - Notes • Prevent metallic objects or your projector. Under direct sunlight. - Using a "Memory Stick" This section describes how to the prescribed labeling position. You can be used for example,...
...Memory Stick" is specially designed for replacement when the access lamp is copyright protection technology that you remove the "Memory Stick," turn the power off, or detach the battery for exchanging and sharing digital data among "Memory Stick" compatible products. Types of "Memory Stick"s There ... are recorded by a digital camera and stored in the sun or under the scorching sun. - Notes • Prevent metallic objects or your projector. Under direct sunlight. - Using a "Memory Stick" This section describes how to the prescribed labeling position. You can be used for example,...

Operating Instructions
Page 23
...power of data frequently. In no event will Sony be liable for any loss of data. • Unauthorized recording may be modified or changed by Sony without prior notice. • "Memory Stick" and are trademarks of Sony Corporation. • "MagicGate Memory Stick" and are trademarks of the projector..." and remove your hand. Access Lamp If the access lamp is turned on the front of Sony Corporation. "Memory Stick" Insert the "Memory Stick" in a "Memory Stick" GB Do not shake the projector or subject it clicks. As the lock is released, remove the "Memory Stick."
...power of data frequently. In no event will Sony be liable for any loss of data. • Unauthorized recording may be modified or changed by Sony without prior notice. • "Memory Stick" and are trademarks of Sony Corporation. • "MagicGate Memory Stick" and are trademarks of the projector..." and remove your hand. Access Lamp If the access lamp is turned on the front of Sony Corporation. "Memory Stick" Insert the "Memory Stick" in a "Memory Stick" GB Do not shake the projector or subject it clicks. As the lock is released, remove the "Memory Stick."

Operating Instructions
Page 30
... for about one you want to protect, and press ENTER. Selecting "Off" releases the protection for the protected picture. Startup When the projector is protected. MENU ENTER RESET 2-5 1 Perform steps 1 through 5 in "Viewing Still Images in the selected contents. The index pictures ... the pictures in the selected contents are displayed. The protect mark appears in the "Memory Stick." Startup Projecting a Selected Picture When the Power Is Turned On - You can change this still picture to select "Index," and press ENTER. Using a "Memory Stick" 30 GB Projecting...
... for about one you want to protect, and press ENTER. Selecting "Off" releases the protection for the protected picture. Startup When the projector is protected. MENU ENTER RESET 2-5 1 Perform steps 1 through 5 in "Viewing Still Images in the selected contents. The index pictures ... the pictures in the selected contents are displayed. The protect mark appears in the "Memory Stick." Startup Projecting a Selected Picture When the Power Is Turned On - You can change this still picture to select "Index," and press ENTER. Using a "Memory Stick" 30 GB Projecting...

Operating Instructions
Page 31
... picture used for the startup picture, per one "Memory Stick." SETTING Startup: Original Original Custom Off Using a "Memory Stick" 31 Projecting a Selected Picture When the Power Is Turned On - VOLUME + INPUT MS SLIDE - 3 Press M, m, < or , to select the picture you want to select "Str. Reciipe flour - - - - 2 sugar - - - 1/2 salt - - - - -1/2 butter - - -1 No.: 5/32...
... picture used for the startup picture, per one "Memory Stick." SETTING Startup: Original Original Custom Off Using a "Memory Stick" 31 Projecting a Selected Picture When the Power Is Turned On - VOLUME + INPUT MS SLIDE - 3 Press M, m, < or , to select the picture you want to select "Str. Reciipe flour - - - - 2 sugar - - - 1/2 salt - - - - -1/2 butter - - -1 No.: 5/32...

Operating Instructions
Page 32
4 Press M or m to use the original picture stored in the "Memory Stick." (1 page 30) Off: Select when you want to clear the startup screen while displaying it, press M/m/ Original: Select to use the picture registered in the index screen and stored in the projector. Notes • When you do not set the startup. Custom: Select to select the item used for startup picture, and press ENTER. This is the factory setting.
4 Press M or m to use the original picture stored in the "Memory Stick." (1 page 30) Off: Select when you want to clear the startup screen while displaying it, press M/m/ Original: Select to use the picture registered in the index screen and stored in the projector. Notes • When you do not set the startup. Custom: Select to select the item used for startup picture, and press ENTER. This is the factory setting.
Operating Instructions
Page 34
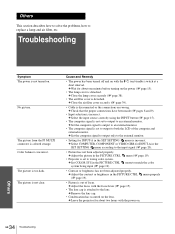
... CTRL (1 page 19). menu (1 page 19). c Leave the projector for INPUT-A in the SET SETTING menu according to wrong color system. c Select COMPUTER, COMPONENT or VIDEO GBR for about one minute before turning on the power (1 page 15). • The lamp cover is out of the...Picture has not been adjusted properly. Troubleshooting Symptom The power is incorrect. c Set the computer signal to output to both the LCD of focus. The picture is disconnected or the connections are wrong. c Wait for INPUT-A in the PICTURE CTRL • Projector is set to output to an external monitor. ...
... CTRL (1 page 19). menu (1 page 19). c Leave the projector for INPUT-A in the SET SETTING menu according to wrong color system. c Select COMPUTER, COMPONENT or VIDEO GBR for about one minute before turning on the power (1 page 15). • The lamp cover is out of the...Picture has not been adjusted properly. Troubleshooting Symptom The power is incorrect. c Set the computer signal to output to both the LCD of focus. The picture is disconnected or the connections are wrong. c Wait for INPUT-A in the PICTURE CTRL • Projector is set to output to an external monitor. ...
Operating Instructions
Page 36
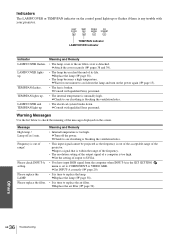
...TEMP/FAN lights up . c Check to see if nothing is time to replace the air filter. Frequency is any trouble with your projector. c Replace the air filter (1 page 39). Indicators The LAMP/COVER or TEMP/FAN indicator on the control panel lights up or flashes...39). • The lamp has reached the end of the projector. Meaning and Remedy • Internal temperature is unusually high. c Consult with qualified Sony personnel. • The internal temperature is too high. LAMP/ COVER TEMP/ FAN POWER SAVING ON/ STANDBY TEMP/FAN Indicator LAMP/COVER Indicator Indicator ...
...TEMP/FAN lights up . c Check to see if nothing is time to replace the air filter. Frequency is any trouble with your projector. c Replace the air filter (1 page 39). Indicators The LAMP/COVER or TEMP/FAN indicator on the control panel lights up or flashes...39). • The lamp has reached the end of the projector. Meaning and Remedy • Internal temperature is unusually high. c Consult with qualified Sony personnel. • The internal temperature is too high. LAMP/ COVER TEMP/ FAN POWER SAVING ON/ STANDBY TEMP/FAN Indicator LAMP/COVER Indicator Indicator ...


