
Startup Guide - Quick Reference Manual
Page 30
... Indicators Page 17 Replacing the Lamp Page 20 Cleaning the Air Filter Page 22 Replacing the Projection Lens page 23 2 GB About the Quick Reference Manual Refer to the Operating Instructions contained in the supplied CDROM. It also describes important notes and cautions to which you have to pay attention when...
... Indicators Page 17 Replacing the Lamp Page 20 Cleaning the Air Filter Page 22 Replacing the Projection Lens page 23 2 GB About the Quick Reference Manual Refer to the Operating Instructions contained in the supplied CDROM. It also describes important notes and cautions to which you have to pay attention when...
Startup Guide - Quick Reference Manual
Page 31
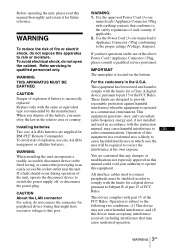
... in a residential area is subject to the following two conditions: (1) This device may not cause harmful interference, and (2) this manual thoroughly and retain it for peripheral device wiring that conforms to the safety regulations of fire or electric shock, do not expose this...plug to qualified personnel only. Use the Power Cord (3-core mains lead) / Appliance Connector / Plug conforming to comply with the instruction manual, may cause undesired operation. 3 WARNING GB IMPORTANT The nameplate is operated in a commercial environment. For the customers in accordance with the ...
... in a residential area is subject to the following two conditions: (1) This device may not cause harmful interference, and (2) this manual thoroughly and retain it for peripheral device wiring that conforms to the safety regulations of fire or electric shock, do not expose this...plug to qualified personnel only. Use the Power Cord (3-core mains lead) / Appliance Connector / Plug conforming to comply with the instruction manual, may cause undesired operation. 3 WARNING GB IMPORTANT The nameplate is operated in a commercial environment. For the customers in accordance with the ...

Startup Guide - Quick Reference Manual
Page 38
...holder (supplied) AC IN socket AC power cord (supplied) 2 Slide the plug holder over the AC power cord to fix to read on the manual that you can purchase a new one from the Adobe website. 1 Open the index.html file in the CD- While pressing the lid, slide...) batteries (2) AC power cord (1) Plug holder (1) Terminal cover (1) Quick Reference Manual (this manual) (1) Operating Instructions (CD-ROM) (1) Using the CD-ROM manual The manual can be read . You can download Adobe Reader free from your Sony dealer or Sony service counter. Note If you have lost or damaged the CD-ROM, you want...
...holder (supplied) AC IN socket AC power cord (supplied) 2 Slide the plug holder over the AC power cord to fix to read on the manual that you can purchase a new one from the Adobe website. 1 Open the index.html file in the CD- While pressing the lid, slide...) batteries (2) AC power cord (1) Plug holder (1) Terminal cover (1) Quick Reference Manual (this manual) (1) Operating Instructions (CD-ROM) (1) Using the CD-ROM manual The manual can be read . You can download Adobe Reader free from your Sony dealer or Sony service counter. Note If you have lost or damaged the CD-ROM, you want...

Startup Guide - Quick Reference Manual
Page 40
...; GB 12 Connecting For information on which has the HDMI Logo. • Use a high speed HDMI cable(s) on other connecting methods, refer to the instruction manuals of picture signals or cause a malfunction. Connecting a Computer Computer HDMI output terminal HDMI cable (not supplied) Notes • Use HDMI-compatible equipment which the cable...
...; GB 12 Connecting For information on which has the HDMI Logo. • Use a high speed HDMI cable(s) on other connecting methods, refer to the instruction manuals of picture signals or cause a malfunction. Connecting a Computer Computer HDMI output terminal HDMI cable (not supplied) Notes • Use HDMI-compatible equipment which the cable...

Startup Guide - Quick Reference Manual
Page 43
... the Remote projector or the Remote the V/v/B/b key to adjust the Commander then press the V/ Commander then press the V/ position. When attaching the Manual When attaching the Manual To return the lens to the center focus lens zoom lens position of the Projected Image Focus Size (Zoom) Position (Lens shift) When attaching...
... the Remote projector or the Remote the V/v/B/b key to adjust the Commander then press the V/ Commander then press the V/ position. When attaching the Manual When attaching the Manual To return the lens to the center focus lens zoom lens position of the Projected Image Focus Size (Zoom) Position (Lens shift) When attaching...

Startup Guide - Quick Reference Manual
Page 46
...) in Quick Reference angle. If the symptom occurs again, the lamp may be exhausted. Consult a qualified Sony consultant. The lamp does not light properly. In this case, replace the lamp with a new one (page 20). Manual and install at the wrong in red) Three times Eight times Nine times Meaning Remedies The...
...) in Quick Reference angle. If the symptom occurs again, the lamp may be exhausted. Consult a qualified Sony consultant. The lamp does not light properly. In this case, replace the lamp with a new one (page 20). Manual and install at the wrong in red) Three times Eight times Nine times Meaning Remedies The...
Operating Instructions
Page 1
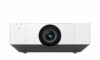
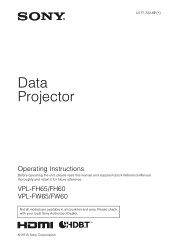
VPL-FH65/FH60 VPL-FW65/FW60 Not all models are available in all countries and area. 4-577-702-17 (1) Data Projector Operating Instructions Before operating the unit, please read this manual and supplied Quick Reference Manual thoroughly and retain it for future reference. Please check with your local Sony Authorized Dealer. © 2015 Sony Corporation
VPL-FH65/FH60 VPL-FW65/FW60 Not all models are available in all countries and area. 4-577-702-17 (1) Data Projector Operating Instructions Before operating the unit, please read this manual and supplied Quick Reference Manual thoroughly and retain it for future reference. Please check with your local Sony Authorized Dealer. © 2015 Sony Corporation
Operating Instructions
Page 9
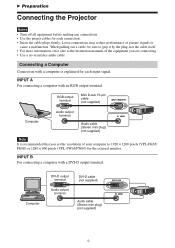
... supplied) Note It is explained for each connection. • Insert the cable plugs firmly; Loose connections may reduce performance of your computer to the instruction manuals of the equipment you set the resolution of picture signals or cause a malfunction. INPUT B For connecting a computer with a DVI-D output terminal. Computer DVI-D output terminal... out a cable, be sure to grip it by the plug, not the cable itself. • For more information, refer also to 1920 × 1200 pixels (VPL-FH65/ FH60) or 1280 × 800 pixels (VPL-FW65/FW60) for each input signal.
... supplied) Note It is explained for each connection. • Insert the cable plugs firmly; Loose connections may reduce performance of your computer to the instruction manuals of the equipment you set the resolution of picture signals or cause a malfunction. INPUT B For connecting a computer with a DVI-D output terminal. Computer DVI-D output terminal... out a cable, be sure to grip it by the plug, not the cable itself. • For more information, refer also to 1920 × 1200 pixels (VPL-FH65/ FH60) or 1280 × 800 pixels (VPL-FW65/FW60) for each input signal.

Operating Instructions
Page 18
... V/v/B/b key to adjust the Commander then press the V/ Commander then press the V/ position. the size. v/B/b key to adjust the focus. When attaching the Manual When attaching the Manual To return the lens to the center focus lens zoom lens position of the Projected Image Focus Size (Zoom) Position (Lens shift) When attaching...
... V/v/B/b key to adjust the Commander then press the V/ Commander then press the V/ position. the size. v/B/b key to adjust the focus. When attaching the Manual When attaching the Manual To return the lens to the center focus lens zoom lens position of the Projected Image Focus Size (Zoom) Position (Lens shift) When attaching...

Operating Instructions
Page 29
In this case, adjust the "Phase," "Pitch," and "Shift" items manually. *6: Available when a computer or video signal is set to "Zoom." 29 This option is available only when "Aspect" is input from the RGB/YPBPR input ...
In this case, adjust the "Phase," "Pitch," and "Shift" items manually. *6: Available when a computer or video signal is set to "Zoom." 29 This option is available only when "Aspect" is input from the RGB/YPBPR input ...

Operating Instructions
Page 34
... Description Network Setting IPv4 Setting*1 IP Address Setup Auto(DHCP): The IP address is assigned automatically from the browser (page 43). Manual: To specify the IP Address manually. Limited: Set when the image input level is used for setting for "IP Address Setup," select the item with the B ... image input level is disturbed or not projected. Input-A Signal Sel. IP Address/ Subnet Mask/ Default Gateway/Primary DNS/Secondary DNS When "Manual" is selected with the INPUT key.*6 Color System Auto/NTSC3.58/PAL/SECAM/NTSC4.43/PAL-M/PAL-N: When set it from the DHCP server...
... Description Network Setting IPv4 Setting*1 IP Address Setup Auto(DHCP): The IP address is assigned automatically from the browser (page 43). Manual: To specify the IP Address manually. Limited: Set when the image input level is used for setting for "IP Address Setup," select the item with the B ... image input level is disturbed or not projected. Input-A Signal Sel. IP Address/ Subnet Mask/ Default Gateway/Primary DNS/Secondary DNS When "Manual" is selected with the INPUT key.*6 Color System Auto/NTSC3.58/PAL/SECAM/NTSC4.43/PAL-M/PAL-N: When set it from the DHCP server...
Operating Instructions
Page 35
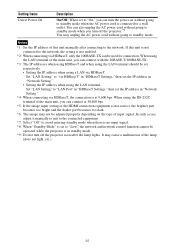
..."LAN Setting" to "LAN Port" in "HDBaseT Settings," then set the IP address in "Network Setting." *4: When connecting via HDBaseT. In such a case, adjust it manually to suit to the connected equipment. *7: Select "Off" to avoid entering standby mode when there is no input signal. *8: When "Standby Mode" is not correct... unplug the AC power cord without going to standby mode when you turn off the projector soon after connecting to the network. If this unit manually after the lamp lights. When using the RS-232C terminal of the main unit, you can connect at 9,600 bps. It may unplug the...
..."LAN Setting" to "LAN Port" in "HDBaseT Settings," then set the IP address in "Network Setting." *4: When connecting via HDBaseT. In such a case, adjust it manually to suit to the connected equipment. *7: Select "Off" to avoid entering standby mode when there is no input signal. *8: When "Standby Mode" is not correct... unplug the AC power cord without going to standby mode when you turn off the projector soon after connecting to the network. If this unit manually after the lamp lights. When using the RS-232C terminal of the main unit, you can connect at 9,600 bps. It may unplug the...

Operating Instructions
Page 43
Specify an IP address: Set the network manually. -IP Address: Input the IP address of the projector. -Subnet Mask: Input the subnet mask of the projector. -Default Gateway: Input the default gateway of ... DNS display the values provided by a DHCP server. MAC Address: Displays the MAC address of the projector. 43 Specify an IPv6 address: Set the network manually. -IPv6 Address: Input the IP address of the projector. -Prefix: Input the prefix of the projector. -Default Gateway: Input the default gateway of the projector...
Specify an IP address: Set the network manually. -IP Address: Input the IP address of the projector. -Subnet Mask: Input the subnet mask of the projector. -Default Gateway: Input the default gateway of ... DNS display the values provided by a DHCP server. MAC Address: Displays the MAC address of the projector. 43 Specify an IPv6 address: Set the network manually. -IPv6 Address: Input the IP address of the projector. -Prefix: Input the prefix of the projector. -Default Gateway: Input the default gateway of the projector...

Operating Instructions
Page 48
... AC power cord into the wall outlet and turn on again after the lamp has cooled. If the lamp is attached and install it securely. Manual and install at the wrong in the projector is abnormal. • Check if the air filter is not installed securely. Warning indicators and remedies Indicator... the projector and turn off the projector again and remove the lamp (page 52), then check if the lamp is not securely attached. Consult a qualified Sony consultant. Check how the lens is broken, do not exchange the lamp by the wall or an object and secure a sufficient gap. • Check ...
... AC power cord into the wall outlet and turn on again after the lamp has cooled. If the lamp is attached and install it securely. Manual and install at the wrong in the projector is abnormal. • Check if the air filter is not installed securely. Warning indicators and remedies Indicator... the projector and turn off the projector again and remove the lamp (page 52), then check if the lamp is not securely attached. Consult a qualified Sony consultant. Check how the lens is broken, do not exchange the lamp by the wall or an object and secure a sufficient gap. • Check ...

Operating Instructions
Page 50
... No image. Check how the air filter is 37 automatically projected. Wait until the pattern turns off and the color calibration function is set "Aspect" manually. Symptom Remedy Page The power is not turned Check if the AC power cord is muted. 7 During "Zone Black Level Adj." Check if the input...
... No image. Check how the air filter is 37 automatically projected. Wait until the pattern turns off and the color calibration function is set "Aspect" manually. Symptom Remedy Page The power is not turned Check if the AC power cord is muted. 7 During "Zone Black Level Adj." Check if the input...
Operating Instructions
Page 59
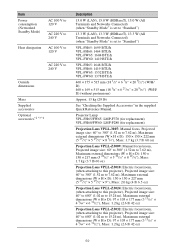
...× 4 9/64" × 6 31/32"), Mass: 1.2 kg (2.6 lb 42 oz) 59 Projector Lamp VPL-FH65/FW65: LMP-F370 (for replacement) VPL-FH60/FW60: LMP-F280 (for replacement) Projection Lens VPLL-3007: Manual focus, Projected image size: 60" to 300" (1.52 m to 7.62 m), Maximum external dimensions (W × ...attaching to this projector), Projected image size: 40" to 600" (1.02 m to "Standard") VPL-FH65: 1699 BTU/h VPL-FH60: 1464 BTU/h VPL-FW65: 1604 BTU/h VPL-FW60: 1419 BTU/h VPL-FH65: 1648 BTU/h VPL-FH60: 1419 BTU/h VPL-FW65: 1552 BTU/h VPL-FW60: 1378 BTU/h 460 × 175 × 515 mm (18 1/8" × ...
...× 4 9/64" × 6 31/32"), Mass: 1.2 kg (2.6 lb 42 oz) 59 Projector Lamp VPL-FH65/FW65: LMP-F370 (for replacement) VPL-FH60/FW60: LMP-F280 (for replacement) Projection Lens VPLL-3007: Manual focus, Projected image size: 60" to 300" (1.52 m to 7.62 m), Maximum external dimensions (W × ...attaching to this projector), Projected image size: 40" to 600" (1.02 m to "Standard") VPL-FH65: 1699 BTU/h VPL-FH60: 1464 BTU/h VPL-FW65: 1604 BTU/h VPL-FW60: 1419 BTU/h VPL-FH65: 1648 BTU/h VPL-FH60: 1419 BTU/h VPL-FW65: 1552 BTU/h VPL-FW60: 1378 BTU/h 460 × 175 × 515 mm (18 1/8" × ...

Operating Instructions
Page 60
Item Description Projection Lens VPLL-3003: Electric focus/electric corner correction, (when attaching to this manual is current as of the unit, including the optional accessories, are subject to "Acceptable Input Signals" on page 62. *2: Not all.../16" × 3 17/32"), Mass: 0.24 kg (0.5 lb) Notes The values for mass and dimensions are as follows. Please check with your local Sony Authorized Dealer. *3: Information on the optional accessories, refer to their operating instructions. *5: The projection lenses compatible to the projection lens adapters are approximate. *1: For ...
Item Description Projection Lens VPLL-3003: Electric focus/electric corner correction, (when attaching to this manual is current as of the unit, including the optional accessories, are subject to "Acceptable Input Signals" on page 62. *2: Not all.../16" × 3 17/32"), Mass: 0.24 kg (0.5 lb) Notes The values for mass and dimensions are as follows. Please check with your local Sony Authorized Dealer. *3: Information on the optional accessories, refer to their operating instructions. *5: The projection lenses compatible to the projection lens adapters are approximate. *1: For ...

Operating Instructions
Page 68
... of Japan Business Machine and Information System Industries Association. • AMX is a trademark of AMX Corporation. • The terms HDMI and HDMI High- In this manual, ™ and ® marks are trademarks or registered trademarks of HDMI Licensing Administrator, Inc. in the United States and/or other trademarks and registered trademarks...
... of Japan Business Machine and Information System Industries Association. • AMX is a trademark of AMX Corporation. • The terms HDMI and HDMI High- In this manual, ™ and ® marks are trademarks or registered trademarks of HDMI Licensing Administrator, Inc. in the United States and/or other trademarks and registered trademarks...

