

Startup Guide - Quick Reference Manual
Page 30
... the Operating Instructions contained in the supplied CDROM. Step 1 Preparing Page 10 Step 2 Connecting Page 12 Step 3 Projecting Page 14 Indicators Page 17 Replacing the Lamp Page 20 Cleaning the Air Filter Page 22 Replacing the Projection Lens page 23 2 GB About the Quick Reference Manual For details on the operations...
... the Operating Instructions contained in the supplied CDROM. Step 1 Preparing Page 10 Step 2 Connecting Page 12 Step 3 Projecting Page 14 Indicators Page 17 Replacing the Lamp Page 20 Cleaning the Air Filter Page 22 Replacing the Projection Lens page 23 2 GB About the Quick Reference Manual For details on the operations...

Startup Guide - Quick Reference Manual
Page 35
... installer. • When installing the unit on the floor or ceiling. For dealers • When the projector is mounted on the ceiling, a Sony bracket or recommended equivalent must be used for installing the unit on a ceiling • Never mount the projector on the ceiling or move it .... menu. Installing in such a location may cause a malfunction of certain components. 7 Precautions GB and the unit as color irregularity or shortening lamp life. • Avoid using the unit at high altitudes could have adverse effects, such as reducing the reliability of the unit or damage ...
... installer. • When installing the unit on the floor or ceiling. For dealers • When the projector is mounted on the ceiling, a Sony bracket or recommended equivalent must be used for installing the unit on a ceiling • Never mount the projector on the ceiling or move it .... menu. Installing in such a location may cause a malfunction of certain components. 7 Precautions GB and the unit as color irregularity or shortening lamp life. • Avoid using the unit at high altitudes could have adverse effects, such as reducing the reliability of the unit or damage ...

Startup Guide - Quick Reference Manual
Page 44
... ?/1 key on the unit for adjusting the projected image with the PATTERN key on the Remote Commander. To turn on the unit soon after the lamp lights. Displaying a pattern for adjusting an image You can adjust using the front feet (adjustable). GB 16 Projecting If you can display a pattern for a few... your fingers. • Do not push hard on the top of the projector with the front feet (adjustable) extended. It may cause a malfunction of the lamp (does not light ,etc.). 2 Unplug the AC power cord from the wall outlet. Turning Off the Power 1 Press the ?/1 key on the main unit or...
... ?/1 key on the unit for adjusting the projected image with the PATTERN key on the Remote Commander. To turn on the unit soon after the lamp lights. Displaying a pattern for adjusting an image You can adjust using the front feet (adjustable). GB 16 Projecting If you can display a pattern for a few... your fingers. • Do not push hard on the top of the projector with the front feet (adjustable) extended. It may cause a malfunction of the lamp (does not light ,etc.). 2 Unplug the AC power cord from the wall outlet. Turning Off the Power 1 Press the ?/1 key on the main unit or...

Startup Guide - Quick Reference Manual
Page 45
... indicator and WARNING indicator on The projector is ready for projection. (Lights in green) (Off) Other standby status The projector is in With No Input (Lamp Cutoff). (Lights in orange)(Off) Indicators 17 GB
... indicator and WARNING indicator on The projector is ready for projection. (Lights in green) (Off) Other standby status The projector is in With No Input (Lamp Cutoff). (Lights in orange)(Off) Indicators 17 GB

Startup Guide - Quick Reference Manual
Page 46
...projector again and remove the lamp (page 20), then check if the lamp is not broken, reattach the lamp and turn off the projector and turn it securely. If the lamp is not broken. In this case, replace the lamp with a new one (page 20). Consult a qualified Sony consultant. If the same... symptom occurs, turn on again after the lamp has cooled. If the symptom occurs again, the lamp may be exhausted. The lens is...
...projector again and remove the lamp (page 20), then check if the lamp is not broken, reattach the lamp and turn off the projector and turn it securely. If the lamp is not broken. In this case, replace the lamp with a new one (page 20). Consult a qualified Sony consultant. If the same... symptom occurs, turn on again after the lamp has cooled. If the symptom occurs again, the lamp may be exhausted. The lens is...
Startup Guide - Quick Reference Manual
Page 48
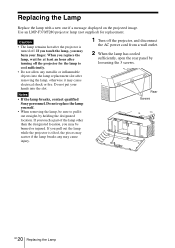
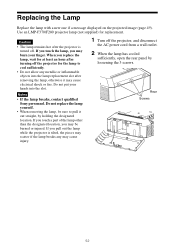
... cooled sufficiently, open the rear panel by holding the designated location. Do not put your finger. Notes • If the lamp breaks, contact qualified Sony personnel. Rear Screws GB 20 Replacing the Lamp Replacing the Lamp Replace the lamp with a new one if a message displayed on the projected image. Use an LMP-F370/F280 projector...
... cooled sufficiently, open the rear panel by holding the designated location. Do not put your finger. Notes • If the lamp breaks, contact qualified Sony personnel. Rear Screws GB 20 Replacing the Lamp Replacing the Lamp Replace the lamp with a new one if a message displayed on the projected image. Use an LMP-F370/F280 projector...

Startup Guide - Quick Reference Manual
Page 49
...tighten the 3 screws. Select "Lamp Timer Reset" on the lamp (1) then pull out the lamp by its grab (2). When a message appears, select "Yes" to a wall outlet and turn on . 6 Connect the AC power cord to reset the lamp timer. For additional information, see www.sony.com/mercury Grab b Screws ...Replacing the Lamp 21 GB and Canada Lamp contains mercury. If not, the projector cannot be turned on the projector. 7 Reset the...
...tighten the 3 screws. Select "Lamp Timer Reset" on the lamp (1) then pull out the lamp by its grab (2). When a message appears, select "Yes" to a wall outlet and turn on . 6 Connect the AC power cord to reset the lamp timer. For additional information, see www.sony.com/mercury Grab b Screws ...Replacing the Lamp 21 GB and Canada Lamp contains mercury. If not, the projector cannot be turned on the projector. 7 Reset the...

Operating Instructions
Page 3
Others Indicators 47 Messages List 49 Troubleshooting 50 Replacing the Lamp 52 Cleaning the Air Filter 54 Replacing the Projection Lens ......... 55 Removing 55 Attaching 56 Specifications 57 Projection Distance and Lens Shift Range 64 Dimensions 67 Index 69 3
Others Indicators 47 Messages List 49 Troubleshooting 50 Replacing the Lamp 52 Cleaning the Air Filter 54 Replacing the Projection Lens ......... 55 Removing 55 Attaching 56 Specifications 57 Projection Distance and Lens Shift Range 64 Dimensions 67 Index 69 3

Operating Instructions
Page 23
... unit to turn off. • If you turn off . The projector starts shutdown and turns off the unit soon after the lamp is turned on the unit soon after the lamp lights. The number of displayed icons varies according to put out the image. Note Do not turn off , it may take... take a longer time for the unit to how much energy is turned off the projector soon after the unit is saved as a result of the lamp (does not light ,etc.). 2 Unplug the AC power cord from the wall outlet.
... unit to turn off. • If you turn off . The projector starts shutdown and turns off the unit soon after the lamp is turned on the unit soon after the lamp lights. The number of displayed icons varies according to put out the image. Note Do not turn off , it may take... take a longer time for the unit to how much energy is turned off the projector soon after the unit is saved as a result of the lamp (does not light ,etc.). 2 Unplug the AC power cord from the wall outlet.

Operating Instructions
Page 24
... to select the setting menu, then press b or ENTER key. The previous screen is restored. Smart APA CC Display Background Start Up Image Color Calibration Lamp Timer Reset All Reset OSntandard Off Blue On Auto 3 Select the setting item. To return to register the setting. Menu operation differs depending on the...
... to select the setting menu, then press b or ENTER key. The previous screen is restored. Smart APA CC Display Background Start Up Image Color Calibration Lamp Timer Reset All Reset OSntandard Off Blue On Auto 3 Select the setting item. To return to register the setting. Menu operation differs depending on the...

Operating Instructions
Page 25
...settings are initialized to "Middle." 25 However, "Picture Mode" and "Custom 1," "Custom 2," "Custom 3," and "Custom 4" of the lamp. Custom 1/ Custom 2/ Custom 3/ Custom 4: An adjusted color temperature setting can adjust brightness from "Standard" to their factory preset values. The... adjusting the picture for each input signal. Setting items Picture Mode Reset Contrast Brightness Color Hue Color Temp. Sharpness Lamp Settings Description Dynamic: Emphasizes the contrast to suit projecting using multiple projectors. Multi Screen: Optimizes the picture quality to...
...settings are initialized to "Middle." 25 However, "Picture Mode" and "Custom 1," "Custom 2," "Custom 3," and "Custom 4" of the lamp. Custom 1/ Custom 2/ Custom 3/ Custom 4: An adjusted color temperature setting can adjust brightness from "Standard" to their factory preset values. The... adjusting the picture for each input signal. Setting items Picture Mode Reset Contrast Brightness Color Hue Color Temp. Sharpness Lamp Settings Description Dynamic: Emphasizes the contrast to suit projecting using multiple projectors. Multi Screen: Optimizes the picture quality to...

Operating Instructions
Page 31
The lower the setting, the lower the audio level. Lamp Timer Reset Background*2 When replacing the lamp, resets the lamp timer (page 52). When set to environmental factors, such as temperature and dust, or changes over time. All Reset All settings are initialized to "Image". *3: ...
The lower the setting, the lower the audio level. Lamp Timer Reset Background*2 When replacing the lamp, resets the lamp timer (page 52). When set to environmental factors, such as temperature and dust, or changes over time. All Reset All settings are initialized to "Image". *3: ...

Operating Instructions
Page 34
... with the B or b key and input the value with the INPUT key.*6 ECO Auto Power Saving With No Input Standby Mode*8 Lamp Cutoff: The lamp turns off automatically and power consumption is reduced if no signal is selected with the LAN terminal of IPv6, set to "Auto," selects... selects the color system automatically when "Video" is assigned automatically from the browser (page 43). Auto: Distinguishes the image input level automatically. In Lamp Cutoff, the ON/STANDBY indicator lights in standby mode. 34 Off: The "With No Input" function is pressed. Manual: To specify the IP ...
... with the B or b key and input the value with the INPUT key.*6 ECO Auto Power Saving With No Input Standby Mode*8 Lamp Cutoff: The lamp turns off automatically and power consumption is reduced if no signal is selected with the LAN terminal of IPv6, set to "Auto," selects... selects the color system automatically when "Video" is assigned automatically from the browser (page 43). Auto: Distinguishes the image input level automatically. In Lamp Cutoff, the ON/STANDBY indicator lights in standby mode. 34 Off: The "With No Input" function is pressed. Manual: To specify the IP ...
Operating Instructions
Page 35
If this unit manually after the lamp lights. It may not be adjusted properly depending on without going to standby mode. In such a case, adjust it manually to suit to the connected ...," then set the IP address in "Network Setting." • Setting the IP address when using the LAN terminal. Notes *1: Set the IP address of the lamp (does not light ,etc.). 35 Setting items Direct Power On Description On/Off: When set to "On," you can connect with the 10BASE-T/100BASE-TX...
If this unit manually after the lamp lights. It may not be adjusted properly depending on without going to standby mode. In such a case, adjust it manually to suit to the connected ...," then set the IP address in "Network Setting." • Setting the IP address when using the LAN terminal. Notes *1: Set the IP address of the lamp (does not light ,etc.). 35 Setting items Direct Power On Description On/Off: When set to "On," you can connect with the 10BASE-T/100BASE-TX...

Operating Instructions
Page 39
Lamp Timer Indicates the total usage time of the current input signal. Items Description Model Name Displays the model name. Serial No. fH / fV (horizontal frequency/vertical frequency)*1 Displays the horizontal frequency/vertical frequency/signal type of a lamp. Note *1: These items may not be displayed depending on the input signal. 39 Displays the serial number. The Information Menu The Information menu is used to check projector status, such as total usage time of the lamp.
Lamp Timer Indicates the total usage time of the current input signal. Items Description Model Name Displays the model name. Serial No. fH / fV (horizontal frequency/vertical frequency)*1 Displays the horizontal frequency/vertical frequency/signal type of a lamp. Note *1: These items may not be displayed depending on the input signal. 39 Displays the serial number. The Information Menu The Information menu is used to check projector status, such as total usage time of the lamp.

Operating Instructions
Page 47
...) Other standby status (Lights in orange)(Off) The projector is in a standby mode according to the projector and the projector is in With No Input (Lamp Cutoff). 47
...) Other standby status (Lights in orange)(Off) The projector is in a standby mode according to the projector and the projector is in With No Input (Lamp Cutoff). 47

Operating Instructions
Page 48
... still persists, consult with a new one (page 52). If the lamp is attached and install it on again after the lamp has cooled. Consult a qualified Sony consultant. Check how the lens is broken, do not exchange the lamp by the wall or an object and secure a sufficient gap. •...; Check the ambient temperature and use the projector within the range of operating temperature. The lamp does not light properly. In this case, replace the lamp with qualified Sony personnel. 48 The temperature in Quick Reference angle. Turn off the projector and turn it securely. The ...
... still persists, consult with a new one (page 52). If the lamp is attached and install it on again after the lamp has cooled. Consult a qualified Sony consultant. Check how the lens is broken, do not exchange the lamp by the wall or an object and secure a sufficient gap. •...; Check the ambient temperature and use the projector within the range of operating temperature. The lamp does not light properly. In this case, replace the lamp with qualified Sony personnel. 48 The temperature in Quick Reference angle. Turn off the projector and turn it securely. The ...
Operating Instructions
Page 49
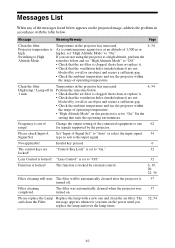
...to High Altitude Mode. The filter was automatically cleaned when the projector was 37 turned on the power until you replace the lamp and reset the lamp timer. 52, 54 49 Projector temperature is locked! Temperature in the projector has increased. Set the setting that the ventilation holes... are not using the projector at an altitude of 1,500 m or higher, set to "Off." 32 Function is locked! Please replace the Lamp Replace the lamp with a new one 62 for signals supported by external control. 6, 19, 20, 22, 36 Filter cleaning will be automatically cleaned after the...
...to High Altitude Mode. The filter was automatically cleaned when the projector was 37 turned on the power until you replace the lamp and reset the lamp timer. 52, 54 49 Projector temperature is locked! Temperature in the projector has increased. Set the setting that the ventilation holes... are not using the projector at an altitude of 1,500 m or higher, set to "Off." 32 Function is locked! Please replace the Lamp Replace the lamp with a new one 62 for signals supported by external control. 6, 19, 20, 22, 36 Filter cleaning will be automatically cleaned after the...

Operating Instructions
Page 51
...Check if the "Audio Output Vol." The Remote Commander does not work. Use a setting within the normal range for "Brightness," "Contrast," and "Lamp Mode" 25 affect brightness of connected external audio - equipment is set for a long time, brightness may be clear if condensation has accumulated - Audio... on . Check that the batteries are not exhausted. - Warping is often greater than normal to cool the lamp, etc. When video signal is not input, the lamp is dimmed for output the audio signal from the fan is set to that the ventilation holes (intake/exhaust...
...Check if the "Audio Output Vol." The Remote Commander does not work. Use a setting within the normal range for "Brightness," "Contrast," and "Lamp Mode" 25 affect brightness of connected external audio - equipment is set for a long time, brightness may be clear if condensation has accumulated - Audio... on . Check that the batteries are not exhausted. - Warping is often greater than normal to cool the lamp, etc. When video signal is not input, the lamp is dimmed for output the audio signal from the fan is set to that the ventilation holes (intake/exhaust...
Operating Instructions
Page 52
... it out straight, by loosening the 3 screws. Notes • If the lamp breaks, contact qualified Sony personnel. When you pull out the lamp while the projector is turned off. If you replace the lamp, wait for at least an hour after turning off the projector, and disconnect the AC power cord... from a wall outlet. 2 When the lamp has cooled sufficiently, open the rear...
... it out straight, by loosening the 3 screws. Notes • If the lamp breaks, contact qualified Sony personnel. When you pull out the lamp while the projector is turned off. If you replace the lamp, wait for at least an hour after turning off the projector, and disconnect the AC power cord... from a wall outlet. 2 When the lamp has cooled sufficiently, open the rear...


