
Operating Instructions
Page 5
.../Front/Left Side 10 Rear/Right Side/Bottom 10 Control Panel 12 Connector Panel 12 Remote Commander 13 Setting Up and Projecting Installing the Projector 17 Connecting the Projector 18 Connecting with a Computer ......18 Connecting with a VCR or 15k RGB/Component Equipment 20 Selecting the Menu Language ..........22 Projecting 24 Effective Tools...
.../Front/Left Side 10 Rear/Right Side/Bottom 10 Control Panel 12 Connector Panel 12 Remote Commander 13 Setting Up and Projecting Installing the Projector 17 Connecting the Projector 18 Connecting with a Computer ......18 Connecting with a VCR or 15k RGB/Component Equipment 20 Selecting the Menu Language ..........22 Projecting 24 Effective Tools...

Operating Instructions
Page 6
... is manufactured using high-precision technology. Do not block or place anything near these will damage the cabinet. • Avoid touching the lens. On LCD data projector • The LCD data projector is in a room where floor and walls are of this unit automatically extends when the power is on the... LCD data projector. This is completed. • Do not spread a cloth or paper under the unit. Use a cover over fluorescent lamps to avoid lowering the contrast ratio. •...
... is manufactured using high-precision technology. Do not block or place anything near these will damage the cabinet. • Avoid touching the lens. On LCD data projector • The LCD data projector is in a room where floor and walls are of this unit automatically extends when the power is on the... LCD data projector. This is completed. • Do not spread a cloth or paper under the unit. Use a cover over fluorescent lamps to avoid lowering the contrast ratio. •...

Operating Instructions
Page 7
...location where the temperature may inhale tininess such as the unit topples over on Installation Unsuitable Installation Do not install the projector in the following conditions. The dust blocking the air through the filter may block the ventilation holes. Tilting the unit... ventilation holes may rise rapidly. These installations may cause malfunction. Clean it up periodically. • Allow adequate air circulation to the projector. Poorly ventilated Very dusty Avoid installing the unit in a location where there is a lot of the adjuster setting • Avoid installing...
...location where the temperature may inhale tininess such as the unit topples over on Installation Unsuitable Installation Do not install the projector in the following conditions. The dust blocking the air through the filter may block the ventilation holes. Tilting the unit... ventilation holes may rise rapidly. These installations may cause malfunction. Clean it up periodically. • Allow adequate air circulation to the projector. Poorly ventilated Very dusty Avoid installing the unit in a location where there is a lot of the adjuster setting • Avoid installing...

Operating Instructions
Page 8
... the screen depending on page 10. converter that converts the input signal within 1024 × 768 dots (VPL-CX6/EX1) or 800 × 600 dots (VPL-CS6) . • Compatible input signals Notes This projector accepts video signals of the projector. Such installation may build up. For details on the ventilation holes (intake/ exhaust), see "Location and...
... the screen depending on page 10. converter that converts the input signal within 1024 × 768 dots (VPL-CX6/EX1) or 800 × 600 dots (VPL-CS6) . • Compatible input signals Notes This projector accepts video signals of the projector. Such installation may build up. For details on the ventilation holes (intake/ exhaust), see "Location and...

Operating Instructions
Page 9
... Data Channel is a trademark of Video Electronics Standard Association. • Memory Stick and are supplied with the VPL-CS6/CX6. 5) The application software (Projector Station) can also control the projector by connecting the projector to function for this projector. ...3) The VPL-CS6 is preset for 25 kinds of ...connecting the computer. Overview Easy presentation • Simple setup with external equipment This projector is preset for the wireless mouse and the USB cable are trademarks of Sony Corporation. 9 Features GB Security lock By setting a password, you can enable...
... Data Channel is a trademark of Video Electronics Standard Association. • Memory Stick and are supplied with the VPL-CS6/CX6. 5) The application software (Projector Station) can also control the projector by connecting the projector to function for this projector. ...3) The VPL-CS6 is preset for 25 kinds of ...connecting the computer. Overview Easy presentation • Simple setup with external equipment This projector is preset for the wireless mouse and the USB cable are trademarks of Sony Corporation. 9 Features GB Security lock By setting a password, you can enable...

Operating Instructions
Page 10
... off . The ON/STANDBY indicator flashes quickly for turning off the power, see "How to use the powered tilt adjuster" on the projector when the projector is in green while the cooling fan runs after the power is plugged into a wall outlet. Once in standby mode, you press the... key, the input signal switches as follows: INPUT A t MS t VIDEO t S VIDEO (VPL-CX6 only) 5 Lens protector (lens cover) The lens protector automatically opens when the power ...
... off . The ON/STANDBY indicator flashes quickly for turning off the power, see "How to use the powered tilt adjuster" on the projector when the projector is in green while the cooling fan runs after the power is plugged into a wall outlet. Once in standby mode, you press the... key, the input signal switches as follows: INPUT A t MS t VIDEO t S VIDEO (VPL-CX6 only) 5 Lens protector (lens cover) The lens protector automatically opens when the power ...

Operating Instructions
Page 11
qj Zoom ring Adjusts the picture size. How to adjust the tilt of the projector. qk Ventilation holes (intake)/air filter cover Notes • Do not place anything near the ventilation holes as it may cause internal heat build-up. &#... adjuster qd Adjuster (hind pad) Turn the adjuster to the right or left for minor tilt adjustment of the projector as it may press the KEYSTONE key (VPL-CS6/CX6) or the D KEYSTONE key (VPL-EX1) on the Remote Commander to an optional security cable (Kensington's). qf Speaker qg Security lock Connects to display...
qj Zoom ring Adjusts the picture size. How to adjust the tilt of the projector. qk Ventilation holes (intake)/air filter cover Notes • Do not place anything near the ventilation holes as it may cause internal heat build-up. &#... adjuster qd Adjuster (hind pad) Turn the adjuster to the right or left for minor tilt adjustment of the projector as it may press the KEYSTONE key (VPL-CS6/CX6) or the D KEYSTONE key (VPL-EX1) on the Remote Commander to an optional security cable (Kensington's). qf Speaker qg Security lock Connects to display...

Operating Instructions
Page 12
... Connector Panel 1 2 3 4 5 PRO AUDIO 6 ACCESS 7 INPUT A POWER SAVING MENU VIDEO S VIDEO TEMP/FAN PUSH ENTER LAMP/COVER 1 INPUT A connector (HD D-sub 15-pin, female) Connect to "ON," the projector goes into power saving mode if no signal is input for the first 60 seconds after the... Panel ACCESS AUDIO INPUT A POWER SAVING MENU VIDEO S VIDEO TEMP/FAN PUSH ENTER LAMP/COVER PRO AUDIO ACCESS INPUT A 1 POWER SAVING MENU 2 PUSH ENTER VIDEO S VIDEO TEMP/FAN 3 LAMP/COVER 4 56 1 POWER SAVING indicator Lights up when the projector is not secured firmly. For details on a...
... Connector Panel 1 2 3 4 5 PRO AUDIO 6 ACCESS 7 INPUT A POWER SAVING MENU VIDEO S VIDEO TEMP/FAN PUSH ENTER LAMP/COVER 1 INPUT A connector (HD D-sub 15-pin, female) Connect to "ON," the projector goes into power saving mode if no signal is input for the first 60 seconds after the... Panel ACCESS AUDIO INPUT A POWER SAVING MENU VIDEO S VIDEO TEMP/FAN PUSH ENTER LAMP/COVER PRO AUDIO ACCESS INPUT A 1 POWER SAVING MENU 2 PUSH ENTER VIDEO S VIDEO TEMP/FAN 3 LAMP/COVER 4 56 1 POWER SAVING indicator Lights up when the projector is not secured firmly. For details on a...

Operating Instructions
Page 13
... APA function will not function properly and the image may extend beyond the screen. 13 Location and Function of video equipment. • S VIDEO (mini DIN 4-pin): Connects to "On." For VPL-CS6/VPL-CX6 qg qf qd FREEZE MS SLIDE I / 1 (on/standby) key 2 APA (Auto Pixel Alignment... APA qa MENU PIC ENTER 0 MUTING 9 8 + RESET R - When you connect the projector to the computer, you use the VPL-EX1, an optional Remote Commander is lit. 6 Video input connector Connect to external video equipment such as those on a computer. Never insert an object other than the Memory Stick. ...
... APA function will not function properly and the image may extend beyond the screen. 13 Location and Function of video equipment. • S VIDEO (mini DIN 4-pin): Connects to "On." For VPL-CS6/VPL-CX6 qg qf qd FREEZE MS SLIDE I / 1 (on/standby) key 2 APA (Auto Pixel Alignment... APA qa MENU PIC ENTER 0 MUTING 9 8 + RESET R - When you connect the projector to the computer, you use the VPL-EX1, an optional Remote Commander is lit. 6 Video input connector Connect to external video equipment such as those on a computer. Never insert an object other than the Memory Stick. ...

Operating Instructions
Page 14
...Joystick c) R Click key: Functions as the right button on the screen. 8 D ZOOM (Digital Zoom) +/- Note Connect a computer to the projector using the USB cable to the computer using the USB cable. This key functions when the menu or a setting item is connected to activate the... or returns the enlarged image back to the FUNCTION key by using the supplied Remote Commander" on page 26. 6 FUNCTION 1, 2 keys (VPL-CX6 only) When you connect the projector with a computer, you want to mute the picture temporarily. Use an arrow key (M/ m/ For details, see "To control the computer using...
...Joystick c) R Click key: Functions as the right button on the screen. 8 D ZOOM (Digital Zoom) +/- Note Connect a computer to the projector using the USB cable to the computer using the USB cable. This key functions when the menu or a setting item is connected to activate the... or returns the enlarged image back to the FUNCTION key by using the supplied Remote Commander" on page 26. 6 FUNCTION 1, 2 keys (VPL-CX6 only) When you connect the projector with a computer, you want to mute the picture temporarily. Use an arrow key (M/ m/ For details, see "To control the computer using...

Operating Instructions
Page 15
While pressing the lid, slide it. Be sure to open the lid, then install the two size AA (R6) batteries (supplied) with the correct polarity. For VPL-EX1 1 I / 1 (on/standby) key 2 ENTER/arrow key (M/m/ Overview To install batteries 1 Push and slide to install the battery from the # side. 2 Replace the lid.
While pressing the lid, slide it. Be sure to open the lid, then install the two size AA (R6) batteries (supplied) with the correct polarity. For VPL-EX1 1 I / 1 (on/standby) key 2 ENTER/arrow key (M/m/ Overview To install batteries 1 Push and slide to install the battery from the # side. 2 Replace the lid.

Operating Instructions
Page 16
...the front or rear remote control detector. • The operation range is , the wider the angle within which the commander can control the projector becomes. 2 Install the lithium battery. + side facing upward 16 GB Location and Function of Controls The shorter the distance between the Remote ...Commander and the remote control detector on the projector. Before using the Remote Commander Pull out the clear film from the Remote Commander. 3 Put the lithium battery holder back into the ...
...the front or rear remote control detector. • The operation range is , the wider the angle within which the commander can control the projector becomes. 2 Install the lithium battery. + side facing upward 16 GB Location and Function of Controls The shorter the distance between the Remote ...Commander and the remote control detector on the projector. Before using the Remote Commander Pull out the clear film from the Remote Commander. 3 Put the lithium battery holder back into the ...

Operating Instructions
Page 17
The distance between the lens and the screen varies depending on the size of the lens VPL-CS6/VPL-CX6 Unit: m (feet) Screen size 40 60 80 100 120 150 (inches) Minimum Distance 1.2 1.9 2.5 3.2 3.8 4.7 (3.9) (6.2) (8.2) (10.5) (12.5) (15.4) Maximum Distance 1.5 2.3 3.0 3.8 4.6 5.7 (4.9) (7.6) ... the screen and the center of the screen. Note When using the projector by suspending it from the ceilling, consult with qualified Sony personel. (fee charged) 17 Installing the Projector GB Setting Up and Projecting Distance between the actual value and the design...
The distance between the lens and the screen varies depending on the size of the lens VPL-CS6/VPL-CX6 Unit: m (feet) Screen size 40 60 80 100 120 150 (inches) Minimum Distance 1.2 1.9 2.5 3.2 3.8 4.7 (3.9) (6.2) (8.2) (10.5) (12.5) (15.4) Maximum Distance 1.5 2.3 3.0 3.8 4.6 5.7 (4.9) (7.6) ... the screen and the center of the screen. Note When using the projector by suspending it from the ceilling, consult with qualified Sony personel. (fee charged) 17 Installing the Projector GB Setting Up and Projecting Distance between the actual value and the design...
Operating Instructions
Page 18
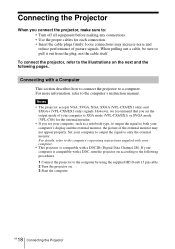
..., the picture of the external monitor may increase noise and reduce performance of your computer to XGA mode (VPL-CX6/EX1) or SVGA mode (VPL-CS6) for the external monitor. • If you connect the projector, make sure to a computer. For details, refer to the computer's operating instructions supplied with your computer. • This...
..., the picture of the external monitor may increase noise and reduce performance of your computer to XGA mode (VPL-CX6/EX1) or SVGA mode (VPL-CS6) for the external monitor. • If you connect the projector, make sure to a computer. For details, refer to the computer's operating instructions supplied with your computer. • This...

Operating Instructions
Page 19
... A POWER SAVING MENU VIDEO S VIDEO TEMP/FAN PUSH ENTER LAMP/COVER to monitor output HD D-sub 15-pin cable (supplied) Computer Stereo audio connecting cable (not supplied)a) to audio output USB cable (supplied only VPL-CS6/CX6) (Connect the USB cable to the projector via the USB cable.... When you use the projector in suspend, standby mode, disconnect the projector from the USB port on a computer loaded with Windows 98, Windows ...
... A POWER SAVING MENU VIDEO S VIDEO TEMP/FAN PUSH ENTER LAMP/COVER to monitor output HD D-sub 15-pin cable (supplied) Computer Stereo audio connecting cable (not supplied)a) to audio output USB cable (supplied only VPL-CS6/CX6) (Connect the USB cable to the projector via the USB cable.... When you use the projector in suspend, standby mode, disconnect the projector from the USB port on a computer loaded with Windows 98, Windows ...
Operating Instructions
Page 20
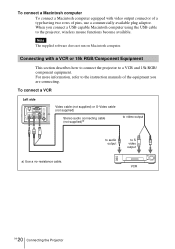
... RGB/ component equipment. When you are connecting. Note The supplied software does not run on Macintosh computer. For more information, refer to S video output VCR 20 GB Connecting the Projector to audio output to the instruction manuals of pins, use a commercially available plug adaptor. To connect a VCR Left side PRO AUDIO ACCESS...
... RGB/ component equipment. When you are connecting. Note The supplied software does not run on Macintosh computer. For more information, refer to S video output VCR 20 GB Connecting the Projector to audio output to the instruction manuals of pins, use a commercially available plug adaptor. To connect a VCR Left side PRO AUDIO ACCESS...

Operating Instructions
Page 21
Setting Up and Projecting To connect a 15k RGB/Component equipment Left side PRO AUDIO ACCESS INPUT A POWER SAVING MENU VIDEO S VIDEO TEMP/FAN PUSH ENTER LAMP/COVER SMF-402 Signal Cable (not supplied) HD D-sub 15-pin (male) ↔ 3 × phono jack Stereo audio connecting ... you connect the unit to the input signal. • When you input the external sync signal from 15k RGB/component equipment. 21 Connecting the Projector GB setting in the INPUT SETTING menu according to 15k RGB or component video equipment, select video GBR or component with the "Input-A Signal Sel."
Setting Up and Projecting To connect a 15k RGB/Component equipment Left side PRO AUDIO ACCESS INPUT A POWER SAVING MENU VIDEO S VIDEO TEMP/FAN PUSH ENTER LAMP/COVER SMF-402 Signal Cable (not supplied) HD D-sub 15-pin (male) ↔ 3 × phono jack Stereo audio connecting ... you connect the unit to the input signal. • When you input the external sync signal from 15k RGB/component equipment. 21 Connecting the Projector GB setting in the INPUT SETTING menu according to 15k RGB or component video equipment, select video GBR or component with the "Input-A Signal Sel."

Operating Instructions
Page 22
... ACCESS INPUT A POWER SAVING MENU VIDEO S VIDEO TEMP/FAN PUSH ENTER LAMP/COVER FREEZE MS SLIDE I / 1 KEYSTONE INPUT APA MENU PIC ENTER MUTING For VPL-CS6/CX6 For VPL-EX1 1 Open the connector panel, then plug the AC power cord into a wall outlet. 2 Press the I / 1 key to turn on the projector. 3 Press the MENU key. PICTURE...
... ACCESS INPUT A POWER SAVING MENU VIDEO S VIDEO TEMP/FAN PUSH ENTER LAMP/COVER FREEZE MS SLIDE I / 1 KEYSTONE INPUT APA MENU PIC ENTER MUTING For VPL-CS6/CX6 For VPL-EX1 1 Open the connector panel, then plug the AC power cord into a wall outlet. 2 Press the I / 1 key to turn on the projector. 3 Press the MENU key. PICTURE...

Operating Instructions
Page 24
... turned on the equipment connected to the projector by pressing certain keys (e.g., / LCD VGA , / , etc.), or by changing your computer, for Memory Stick". 3 Turn on , the Startup screen is projected (VPL-CX6 only). For details on the Startup screen, see the attached "Operating Instructions for example a ...stops at the previously adjusted position. The ON/STANDBY indicator lights in red and the projector goes into standby mode. 2 Press the I / 1 KEYSTONE INPUT APA MENU PIC ENTER MUTING For VPL-CS6/CX6 For VPL-EX1 1 Open the connector panel, plug the AC power cord into a wall ...
... turned on the equipment connected to the projector by pressing certain keys (e.g., / LCD VGA , / , etc.), or by changing your computer, for Memory Stick". 3 Turn on , the Startup screen is projected (VPL-CX6 only). For details on the Startup screen, see the attached "Operating Instructions for example a ...stops at the previously adjusted position. The ON/STANDBY indicator lights in red and the projector goes into standby mode. 2 Press the I / 1 KEYSTONE INPUT APA MENU PIC ENTER MUTING For VPL-CS6/CX6 For VPL-EX1 1 Open the connector panel, plug the AC power cord into a wall ...

Operating Instructions
Page 25
... picture by pressing the TILT key. Notes • If "Auto Input Search" is set to "On," the projector searches for the input signal from the connected equipment and displays the input channel where the input signals are found....VIDEO input connector Video equipment connected to the S VIDEO input connector VIDEO S VIDEO Smart APA (Auto Pixel Alignment) adjusts the picture of the connected equipment so that it is effective for the signals from a computer only. 5 Adjust the position of the picture using the Remote Commander, press the KEYSTONE key (VPL-CS6/CX6) or the D KEYSTONE key (VPL...
... picture by pressing the TILT key. Notes • If "Auto Input Search" is set to "On," the projector searches for the input signal from the connected equipment and displays the input channel where the input signals are found....VIDEO input connector Video equipment connected to the S VIDEO input connector VIDEO S VIDEO Smart APA (Auto Pixel Alignment) adjusts the picture of the connected equipment so that it is effective for the signals from a computer only. 5 Adjust the position of the picture using the Remote Commander, press the KEYSTONE key (VPL-CS6/CX6) or the D KEYSTONE key (VPL...


